

开源的Qt串口助手的使用方法
电子说
描述
串口调试助手是一款用于串口调试的工具,目前网上存在很多个版本,功能都差不多,但稳定性有好有坏,如果只用于一般的串口调试,这些工具够用了,如果想开发一款适于自己的串口调试助手,本文也许可以帮你。本文中的调试助手用QT开发,QT的开发环境不在这里详述了,不会安装的可以在网上找找类似的博文吧,以下仅供参考。
第一部分:代码托管:此部分可能存在一些未知的bug,欢迎广大网友指出。
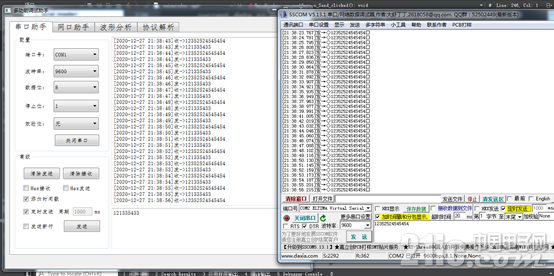
第二部分:效果展示:
实现的功能:
1.自动获取计算机的端口号;
2.串口参数可更改:包括 波特率、数据位、停止位、校验和等。
3.串口数据的发送和接收
4.支持十六进制数据的发送和接收
5.支持时间戳功能,方便文件的存储查看
6.发送从窗口和接收窗口的清理
7.定时发送功能
简单设置一下背景色,好看多了!
第二部分:代码部分:
1.当我们的计算机的端口号发生改变时,串口助手要具备实时扫面本机的端口号的功能,具有实时获取有效的串口信息,并将其刷新到下拉框中供我们选择。有些自己编写的串口助手是没有这个功能的,这里我给大家补充上去。
//使用foreach获取有效的串口信息 foreach(const QSerialPortInfo &info, QSerialPortInfo::availablePorts()) { //这里相当于自动识别串口号之后添加到了cmb,如果要手动选择可以用下面列表的方式添加进去 Serial.setPort(info); if(Serial.open(QIODevice::ReadWrite)) { //将串口号添加到cmb ui-》comboBox_Port-》addItem(info.portName()); //关闭串口等待人为(打开串口按钮)打开 Serial.close(); } }
2.填充下拉框的波特率、数据位、停止位、效验位…。,初始化下拉框默认参数,这个参数设置大部分的串口助手都会具备,因此不足为奇。该有的功能个咱还是得有的。
// 填充波特率 QStringList Baud; Baud《《“1200”《《“2400”《《“4800”《《“9600”《《“38400”《《“115200”; ui-》comboBox_Baud-》addItems(Baud); // 填充数据位 QStringList DataBit; DataBit《《“5”《《“6”《《“7”《《“8”; ui-》comboBox_DataBit-》addItems(DataBit); // 填充停止位 QStringList StopBit; StopBit《《“1”《《“1.5”《《“2”; ui-》comboBox_StopBit-》addItems(StopBit); // 填充效验位 QStringList CheckBit; CheckBit《《“奇效验”《《“偶效验”《《“无”; ui-》comboBox_CheckBit-》addItems(CheckBit);
//初始化默认参数 ui-》comboBox_Baud-》setCurrentIndex(3); //默认9600 ui-》comboBox_DataBit-》setCurrentIndex(3); //默认8bit Data ui-》comboBox_StopBit-》setCurrentIndex(0); //默认1bit Stop ui-》comboBox_CheckBit-》setCurrentIndex(2); //默认 无效验
3.串口打开和关闭按钮操作,这个就是打开串口按钮和关闭按钮的逻辑操作,成功打开串口后,相应的参数将会被设置。串口即可以用于数据的发送和接收了,这里也处理,打开失败时的逻辑操作,可谓是“疏而不漏也!”。
//串口打开和关闭按钮void MainWindow::on_pushButton_Open_clicked(){ //设置串口号;也就是说打开的是当前显示的串口 if(ui-》comboBox_Port-》currentText().isEmpty()) { QMessageBox::information(this,“提示”,“没有可用的串口”); return; } Serial.setPortName(ui-》comboBox_Port-》currentText()); if(ui-》pushButton_Open-》text() == “打开串口”) { if(Serial.open(QIODevice::ReadWrite))//读写方式打开,成功后设置串口 { //设置波特率 Serial.setBaudRate(ui-》comboBox_Baud-》currentText().toInt());
//设置数据位 switch(ui-》comboBox_DataBit-》currentText().toInt()) { case 5: Serial.setDataBits(QSerialPort::Data5); break; case 6: Serial.setDataBits(QSerialPort::Data6); break; case 7: Serial.setDataBits(QSerialPort::Data7); break; case 8: Serial.setDataBits(QSerialPort::Data8); break; default: QMessageBox::information(this,“提示”,“数据位配置出错”); return; break; }
//设置校验位 if (ui-》comboBox_CheckBit-》currentText() == “奇效验”) { Serial.setParity(QSerialPort::OddParity); } else if (ui-》comboBox_CheckBit-》currentText() == “偶效验”) { Serial.setParity(QSerialPort::EvenParity); } else if (ui-》comboBox_CheckBit-》currentText() == “无”) { Serial.setParity(QSerialPort::NoParity); }
//设置停止位 if (ui-》comboBox_StopBit-》currentText().toFloat() == 1) { Serial.setStopBits(QSerialPort::OneStop); } else if(ui-》comboBox_StopBit-》currentText().toFloat() == 1.5) { Serial.setStopBits(QSerialPort::OneAndHalfStop); } else if(ui-》comboBox_StopBit-》currentText().toFloat() == 2) { Serial.setStopBits(QSerialPort::TwoStop); }
//设置流控制 Serial.setFlowControl(QSerialPort::NoFlowControl); ui-》pushButton_Open-》setText(“关闭串口”);
//建立串口接收的槽函数 connect(&Serial,&QSerialPort::readyRead ,this,&MainWindow::ReadRecData);
// timer0-》start(100);
} else//串口打开失败 { QMessageBox::about(NULL, “提示”, “打开出错,串口被占用!”); return ; } } else if(ui-》pushButton_Open-》text() == “关闭串口”) { Serial.close();//关串口 //timer0-》stop(); ui-》pushButton_Open-》setText(“打开串口”); }}
4. 串口接收数据函数(支持时间戳、HEX接收) 这个是很关键的地方了,要保证数据接收的完整性和实时性,可采用两种接收数据的模式:定时器触发和槽触发,定时器触发我这里采用的是100ms的中断接收,大家还可以调的更小一点。
void MainWindow::ReadRecData(){ QByteArray readData = Serial.readAll();//读取串口数据 QByteArray NewData; QString current_date;
if(readData != NULL)//将读到的数据显示到数据接收区 { if(HexRecvFlag) //判断是否使用HEX { //判断是否使用时间戳 if(EnableTimeFlag == 1) { current_date_time = QDateTime::currentDateTime(); current_date += “[”; current_date += current_date_time.toString(“yyyy-MM-dd hhss”); current_date += “]收-》”; ui-》textEdit_Recv-》append(current_date.toUtf8() + readData.toHex()); } else { ui-》textEdit_Recv-》append(readData.toHex()); }
} else { //判断是否使用时间戳 if(EnableTimeFlag == 1) { current_date_time = QDateTime::currentDateTime(); current_date += “[”; current_date += current_date_time.toString(“yyyy-MM-dd hhss”); current_date += “]收-》”; ui-》textEdit_Recv-》append(current_date.toUtf8() + readData); } else { ui-》textEdit_Recv-》append(readData); } }
}}
5. 串口发送数据函数(支持时间戳、HEX接收) 这个是很关键的地方了,串口发送数据的方式就比较简单了,直接将数据送入缓冲区
//发送数据void MainWindow::on_pushButton_Send_clicked(){ QString DataStr; QString NewData; QString current_date;
DataStr = ui-》textEdit_Send-》toPlainText(); if(ui-》pushButton_Open-》text() == “打开串口”) { QMessageBox::information(this,“提示”,“未打开串口”); return; }
if(EnableTimeFlag == 1) { current_date_time = QDateTime::currentDateTime(); current_date += “[”; current_date += current_date_time.toString(“yyyy-MM-dd hhss”); current_date += “]发-》”; NewData = current_date + DataStr; } else { NewData = DataStr; }
if(HexSendFlag) { Serial.write(DataStr.toUtf8().toHex());//写入缓冲区 } else {
ui-》textEdit_Recv-》append(NewData.toUtf8()); }}
6.清除接收和发送窗口数据函数,为了方便调试和观察,这里添加了清除接收和发送窗口数据函数的操作。
//清除接收窗口数据void MainWindow::on_pushButton_ClearRecv_clicked(){ ui-》textEdit_Recv-》clear();}
//清除发送窗口数据void MainWindow::on_pushButton_2_clicked(){ ui-》textEdit_Send-》clear();}
7.使能时间戳,时间戳的主要目的在于通过一定的技术手段,对数据产生的时间进行认证,从而验证这段数据在产生后是否经过篡改。所以时间戳服务的提供者必须证明服务中使用的时间源是可信的,所提供的时间戳服务是安全的。
void MainWindow::on_checkBox_EnableTime_clicked(bool checked){ if(checked == true) { EnableTimeFlag = 1; } else { EnableTimeFlag = 0; }}
8. 使能定时发送,定时发送很香了,必须得有啊!
void MainWindow::on_checkBox_clicked(bool checked){ if(checked == true) { if(ui-》pushButton_Open-》text() == “打开串口”) { QMessageBox::information(this,“提示”,“未打开串口”); ui-》checkBox-》setChecked(false); return; } quint32 stime= ui-》lineEdit_STime-》text().toInt(); timer_id1 = startTimer(stime); ui-》lineEdit_STime-》setEnabled(false); } else { killTimer(timer_id1); ui-》lineEdit_STime-》setEnabled(true); }}
9. 使能HEX 发送和接收按钮,HEX那是标配,我只希望不要出bug,慢慢完善吧!
void MainWindow::on_checkBox_HexRecv_clicked(bool checked){ if(checked) { HexRecvFlag = 1; }
else HexRecvFlag = 0;}
void MainWindow::on_checkBox_HexSend_clicked(bool checked){ if(checked) HexSendFlag = 1; else HexSendFlag = 0;}
10. 定时器中断函数 触发接收串口数据的核心,没它啥也干不了。
void MainWindow:: timerEvent(QTimerEvent *ev){ if(ev-》timerId() == timer_id1) { on_pushButton_Send_clicked(); }}
串口助手部分最后的展示效果
原文标题:开源的Qt串口助手:一学就会
文章出处:【微信公众号:嵌入式ARM】欢迎添加关注!文章转载请注明出处。
责任编辑:haq
-
利用QT来制作一个最基本的串口助手2022-01-18 1089
-
串口调试助手怎么用_串口调试助手使用方法2017-11-28 76736
-
友善串口调试助手怎么使用及使用方法说明2018-05-23 131333
-
QT从零开始作单片机上位机-串口调试助手+波形显示-设计QT串口助手界面,添加主窗口控件2022-01-12 1453
-
Qt小项目之串口助手控制LED2022-01-26 693
-
基于Qt实现的串口示波器2022-06-12 5496
-
QT 串口示波器的串口调试助手功能2022-07-07 3595
-
CubeMX的基础使用方法2022-08-15 5886
-
QT设计的网络助手源码2022-09-27 615
-
【飞凌OKA40i-C开发板试用体验】QT实现串口助手2022-10-19 2137
-
【米尔MYD-YT507开发板试用体验】ubuntu下QT串口助手开发调试2022-10-26 2644
-
基于QT的串口小助手开发2023-04-04 3340
-
Qt5实现上位机与串口通信2023-05-10 543
-
QT上位机开发之串口助手(下)2023-05-29 562
-
QT串口通信的简单使用2024-01-15 4476
全部0条评论

快来发表一下你的评论吧 !
