

 跟AB32VG1开发学习RGB交替闪烁
描述
今天开始学习RGB交替闪烁。
这是一个最基本的io口控制例程。看到AB32VG1编写的内容,感觉有些地方不懂,后面再说。现在先记录整个学习过程。
1.查看硬件电路结构
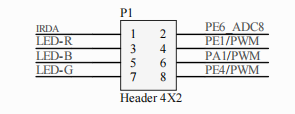 led接口电路
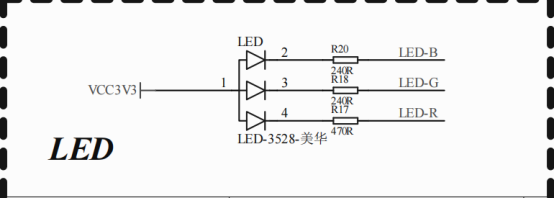 led接口电路2
这里采用了header4×2来转接一下。便于胸口复用。
2.软件设计与编写
可以看到LED是低电平使能,在相应的io口轮次输出0,使得LED点亮。
获得LED
设置pin模式,
轮次输出相应电平,点亮或熄灭相应led
void RGB_Init(void)
{
// 获得 led
Led.LED_R = rt_pin_get("PE.1");
Led.LED_G = rt_pin_get("PE.4");
Led.LED_B = rt_pin_get("PA.1");
// 设置引脚为输出方式
rt_pin_mode(Led.LED_R, PIN_MODE_OUTPUT);
rt_pin_mode(Led.LED_G, PIN_MODE_OUTPUT);
rt_pin_mode(Led.LED_B, PIN_MODE_OUTPUT);
rt_kprintf("rgb init success\n");
}
//传入参数 on=1:对应亮,on=0:对应灭
//红灯驱动
void RGB_Red(rt_bool_t on)
{
rt_pin_write(Led.LED_G, PIN_HIGH);
rt_pin_write(Led.LED_B, PIN_HIGH);
if (on) {
rt_pin_write(Led.LED_R, PIN_LOW);
} else {
rt_pin_write(Led.LED_R, PIN_HIGH);
}
}
//蓝灯驱动
void RGB_Blue(rt_bool_t on){
rt_pin_write(Led.LED_G, PIN_HIGH);
rt_pin_write(Led.LED_R, PIN_HIGH);
if (on) {
rt_pin_write(Led.LED_B, PIN_LOW);
} else {
rt_pin_write(Led.LED_B, PIN_HIGH);
}
}
//绿灯驱动
void RGB_Green(rt_bool_t on)
{
rt_pin_write(Led.LED_R, PIN_HIGH);
rt_pin_write(Led.LED_B, PIN_HIGH);
if (on) {
rt_pin_write(Led.LED_G, PIN_LOW);
} else {
rt_pin_write(Led.LED_G, PIN_HIGH);
}
}
下面要做的是使得led能够循环工作。
void rgb_switch(void)
{
static uint8_t led_num = 0;
if(led_num == 0)
RGB_Red(1);
else if(led_num == 1)
RGB_Blue(1);
else if(led_num == 2)
RGB_Green(1);
led_num++;
if(led_num == 3)
led_num = 0;
}
操作系统入口函数
void rgb_thread_entry(void* p)
{
RGB_Init();
while(1)
{
rt_thread_mdelay(500);
rgb_switch();
}
}
//这个函数不太明白是做什么的,应该是线程控制函数,不知道哪里有相应的教程可以看到
static int Thread_RGB(void)
{
rgb_thread = rt_thread_create("rgb", rgb_thread_entry, RT_NULL, 512, 10, 10);
if(rgb_thread == RT_NULL)
{
rt_kprintf("Thread_GRB Init ERROR");
return RT_ERROR;
}
rt_thread_startup(rgb_thread);
}
然后看到该同学还设置了key.h函数。
//rgb.h
/*
* Copyright (c) 2006-2021, RT-Thread Development Team
*
* SPDX-License-Identifier: Apache-2.0
*
* Change Logs:
* Date Author Notes
* 2021-11-06 Administrator the first version
*/
#ifndef APPLICATIONS_RGB_H_
#define APPLICATIONS_RGB_H_
#endif /* APPLICATIONS_RGB_H_ */
不太明白为什么要做这个,是为了以后扩展用?
修改主函数main.c
/*
* Copyright (c) 2020-2021, Bluetrum Development Team
*
* SPDX-License-Identifier: Apache-2.0
*
* Change Logs:
* Date Author Notes
* 2020/12/10 greedyhao The first version
*/
/**
* Notice!
* All functions or data that are called during an interrupt need to be in RAM.
* You can do it the way exception_isr() does.
*/
#include
#include "board.h"
int main(void)
{
rt_kprintf("Hello, world\n");
while (1)
{
rt_thread_mdelay(500);
rt_thread_mdelay(500);
}
}
该同学把原来的按键控制删掉后,给了两个mdelay();不明白为什么要这样写。
3.执行downloader
实现功能。
看完了这个学习,感觉疑惑还是很多,
有关于系统本身的,也有关于这位同学的编写代码内容的。可是独学而无友,则孤陋而寡闻。
多向各位大佬学习。
争取能够看明白。
还有这个编辑界面不知道为什么无法直接在word中直接粘贴复制。
难道是需要排版才行?
ymf
-
中科蓝讯AB32VG1开发实践指南2022-04-12 2208
-
基于AB32VG1开发板的设备温度检测2022-02-18 2326
-
【RTT大赛作品连载】AB32VG1开发板之开箱篇2022-01-04 5610
-
AB32VG1 RT-Thread 开发环境搭建2021-12-20 1017
-
【RTT大赛作品连载】基于AB32VG1 sdk BLE例程2021-12-06 6736
-
【RTT大赛作品连载】AB32VG1评估板 炫酷音乐播放器2021-11-26 8672
-
【RTT大赛作品连载】AB32VG1的开发环境搭建2021-11-17 10928
-
RTT大赛作品:AB32VG1开发板—按键扫描2021-11-15 5718
-
【RTT大赛作品连载】中科蓝讯AB32VG1开发板开箱篇2021-11-13 14668
-
【RTT大赛作品连载】AB32VG1评估板 音乐播放器2021-11-12 7369
-
如何在AB32VG1开发板OLED显示使开发板上电2021-11-08 3950
-
AB32VG1连接无线网2021-11-04 4517
-
通过RT-Thread Studio配置AB32VG1片上外设GPIO引脚控制RGB彩灯2021-11-03 14752
-
RISC-V架构开发板AB32VG1测评之GPIO点灯2021-10-28 10217
全部0条评论

快来发表一下你的评论吧 !
