

 【RTT设计大赛】音乐播放器设计完成
描述
无意中看大官方一个demo,关于audio功能的设计,现在学习一下。
从内部Flash读取WAV音频播放
主要的工作是安装播放器,通过按键控制播放和停止。
1.使能相关组件
需要使用到 Audio 和 dfs 相关的组件
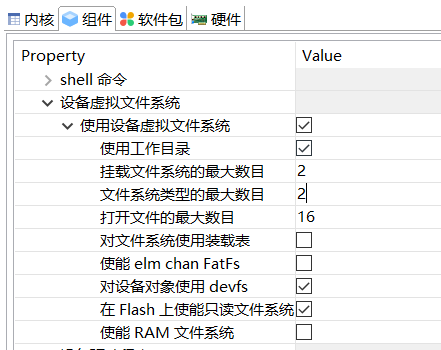

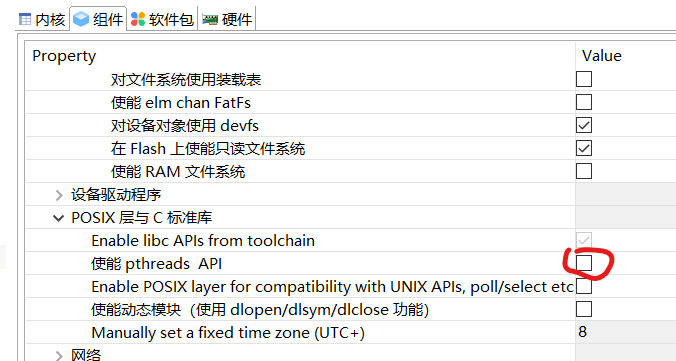
开启 dfs 的时候会默认开启 posix 的使能,需要 关闭 posix 的使能 ,否则终端的输入会有问题。
软件包安装
本次实验实现音乐播放功能,单击按键进行音乐切换。需要安装的软件包有 wavplayer/optparse/multibutton 三个软件包。其中 optparse 在 wavplayer 勾选后,自动选择。
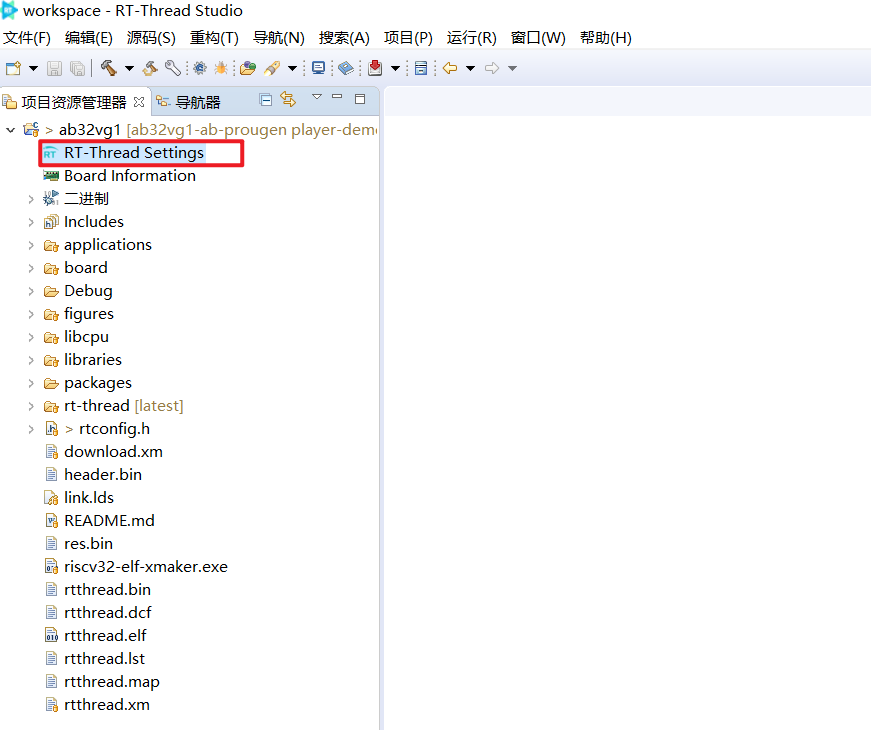
进入软件包选择界面。
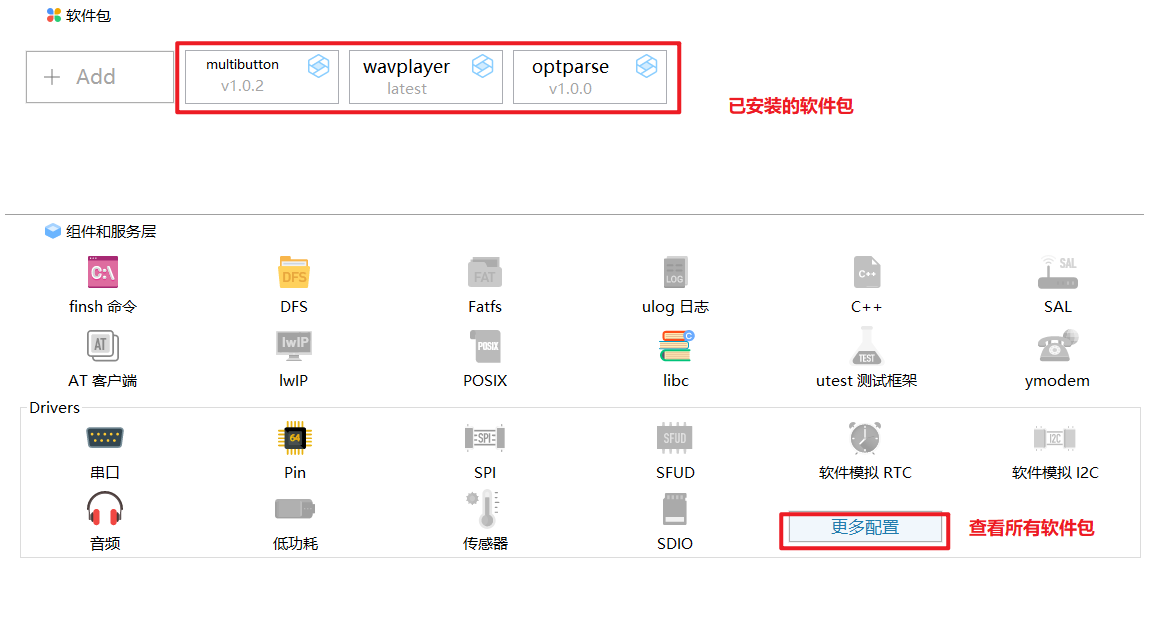
也可以通过`更多配置`查看所有软件包来选择个软件包:
wavplayer 软件包安装
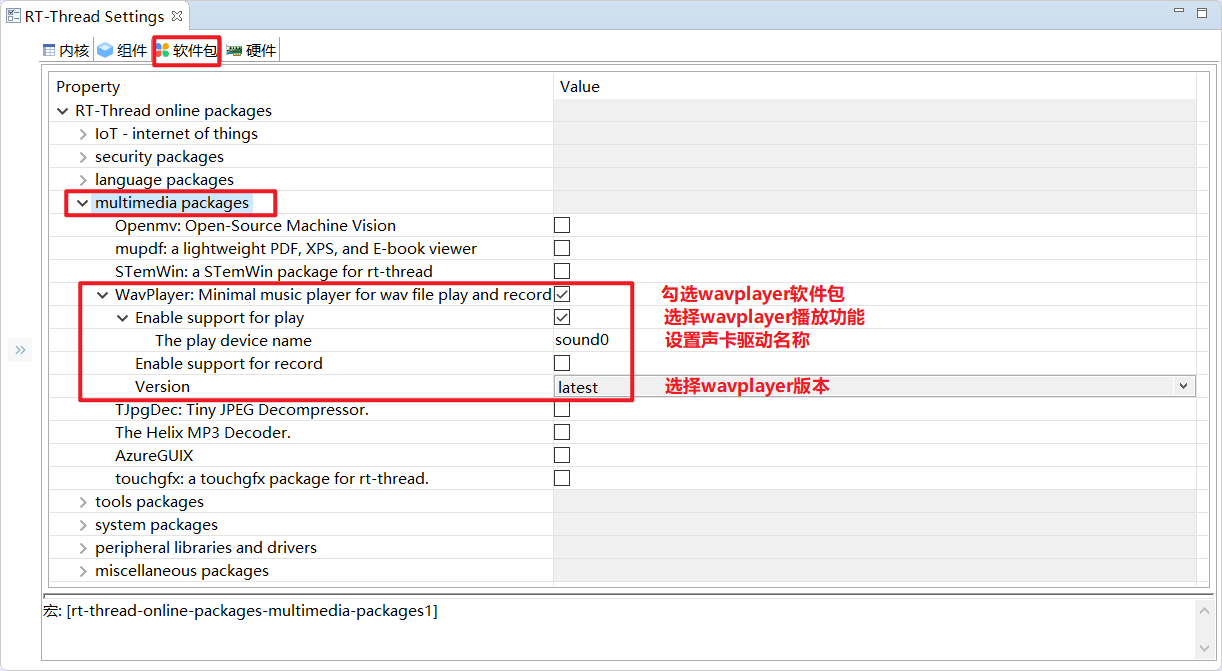
multibutton 软件包安装

demo编写
安装完 wavplayer/optparse/multibutton 三个软件包之后,就完成此次试验所需要的依赖的软件包。接下来开始编写demo。
下载 romfs.c(本文件包含了两个音频文件用于demo播放) 放置到 applications 下
romfs.c
下载 mnt.c 替换 applications 下原有的文件,从而挂载 romfs,主要代码在下方
mnt.c
#include #include "dfs_romfs.h"
int ab32_romfs_mount(void){
if (dfs_mount(RT_NULL, "/", "rom", 0, &(romfs_root)) == 0)
{
rt_kprintf("ROM file system initializated!\n");
}
else
{
rt_kprintf("ROM file system initializate failed!\n");
}
return 0;}INIT_ENV_EXPORT(ab32_romfs_mount);
然后在 applications 下新建 event_async.c 文件,复制以下代码
#include #include #include "board.h"#include #include "wavplayer.h"
#define BUTTON_PIN_0 rt_pin_get("PF.0")#define BUTTON_PIN_1 rt_pin_get("PF.1")
#define NUM_OF_SONGS (2u)
static struct button btn_0;static struct button btn_1;
static uint32_t cnt_0 = 0;static uint32_t cnt_1 = 0;
static char *table[2] ={
"wav_1.wav",
"wav_2.wav",};
void saia_channels_set(uint8_t channels);void saia_volume_set(rt_uint8_t volume);uint8_t saia_volume_get(void);
static uint8_t button_read_pin_0(void){
return rt_pin_read(BUTTON_PIN_0);}
static uint8_t button_read_pin_1(void){
return rt_pin_read(BUTTON_PIN_1);}
static void button_0_callback(void *btn){
uint32_t btn_event_val;
btn_event_val = get_button_event((struct button *)btn);
switch(btn_event_val)
{
case SINGLE_CLICK:
if (cnt_0 == 1) {
saia_volume_set(30);
}else if (cnt_0 == 2) {
saia_volume_set(50);
}else {
saia_volume_set(100);
cnt_0 = 0;
}
cnt_0++;
rt_kprintf("vol=%d\n", saia_volume_get());
rt_kprintf("button 0 single click\n");
break;
case DOUBLE_CLICK:
if (cnt_0 == 1) {
saia_channels_set(1);
}else {
saia_channels_set(2);
cnt_0 = 0;
}
cnt_0++;
rt_kprintf("button 0 double click\n");
break;
case LONG_PRESS_START:
rt_kprintf("button 0 long press start\n");
break;
case LONG_PRESS_HOLD:
rt_kprintf("button 0 long press hold\n");
break;
}}
static void button_1_callback(void *btn){
uint32_t btn_event_val;
btn_event_val = get_button_event((struct button *)btn);
switch(btn_event_val)
{
case SINGLE_CLICK:
wavplayer_play(table[(cnt_1++) % NUM_OF_SONGS]);
rt_kprintf("button 1 single click\n");
break;
case DOUBLE_CLICK:
rt_kprintf("button 1 double click\n");
break;
case LONG_PRESS_START:
rt_kprintf("button 1 long press start\n");
break;
case LONG_PRESS_HOLD:
rt_kprintf("button 1 long press hold\n");
break;
}}
static void btn_thread_entry(void* p){
while(1)
{
/* 5ms */
rt_thread_delay(RT_TICK_PER_SECOND/200);
button_ticks();
}}
static int multi_button_test(void){
rt_thread_t thread = RT_NULL;
/* Create background ticks thread */
thread = rt_thread_create("btn", btn_thread_entry, RT_NULL, 1024, 10, 10);
if(thread == RT_NULL)
{
return RT_ERROR;
}
rt_thread_startup(thread);
/* low level drive */
rt_pin_mode (BUTTON_PIN_0, PIN_MODE_INPUT_PULLUP);
button_init (&btn_0, button_read_pin_0, PIN_LOW);
button_attach(&btn_0, SINGLE_CLICK, button_0_callback);
button_attach(&btn_0, DOUBLE_CLICK, button_0_callback);
button_attach(&btn_0, LONG_PRESS_START, button_0_callback);
button_attach(&btn_0, LONG_PRESS_HOLD, button_0_callback);
button_start (&btn_0);
rt_pin_mode (BUTTON_PIN_1, PIN_MODE_INPUT_PULLUP);
button_init (&btn_1, button_read_pin_1, PIN_LOW);
button_attach(&btn_1, SINGLE_CLICK, button_1_callback);
button_attach(&btn_1, DOUBLE_CLICK, button_1_callback);
button_attach(&btn_1, LONG_PRESS_START, button_1_callback);
button_attach(&btn_1, LONG_PRESS_HOLD, button_1_callback);
button_start (&btn_1);
return RT_EOK;}INIT_APP_EXPORT(multi_button_test);
程序下载
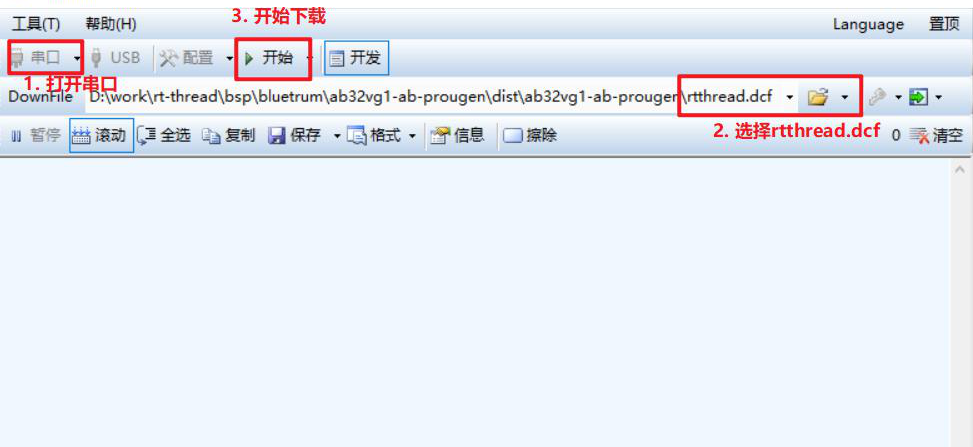
demo编写完成后,单击编译按钮开始编译,编译成功后下载编译后生成的 .dcf 固件到芯片;
双击打开 Downloader
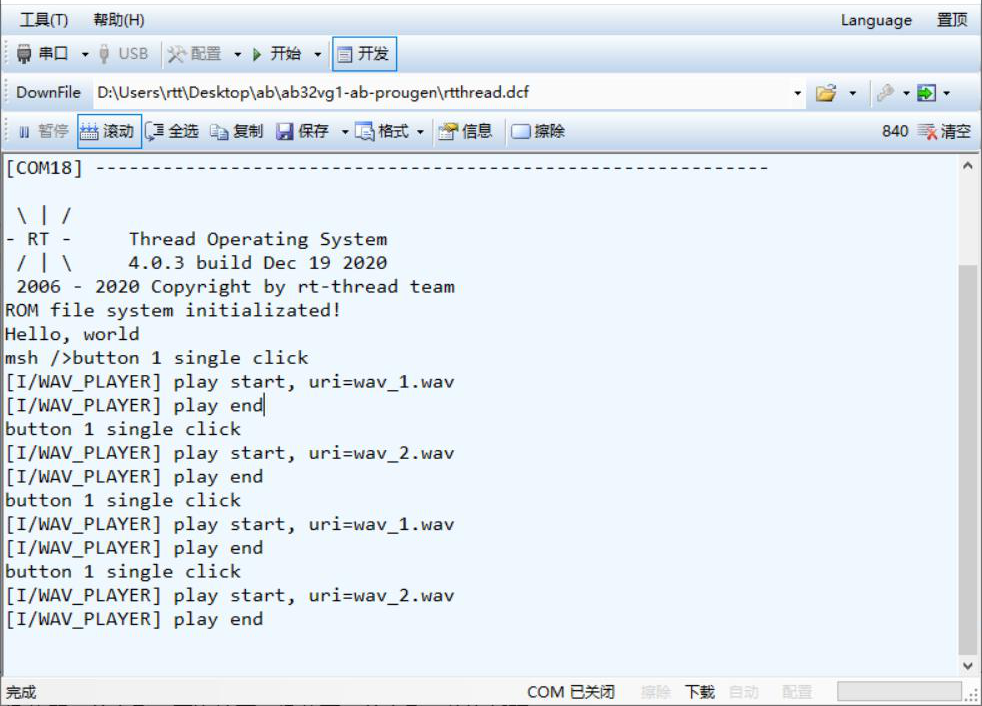
下载成功后会在串口界面打印"Hello World", 并会有led灯闪烁
思考:在这个demo学习过程中,发现了这样几个问题,一些函数看不懂,不知道参数代表的是什么意思。
对于需要配置什么也不是很明白,应该是对thread还不是很明白,不知道哪里有相关的资料可以学习下。
还有就是安装的这些软件包是如何开发的。
因为电脑比较卡,图片使用的是原demo的。实际工程已经测试完。
- 相关推荐
- 热点推荐
- 音乐播放器
-
HarmonyOS开发案例:【音乐播放器】2024-04-23 2921
-
基于RTT-LVGL的音乐播放器设计案例2023-09-18 3973
-
基于Arduino的音乐播放器设计2022-03-25 7106
-
基于Labview制作的音乐播放器源码分享2021-12-01 1546
-
#RTT设计大赛 音乐播放器 @xinshuwei电子发烧友论坛 2021-11-18
-
【RTT大赛作品连载】AB32VG1评估板 音乐播放器2021-11-12 6966
-
基于fpga的音乐播放器设计2021-04-02 3595
-
基于Android音乐播放器的研究2017-12-11 1622
-
基于单片机音乐播放器2017-08-10 1866
-
基于单片机的音乐播放器2016-03-10 1149
-
音乐播放器2013-05-28 21425
-
Windows Media Player音乐播放器代码2008-01-10 2394
全部0条评论

快来发表一下你的评论吧 !

