

 用Arduino和超声波传感器DIY一个智能垃圾桶
今日头条
描述
智能垃圾桶(dustbin)是传统垃转存设备的替代者。本项目采用基于MCU的Arduino Uno开发板,通过伺服马达和超声波传感器,实现了对传统垃圾桶的智能化升级改造。

1.项目介绍
项目中的超声波传感器安置于垃圾桶的顶部,感测来迹象的状态,其阈值设置成一个特别电平。Arduino编程逻辑如下:当有人靠近垃圾桶前方并伸手丢垃圾时,伺服马达开始动作,并打开垃圾桶的盖子,让人把废物丢进垃圾桶里。
由于住户不用动手开盖,并在离开时自动关闭,避免了传统垃圾桶盖子长期打开散发气味、危害环境的弊端,还能培养住户和小孩养成良好卫生习惯,保持环境干净、整洁。
通常,垃圾箱分为干、湿、可回收、有毒害四类。本项目通过检测人手的存在决定箱盖的打开、闭合,还能够识别丢进来的垃圾的种类,并区分为可生物降解,获非降解两类。
2.物料介绍
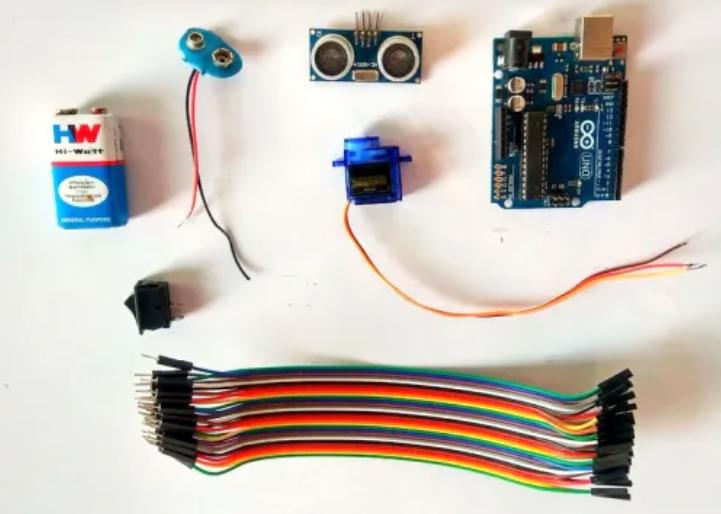
项目物料清单如下:
12v电源适配器
Arduino Uno开发板
Arduino Nano
HC-SR04超声波传感器
微型伺服马达
面包板
工具及软件:示波器、可变电源、数字万用表、烙铁、PCB打孔机
(1)超声波传感器
超声波传感器工作时会发出一个超出人类听觉范围的超声波,其换能器相当于话筒,可接收超声波信号并转换成电信号。超声波是振动频率高于20kHz的机械波,具有频率高、波长短、绕射现象小、方向性好等特点。
本项目与其他一样,也使用单换能器来发送脉冲合接收回声。如图2所示,传感器向某一方向发射超声波时开始计时,超声波碰到障碍物时返回,根据时间差和超声波速度可以估算出发射位置到障碍物的距离。
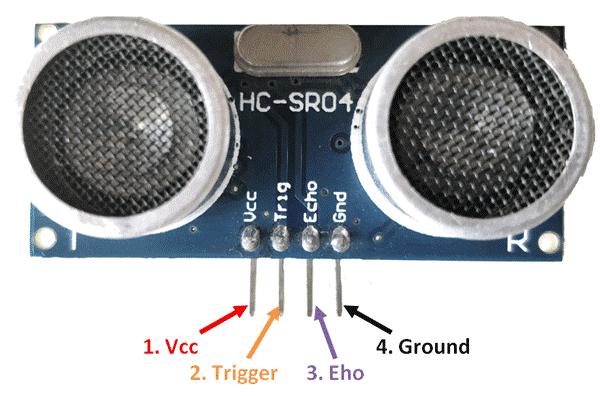
项目使用的HC-SRO4传感器模块的四个引脚分别为:Vcc(5V电源)、触发引脚、回声引脚、接地(0V)。工作时,采用IO触发测距10us的高电平信号,模块自动发送8个40khz的方波,自动检测是否有回声。如果有回声,通过IO输出一高电平,高电平持续的时间就是超声波从发射到返回的时间。HC-SRO4性能参数如下:
工作使用电压:DC5V
静态电流:小于2mA
电平输出:高5V
电平输出:底0V
感应角度:不大于15度
探测距离:2-450cm
高精度:可达0.3cm
(2)伺服马达
伺服马达是可以让物体精确转动的电气元件,可以控制速度,位置精度非常准确。伺服电机转子转速受输入信号控制,并能快速反应,在自动控制系统中,用作执行元件,且具有机电时间常数小、线性度高等特性,可把所收到的电信号转换成电动机轴上的角位移或角速度输出。
伺服马达分为直流和交流两大类,当信号电压为零时无自转现象,转速随着转矩的增加而匀速下降。Micro Servo 9G伺服马达参数如下:
重量: 9g
尺寸: 22.2 x 11.8 x 31mm approx.
失速转矩: 1.8kgf·cm
运行速度: 0.1s/60度
工作电压: 4.8V(~5V)
死区宽度: 10μs
工作温度: 0–55ºC
模拟力矩: 4.8V@1.80kg-cm)
旋转范围: 180°
脉冲周期: ca. 20ms
脉冲宽度: 500-2400µs
(3)Arduino UNO
Arduino是一个构架电子项目的开源平台,包括一个物理可编程电路板和一套开发环境软件(IDE),IDE可在PC运行,用来向Arduino板子写入代码或上传代码。
Arduino的Uno版本更加普及,适合艺术家、设计师、发烧友和各种爱好DIY的人群,可用来控制按钮、LEDs、马达、喇叭、GPS单元、照相机,甚至于手机和电视机。
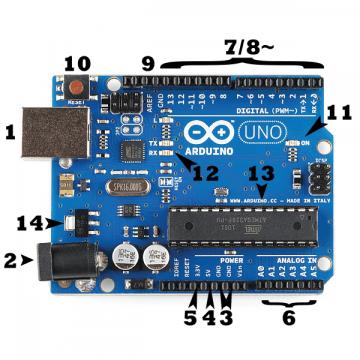
Arduino有很多种类,但大多数板子上面的元器件是一样的。以下按标号逐一解释:
标号1:USB座。可通过USB电缆连接电脑或者电源,为Arduino UNO供电。从PC向Arduino开发板上传代码,也是通过这个USB电缆进行的。
标号3:GND引脚。Arduino有多个接地引脚,功能是一样的。
标号4:5V电源。提供5V电压。
标号5:3.3V电源。提供3.3V电压。
标号6:模拟输入引脚(A0--A5),用来读取来自模拟传感器(如温度传感器)的信号,并转换成我们能够识别的数字。
标号7:数字输入引脚(0--13),用以数字输入(如按钮被按下)信号,或者输出数字信号(如驱动一个LED)。
标号8:PWM引脚 (3, 5, 6, 9, 10, 11)。本质上属于数字引脚,也可用作PWM。可用来模拟某些输出,如LED的亮度变化。
标号9:AREF引脚,表示模拟参考,大多数情况下不用,有时用来设置一个作为上限的外部模拟电压。
标号10:复位按钮。按个案件非常有用,按下就立即接地,并重启任何上传到Arduino的代码。
标号11:电源LED指示器。只要将Arduino接上电源,这个LED就一直点亮。如果不亮,马上检查电路,看看哪里出错了?
标号12:TX RX LEDs指示灯,点亮表示正在接收或发射数据。
标号13:主控IC芯片,来自爱特梅尔的ATmega。
标号14:稳压芯片。
3.项目目标
该项目的目的是建立一个原型,在有人准备扔垃圾的时候自动打开垃圾箱盖子,并检测刚扔进来垃圾的种类,具体参考原理图。Arduino连接方法如下:
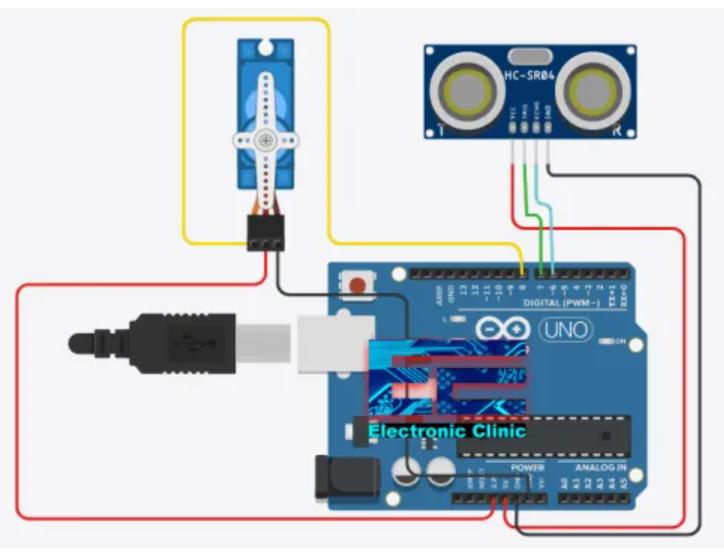
HC-SRO4传感器模块引脚VCC连接到Arduino引脚+5VDC,引脚Trig连接到Arduino引脚7,引脚Echo连接到Arduino引脚6,引脚GND连接到Arduino引脚GND。
伺服马达SG-90的Red引脚连接Arduino 3.3v,Black引脚连接Arduino GND,Orange引脚连接Arduino Pin 8。
4.代码编程
按照上述说明把Arduino与超声波传感器、伺服马达连接好后,就开始上传代码。
该智能垃圾箱的伺服数据库为:
// Download Servo Library
//https://www.electroniclinic.com/arduino-libraries-download-and-projects-they-are-used-in-project-codes/
#include
// Defines Tirg and Echo pins of the Ultrasonic Sensor
const int trigPin = 6;
const int echoPin = 7;
// Variables for the duration and the distance
long duration;
int distance;
Servo myServo; // Creates a servo object for controlling the servo motor
void setup() {
pinMode(trigPin, OUTPUT); // Sets the trigPin as an Output
pinMode(echoPin, INPUT); // Sets the echoPin as an Input
Serial.begin(9600);
myServo.attach(9); // Defines on which pin is the servo motor attached
}
void loop() {
// rotates the servo motor from 15 to 165 degrees
for (int i = 15; i <= 165; i++) {
myServo.write(i);
delay(30);
distance = calculateDistance();// Calls a function for calculating the distance measured by the Ultrasonic sensor for each degree
Serial.print(i); // Sends the current degree into the Serial Port
Serial.print(","); // Sends addition character right next to the previous value needed later in the Processing IDE for indexing
Serial.print(distance); // Sends the distance value into the Serial Port
Serial.print("."); // Sends addition character right next to the previous value needed later in the Processing IDE for indexing
}
// Repeats the previous lines from 165 to 15 degrees
for (int i = 165; i > 15; i--) {
myServo.write(i);
delay(30);
distance = calculateDistance();
Serial.print(i);
Serial.print(",");
Serial.print(distance);
Serial.print(".");
}
}
// Function for calculating the distance measured by the Ultrasonic sensor
int calculateDistance() {
digitalWrite(trigPin, LOW);
delayMicroseconds(2);
// Sets the trigPin on HIGH state for 10 micro seconds
digitalWrite(trigPin, HIGH);
delayMicroseconds(10);
digitalWrite(trigPin, LOW);
duration = pulseIn(echoPin, HIGH); // Reads the echoPin, returns the sound wave travel time in microseconds
distance = duration * 0.034 / 2;
return distance;
}
开始编程前,我们先添加 Servo.h 头文件,
#include
接下来,定义触发和回声引脚。HC-SR04超声波传感器的触发和回声引脚分别连接于Arduino的pins 6、7。
const int trigPin = 6;
const int echoPin = 7;
// Variables for the duration and the distance
long duration;
int distance;
Servo myServo; // Creates a servo object for controlling the servo motor
setup() function runs only one time with the Arduino board is turned ON.
void setup() {
pinMode(trigPin, OUTPUT); // Sets the trigPin as an Output
pinMode(echoPin, INPUT); // Sets the echoPin as an Input
Serial.begin(9600);
myServo.attach(9); // Defines on which pin is the servo motor attached
}
void loop() {
// rotates the servo motor from 15 to 165 degrees
for (int i = 15; i <= 165; i++) {
myServo.write(i);
delay(30);
distance = calculateDistance();// Calls a function for calculating the distance measured by the Ultrasonic sensor for each degree
Serial.print(i); // Sends the current degree into the Serial Port
Serial.print(“,”); // Sends addition character right next to the previous value needed later in the Processing IDE for indexing
Serial.print(distance); // Sends the distance value into the Serial Port
Serial.print(“.”); // Sends addition character right next to the previous value needed later in the Processing IDE for indexing
}
// Repeats the previous lines from 165 to 15 degrees
for (int i = 165; i > 15; i–) {
myServo.write(i);
delay(30);
distance = calculateDistance();
Serial.print(i);
Serial.print(“,”);
Serial.print(distance);
Serial.print(“.”);
}
}
// Function for calculating the distance measured by the Ultrasonic sensor
int calculateDistance() {
digitalWrite(trigPin, LOW);
delayMicroseconds(2);
// Sets the trigPin on HIGH state for 10 micro seconds
digitalWrite(trigPin, HIGH);
delayMicroseconds(10);
digitalWrite(trigPin, LOW);
duration = pulseIn(echoPin, HIGH); // Reads the echoPin, returns the sound wave travel time in microseconds
distance = duration * 0.034 / 2;
return distance;
审核编辑:符乾江
-
深联华单片机的智能垃圾桶系统设计2013-10-29 8182
-
【蓝牙4.1申请】智能垃圾桶2015-10-09 2607
-
浅谈超声波传感器技术在城市智能垃圾处理中的运用2017-11-09 2981
-
超声波传感器怎样进行城市垃圾桶液位测量2018-11-21 2762
-
基于WeMos的智能垃圾桶硬件和IDE介绍2021-10-27 1432
-
基于arduino制作的感应开盖垃圾桶2022-01-17 1678
-
怎样去设计一种基于Arduino与超声波感应器的感应式垃圾桶呢2022-03-01 2438
-
基于LD3320的语音识别智能垃圾桶设计2017-12-15 25128
-
智能垃圾桶DIY教程2019-08-30 6810
-
超声波智能垃圾桶在城市垃圾分类中的作用2020-12-25 2035
-
智能语音垃圾桶带四路超声波测距的设计资料合集2021-01-18 1182
-
基于Arduino和传感器制作智能垃圾桶2022-11-18 739
-
用超声波传感器表示学校食堂垃圾桶升级项目2023-02-01 562
-
NB-IOT垃圾桶超声波满溢传感器解决方案2023-03-02 3185
-
垃圾桶满溢传感器的工作原理2023-04-18 2815
全部0条评论

快来发表一下你的评论吧 !
