

AutoML:训练模型以识别凹坑
描述
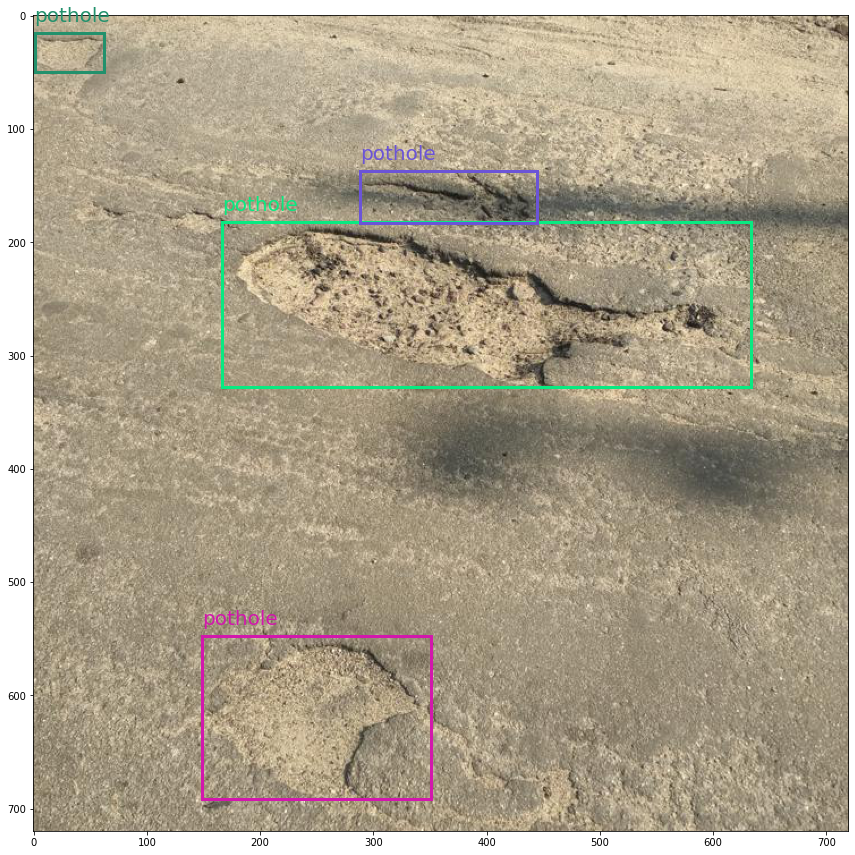
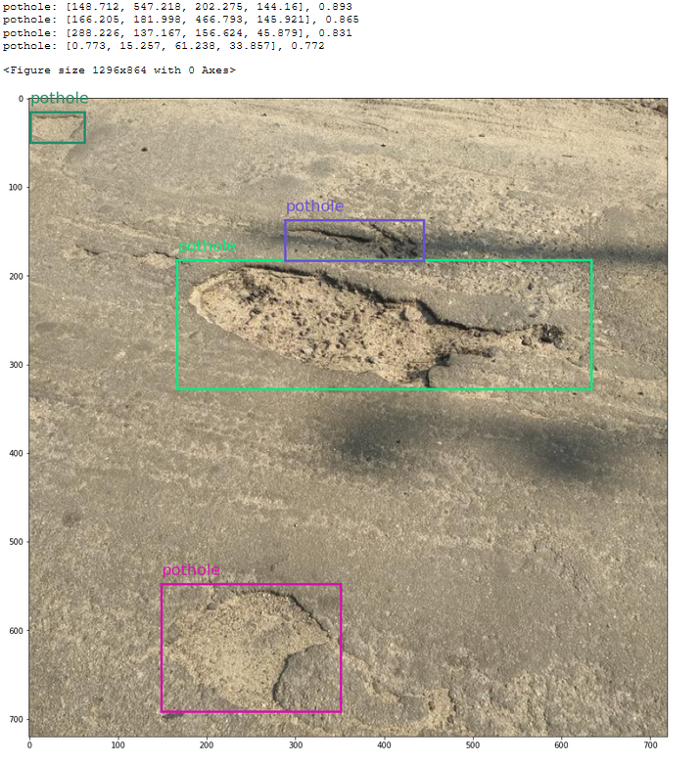
从我们训练的模型中得到的坑洞预测和置信度分数:
 初始算法选择和超参数优化是我个人不喜欢做的活动。如果你像我一样,那么也许你会喜欢自动机器学习(AutoML),一种我们可以让脚本为我们完成这些耗时的ML任务的技术。Azure机器学习(AML)是一项云服务,其功能包括准备和创建数据集、训练模型以及将其部署为web服务变得更加容易。最近,AML团队发布了AutoML功能,供公众预览。今天,我们将使用此功能训练一个目标检测模型,以识别道路上的凹坑。在这篇文章中,我将简要回顾一些AML和目标检测的概念,因此你不必完全熟悉它们就可以进行后续操作。本教程主要基于Azure中的这个示例,你可以查看我在这里编写的Jupyter笔记本:https://github.com/dmesquita/azureml-automl-potholes-object-detection酷,让我们开始吧!
我们该怎么办?
对象检测数据集很有趣,因为它们由表格数据(边界框的注释)和图像数据(.png、.jpeg等)组成。COCO格式是对象检测数据集的一种流行格式,我们将使用此格式下载坑洞数据集:https://public.roboflow.com/object-detection/pothole。Azure机器学习使用TABLAR DATASET格式,因此我们需要做的第一件事是将COCO转换为TABLAR DATASET。转换后,我们将选择一种对象检测算法,并最终训练模型。1-准备数据集
我从Roboflow那里得到了数据集。它有665张标有坑洞的道路图片,由Atikur Rahman Chitholian创作并分享,作为其论文的一部分。Roboflow团队按照70/20/10将数据集划分为训练-验证-测试集。每个拆分都有两个主要组件:- _annotations.coco.json,一个包含images、categories和annotations的json文件
- 图像本身(.jpg文件)
- images:包含有关数据集图像的信息(id、文件名、大小等)
- categories:边界框类别的名称和id
- annotations:包含有关对象的信息,包括边界框坐标(在此数据集中,它们位于绝对坐标)、对象的图像id和类别id
 我已经下载并提取了数据库中的数据集.放在/potholeObjects文件夹。每个拆分都有一个文件夹,里面有图像和JSON文件。
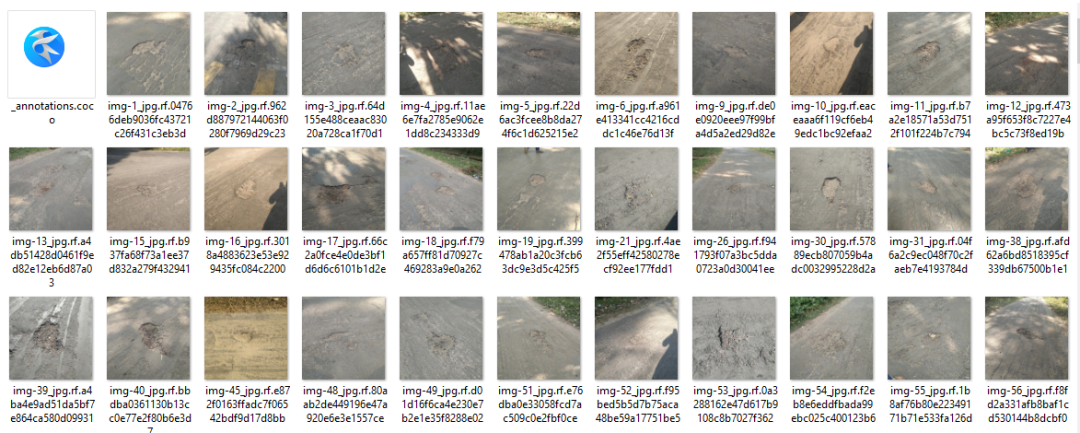 你需要将图像和JSON文件上传到数据存储,以便AML可以访问它们。数据存储是云数据源的抽象。创建AML工作区时,将创建AzureBlobDatastore并将其设置为默认值。我们将使用此默认数据存储并将图像上传到那里。
from azureml.core import Workspace workspace = Workspace.from_config() # 如果你在一个aml计算实例上运行notebook,这是可行的 default_datastore = workspace.get_default_datastore() datastore_name = default_datastore.name 注释采用COCO格式(JSON),但tablerDataSet要求注释采用JSON行。tablerDataset具有相同的元数据,但以不同的键组织。以下是用于对象检测的TablerDataset的外观:
{ "image_url":"AmlDatastore://data_directory/../Image_name.image_format", "image_details":{ "format":"image_format", "width":"image_width", "height":"image_height" }, "label":[ { "label":"class_name_1", "topX":"xmin/width", "topY":"ymin/height", "bottomX":"xmax/width", "bottomY":"ymax/height", "isCrowd":"isCrowd" }, { "label":"class_name_2", "topX":"xmin/width", "topY":"ymin/height", "bottomX":"xmax/width", "bottomY":"ymax/height", "isCrowd":"isCrowd" }, "..." ] } 幸运的是,微软工程师编写了一个脚本来转换COCO:https://github.com/Azure/azureml-examples/blob/1a41978d7ddc1d1f831236ff0c5c970b86727b44/python-sdk/tutorials/automl-with-azureml/image-object-detection/coco2jsonl.py此文件的image_url键需要指向我们正在使用的数据存储中的图像文件(默认)。我们使用coco2jsonl的base_url参数指定。
# 从coco文件生成训练jsonl文件 !python coco2jsonl.py --input_coco_file_path "./potholeObjects/train/_annotations.coco.json" --output_dir "./potholeObjects/train" --output_file_name "train_pothole_from_coco.jsonl" --task_type "ObjectDetection" --base_url "AmlDatastore://{datastore_name}/potholeObjects/train/" 我们将对验证集运行相同的命令。现在,下一步是将文件上传到数据存储,并在AML中创建数据集。不要将数据集与数据存储混淆。数据集是版本控制的打包数据对象,通常基于数据存储中的文件创建。我们将从JSON行文件创建数据集。
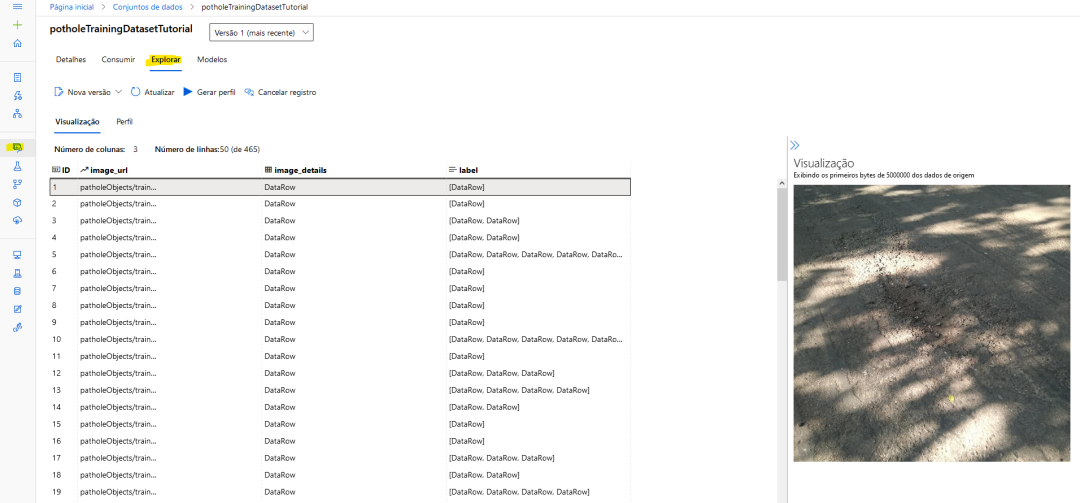
from azureml.core import Dataset from azureml.data.datapath import DataPath from azureml.data import DataType # 上传文件到数据存储 Dataset.File.upload_directory( src_dir="./potholeObjects/train/", target=DataPath(default_datastore, "/potholeObjects/train"), show_progress=True ) training_dataset_name = "potholeObjectesTrainingDataset" # 创建数据集 training_dataset = Dataset.Tabular.from_json_lines_files( path=DataPath(default_datastore, "/potholeObjects/train/train_pothole_from_coco.jsonl"), set_column_types={"image_url": DataType.to_stream(default_datastore.workspace)}, ) # 在工作区中注册数据集 training_dataset = training_dataset.register( workspace=workspace, name=training_dataset_name ) 对于训练和验证拆分,也将这样做。如果一切顺利,你可以看到AML内部的图像预览。AML工作区内的数据集预览
2.进行实验
在AML内部,你运行的一切都称为实验。要使用AutoML训练模型,你将创建一个实验,指向它假定运行的计算目标,并提供AutoML参数的配置。让我们首先创建实验并从工作区获取计算机实例:from azureml.core import Experiment experiment_name = "pothole-yolov5-model" experiment = Experiment(workspace, name=experiment_name) compute_target = workspace.compute_targets['gpu-computer'] # 给计算实例的名称 在这里,我将使用yolov5默认参数运行实验。你需要提供超参数、计算目标、训练数据和验证数据(如示例所示,验证数据集是可选的)。
from azureml.automl.core.shared.constants import ImageTask from azureml.train.automl import AutoMLImageConfig from azureml.train.hyperdrive import GridParameterSampling, choice automl_config_yolov5 = AutoMLImageConfig( task=ImageTask.IMAGE_OBJECT_DETECTION, compute_target=compute_target, training_data=training_dataset, validation_data=validation_dataset, hyperparameter_sampling=GridParameterSampling({"model_name": choice("yolov5")}), iterations=1, ) 现在可以提交实验了:
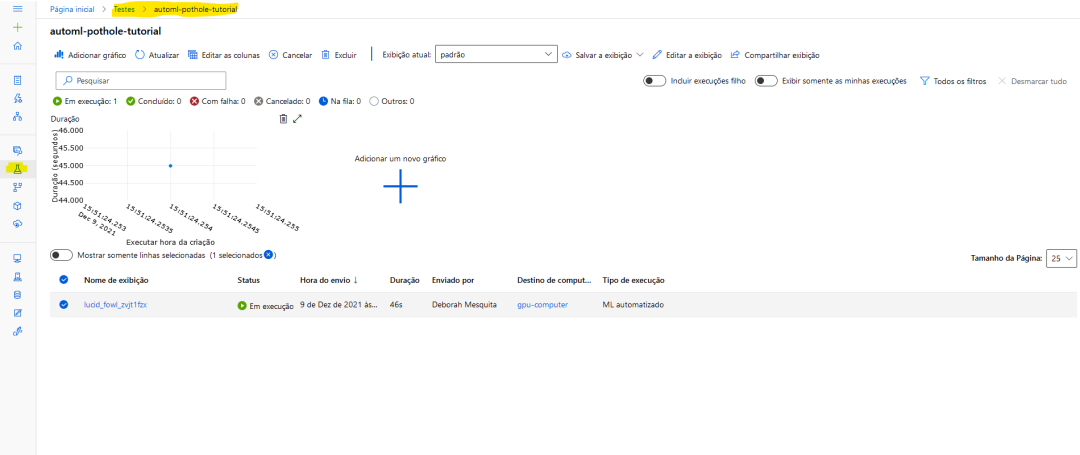
automl_image_run = experiment.submit(automl_config_yolov5) 你可以使用Workspace web界面监控实验:
 以下是Microsoft教程中的一个示例:
from azureml.automl.core.shared.constants import ImageTask from azureml.train.automl import AutoMLImageConfig from azureml.train.hyperdrive import BanditPolicy, RandomParameterSampling from azureml.train.hyperdrive import choice, uniform parameter_space = { "model": choice( { "model_name": choice("yolov5"), "learning_rate": uniform(0.0001, 0.01), "model_size": choice("small", "medium"), # 模型相关 #'img_size': choice(640, 704, 768), # 特定型号;可能需要有大内存的GPU }, { "model_name": choice("fasterrcnn_resnet50_fpn"), "learning_rate": uniform(0.0001, 0.001), "optimizer": choice("sgd", "adam", "adamw"), "min_size": choice(600, 800), # 模型相关 #'warmup_cosine_lr_warmup_epochs': choice(0, 3), }, ), } tuning_settings = { "iterations": 10, "max_concurrent_iterations": 2, "hyperparameter_sampling": RandomParameterSampling(parameter_space), "early_termination_policy": BanditPolicy( evaluation_interval=2, slack_factor=0.2, delay_evaluation=6 ), } automl_image_config = AutoMLImageConfig( task=ImageTask.IMAGE_OBJECT_DETECTION, compute_target=compute_target, training_data=training_dataset, validation_data=validation_dataset, **tuning_settings, )
3-将预测可视化
这个yolov5模型是使用Pytorch训练的,因此我们可以下载模型并使用Jupyter笔记本检查预测。我的花了56分钟训练。获取模型需要做的第一件事是注册工作区中的最佳运行,以便访问模型。best_child_run = automl_image_run.get_best_child() model_name = best_child_run.properties["model_name"] model_output_path = best_child_run.properties["model_output_path"] # 从最佳运行中注册模型 model = best_child_run.register_model( model_name=model_name, model_path=model_output_path ) 现在我们可以下载模型了并运行推断。为此,我们将使用azureml contrib automl dnn vision包中的代码:
from azureml.contrib.automl.dnn.vision.common.model_export_utils import load_model, run_inference from azureml.contrib.automl.dnn.vision.object_detection_yolo.writers.score import _score_with_model TASK_TYPE = 'image-object-detection' model_settings = {"img_size": 640, "model_size": "medium", "box_score_thresh": 0.1, "box_iou_thresh": 0.5} model_wrapper = load_model(TASK_TYPE, 'model.pt', **model_settings) sample_image = "./img-23_jpg.rf.e6aa0daf83e72ccbf1ea10eb6a6ab3bd.jpg" with open(sample_image, 'rb') as f: bytes_img = f.read() model_response = run_inference(model_wrapper, bytes_img, _score_with_model) 我使用Microsoft教程中的代码来可视化边界框。以下是测试图像的结果:从我们训练的模型中得到的坑洞预测和置信度分数:
 酷吧?
酷吧?最后
Azure机器学习是一个很好的工具,可以让你开始机器学习(在我们的例子中是深度学习),因为它隐藏了很多复杂性。你可以在Jupyter笔记本上查看所有代码:https://github.com/dmesquita/azureml-automl-potholes-object-detection。管道中的下一步是将模型部署为web服务。如果你有兴趣,也可以使用Microsoft教程检查如何做到这一点:https://github.com/dmesquita/azureml-automl-potholes-object-detection。参考引用Pothole Dataset. Shared By. Atikur Rahman Chitholian. November 2020. License. ODbL v1.0 审核编辑 :李倩
声明:本文内容及配图由入驻作者撰写或者入驻合作网站授权转载。文章观点仅代表作者本人,不代表电子发烧友网立场。文章及其配图仅供工程师学习之用,如有内容侵权或者其他违规问题,请联系本站处理。
举报投诉
-
在Ubuntu20.04系统中训练神经网络模型的一些经验2025-10-22 115
-
人脸识别模型训练是什么意思2024-07-04 1875
-
【大语言模型:原理与工程实践】大语言模型的预训练2024-05-07 1430
-
卷积神经网络模型训练步骤2023-08-21 2639
-
使用 NVIDIA TAO 工具套件和预训练模型加快 AI 开发2022-12-15 1749
-
AI模型是如何训练的?训练一个模型花费多大?2022-10-23 28315
-
AutoML技术提高NVIDIA GPU和RAPIDS速度2022-04-26 3440
-
AutoML和神经架构搜索介绍2019-09-04 2904
-
关于AutoML的完整资源列表2019-06-07 3651
-
Waymo用AutoML自动生成机器学习模型2019-01-19 3886
-
Pytorch模型训练实用PDF教程【中文】2018-12-21 5038
-
AutoML新书:AutoML系统背后的基础知识2018-10-18 5446
全部0条评论

快来发表一下你的评论吧 !

