

gpio和pinctrl子系统的关系与区别
描述
哈喽,我是老吴,我来继续分享我的学习心得啦。
gpio 和 pinctrl 子系统在内核里的使用率非常高,和嵌入式产品的关联非常大。从这两个子系统开始学习驱动开发是个不错的入门选择。
本文目录:
一、gpio 与 pinctrl
二、内核里如何引用 gpio
三、gpio 子系统框架
四、应用层如何访问 gpio
一、gpio 与 pinctrl
本文主要关注 gpio 子系统,但是老吴认为必要先说明一下 pinctrl 子系统和 gpio 子系统的之间关系。
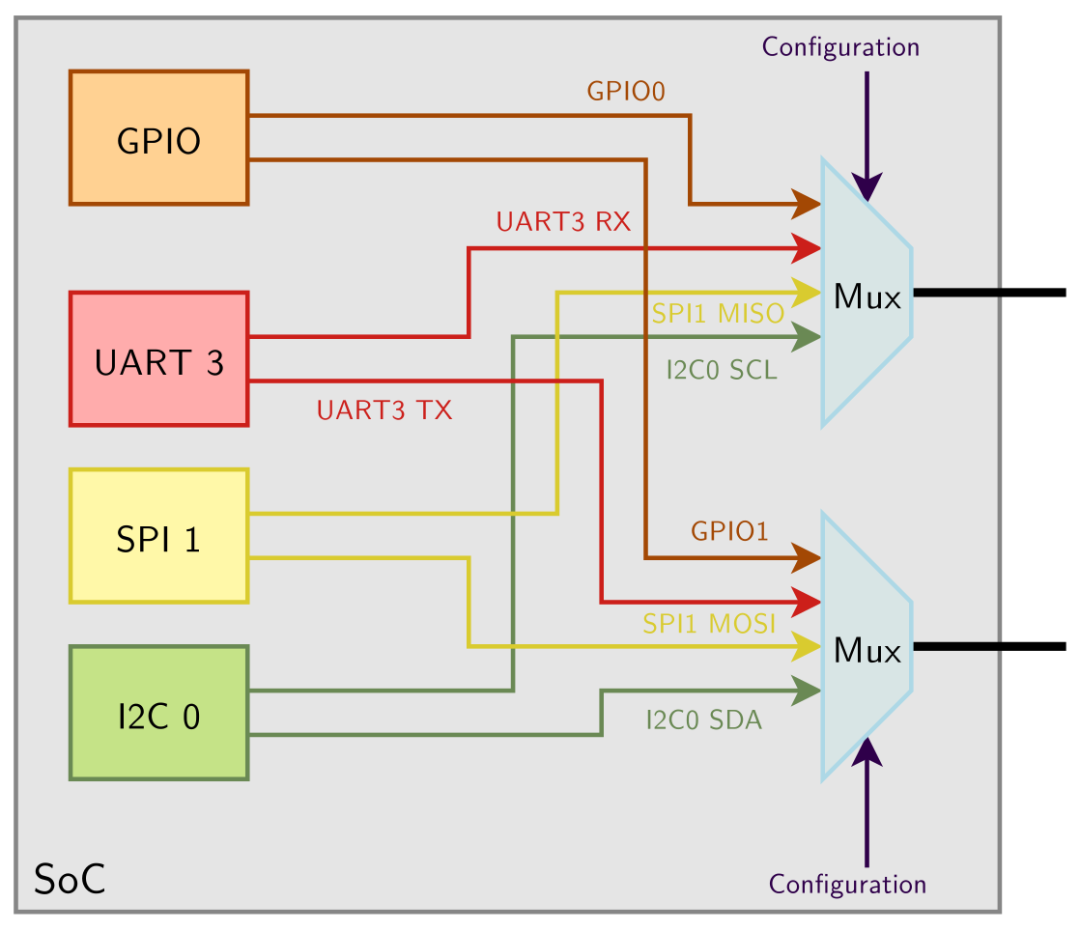
pinctrl 的作用:
- 引脚复用,例如某个引脚即可用作为普通的gpio,也可以作为UART的TX;
- 引脚配置,一般包括上下拉、驱动能力等;
gpio 的作用:
- 作为输入功能时,支持读引脚值;
- 作为输出功能时,支持输出高低电平;
- 部分 gpio 还负责接收中断;
gpio 的使用依赖于 pinctrl:
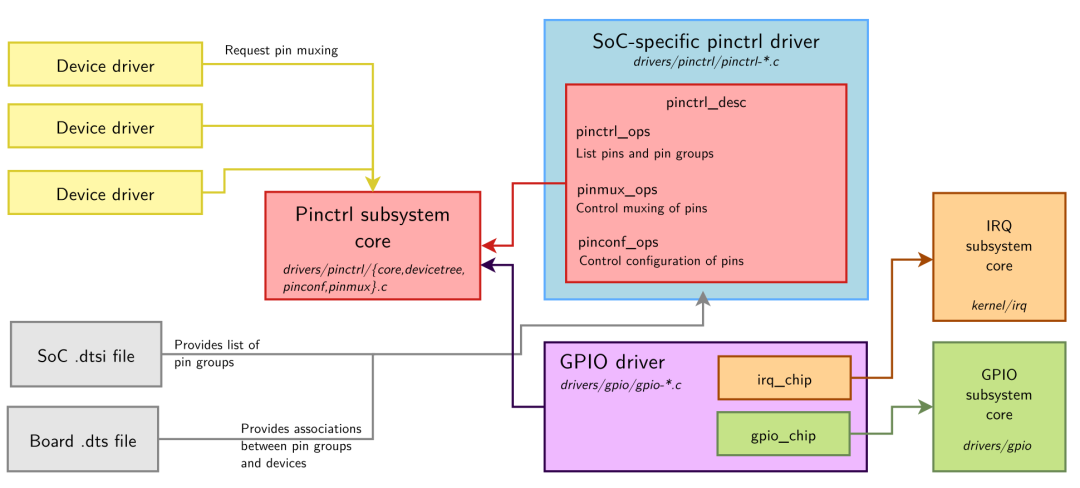
本文的关注点是 gpio driver --> gpio subsystem core -> gpio consumer 这一路径,读者如果想更深入地了解 pinctrl 子系统,可以参考内核文档:Documentation/driver-api/pinctl.rst。
gpio 子系统内核文档:
Documentation/driver-api/gpio:
| 文档 | 简介 |
|---|---|
| index.rst | 文档目录和源码清单 |
| intro.rst | gpio 简介 |
| driver.rst | 描述如何编写 gpio controller driver |
| consumer.rst | 描述 gpio consumer 如何使用 gpio |
| board.rst | 描述设备如何申请 gpio |
| drivers-on-gpio.rst | 列举一些使用了gpio子系统的常见驱动,例如 leds-gpio.c、gpio_keys.c 等 |
| legacy.rst | 描述 legacy gpio 接口 |
注:本文基于 Linux-4.19。
二、内核里如何引用 gpio
2 个步骤:
1) 设备树里添加 gpio mappings
示例:
foo_device {
    compatible = "packt,gpio-descriptor-sample";
    led-gpios = <&gpio2 15 GPIO_ACTIVE_HIGH>, // red
                <&gpio2 16 GPIO_ACTIVE_HIGH>, // green

    btn1-gpios = <&gpio2 1 GPIO_ACTIVE_LOW>;
    btn2-gpios = <&gpio2 1 GPIO_ACTIVE_LOW>;
};
要点:
-
属性
-gpios里的由使用者自行决定的, 例如上述例子中的为 led,在 gpio consumer driver 里可以通过 "led" 这个字符串,配合偏移值来获取这一组 gpio 里的任一 gpio。 -
至于如何标志是硬件上的哪一个引脚,是由平台相关的 gpio controller driver 的设备树节点里的
#gpio-cells的值来决定,上述例子中需要 2个参数才能确定硬件引脚,所以#gpio-cells = 2。
2) 在 gpio consumer driver 中引用
目前 gpio subsystem 提供了 2 套接口:
-
legacy API:integer-based GPIO interface,形式为 gpio_xxx(),例如
void gpio_set_value(unsigned gpio, int value),不推荐使用该 API; -
推荐 API: descriptor-based GPIO interface,形式为 gpiod_xxx(),例如
void gpiod_set_value(struct gpio_desc *desc, int value),新添加的驱动代码一律采用这套 API。
示例:
static struct gpio_desc *red, *green, *btn1, *btn2;
static int irq;

static irqreturn_t btn1_pushed_irq_handler(int irq, void *dev_id)
{
    int state;

    /* read the button value and change the led state */
    state = gpiod_get_value(btn2);
    gpiod_set_value(red, state);
    gpiod_set_value(green, state);

    pr_info("btn1 interrupt: Interrupt! btn2 state is %d)
", state);
    return IRQ_HANDLED;
}

static const struct of_device_id gpiod_dt_ids[] = {
    { .compatible = "gpio-descriptor-sample", },
};


static int my_pdrv_probe(struct platform_device *pdev)
{
    int retval;
    struct device *dev = &pdev->dev;

    // 获得 gpio descriptor 的同时也将其设置为 output,并且输出低电平
    red = gpiod_get_index(dev, "led", 0, GPIOD_OUT_LOW);
    green = gpiod_get_index(dev, "led", 1, GPIOD_OUT_LOW);

    btn1 = gpiod_get(dev, "btn1", GPIOD_IN);
    btn2 = gpiod_get(dev, "btn2", GPIOD_IN);

    // 获得中断号
    irq = gpiod_to_irq(btn1);

    // 申请中断
    retval = request_threaded_irq(irq, NULL,
                            btn1_pushed_irq_handler,
                            IRQF_TRIGGER_LOW | IRQF_ONESHOT,
                            "gpio-descriptor-sample", NULL);
    pr_info("Hello! device probed!
");
    return 0;
}

static int my_pdrv_remove(struct platform_device *pdev)
{
    free_irq(irq, NULL);

    // 释放 gpio
    gpiod_put(red);
    gpiod_put(green);
    gpiod_put(btn1);
    gpiod_put(btn2);
    pr_info("good bye reader!
");
    return 0;
}

static struct platform_driver mypdrv = {
    .probe      = my_pdrv_probe,
    .remove     = my_pdrv_remove,
    .driver     = {
        .name     = "gpio_descriptor_sample",
        .of_match_table = of_match_ptr(gpiod_dt_ids),
        .owner    = THIS_MODULE,
    },
};
module_platform_driver(mypdrv);
gpiod_xxx() API
在 gpio 子系统中,用 struct gpio_desc 来描述一个 gpio 引脚,gpiod_xxx() 都是围绕着 strcut gpio_desc 进行操作的。
完整的接口定义位于 linux/gpio/consumer.h,大约共有 70个 API。
常用 API:
-
获得/释放 一个或者一组 gpio:
- [devm]_gpiod_get*()
- [devm]_gpiod_put*()
-
设置/查询 输入或者输出
- gpiod_direction_input()
- gpiod_direction_output()
- gpiod_get_direction()
-
读写一个 gpio
- gpiod_get_value()
- gpiod_set_value()
- gpiod_get_value_cansleep()
- gpiod_set_value_cansleep()
-
读写一组 gpio
- gpiod_get_array_value()
- gpiod_set_array_value()
-
获得 gpio 对应的中断号
- gpiod_to_irq()
相关要点:
-
以 _cansleep 为后缀的函数是可能会睡眠的 API,不可以在 hard (non-threaded) IRQ handlers 中使用;
-
gpiod_get_value() 返回的是硬件上的电平值;
-
gpiod_set_value() 设置的值是逻辑值而非电平值,1 表示使能,0 表示不使能,由设备树里的 gpio mappings 里的 GPIO_ACTIVE_XXX 来决定哪个电平值是有效的,总结如下:
| Function | line property | physical line |
|---|---|---|
| gpiod_set_raw_value(desc, 0); | don't care | low |
| gpiod_set_raw_value(desc, 1); | don't care | high |
| gpiod_set_value(desc, 0); | default (active high) | low |
| gpiod_set_value(desc, 1); | default (active high) | high |
| gpiod_set_value(desc, 0); | active low | high |
| gpiod_set_value(desc, 1); | active low | low |
| gpiod_set_value(desc, 0); | default (active high) | low |
| gpiod_set_value(desc, 1); | default (active high) | high |
| gpiod_set_value(desc, 0); | open drain | low |
| gpiod_set_value(desc, 1); | open drain | high impedance |
| gpiod_set_value(desc, 0); | open source | high impedance |
| gpiod_set_value(desc, 1); | open source | high |
三、gpio 子系统框架
1. 整体框架
正常情况下,驱动工程师不需要了解 gpio chip driver 和 gpiolib:
-
驱动工程师负责编写 gpio consumer drvier;
-
芯片厂商的 bsp 工程师负责编写 gpio chip driver;
-
开源社区里的大牛负责 gpiolib 的核心实现;
但是当功能和预期的不一样时,为了调试定位出问题,这时就有必要弄清楚 gpio chip driver 和 gpiolib 的工作流程。
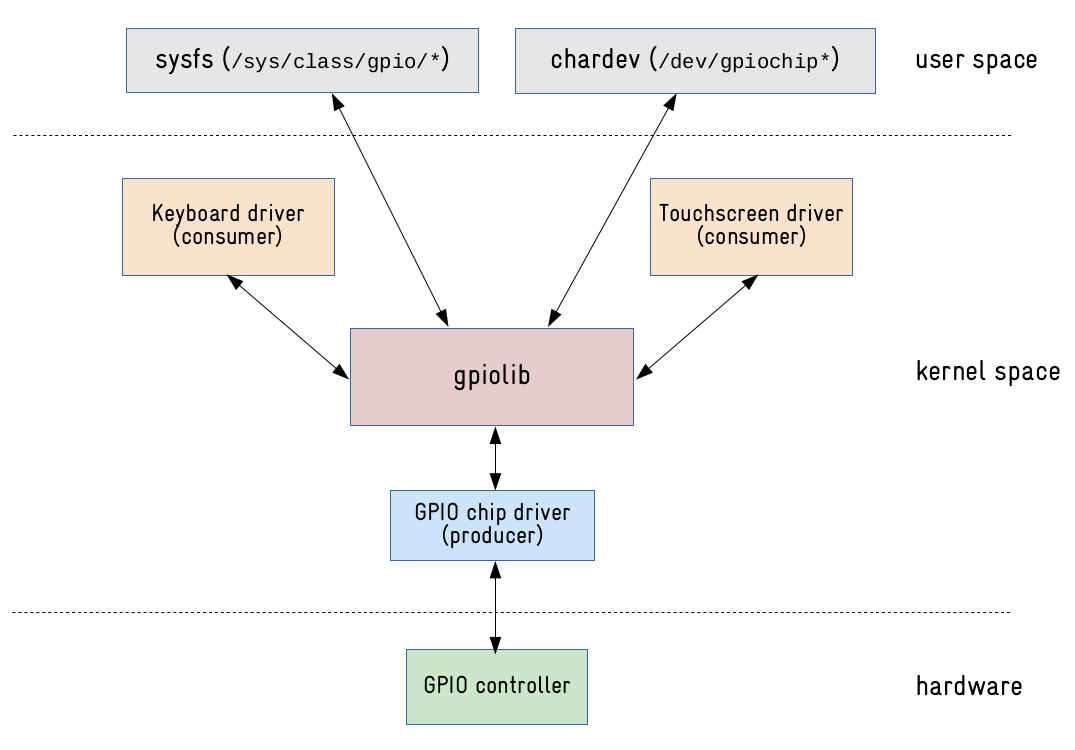
2. gpiolib
作用:
-
向下为 gpio chip driver 提供注册 struct gpio_chip 的接口:gpiochip_xxx();
-
向上为 gpio consumer 提供引用 gpio 的接口:gpiod_xxx();
-
实现字符设备的功能;
-
注册 sysfs;
源码:
$ cd linux-4_19/drivers/gpio
$ ls gpiolib* -1X
gpiolib-acpi.c      // ACPI helpers for GPIO API
gpiolib.c           // GPIO subsystem core
gpiolib-devprop.c   // Device property helpers for GPIO chips.
gpiolib-legacy.c
gpiolib-of.c        // OF helpers for the GPIO API
gpiolib-sysfs.c     // sysfs helpers
gpiolib.h
int gpiochip_add(struct gpio_chip *chip)
这是 bsp 工程师比较关心的 api。
在 gpio 子系统中,SoC 上的每一个 gpio bank 都会被认为是一个 gpio controller,每一个 gpio controller 都由一个 struct gpio_chip 来描述,bsp 工程师的核心工作就是填充该结构体。
struct gpio_chip 比较庞大,但是我们只需要关注跟硬件联系比较紧密的成员就好:
- .set(),输出电平
- .get(),获得电平
- .get_direction(),获得方向
- .direction_input(),设置为输入
- .direction_output(),设置为输出
- .to_irq(),获得中断号
3. gpio chip driver
最简单的 demo:
#define GPIO_NUM 16
static struct gpio_chip chip;

static int fake_get_value(struct gpio_chip *gc, unsigned offset)
{
 return 0;
}

static void fake_set_value(struct gpio_chip *gc, unsigned offset, int val)
{
}

static int fake_direction_output(struct gpio_chip *gc, unsigned offset, int val)
{
 return 0;
}

static int fake_direction_input(struct gpio_chip *gc,unsigned offset)
{
    return 0;
}

static const struct of_device_id fake_gpiochip_ids[] = {
    { .compatible = "fake-gpio-chip", },
};

static int my_pdrv_probe(struct platform_device *pdev)
{
 chip.label = pdev->name;
 chip.base = -1;
 chip.dev = &pdev->dev;
 chip.owner = THIS_MODULE;
 chip.ngpio = GPIO_NUM;
 chip.can_sleep = 1;
 chip.get = fake_get_value;
 chip.set = fake_set_value;
 chip.direction_output = fake_direction_output;
 chip.direction_input = fake_direction_input;

 return gpiochip_add(&chip);
}

static int my_pdrv_remove(struct platform_device *pdev)
{
 gpiochip_remove(&chip);
    return 0;
}

static struct platform_driver mypdrv = {
    .probe      = my_pdrv_probe,
    .remove     = my_pdrv_remove,
    .driver     = {
        .name     = "fake-gpio-chip",
        .of_match_table = of_match_ptr(fake_gpiochip_ids),
        .owner    = THIS_MODULE,
    },
};
module_platform_driver(mypdrv);
RK3399 实例分析
1) 设备树
gpio0: gpio0@ff720000 {
    compatible = "rockchip,gpio-bank";
    reg = <0x0 0xff720000 0x0 0x100>;
    clocks = <&pmucru PCLK_GPIO0_PMU>;
    interrupts = ;

    gpio-controller;
    #gpio-cells = <0x2>;

    interrupt-controller;
    #interrupt-cells = <0x2>;
};
...
gpio4: gpio4@ff790000 {
    ...
}
一共定义了 5 个 gpio-controller 节点,对应芯片上的 5 个 gpio bank。
里面用于表明寄存器地址 和 clock 等属性会在 gpio chip driver 中被使用。
2) chip driver
这里只关心程序主干,不关心芯片厂商为了适应多款芯片而封装的代码。
gpio_chip 的注册过程:
drivers/pinctrl/pinctrl-rockchip.c
rockchip_pinctrl_probe() {
    // rockchip 用于管理 gpio/pinctrl 大管家结构体
    struct rockchip_pinctrl *info = devm_kzalloc()

    // rk3399 gpio bank 相关的硬件描述信息
    struct rockchip_pin_ctrl *ctrl = & rk3399_pin_ctrl;

    info->ctrl = ctrl;

    rockchip_gpiolib_register(pdev, info); {
        struct gpio_chip *gc;

        for (i = 0; i < ctrl->nr_banks; ++i, ++bank) {
            // 初始化 gpio_chip
            gc = &rockchip_gpiolib_chip;
            gc->base = bank->pin_base;
            gc->ngpio = bank->nr_pins;

            // 注册 gpio_chip
            gpiochip_add_data(gc, bank);
        }
    }
}
struct gpio_chip 的定义:
static const struct gpio_chip rockchip_gpiolib_chip = {
 .request = gpiochip_generic_request,
 .free = gpiochip_generic_free,
 .set = rockchip_gpio_set,
 .get = rockchip_gpio_get,
 .get_direction = rockchip_gpio_get_direction,
 .direction_input = rockchip_gpio_direction_input,
 .direction_output = rockchip_gpio_direction_output,
 .set_config = rockchip_gpio_set_config,
 .to_irq = rockchip_gpio_to_irq,
 .owner = THIS_MODULE,
};
这些函数都是在操作 rk3399 gpio 相关的寄存器,实现一个 gpio chip driver 本质上就是实现上面一系列的硬件操作函数。
四、应用层如何访问 gpio
1. /dev/gpiochipX
直接操作字符设备是比较低效率的,内核里提供了一些 demo:
$ cd linux-4_19/tools/gpio
$ ls
Makefile
gpio-event-mon.c
gpio-hammer.c
gpio-utils.c
lsgpio.c
gpio-utils.h
$ make ARCH=arm64 CROSS_COMPILE=aarch64-linux-
具体的代码请各位自行阅读吧。
2. libgpiod
libgpiod 是一个用 C 语言编写的用于访问 gpio chardev 的库,同时里面包含了一些访问 gpio 的命令行工具,推荐优先采用这个库来访问 gpio。
编译:
$ git clone https://git.kernel.org/pub/scm/libs/libgpiod/libgpiod.git -b v1.6.x
$ ./autogen.sh --enable-tools=yes
$ make && make install
$ ldconfig
附带的几个命令行工具:
gpiodetect – list all gpiochips present on the system, their names, labels and number of GPIO lines
gpioinfo – list all lines of specified gpiochips, their names, consumers, direction, active state and additional flags
gpioget – read values of specified GPIO lines
gpioset – set values of specified GPIO lines, potentially keep the lines exported and wait until timeout, user input or signal
gpiofind – find the gpiochip name and line offset given the line name
gpiomon – wait for events on GPIO lines, specify which events to watch, how many events to process before exiting or if the events should be reported to the console
$ gpiodetect
gpiochip0 [gpio0] (32 lines)
gpiochip1 [gpio1] (32 lines)
gpiochip2 [gpio2] (32 lines)
gpiochip3 [gpio3] (32 lines)
gpiochip4 [gpio4] (32 lines)
$ gpioinfo gpio0
gpiochip0 - 32 lines:
        line   0:      unnamed       unused   input  active-high
        line   1:      unnamed     "vcc_sd"  output  active-high [used]
        line   2:      unnamed       unused   input  active-high
        line   3:      unnamed       unused   input  active-high
        line   4:      unnamed "bt_default_wake_host" input active-high [used]
        line   5:      unnamed "GPIO Key Power" input active-low [used]
        ...
        line  13:      unnamed "status_led"  output  active-high [used]
        ...
        line  30:      unnamed       unused   input  active-high
        line  31:      unnamed       unused   input  active-high
3. sysfs
过时的接口,不推荐使用,用法如下:
$ echo 25 >/sys/class/gpio/export
$ echo out > /sys/class/gpio/gpio25/direction
$ echo 1 > /sys/class/gpio/gpio25/value
五、相关参考
-
Linux-4.19 Documentation
-
Linux Device Drivers Development / GPIO Controller Drivers
原文标题:五、相关参考
文章出处:【微信公众号:FPGA之家】欢迎添加关注!文章转载请注明出处。
-
RK3568驱动指南|第十二篇 GPIO子系统-第135章 GPIO子系统与pinctrl子系统相结合实验2025-05-23 1357
-
嵌入式学习-飞凌嵌入式ElfBoard ELF 1板卡-Pinctrl和GPIO子系统之Pinctrl子系统2025-03-24 789
-
飞凌嵌入式ElfBoard ELF 1板卡-Pinctrl和GPIO子系统之Pinctrl子系统2025-03-22 1447
-
Linux中pinctrl操作GPIO只需要几步2023-09-27 5995
-
一文搞懂Linux pinctrl/gpio子系统2023-06-09 4305
-
使用pinctrl和gpio子系统实现LED灯驱动2023-04-03 2491
-
RK3399开发板的pinctrl和gpio子系统相关资料介绍2022-09-16 5494
-
【i.MX6ULL】驱动开发6——GPIO子系统点亮LED2022-05-21 4529
-
嵌入式驱动开发两大子系统的使用2022-03-15 2620
-
怎样去使用linux下的pintcrl和gpio子系统呢2022-03-07 2339
-
瑞芯微RK3568-iomuxc和pinctrl子系统初窥2021-12-20 1174
-
基于GPIO子系统的LED驱动程序分享2021-12-16 1093
-
「正点原子Linux连载」第四十五章 pinctrl和gpio子系统实验(一)2020-03-19 2302
全部0条评论

快来发表一下你的评论吧 !
