

如何利用GD32F310读取HDC1080环境温湿度
描述
我拿到的开发板实际板载的MCU是GD32F310G8,QFN28pin封装,基于ARM CORTEX M4内核,主频72MHz,芯片内置64KB flash,8KB SRAM,两路I2C外设。
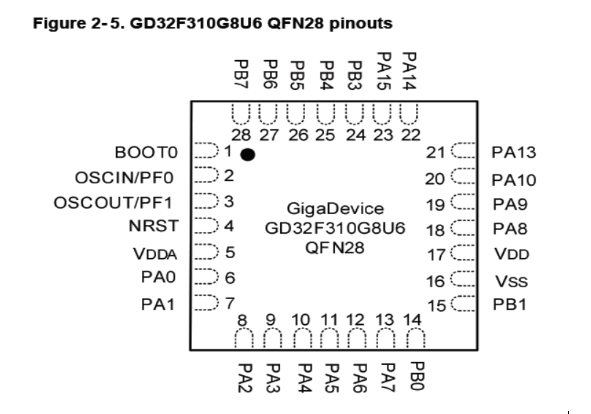
本次试用目的是利用GD32F310的I2C0实现对HDC1080的初始化及读取环境温湿度,并利用UART口在电脑上显示出来。
1、新建工程
①首先建立一个新的项目文件夹,并在此文件夹下建立对应子文件夹,我建立的文件如下图所示,这个依个人习惯会有不同:
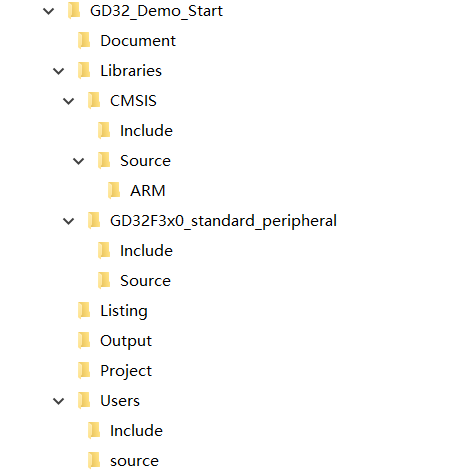
② Document文件夹中存放对项目的说明文件readme.txt;将系统支持包中的GD32F3x0_Firmware_Library_V2.2.0/Firmware文件夹中的内容复制到Libraries文件夹中;Listing/Output文件夹用于存放项目编译时生成的目标文件及list文件,在MDK的魔术棒中进行设置路径;users文件夹中存放main文件及我们自已写的代码;Project文件夹中存放MDK项目文件;
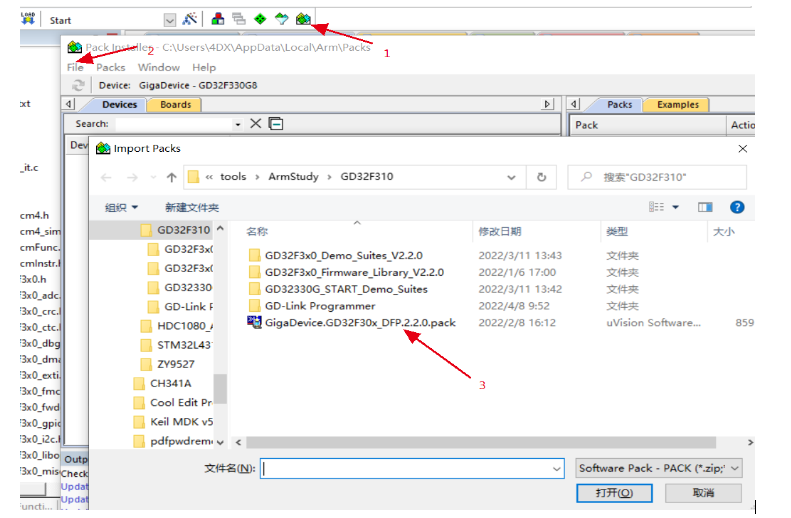
③打开MDK keil5,首先要先导入GD32F310G文件支持包。
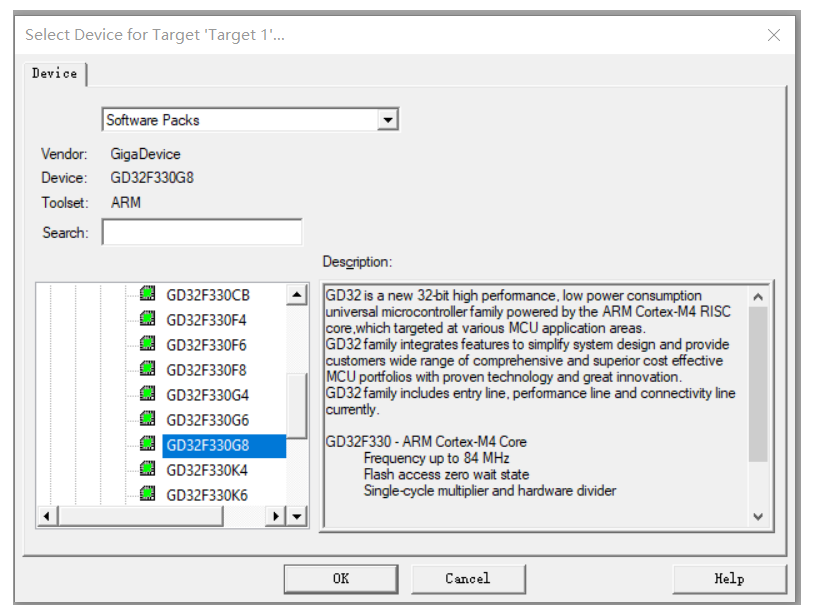
④建立新的项目,选择所使用的MCU,我们选择GD32F330G8,如下图所示
⑤新项目中建立如下文件组,并导入启动文件和外设支持包。
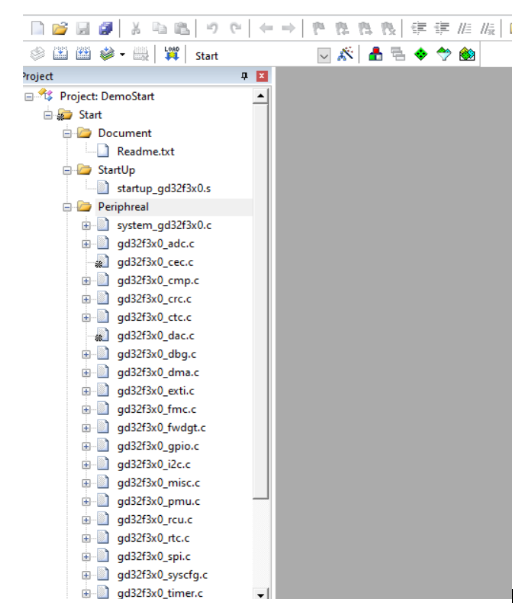
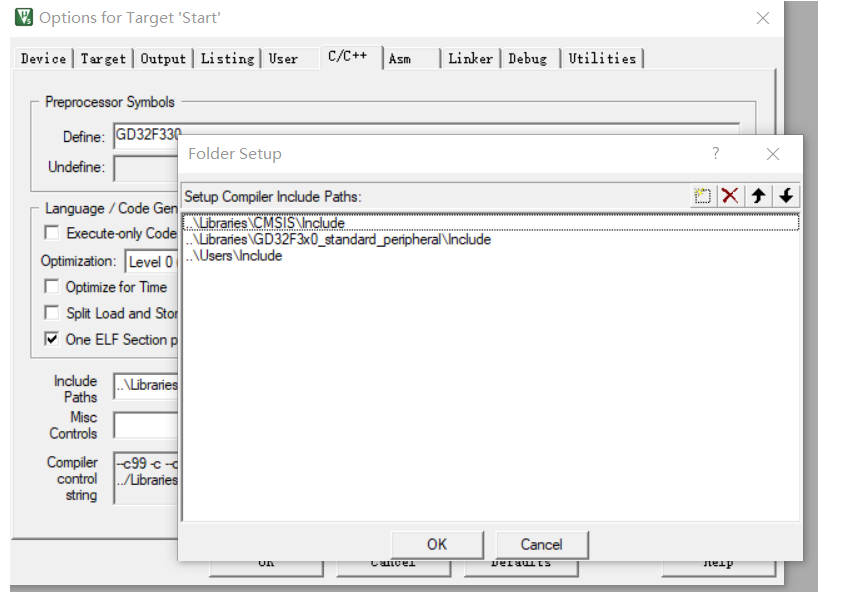
⑥点击魔术棒工具进行项目设置。在C/C++选项中添加include文件路径;
⑦点击Debug选项进行GDLink的设置,要选择CMSIS_DAP Debugger,并将Reset and Run打勾。
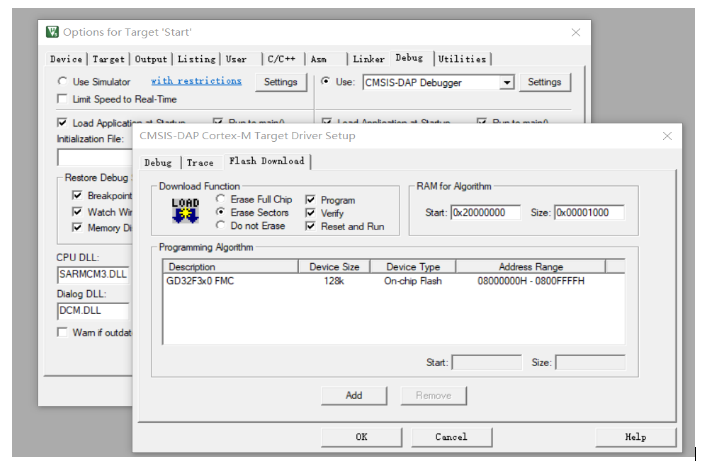
⑧这样整个项目的配置基本就结束了,可以在main.c文件中建立一个空循环,编译测试项目建立是否正确无误。
2、硬件映射
硬件映射的目的是按目前的硬件连接建立.h文件,如下图所示:
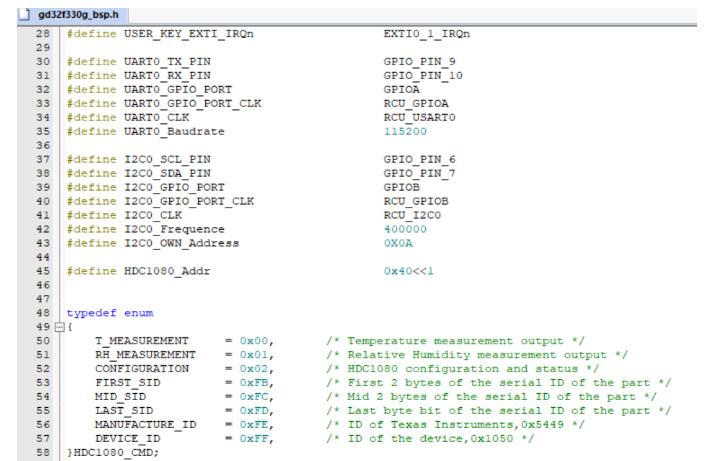
因此基于开发板I2C0采用的是PB6/PB7引脚,因为需要打印读出的值,UART0使用的是PA9/PA10引脚。
3、编写代码
①UART0初始化和printf函数重定向:
void UART_TypeInit(void)
{
    gpio_deinit(UART0_GPIO_PORT);
    usart_deinit(USART0);
    rcu_periph_clock_enable(UART0_GPIO_PORT_CLK);
    gpio_mode_set(UART0_GPIO_PORT,GPIO_MODE_AF,GPIO_PUPD_NONE,UART0_TX_PIN | UART0_RX_PIN);
    gpio_output_options_set(UART0_GPIO_PORT,GPIO_OTYPE_OD,GPIO_OSPEED_MAX,UART0_TX_PIN | UART0_RX_PIN);
    gpio_af_set(UART0_GPIO_PORT,GPIO_AF_1,UART0_TX_PIN | UART0_RX_PIN);

    rcu_periph_clock_enable(UART0_CLK);
    usart_baudrate_set(USART0,UART0_Baudrate);
    usart_parity_config(USART0,USART_PM_NONE);
    usart_word_length_set(USART0,USART_WL_8BIT);
    usart_stop_bit_set(USART0,USART_STB_1BIT);
    usart_enable(USART0);
    usart_transmit_config(USART0,USART_TRANSMIT_ENABLE);
    usart_receive_config(USART0,USART_RECEIVE_ENABLE);
}

/* retarget the C library printf function to the USART */
int fputc(int ch, FILE *f)
{
    usart_data_transmit(USART0, (uint8_t)ch);
    while(RESET == usart_flag_get(USART0,USART_FLAG_TBE));

    return ch;
}
②I2C0外设初始化:
void I2C0_TypeInit(void)
{
    gpio_deinit(I2C0_GPIO_PORT);
    i2c_deinit(I2C0);
    rcu_periph_clock_enable(I2C0_GPIO_PORT_CLK);
    gpio_mode_set(I2C0_GPIO_PORT,GPIO_MODE_AF,GPIO_PUPD_NONE,I2C0_SCL_PIN | I2C0_SDA_PIN);
    gpio_output_options_set(I2C0_GPIO_PORT,GPIO_OTYPE_OD,GPIO_OSPEED_MAX,I2C0_SCL_PIN | I2C0_SDA_PIN);
    gpio_af_set(I2C0_GPIO_PORT,GPIO_AF_1,I2C0_SCL_PIN | I2C0_SDA_PIN);

    rcu_periph_clock_enable(I2C0_CLK);
    i2c_clock_config(I2C0,I2C0_Frequence,I2C_DTCY_2);
    i2c_mode_addr_config(I2C0,I2C_I2CMODE_ENABLE,I2C_ADDFORMAT_7BITS,I2C0_OWN_Address);
    i2c_enable(I2C0);
    i2c_ack_config(I2C0,I2C_ACK_ENABLE);
}
③读寄存器操作:
void  I2C0_Register_Read(uint8_t* B_buffer, uint8_t read_address,uint16_t number_of_byte)
{
     /* wait until I2C bus is idle */
    while(i2c_flag_get(I2C0, I2C_FLAG_I2CBSY));

    if(2 == number_of_byte){
        i2c_ackpos_config(I2C0,I2C_ACKPOS_NEXT);
    }

    /* send a start condition to I2C bus */
    i2c_start_on_bus(I2C0);

    /* wait until SBSEND bit is set */
    while(!i2c_flag_get(I2C0, I2C_FLAG_SBSEND));

    /* send slave address to I2C bus */
    i2c_master_addressing(I2C0, HDC1080_Addr, I2C_TRANSMITTER);

    /* wait until ADDSEND bit is set */
    while(!i2c_flag_get(I2C0, I2C_FLAG_ADDSEND));

    /* clear the ADDSEND bit */
    i2c_flag_clear(I2C0, I2C_FLAG_ADDSEND);

    /* wait until the transmit data buffer is empty */
    while(SET != i2c_flag_get( I2C0 , I2C_FLAG_TBE));

    /* enable I2C0*/
    i2c_enable(I2C0);

    /* send the EEPROM's internal address to write to */
    i2c_data_transmit(I2C0, read_address);

    /* wait until BTC bit is set */
    while(!i2c_flag_get(I2C0, I2C_FLAG_BTC));

        delay_1ms(20);

    /* send a start condition to I2C bus */
    i2c_start_on_bus(I2C0);

    /* wait until SBSEND bit is set */
    while(!i2c_flag_get(I2C0, I2C_FLAG_SBSEND));

    /* send slave address to I2C bus */
    i2c_master_addressing(I2C0, HDC1080_Addr, I2C_RECEIVER);

    if(number_of_byte < 3){
        /* disable acknowledge */
        i2c_ack_config(I2C0,I2C_ACK_DISABLE);
    }

    /* wait until ADDSEND bit is set */
    while(!i2c_flag_get(I2C0, I2C_FLAG_ADDSEND));

    /* clear the ADDSEND bit */
    i2c_flag_clear(I2C0,I2C_FLAG_ADDSEND);

    if(1 == number_of_byte){
        /* send a stop condition to I2C bus */
        i2c_stop_on_bus(I2C0);
    }

    /* while there is data to be read */
    while(number_of_byte){
        if(3 == number_of_byte){
            /* wait until BTC bit is set */
            while(!i2c_flag_get(I2C0, I2C_FLAG_BTC));

            /* disable acknowledge */
            i2c_ack_config(I2C0,I2C_ACK_DISABLE);
        }
        if(2 == number_of_byte){
            /* wait until BTC bit is set */
            while(!i2c_flag_get(I2C0, I2C_FLAG_BTC));

            /* send a stop condition to I2C bus */
            i2c_stop_on_bus(I2C0);
        }

                delay_1ms(1);
        /* wait until the RBNE bit is set and clear it */
        if(i2c_flag_get(I2C0, I2C_FLAG_RBNE)){
            /* read a byte from the EEPROM */
            *B_buffer = i2c_data_receive(I2C0);

            /* point to the next location where the byte read will be saved */
            B_buffer++;

            /* decrement the read bytes counter */
            number_of_byte--;
        }
    }

    /* wait until the stop condition is finished */
    while(I2C_CTL0(I2C0)&0x0200);

    /* enable acknowledge */
    i2c_ack_config(I2C0, I2C_ACK_ENABLE);

    i2c_ackpos_config(I2C0, I2C_ACKPOS_CURRENT);
}
④写寄存器操作:
void I2C0_Byte_Write(uint8_t* P_buffer, uint8_t write_address)
{
    uint8_t i;
    /* wait until I2C bus is idle */
    while(i2c_flag_get(I2C0, I2C_FLAG_I2CBSY));

    /* send a start condition to I2C bus */
    i2c_start_on_bus(I2C0);

    /* wait until SBSEND bit is set */
    while(!i2c_flag_get(I2C0, I2C_FLAG_SBSEND));

    /* send slave address to I2C bus */
    i2c_master_addressing(I2C0, HDC1080_Addr, I2C_TRANSMITTER);

    /* wait until ADDSEND bit is set */
    while(!i2c_flag_get(I2C0, I2C_FLAG_ADDSEND));

    /* clear the ADDSEND bit */
    i2c_flag_clear(I2C0,I2C_FLAG_ADDSEND);

    /* wait until the transmit data buffer is empty */
    while(SET != i2c_flag_get(I2C0, I2C_FLAG_TBE));

    /* send the EEPROM's internal address to write to : only one byte address */
    i2c_data_transmit(I2C0, write_address);

    /* wait until BTC bit is set */
    while(!i2c_flag_get(I2C0, I2C_FLAG_BTC));

    for(i=0;i<2;i++)
    {

        /* send the byte to be written */
        i2c_data_transmit(I2C0, *(P_buffer+i));

        /* wait until BTC bit is set */
        while(!i2c_flag_get(I2C0, I2C_FLAG_TBE));

    }

    /* send a stop condition to I2C bus */
    i2c_stop_on_bus(I2C0);

    /* wait until the stop condition is finished */
    while(I2C_CTL0(I2C0)&0x0200);
}
⑤对HDC1080进行初始化并读取其ID:
void HDC1080_Init(void)
{
    uint8_t    IDBuffer[2]={0};
    uint8_t InitSetup[2]={0x90,0x00};
    uint32_t SID[3]={0},MID=0,DID=0;
    I2C0_Byte_Write(InitSetup,CONFIGURATION);
    delay_1ms(20);

    I2C0_Register_Read(IDBuffer,DEVICE_ID,2);
    DID = (((uint32_t)IDBuffer[0])<<8 | IDBuffer[1]);
    printf("The DeviceID is 0x%x\n\r",DID);
    I2C0_Register_Read(IDBuffer,MANUFACTURE_ID,2);
    MID = ((uint16_t) IDBuffer[0]<<8 | IDBuffer[1]);
    printf("The ManufactureID is 0x%x\n\r",MID);
    I2C0_Register_Read(IDBuffer,FIRST_SID,2);
    SID[0] = ((uint16_t) IDBuffer[0]<<8 | IDBuffer[1]);
    I2C0_Register_Read(IDBuffer,MID_SID,2);
    SID[1] = ((uint16_t) IDBuffer[0]<<8 | IDBuffer[1]);
    I2C0_Register_Read(IDBuffer,LAST_SID,2);
    SID[2] = ((uint16_t) IDBuffer[0]<<8 | IDBuffer[1]);
    printf("The First bytes of the serial ID of the part is 0x%x\n\r",SID[0]);
    printf("The MID bytes of the serial ID of the part is 0x%x\n\r",SID[1]);
    printf("The Last bytes of the serial ID of the part is 0x%x\n\r",SID[2]);
    printf("\n\r");
}
⑥读取温湿度值并转换成十进制显示:
void readSensor(void)
{
  //holds 2 bytes of data from I2C Line
  uint8_t Buffer_Byte[2];

  //holds the total contents of the temp register
  uint16_t temp,hum;

  //holds the total contents of the humidity register
  double temperature=0,humidity=0 ;

    I2C0_Register_Read(Buffer_Byte,T_MEASUREMENT,2);
    temp = (((uint32_t)Buffer_Byte[0])<<8 | Buffer_Byte[1]);
    temperature = (double)(temp)/(65536)*165-40;
    printf("The temperature is %.2f\n\r",temperature);

    I2C0_Register_Read(Buffer_Byte,RH_MEASUREMENT,2);
    hum = (((uint32_t)Buffer_Byte[0])<<8 | Buffer_Byte[1]);
    humidity = (double)(hum)/(65536)*100;
    printf("The humidity is %.2f%%\n\r",humidity);
}
⑦main函数:
/*!
    \brief      main function
    \param[in]  none
    \param[out] none
    \retval     none
*/
int main(void)
{
    /* configure periphreal */
  systick_Init();
    LED_TypeInit();
//    NVIC_config();
//    KEY_EXTI_TypeInit();
    UART_TypeInit();
    I2C0_TypeInit();
    printf("**********DEMO START**********\n\r");
    printf("******************************\n\r");
    HDC1080_Init();

    while(1)
    {
        readSensor();
        delay_1ms(1000);
    }
}
4、编译下载
①Build项目文件:
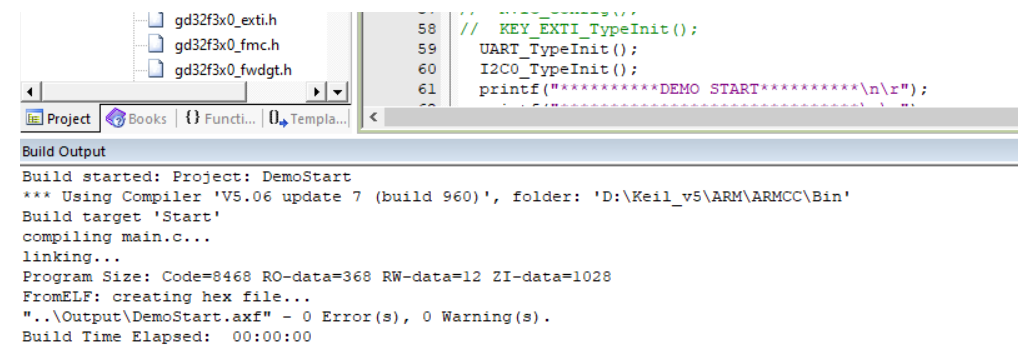
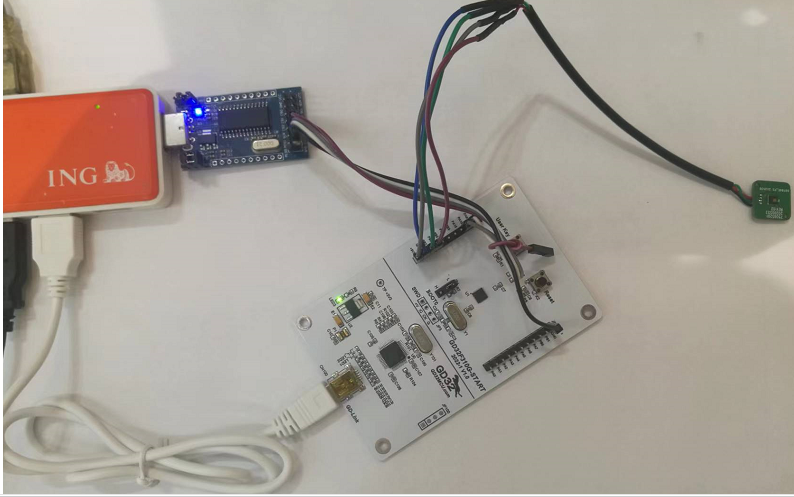
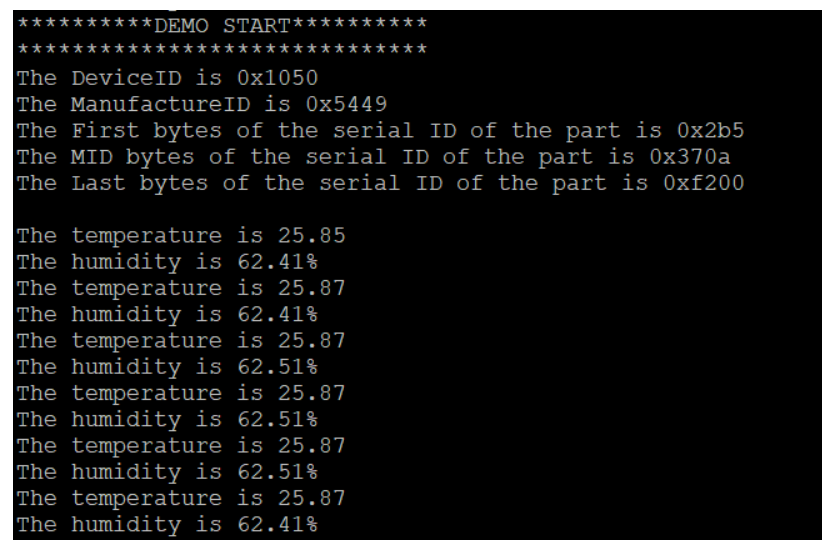
②没有错误,直接下载到开发板中,可以打开串口看到读出温湿度每隔1S读一次并打印出来,与环境温度计比较取值还是比较准确的。
5、试用总结
GD32F310G8芯片采用4x4 QFN28封装,结构可以设计相当紧凑,软件开发资源也是很丰富,虽然功能不算特别强大,但主流的外设基本都有囊括,在目前国产替代的大环境之下,应用前景还是相当广泛的。
-
HDC1080的湿度和正常湿度计负偏差10左右,为什么?2024-11-29 758
-
HDC1080损坏的可能原因有哪些?2024-12-02 417
-
HDC1080的湿度测量非常不准确,尤其是在高湿度的情况下,怎么解决?2024-12-03 459
-
使用HDC1080测温湿度遇到的疑问求解答2024-12-09 498
-
hdc1080可以正常读取设备ID,但是当读取温湿度值时总是0,为什么?如何解决?2024-12-12 750
-
HDC1080不能够测量温度和湿度是什么原因呢?2024-12-18 284
-
常见的温湿度传感器类型?2025-06-24 2600
-
hdc1080读取温湿度值为02019-03-05 4903
-
MSP430FR2433无法读取HDC10802021-07-02 4598
-
HDC1080温湿度传感器的使用步骤2021-11-25 2032
-
详解HDC1080温湿度传感器2022-01-18 3009
-
HDC1080温湿度驱动IIC/I2C/STM32的过程是怎样的?2022-02-28 1612
-
利用GD32F310的I2C0实现对HDC1080的初始化及读取环境温湿度2022-11-08 2323
-
HDC1080 HDC1080 具有温度传感器的低功耗、高精度数字湿度传感器2018-09-21 2154
-
HDC1080传感器使用2021-11-16 883
全部0条评论

快来发表一下你的评论吧 !

