

使用实时时钟IC DS1307制作精确时钟的方法
描述
如何使用实时时钟 IC DS1307 制作准确的时钟。时间将显示在液晶显示屏上。
要求
运行 Arduino 1.6.5 的计算机
阿杜诺
跳线
面包板
零件清单中的零件
您可以用 ATMEL 的另一个 IC 替换 Arduino,但要确保它具有足够数量的输入和输出引脚以及 I 2 C 功能。我正在使用 ATMega168A-PU。如果你这样做,你将需要一个程序员。我有 AVR MKII ISP 编程器。
建议读者熟悉面包板,在Arduino环境下编程,对C编程语言有一定的了解。下面的两个程序不需要额外的解释。
介绍
微控制器如何跟踪时间和日期?普通的微控制器有一个定时器功能,上电时从0(零)开始,然后开始计数。在 Arduino 世界中,我们可以使用 millis() 函数来重置自上电以来经过的毫秒数。当您断开并重新连接电源时,它会重新开始。这在时钟和日期方面不太方便。
这就是实时时钟或 RTC 芯片派上用场的地方。该 IC 带有 3v 纽扣电池或另一个 3v 电源,可跟踪时间和日期。时钟/日历提供秒、分钟、小时、星期、日期、月份和年份信息。IC 以 30/31 天和闰年校正月份。通过 I 2 C 总线进行通信。I 2 C 总线将不在这里讨论。
如果主电路的 Vcc 低于 Vbat,RTC 会自动切换到低功耗电池备份模式。备用电池通常是连接到 PIN 3 和 GND 的 3v 纽扣电池。通过这种方式,IC 仍会跟踪时间和日期,当主电路通电时,微控制器会获取当前时间和日期。
在这个项目中,我们使用的是DS1307。在该 IC 上,引脚 7 是 SQW/OUT 引脚。您可以使用此引脚来闪烁 LED,或为微控制器计时。我们将两者都做。数据表中的下图有助于我们了解 SQW/OUT。

此表可帮助您了解频率:
频率BIT7 & BIT6 & BIT5BIT4第 3 位和第 2 位BIT1位0
1赫兹 01 0 0 0
4.096Hz 01 0 0 1
8.192Hz 01 0 1 0
32.768Hz 01 0 1 1
如果将 LED 和电阻连接到 PIN 7,并希望它以 1Hz 频率闪烁,则将 0b00010000 写入控制寄存器内存地址。如果你想要 4.096 Hz,你会写 0b000100001。现在您需要一台示波器来查看脉冲,因为 LED 闪烁得如此之快,以至于看起来它一直亮着。我们使用的是 1Hz。
硬件
这是我们想要的框图。
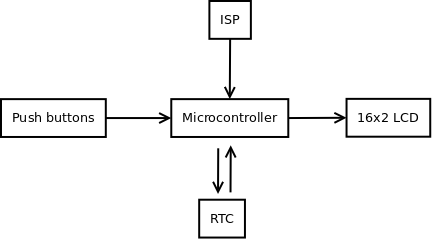
我们想要:
ISP(在系统编程中)对微控制器进行编程
按钮设置时间和日期
微控制器通过 I 2 C与 RTC 通信
在 LCD 上显示时间和日期
示意图:
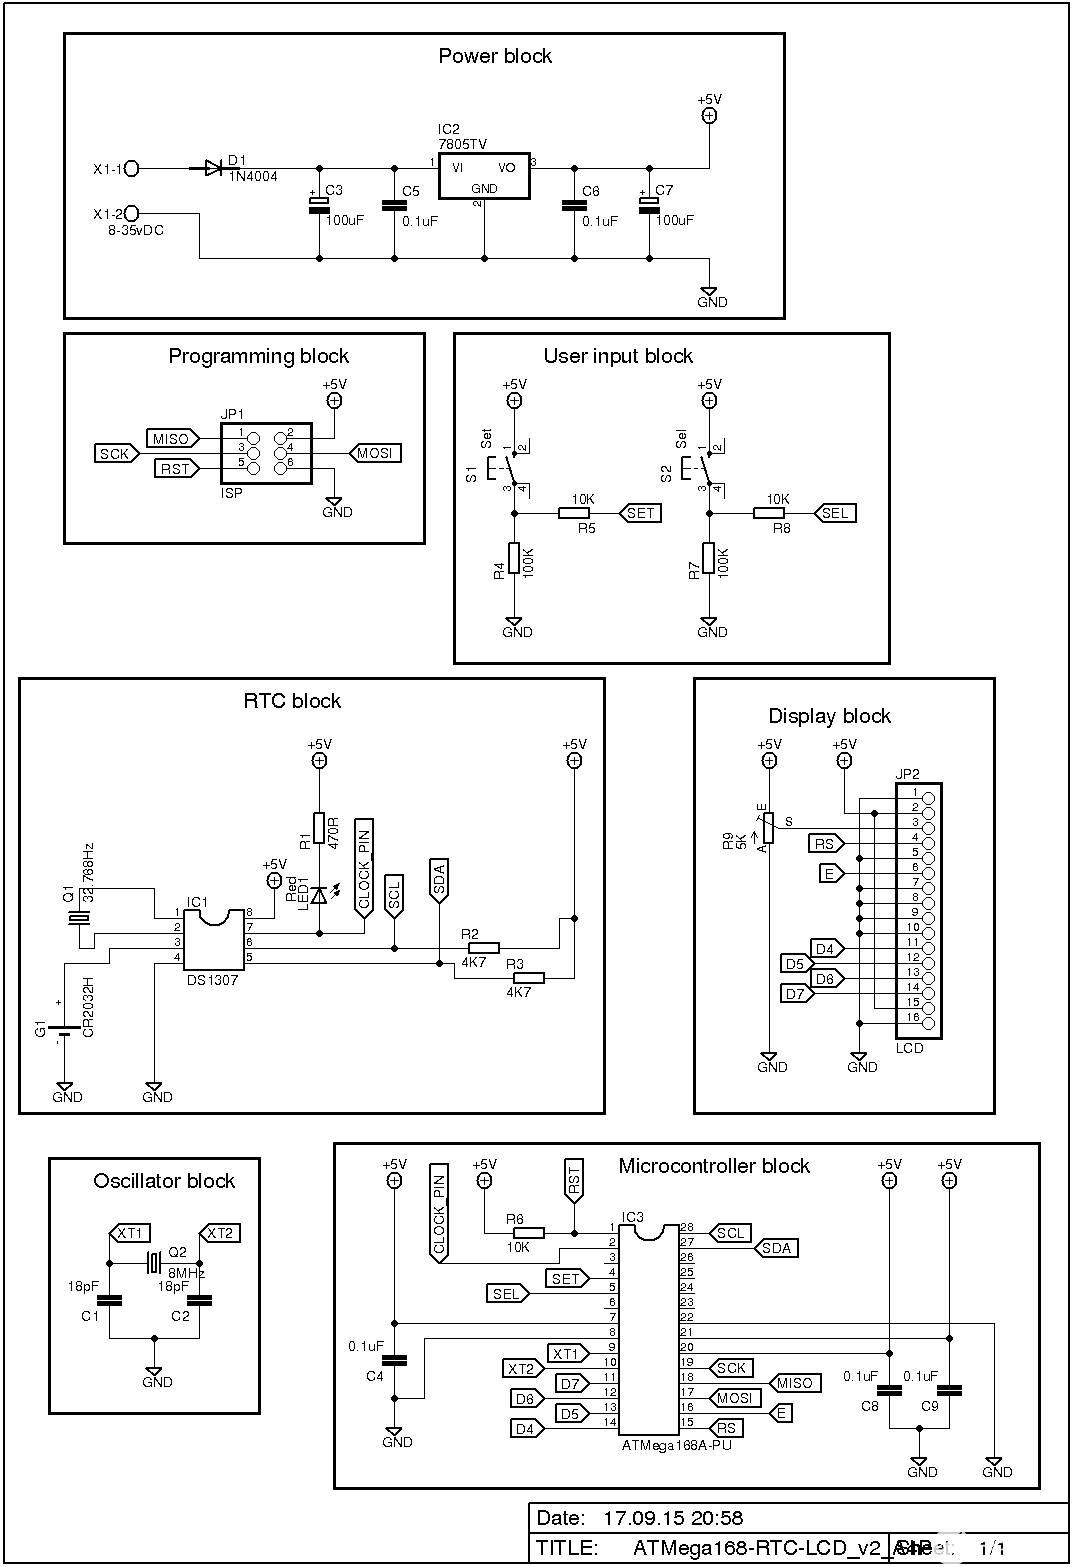
点击图片为全尺寸。
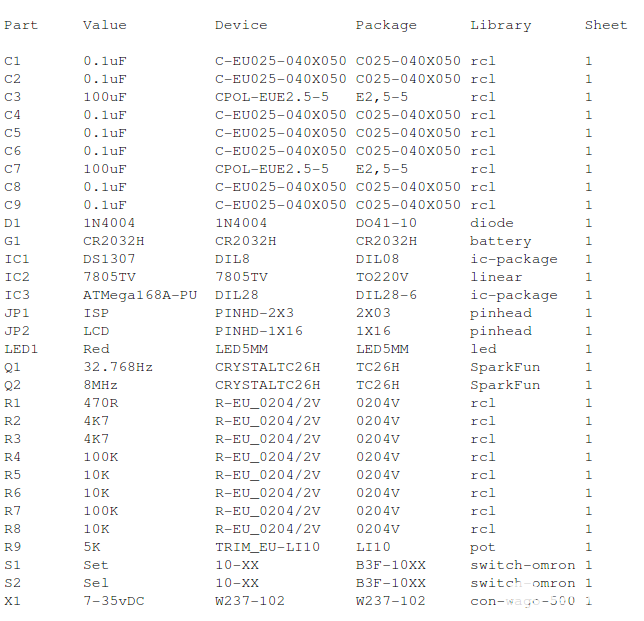
零件清单
这是 Eagle 的截图:
软件
我们将在本指南中使用两种不同的草图:一种将时间和日期写入 RTC,另一种从 RTC 读取时间和日期。我已经这样做了,因此您将对正在发生的事情有更好的了解。我们将为这两个程序使用与上述相同的电路。
首先,我们将时间和日期写入 RTC,这就像在手表上设置时间一样。
我们使用两个开关。一种是增加小时、分钟、日期、月、年和星期几,另一种是在它们之间进行选择。该应用程序不会从任何关键传感器读取值,因此我们使用中断来检查是否按下了开关并处理开关弹跳。有关开关弹跳的更多信息, 请阅读此。
以下代码将设置值并将它们写入 RTC:
// Include header files
#include
#include

// LCD pin definitions
#define RS 9
#define E 10
#define D4 8
#define D5 7
#define D6 6
#define D7 5

LiquidCrystal lcd(RS, E, D4, D5, D6, D7);

// Interrupt 0 is hardware pin 4 (digital pin 2)
int btnSet = 0;

// Interrupt 1 is hardware pin 5 (digital pin 3)
int btnSel = 1;

// Interrupt state
int togBtnSet = false;
int togBtnSel = false;

// Time and date variables
int tmpHour = 0;
int tmpMinute = 0;
int tmpDate = 0;
int tmpMonth = 0;
int tmpYear = 0;
int tmpDay = 0;
int tmpSecond = 0;

int counterVal = 0;

// Variable to keep track of where we are in the "menu"
int myMenu[6]; // 0=Hour, 1=Minutes, 2=date, 3=MOnth, 4=Year, 5=DOW
int menuCounter = 0;

// A array of the weekday
char* days[] = { "NA", "Mon", "Tue", "Wed", "Thu", "Fre", "Sat", "Sun" };

void setup() {
  // Interrupt declaration, execute increaseValue/nextItem function
  // when btnXXX is RISING
  attachInterrupt(btnSet, increaseValue, RISING);
  attachInterrupt(btnSel, nextItem, RISING);
  Wire.begin();
  lcd.begin(16,2);
  showWelcome();
}

// Interrupt function
void increaseValue()
{
  // Variables
  static unsigned long lastInterruptTime = 0;
  // Making a timestamp
  unsigned long interruptTime = millis();

  // If timestamp - lastInterruptTime is greater than 200
  if (interruptTime - lastInterruptTime > 200)
  {
    // Toggle the variable
    togBtnSet = !togBtnSet;
    // Increase the counterVal by 1
    counterVal++;
  }
  // Setting lastInterruptTime equal to the timestamp
  // so we know we moved on
  lastInterruptTime = interruptTime;
}

// Next menuItem Interrupt function
void nextItem()
{
  static unsigned long lastInterruptTime = 0;
  unsigned long interruptTime = millis();

  if (interruptTime - lastInterruptTime > 200)
  {
    togBtnSel = !togBtnSel;
    // Increase the menu counter so we move to next item
    menuCounter++;
    // Placing the counterVal in the menucounters array position
    myMenu[menuCounter] = counterVal;
    // Reset counterVal, now we start at 0 on the next menuItem
    counterVal = 0;
  }
  lastInterruptTime = interruptTime;
}

// Function that convert decimal numbers to binary
byte decToBCD(byte val)
{
  return ((val/10*16) + (val));
}

// Short welcome message, now we know everything is OK
void showWelcome()
{
  lcd.setCursor(2,0);
  lcd.print("Hello world.");
  lcd.setCursor(3,1);
  lcd.print("I'm alive.");
  delay(500);
  lcd.clear();
}

// Funcion to set the hour
void setHour()
{
  lcd.setCursor(0,0);
  lcd.print("Set hour.       ");
 // Checks if interrupt has occured = button pressed
 if (togBtnSet)
 {
  // Update array value with counterVal
  myMenu[menuCounter] = counterVal;
  lcd.setCursor(7,1);
  // Print the new value
  lcd.print(myMenu[menuCounter]); lcd.print("  ");
 }
 else
 {
  // Update array value with counterVal
  myMenu[menuCounter] = counterVal;
  lcd.setCursor(7,1);
  // Print the new value
  lcd.print(myMenu[menuCounter]); lcd.print("  ");
 }
}

// Function to set minutes
void setMinute()
{
  lcd.setCursor(0,0);
  lcd.print("Set minute.     ");
  if (togBtnSet)
  {
  myMenu[menuCounter] = counterVal;
    lcd.setCursor(7,1);
    lcd.print(myMenu[menuCounter]); lcd.print("  ");
  }
  else
  {
  myMenu[menuCounter] = counterVal;
    lcd.setCursor(7,1);
    lcd.print(myMenu[menuCounter]); lcd.print("  ");
  }
}

// Function to set date
void setDate()
{
  lcd.setCursor(0,0);
  lcd.print("Set date.       ");
  if (togBtnSet)
  {
    myMenu[menuCounter] = counterVal;
    lcd.setCursor(7,1);
    lcd.print(myMenu[menuCounter]); lcd.print("  ");
  }
  else
  {
  myMenu[menuCounter] = counterVal;
    lcd.setCursor(7,1);
    lcd.print(myMenu[menuCounter]); lcd.print("  ");
  }
}

// Function to set month
void setMonth()
{
  lcd.setCursor(0,0);
  lcd.print("Set month.      ");
  if (togBtnSet)
  {
  myMenu[menuCounter] = counterVal;
    lcd.setCursor(7,1);
    lcd.print(myMenu[menuCounter]); lcd.print("  ");
  }
  else
  {
  myMenu[menuCounter] = counterVal;
    lcd.setCursor(7,1);
    lcd.print(myMenu[menuCounter]); lcd.print("  ");
  }
}

// Function to set year
void setYear()
{
  lcd.setCursor(0,0);
  lcd.print("Set year.       ");
  if (togBtnSet)
  {
  myMenu[menuCounter] = counterVal;
    lcd.setCursor(7,1);
    lcd.print(myMenu[menuCounter]); lcd.print("  ");
  }
  else
  {
  myMenu[menuCounter] = counterVal;
    lcd.setCursor(7,1);
    lcd.print(myMenu[menuCounter]); lcd.print("  ");
  }
}

// Function to set the day of week
void setDOW()
{
  lcd.setCursor(0,0);
  lcd.print("Set day (1=mon).");
  if (togBtnSet)
  {
  myMenu[menuCounter] = counterVal;
    lcd.setCursor(7,1);
    lcd.print(myMenu[menuCounter]); lcd.print("  ");
  }
  else
  {
  myMenu[menuCounter] = counterVal;
    lcd.setCursor(7,1);
    lcd.print(myMenu[menuCounter]); lcd.print("  ");
  }
}

// Write the data to the RTC
void writeRTC()
{
  Wire.beginTransmission(0x68);
  Wire.write(0); // Start address
  Wire.write(0x00); // seconds
  Wire.write(decToBCD(myMenu[1])); // convert tmpMinutes to BCD and write them
  Wire.write(decToBCD(myMenu[0]));  // convert tmpHour to BCD and write them
  Wire.write(decToBCD(myMenu[5]));  // convert tmpDay to BCD and write them
  Wire.write(decToBCD(myMenu[2]));  // convert tmpDate to BCD and write them
  Wire.write(decToBCD(myMenu[3]));  // convert tmpMonth to BCD and write them
  Wire.write(decToBCD(myMenu[4]));  // convert tmpYear to BCD and write them
  Wire.write(0b00010000); // enable 1Hz Square wave on PIN7
  Wire.endTransmission(); // close the transmission
}

// Show the time
// You need to use the other program to see the RTC is working
void showTime()
{
  lcd.setCursor(0,0);
    lcd.print("    ");
    lcd.print(myMenu[0]); lcd.print(":"); // hour
    lcd.print(myMenu[1]); lcd.print(":"); lcd.print("00       "); // minute
  lcd.setCursor(3,1);
    lcd.print(days[myMenu[5]]); lcd.print(" "); // DOW
    lcd.print(myMenu[2]); lcd.print("."); // date
    lcd.print(myMenu[3]); lcd.print("."); // month
    lcd.print(myMenu[4]); lcd.print("   "); // year
// Call the writeRTC function
writeRTC();
}

void loop()
{
  if (menuCounter == 0)
  {
    setHour();
  }
  if (menuCounter == 1)
  {
    setMinute();
  }
  if (menuCounter == 2)
  {
    setDate();
  }
  if (menuCounter == 3)
  {
    setMonth();
  }
  if (menuCounter == 4)
  {
    setYear();
  }
  if (menuCounter == 5)
  {
    setDOW();
  }
  if (menuCounter == 6)
  {
    showTime();
  }
}
该程序以简短的欢迎信息开始。此消息告诉您已接通电源,LCD 正在工作,并且程序已开始运行。
要从 RTC 读取并显示时间和日期,您必须使用以下程序对微控制器进行编程。程序从 RTC 读取时间和日期值并将它们显示在 LCD 上。
// Include header files
#include
#include

// LCD pin definitions
#define RS 9
#define E 10
#define D4 8
#define D5 7
#define D6 6
#define D7 5

LiquidCrystal lcd(RS, E, D4, D5, D6, D7);

// Pin that will receive clock pulse from RTC
int clockPin = 0;

// Time and date vaiables
byte second;
byte minute;
byte hour;
byte day;
byte date;
byte month;
byte year;

// A array of the weekday
char* days[] = { "NA", "Mon", "Tue", "Wed", "Thu", "Fre", "Sat", "Sun" };

// Function run once
void setup() {
  pinMode(clockPin, INPUT); pinMode(clockPin, LOW);
  Wire.begin();
  lcd.begin(16,2);
  showWelcome();
}

// Nice welcome message, then we know LCD is OK
void showWelcome()
{
  lcd.setCursor(2,0);
  lcd.print("Hello world.");
  lcd.setCursor(3,1);
  lcd.print("I'm alive.");
  delay(500);
  lcd.clear();
}

// Doing this forever
void loop() {
  // While clockPin is high
  while (digitalRead(clockPin))
  {
    // start the I2C transmission, at address 0x68
    Wire.beginTransmission(0x68);

    // Start at address 0
    Wire.write(0);

    // Close transmission
    Wire.endTransmission();

    // Start to read the 7 binary data from 0x68
    Wire.requestFrom(0x68, 7);
    second = Wire.read();
    minute = Wire.read();
    hour = Wire.read();
    day = Wire.read();
    date = Wire.read();
    month = Wire.read();
    year = Wire.read();

    // Formatting and displaying time
    lcd.setCursor(4,0);
      if (hour < 10) lcd.print("0");
        lcd.print(hour, HEX); lcd.print(":");
      if (minute < 10) lcd.print("0");
        lcd.print(minute, HEX); lcd.print(":");
      if (second < 10) lcd.print("0");
        lcd.print(second, HEX);
    lcd.setCursor(2,1);

    // Formatting and displaying date
    lcd.print(days[day]); lcd.print(" ");
      if (date < 10) lcd.print("0");
        lcd.print(date, HEX); lcd.print(".");
      if (month < 10) lcd.print("0");
        lcd.print(month, HEX); lcd.print(".");
        lcd.print(year, HEX);
    } // end while
}
结论
在本文中,我们研究了 Maxim Integrated 的小型 DS1307 RTC IC。我们制作了一个程序来设置时间和日期,我们制作了另一个程序来读取时间和日期。为了检查是否按下了开关,我们使用了中断。中断还负责开关弹跳。
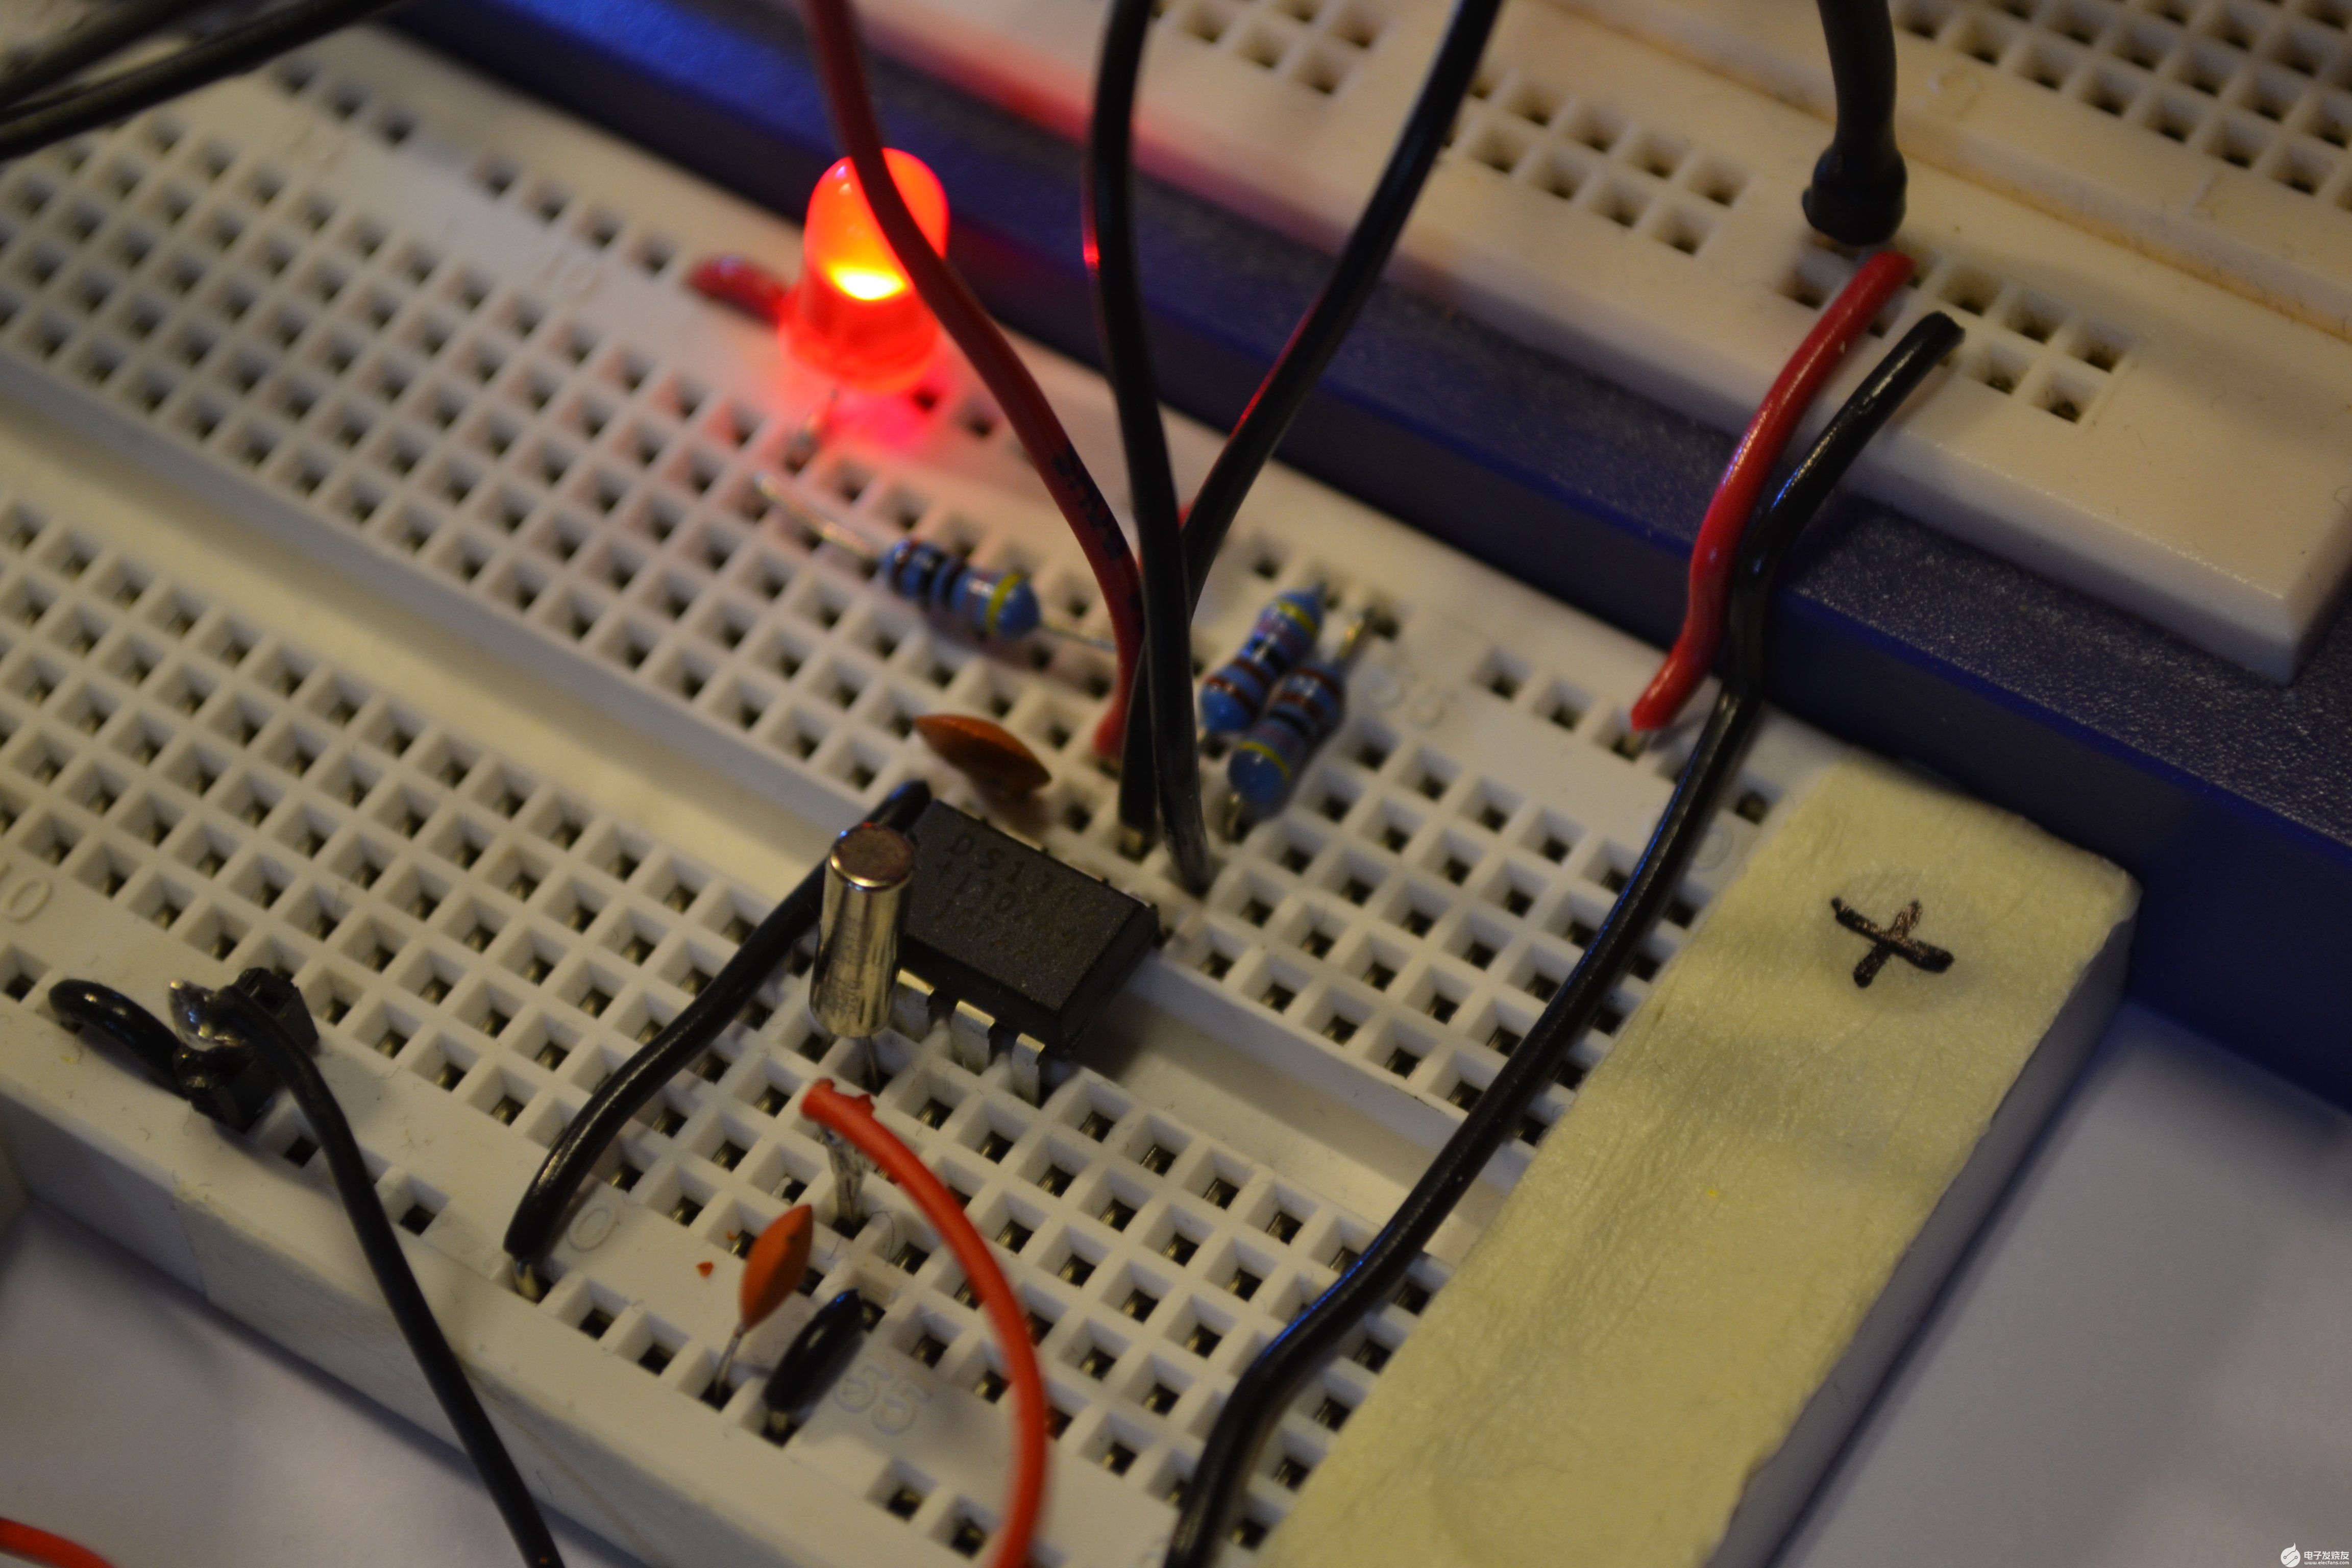
图片

点击图片为全尺寸。
-
Adafruit DS1307实时时钟模块:实用之选2026-05-11 483
-
DS1307 64 x 8、串行、I2C实时时钟技术手册2025-02-28 1572
-
Arduino篇—实时时钟2023-11-01 4031
-
从旧风扇和DS1307 RTC创建POV时钟2022-11-23 564
-
Arduino DS1307 RTC时钟2022-11-22 1062
-
DS1307 时钟/定时 - 实时时钟2022-11-21 428
-
带有ATtiny85/DS1307的时钟开发板2022-08-19 1547
-
dfrobotI2C DS1307 RTC实时时钟模块介绍2019-12-07 6202
-
DS1307串行实时时钟和AT24C02串行CMOS E2PROM电路原理图免费下载2019-03-22 2408
-
基于ARM和DS1307的实时时钟系统设计2018-01-26 5839
-
ds1302实时时钟2009-10-09 4076
-
I2C总线接口时钟芯片DS1307在坦克半主动悬挂电控单元中2009-04-24 1064
-
实时时钟电路DS1302的原理及应用2006-01-01 6147
全部0条评论

快来发表一下你的评论吧 !
