

工业级智能停车系统设计方案
今日头条
描述
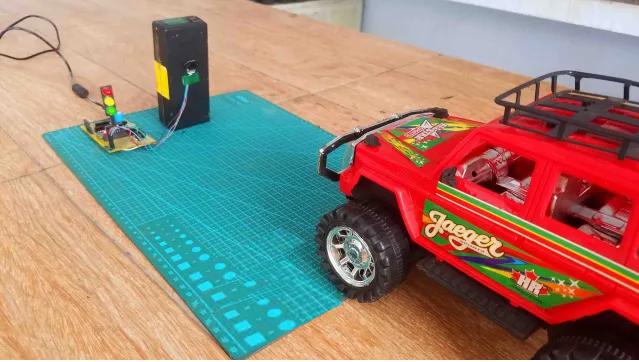
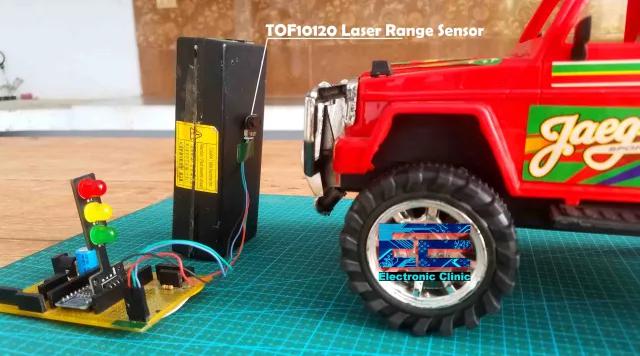
本项目是一个采用Traffic LED模块、Arduino Uno/Nano,以及TOF10120飞行时间传感器的工业级智能停车系统。项目采用一块切边的垫子作为停车区,先测量垫子长度,再根据这个数值定义不同距离的代码,一个接一个的点亮(ON)和熄灭(OFF)这些LEDs,以帮助司机安全停车:
当汽车即将进入停车区域时,绿色LED点亮。然后,黄色LED点亮,提醒司机即将接近目标停车位置,这表明汽车车身已经有一半位于停车区域。
当红色LED开始闪烁时,警告司机缓慢行驶并留意,到达停车点后关闭汽车,或者继续移动直到红色LED停止闪烁。
作为一个用以理解停车系统的原型,项目使用的均为廉价元件。读者可对电路进行升级,如改变代码中的测量距离数值,甚至替换电路中的传感器等,使项目更加实用。
ToF10120飞行时间传感器
tof10120激光模块最大的优势在于测距远、操作简单,程序中仅仅需要通过单片机给模块串口发送命令字符串,就可以向单片机发送回距离数据。如果发送自动测距的字符串命令,则模块会按照一定频率自动回送数据,相关物理量都可以通过命令字符串设置。传感器仅需要串口就可以实现。
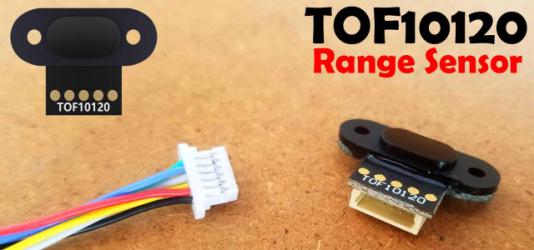
TOF10120基于Sharp低成本标准CMOS工艺和SPAD技术,可为自动对焦(AF)提供精确、可重复的长距离测量,测量结果不受物体反射的影响。主要特点包括:
・采用940nm激光;
・小型陶瓷封装(20×13.2×2.0mm);
・ 可在室内测量长达1.8m长度,精度5%;
・测量距离不受姆堡反射的影响;
・先进广促俄串扰补偿技术;
・30ms高速测量;
・单电源供电;
・Txd接口用于设备控制和数据传送;
・无铅,符合RoHS指令。
TOF10120典型测距范围为100-1800mm,电源电压3-5v,消耗电流35mA,兼容Arduino、ESP8266、ESP32等5V和3.3V控制板,适合-20°C to +70°C等室内外环境。
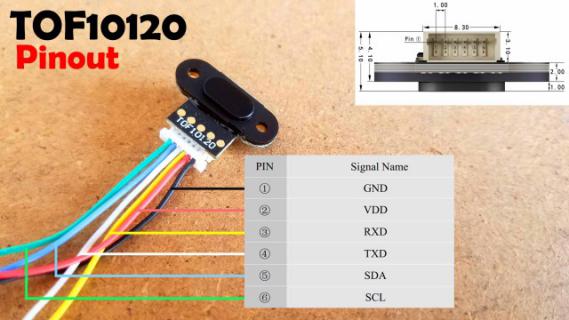
TOF10120支持UART、I2C通讯,1#引脚、2#引脚、3#引脚、4#引脚、5#引脚、6#引脚分别为GND、VDD、RXD、TXD、SDA、SCL。在六个引脚中,本项目只使用了其中的GND, VDD, SDA, and SCL四个脚。
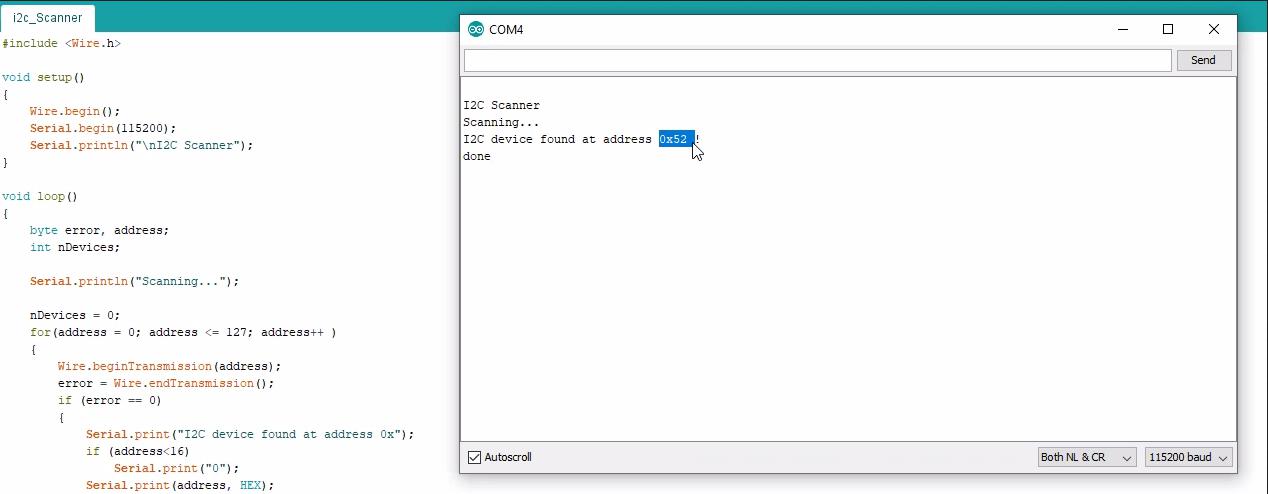
根据数据表,TOF10120的I2C地址为0xA4,但寻址采用高7bit即0x52,这相当于82。
交通LED模块
该模块为司机提供指示,本身带有限流电阻,无需额外连接电阻器。
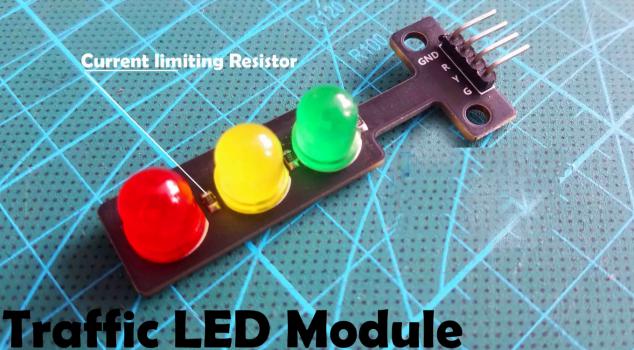
模块共有4个公头,GND引脚链接与控制器的GND引脚,或数字引脚。这样,5v信号将熄灭模块,GND or LOW电平信号将启动模块。其中,R标号代表红色LED, Y标号代表黄色LED,G标号代表绿色LED,高电平信号时LED点亮。
连接电路
首先,按照电路图,5V电源由LM7805三端稳压器提供给Arduino Nano,后面需要连接一个470uF的去耦铝电解电容器。
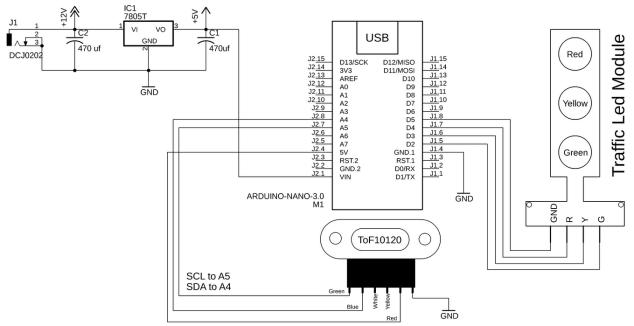
其中,5v稳压连接到Arduino Nano的VIN引脚,TOF10120激光测距模块的SCL、SDA引脚分别连接于Arduino板子的A5、A4引脚,电源线链接于Arduino板子的5V和接地引脚。
信号灯LED模块的GND引脚链接到Arduino板子的5号引脚,红色LED链接到Arduino的4号引脚,黄色LED连接到3号引脚,绿色LED连接到2号引脚。
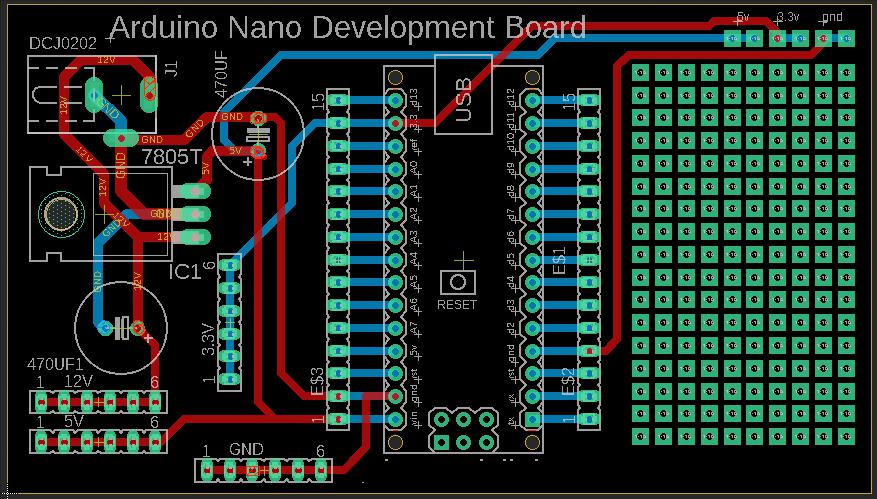
PCB设计
接下来,设计Arduino Nano PCB开发板,母头用于3.3V、12V、5V和接地,左侧作为Vero板用来焊接其他电子元件,Arduino Nano的左右两侧都设计母头来连接跳线,也可连接传感器和电子元器件,例如TOF10120传感器和OLED显示模块的I2C引脚。
最后,将Traffic LED模块连接于Arduino板子的5、4、3、2引脚,再用公头连来连接TOF10120传感器的GND、Vdd、SCL、SDA引线。
做完上述连接后,就使用下述代码进行I2C寻址:
#include
void setup()
{
Wire.begin();
Serial.begin(115200);
Serial.println("\nI2C Scanner");
}
void loop()
{
byte error, address;
int nDevices;
Serial.println("Scanning...");
nDevices = 0;
for(address = 0; address <= 127; address++ )
{
Wire.beginTransmission(address);
error = Wire.endTransmission();
if (error == 0)
{
Serial.print("I2C device found at address 0x");
if (address<16)
Serial.print("0");
Serial.print(address, HEX);
Serial.println(" !");
nDevices++;
}
else if (error==4)
{
Serial.print("Unknow error at address 0x");
if (address<16)
Serial.print("0");
Serial.println(address,HEX);
}
}
if (nDevices == 0)
Serial.println("No I2C devices found\n");
else
Serial.println("done\n");
delay(30000);
}
上述代码上传完成后,打开serial monitor就会看到TOF10120激光传感器的I2C地址。按照数据手册,TOF10120模块的I2C地址为0xA4,由于其寻址采用了高7 bits,这样就变成了0x52,相当于82。
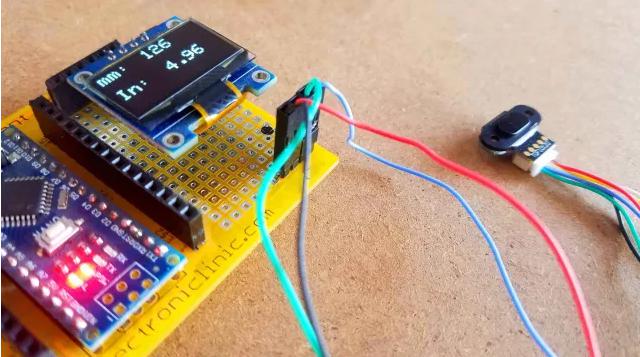
至此,大家已经知道了i2c地址,可以把TOF10120测距传感器模块固定到板子上了。该传感器须固定到适当的高度,以检测车辆和距离。这当然不难,你可以竖一个底部带有螺丝的胶块,我为了方便站了一个充电器的外壳,只要高度满足即可。
下面是本项目的代码,我是按照裁剪的垫子大小来写的,这个尺寸正好就是停车区域的大小。
/* Smart Car Parking system Code
* In this project the TOF10120 Laser Distance Sensor is used for measuring the distance.
*/
#include
// Traffic LED Module interfacing with Arduino Uno or Arduino Nano
int GND_PIN = 5;
int RED_PIN = 4;
int YELLOW_PIN = 3;
int GREEN_PIN = 2;
unsigned char ok_flag;
unsigned char fail_flag;
unsigned short lenth_val = 0;
unsigned char i2c_rx_buf[16];
unsigned char dirsend_flag=0;
int x_mm; // distance in millimeters
float y_inches; // distance in inches
void setup() {
Wire.begin();
Serial.begin(9600,SERIAL_8N1);
printf_begin();
pinMode(GND_PIN, OUTPUT);
pinMode(RED_PIN, OUTPUT);
pinMode(YELLOW_PIN, OUTPUT);
pinMode(GREEN_PIN, OUTPUT);
digitalWrite(GND_PIN, LOW);
digitalWrite(RED_PIN, LOW);
digitalWrite(YELLOW_PIN, LOW);
digitalWrite(GREEN_PIN, LOW);
}
void loop() {
x_mm = ReadDistance();
// Serial.print(x_mm);
// Serial.println(" mm");
// You can convert millimeters to inches in one of two ways: divide the number of millimeters by 25.4, or multiply the number of millimeters by 0.0394
y_inches = x_mm * 0.0394;
// Serial.print(y_inches);
// Serial.println(" inches");
if ( (y_inches > 0) && (y_inches <= 3) )
{
digitalWrite(RED_PIN, HIGH);
digitalWrite(YELLOW_PIN, LOW);
digitalWrite(GREEN_PIN, LOW);
}
if ( (y_inches > 3) && (y_inches <= 6) )
{
digitalWrite(RED_PIN, HIGH);
delay(200);
digitalWrite(RED_PIN, LOW);
delay(200);
digitalWrite(YELLOW_PIN, LOW);
digitalWrite(GREEN_PIN, LOW);
}
if ( (y_inches > 6) && (y_inches <= 10) )
{
digitalWrite(RED_PIN, LOW);
digitalWrite(YELLOW_PIN, HIGH);
digitalWrite(GREEN_PIN, LOW);
}
if ( (y_inches > 10) && (y_inches <= 20) )
{
digitalWrite(RED_PIN, LOW);
digitalWrite(YELLOW_PIN, LOW);
digitalWrite(GREEN_PIN, HIGH);
}
if ( y_inches > 20 )
{
digitalWrite(RED_PIN, LOW);
digitalWrite(YELLOW_PIN, LOW);
digitalWrite(GREEN_PIN, LOW);
}
if ( y_inches < 0 )
{
digitalWrite(RED_PIN, LOW);
digitalWrite(YELLOW_PIN, LOW);
digitalWrite(GREEN_PIN, LOW);
}
}
int serial_putc( char c, struct __file * )
{
Serial.write( c );
return c;
}
void printf_begin(void)
{
fdevopen( &serial_putc, 0 );
}
void SensorRead(unsigned char addr,unsigned char* datbuf,unsigned char cnt)
{
unsigned short result=0;
// step 1: instruct sensor to read echoes
Wire.beginTransmission(82); // transmit to device #82 (0x52), you can also find this address using the i2c_scanner code, which is available on electroniclinic.com
// the address specified in the datasheet is 164 (0xa4)
// but i2c adressing uses the high 7 bits so it's 82
Wire.write(byte(addr)); // sets distance data address (addr)
Wire.endTransmission(); // stop transmitting
// step 2: wait for readings to happen
delay(1); // datasheet suggests at least 30uS
// step 3: request reading from sensor
Wire.requestFrom(82, cnt); // request cnt bytes from slave device #82 (0x52)
// step 5: receive reading from sensor
if (cnt <= Wire.available()) { // if two bytes were received
*datbuf++ = Wire.read(); // receive high byte (overwrites previous reading)
*datbuf++ = Wire.read(); // receive low byte as lower 8 bits
}
}
int ReadDistance(){
SensorRead(0x00,i2c_rx_buf,2);
lenth_val=i2c_rx_buf[0];
lenth_val=lenth_val<<8;
lenth_val|=i2c_rx_buf[1];
delay(300);
return lenth_val;
}
上面是编程代码,前提是已经下载了 Wire.h 库文件,代码中的距离单位为英寸,欢迎实践和分享。
-
停车场智能管理系统方案2009-01-07 6514
-
设计方案:基于单片机的交流LED智能照明系统设计2012-07-31 10261
-
小区智能化系统设计方案2012-08-18 3257
-
WIFI无线技术各种热门设计方案~2014-12-13 4547
-
智能停车场的系统,通过手机随时掌握停车场的动态,轻松解决车主停车烦恼!2016-12-21 7177
-
SX1278-DTU应用于智能停车系统2020-03-28 4642
-
路侧停车系统的利弊2020-06-23 3216
-
求一种智能物品清点系统的设计方案2021-05-20 1889
-
分享一份智能视频监控应用系统的设计方案2021-06-08 3823
-
基于stm32的智能小车设计方案2021-07-14 1952
-
停车传感器是什么?智能停车场如何实现2022-11-15 2065
-
智能停车场系统设计方案2017-06-06 23093
-
智能停车辅助系统:全球首例运用量产车的L4级停车功能2020-10-21 3042
-
面向工业4.0的多维视频监控系统设计方案2021-06-29 1131
-
基于RFID的智能停车系统2022-12-06 694
全部0条评论

快来发表一下你的评论吧 !
