

如何制作一个辐射探测器
描述
本文的目的是创建最详细的组装说明如何制作您的第一个自己动手做的辐射探测器。
曾几何时,你可能考虑过购买一个个人剂量计来测量家中的辐射水平,但后续你可能觉得有些没必要就作罢。而今天我们将组装一个基于 ESP32 WiFi 控制器和 RadSens 板的简单便宜的辐射探测剂量计。RadSens 是用于气体放电盖革-穆勒计数器的现成 I2C 模块。可靠且广泛使用的 SBM20-1 管将用作传感器。除了它,任何其他管也可以连接到模块,像是 J305、M4011、STS-5 等。
本文的目的是创建最详细的组装说明。如果一个年轻的工程师也可以重复上述步骤,那我们就算实现了目标。
构建
选择电路板和组件时最重要的标准是成本。我们的目标是使剂量计尽可能地节省预算。
使用了以下组件:
剂量计模块 - RadSens。RadSens 是与流行的 SBM-20 管组装在一起的现成模块。只需要在 Arduino Library Manager 中安装库即可。剂量计已准备好开箱即用。
ESP8266 / ESP32 板。RadSens模块具有I2C接口,兼容Arduino、ESP、Raspberry
0.96 英寸 OLED 显示屏。您可以使用任何带有 I2C 的屏幕。但 OLED 屏幕允许您添加当前辐射水平的简单动画和颜色编码。
Boozer(高音)模块,用于声音指示脉冲。当无法访问屏幕上的信息时,Boozer 用于用户声音信息。
面包板 120*80 毫米。该板用于方便的布线放置和元件之间的组织。
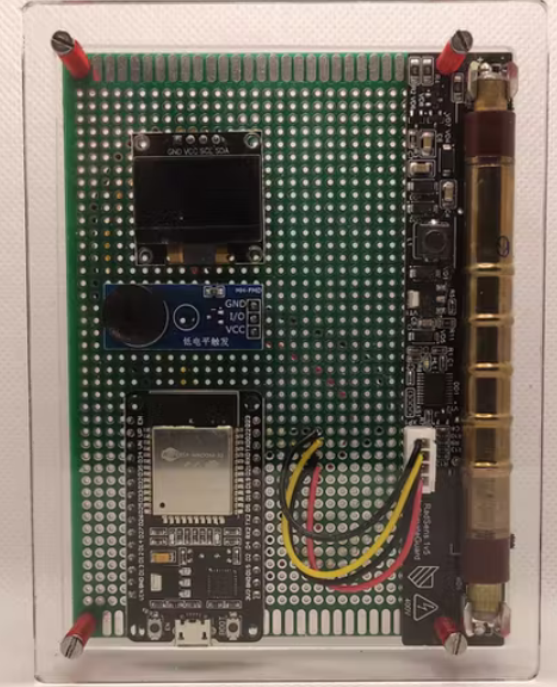
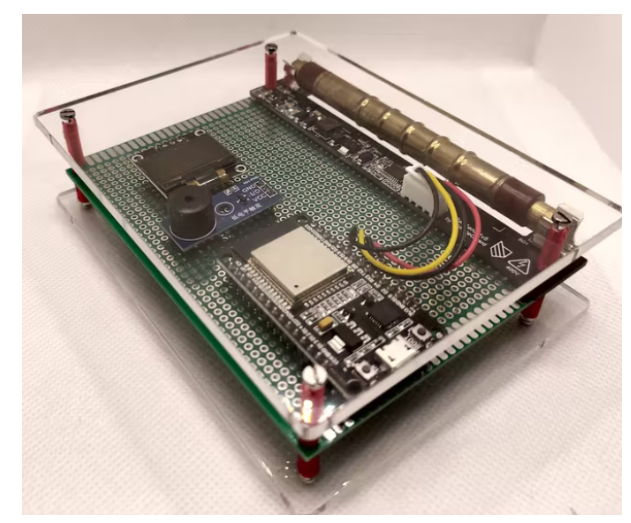
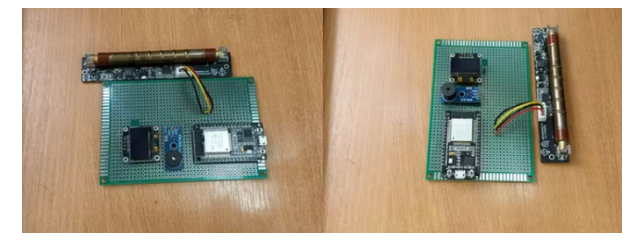
自制剂量计组装过程
所需步骤:
将元件焊接到所需位置的面包板上。
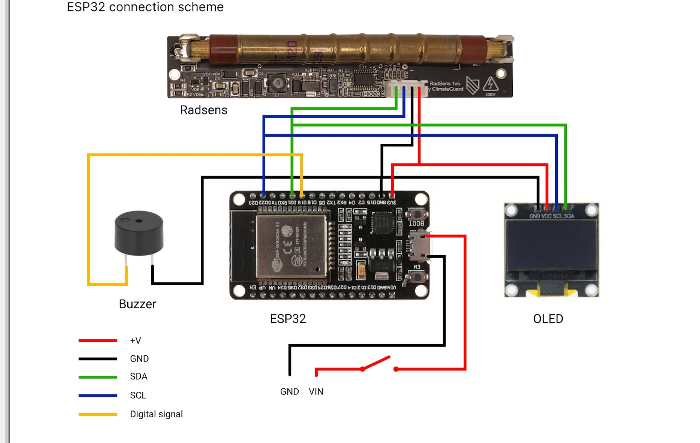
根据建议的方案连接所有元素。
首先目视检查连接,然后将 ESP 连接到 USB。
将 RadSens 库和 ESP32 板连接到 Arduino IDE。
将代码添加到 IDE 并上传。
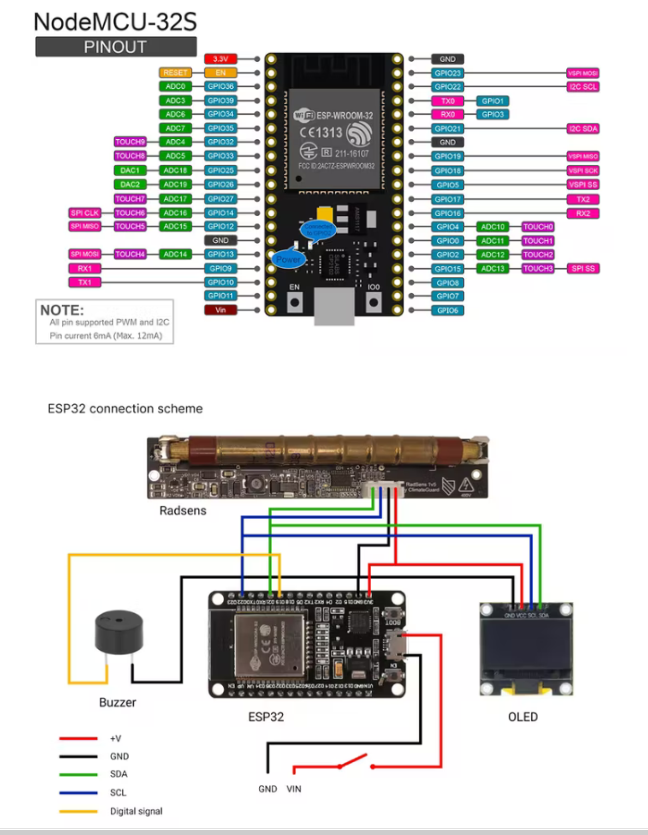
步骤 1. 连接
我们需要焊接所有元素并将它们连接起来。RadSens 和 OLED 屏幕上的 SDA 和 SCL 引脚必须连接到通过 I2C 接口进行通信的 D22 (SCL) 和 D21 (SDA) 端口。根据下图连接其余部分:
步骤 2. RadSens、ESP32、GyverOLED 库连接
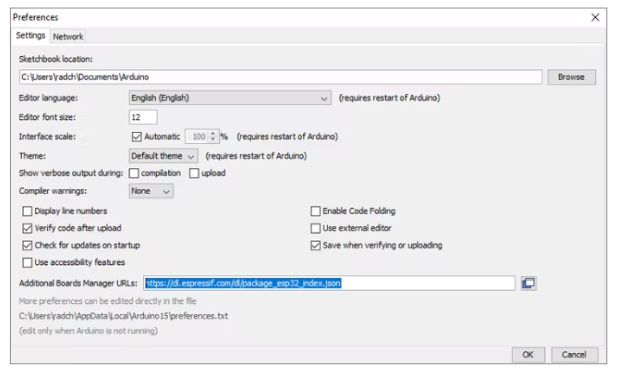
在安装 ESP32 工具之前,您需要打开首选项并在 Additional Boards Manager URL 行中键入
“https://dl.espressif.com/dl/package_esp32_index.json”
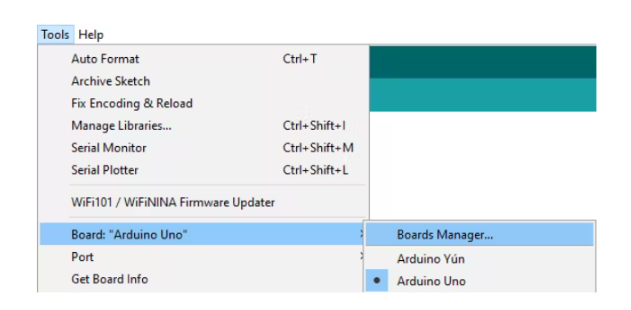
ESP32 开发板的 Arduino IDE 中的扩展连接如下:
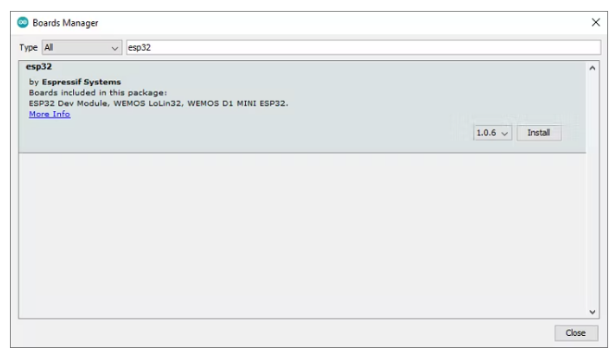
Arduino -》 Tools -》 Board -》 Board Manager -》 在搜索栏中输入“ESP32”。
安装完成后,需要在“Board”部分指定“ESP32 Dev module”。
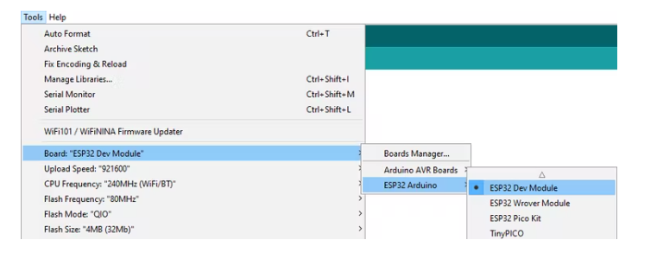
接下来,我们需要选择具体的板子。为此,请转到“工具”选项卡,选择“板”部分,然后在“ESP32 Arduino”子部分中选择“ESP32 开发模块”。
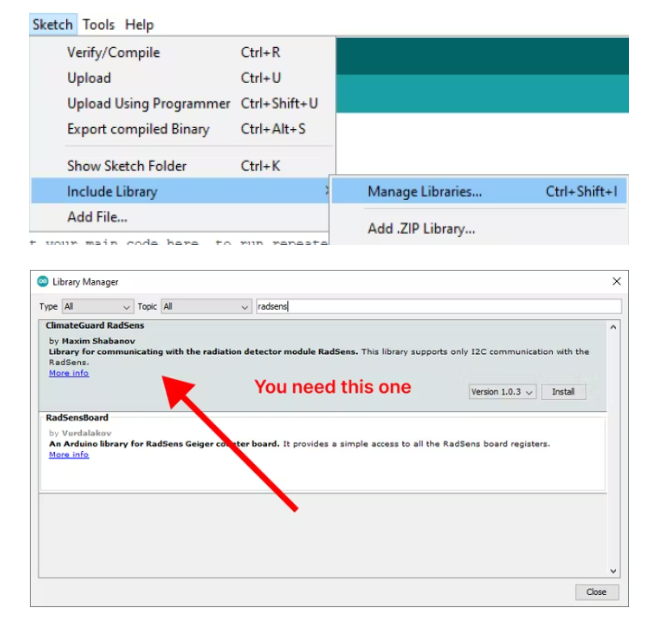
要安装 RadSens 库,您需要遵循几乎相同的步骤:
Arduino -》 Sketch -》 添加库 -》 管理库 -》 在搜索栏中输入“RadSens”。
接下来,您需要在库管理器中安装 GyverOLED 库。
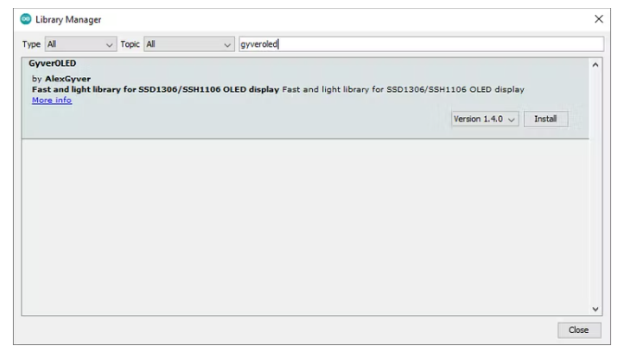
现在我们已经准备好继续开发了。
步骤 3. 代码
该代码是使用 Alex Gyver 的 OLED 库编写的,我认为这是最容易使用的库之一。但是使用 U8G2、Adafruit 或任何你方便的库是可以接受的。
// Connecting the libraries
#include // RadSens library
#include // I2C library
#include // One of the easiest-to-learn OLED libraries by Alex Gyver
#define buz 18 // Initializing the buzzer pin. You may change it if you connected buzzer to another pin
GyverOLED oled; // Initializing OLED screen
ClimateGuard_RadSens1v2 radSens(RS_DEFAULT_I2C_ADDRESS); // Initializing RadSens,>
uint32_t timer_cnt; // Timer for updating count of pulses and intensity
uint32_t timer_imp; // Timer for updating pulses for buzzer
uint32_t timer_oled; // Timer for updating OLED data
float dynval; // Variable for dynamic intensity value
float statval; // Variable for static intensity value
uint32_t impval; // Variable for count of impulses
uint32_t pulsesPrev; // Variable for count of impulses at previous cycle
void setup() {
pinMode(buz, OUTPUT); // Initializing buzzer as an output
ledcSetup(1, 500, 8); // Initializing PWM for buzzer (ONLY FOR ESP DELETE THIS STOKE FOR ARDUINO)
ledcAttachPin(buz, 1); // Initializing buzzer pin for PWM (ONLY FOR ESP DELETE THIS STOKE FOR ARDUINO)
oled.init(); // Initializing OLED in code
oled.flipV(1); //I has flipped the screen for comfortable use
oled.flipH(1); // For normal appearance of text we need horizontal inverting
oled.clear();
oled.setScale(2); // Setting scale of text
radSens.radSens_init();
oled.clear();
radSens.setSensitivity(105); // Setting sensitivity of Heiger’s tube (in case of not default tube, check technical specifications of your tube to find sensitivity)
int16_t sensval = radSens.getSensitivity();
oled.setCursor(10, 2);
oled.print("Sens:");
oled.setCursor(42, 4);
oled.print(sensval);
delay(4000);
oled.clear();
pulsesPrev = radSens.getNumberOfPulses(); //Setting number of pulses to zero
}
void beep(int deltime) { // Setting time and frequency of buzzer beeps
ledcWriteTone(1, 500); // Switching on (freq = 500Hz)
delay(3);
ledcWriteTone(1, 0); // Switching off
delay(deltime);
}
/*
void beep(int deltime){
tone(buz, 500, deltime)
} same function but for Arduino */
void loop() {
if (millis() - timer_imp > 250) { // This function creates crack of buzzer
timer_imp = millis();
int pulses = radSens.getNumberOfPulses();
if (pulses > pulsesPrev) {
for (int i = 0; i < (pulses - pulsesPrev); i++) {
beep(30); // You may change this parameter if you need longer cracks
}
pulsesPrev = pulses;
}
}
if (millis() - timer_cnt > 1000) { // Writing values to global variables
timer_cnt = millis();
dynval = radSens.getRadIntensyDyanmic();
statval = radSens.getRadIntensyStatic();
impval = radSens.getNumberOfPulses();
}
if (millis() - timer_oled > 1000) { //Writing variables to a strings and display them on the screen
timer_oled = millis();
String dynint = "Dyn: ";
dynint += dynval;
String statint = "Stat: ";
statint += statval;
String nimp = "Imp: ";
nimp += impval;
oled.setCursor(0, 1);
oled.print(dynint);
oled.setCursor(0, 3);
oled.print(statint);
oled.setCursor(0, 5);
oled.print(nimp);
}
}// Connecting the libraries
测试
这一次由于我们是考虑了最经济的剂量计辐射计版本。同时出于好奇,我们还订购了透明有机玻璃板,以使设备更方便和更具描述性。我们使用硫酸钾用于测试。这种肥料富含放射性同位素钾 40,它会主动发射 β 辐射。
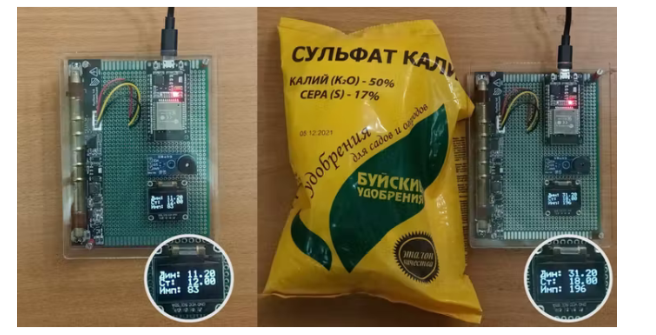
房间内的标准辐射水平为 15-20 μR/h。直接接触硫酸钾,我们得到 32-39 μR/h,高出两倍。
连接示意图
-
 jf_96155087
2023-10-04
0 回复 举报成本大概多少 收起回复
jf_96155087
2023-10-04
0 回复 举报成本大概多少 收起回复
-
被动红外探测器与主动红外探测器的原理比较2024-09-20 4231
-
VirtualLab:通用探测器2024-08-06 5485
-
什么是红外辐射?红外探测器的分类2024-01-02 5006
-
红外探测器:热探测器与光子探测器2023-07-19 3817
-
红外探测器——热探测器详解2022-11-08 5029
-
如何制作烟雾探测器警报2022-10-27 1065
-
制作一个简单的黑暗探测器电路2022-08-23 3973
-
不同的辐射探测器包括哪些功能?2020-06-16 4026
-
如何制作一个简易的电子烟雾探测器?2018-08-02 10218
-
honeywell火焰探测器2018-04-27 3144
-
红外辐射探测器2017-12-27 4154
-
热探测器和光电发射探测器等光辐射探测技术的解析2017-11-18 1354
-
光子探测器2014-03-03 6004
全部0条评论

快来发表一下你的评论吧 !
