
用STM32F103C8控制伺服马达的电路连接及代码说明
电子说
描述
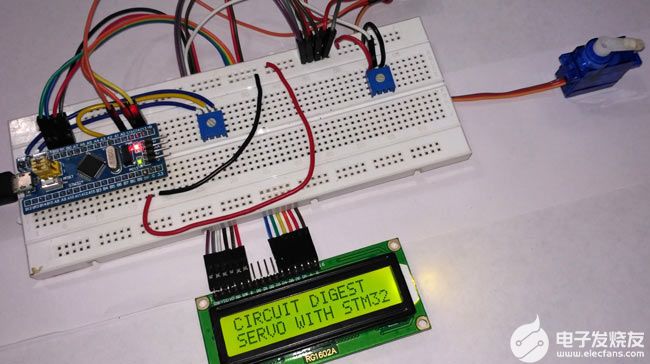
伺服马达(Servo motor)凭准确、小型、高效,易用在机器人领域应用广泛,其高扭矩特性非常适合升降重物。本项目用电位器改变马达转子位置,用STM32F103C8(蓝丸)控制伺服马达,用LCD显示角度值。
项目BOM表及电路连接
项目BOM表如下:
1、STM32F103C8蓝丸板 x1
2、伺服马达(SG90) x1
3、LCD(16x2) x1
4、电位器 x2
5、面包板 x1
6、跳线 若干

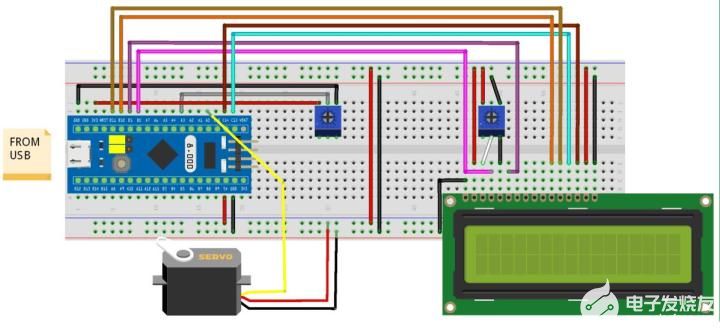
STM32F103C8有10路ADC引脚(PA0-PB1),本项目使用PA3作为analogread(),通过电位器设定马达的位置。在STM32引脚的15 PWM引脚中(PA0, PA1, PA2, PA3, PA6, PA7, PA8, PA9, PA10, PB0, PB1, PB6, PB7, PB8, PB9),我们只使用其中的一个引脚,为伺服马达的PWM引脚(该引脚通常带有颜色)提供脉冲信号。
STM32F103C8与LCD的连接如下:
STM32F103C8 LCD
GND VSS
+5V VDD
电位器中心PIN V0
PB0 RS
GND RW
PB1 E
PB10 D4
PB11 D5
PC13 D6
PC14 D7
+5V A
GND K
伺服马达与STM32F103C8的连接如下:
STM32F103C8 伺服马达
+5V RED (+5V)
PA0 ORANGE (PWM pin)
GND BROWN (GND)

本项目使用两个电位器:
(1)右边的用来改变LCD对比度。左边接5V电源,右边接地,中间引脚与LCD的V0连接。
(2)左边的用来模拟输入电压的大小,以改变伺服马达转子的位置。左边引脚接3.3V电源,右边接地,中间连接与的STM32板子的PA3引脚。
编程及代码说明
如果电脑安装了Arduino IDE,连接上USB接口,就可以像使用Arduino一样,对STM32F103C8进行编程了,无须使用FTDI编程器。
首先,载入马达和LCD函数:
#include
#include
其次,声明LCD显示器引脚并初始化。同时还要声明其他几个用于PWM和电位器的变量:
const int rs = PB0, en = PB1, d4 = PB10 , d5 = PB11 , d6 = PC13, d7 = PC14;
LiquidCrystal lcd(rs,en,d4,d5,d6,d7);
int servoPin = PA0;
int potPin = PA3;
这里,我们创建了伺服变量,并将其赋予前述声明的PWM引脚。
Servo servo;
servo.attach(servoPin);
然后,从ADC引脚——PA3读取模拟值,将模拟电压(0-3.3)转换成数字形式(0-4095)。
analogRead(potPin);
该ADC为12位,我们需要获得的0-170模拟值,要将其均分为(0-4096)数字形式。
angle = (reading/24);
下面指令使伺服马达以给定的角度旋转转轴:
servo.write(angle);
完整的代码如下:
//INTERFACE SERVO WITH STM32
//CIRCUIT DIGEST
#include //including servo library
#include //including LCD display library
const int rs = PB0, en = PB1, d4 = PB10 , d5 = PB11 , d6 = PC13, d7 = PC14; //declaring pin names and pin numbers of lcd
LiquidCrystal lcd(rs,en,d4,d5,d6,d7);//setting lcd and its paramaters
int servoPin = PA0; //declare and initialize pin for servo output PWM
int potPin = PA3; //potentiometer ADC input
Servo servo; // creating variable servo with datatype Servo
void setup()
{
lcd.begin(16,2); //setting lcd as 16x2
lcd.setCursor(0,0); //setting cursor at first row and first column
lcd.print("CIRCUIT DIGEST"); //puts CIRCUIT DIGEST in LCD
lcd.setCursor(0,1); //setting cursor at second row and first column
lcd.print("SERVO WITH STM32"); //puts SERVO WITH STM32 in LCD
delay(3000); // delays for 3 seconds
lcd.clear(); //clears lcd display
servo.attach(servoPin); //it connects pin PA0 with motor as control feedback by providing pulses
}
void loop()
{
lcd.clear(); //clears lcd
int angle; //declare varible angle as int
int reading; //declare varible reading as int
reading = analogRead(potPin); //read analog value from pin PA3
angle = (reading/24); //it divides ADC the value according to max angle 170 deg
servo.write(angle); //it puts angle value at servo
lcd.setCursor(0,0); //setting cursor at first row and first column
lcd.print("ANGLE:"); //puts ANGLE in LCD
lcd.print(angle); //puts value at angle
delay(100); //delay in time
- 相关推荐
- 热点推荐
- lcd
- 伺服马达
- 电路连接
- STM32F103C8
-
在STM32F103c8上做DLQR最优控制算法的C编程资料2025-07-23 209
-
将步进电机与STM32F103C8板连接的教程2022-11-07 9489
-
将伺服电机与STM32F103C8板连接起来的教程2022-11-04 3921
-
如何在STM32F103C8中使用中断2022-11-03 3667
-
使用ESP8266将STM32F103C8连接到互联网的方法2022-10-28 13827
-
如何使用STM32F103C8的GPS模块获取位置坐标2022-09-08 10038
-
在STM32F103C8微控制器中使用RS-485串行通信2022-09-06 9591
-
IAP在STM32F103C8上的实现2022-03-02 3914
-
STM32F103C8虚拟串口移植的实验代码该怎样去实现呢2022-02-24 1690
-
基于STM32F103C8 输入捕获实验2021-11-30 834
-
在STM32F103C8上实现一个简单的bootloader2021-11-23 1151
-
STM32F103C8的电路原理图免费下载2020-04-23 1754
-
stm32f103c82013-07-14 3579
-
STM32F103C82012-08-04 2172
全部0条评论

快来发表一下你的评论吧 !

