

如何利用RFID实现扫描仪的设计
描述
目前,各个地方正在推广有关非接触式操作的任何事情,以降低感染病毒的风险。这让我质疑生活在经济和健康问题的 COVID 世界中的两个重要方面。
使用这个想法,我制作了一个 RFID 设备,它为它的串行监视器(本质上是计算机)提供信息。只有有限数量的卡可以解锁系统,在此过程中,Arduino 会检测 RFID 卡的唯一标识号 (UID)。在串行监视器上,它会就 UID 号向用户提供建议,然后通过提供授权或拒绝访问来描述情况。所有这些都是在 Arduino 的能力下完成的,它可以在有限的时间内处理这个处理。
此项目的步骤:
库下载
这是整个项目中最重要的一步,没有这个,代码将无法工作,电路将无法工作,就像我在你的项目失败之前所说的那样。
该库可使用此链接获得,其中包含需要提取的 ZIP 文件:https ://github.com/miguelbalboa/rfid
提取文件后,您将放入一个已经 Arduino 文件夹,这意味着该库现在位于您下载的 Arduino 应用程序中。
访问此项目时,您需要通过转到文件 ⇉ 示例 ⇉ 自定义库来检查它,以确保您确认它在那里。确保单击这些选项将其插入 Arduino。
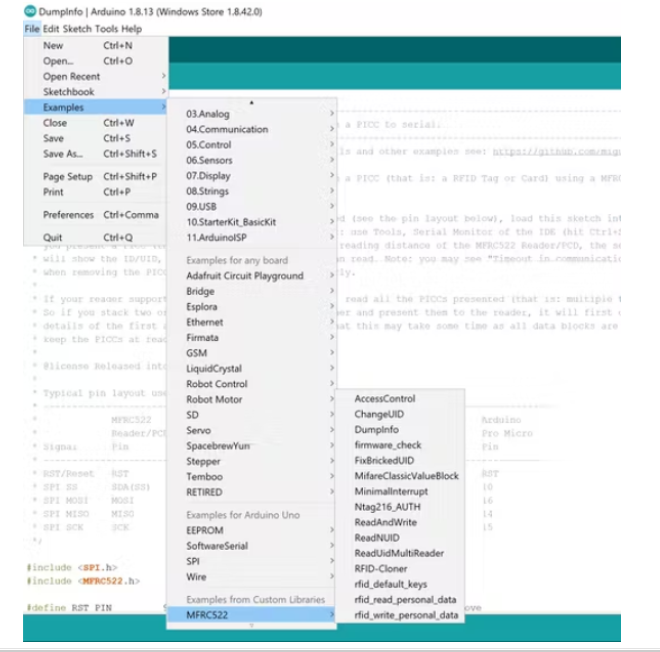
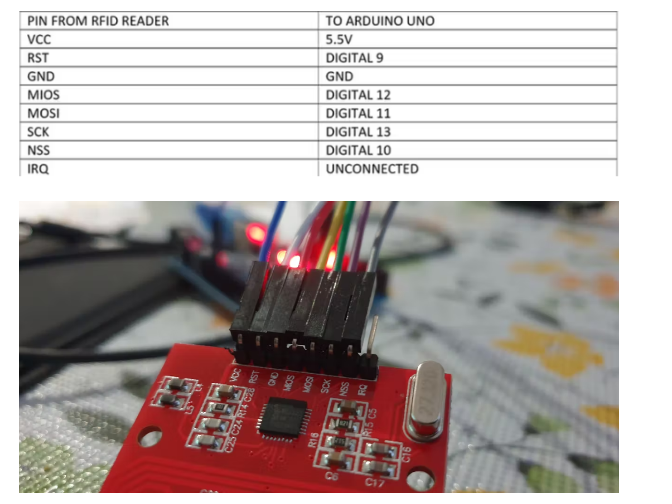
设置电路
我提供了一个根据引脚接线的简单表格,这是操作 RFID 阅读器所必需的。
将库上传到 ARDUINO
如前所示,示例类别,在单击作为自定义库一部分的 MFRC522 后,您将选择“DumpInfo”。该术语指的是如何处理大量信息。这对于阅读器必须做出多产判断的 RFID 来说是必需的。
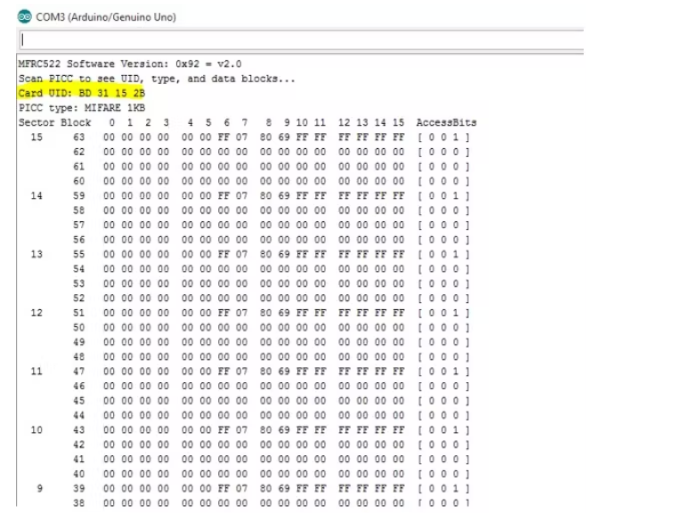
选择 DumpInfo 后,您需要转到串行监视器 (Ctrl+Shift+M),它会要求您扫描 RFID 卡。
扫描后,串口监视器会提示用户卡 UID,如下图所示。
记得注明这张卡的 UID,这将在后面的代码中使用。
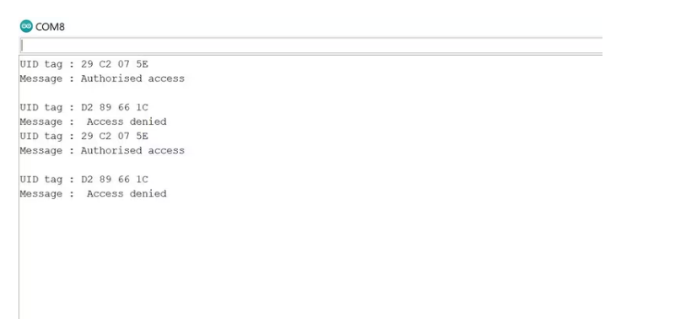
现在您将上传正在设置的代码。请记住更改它所说的 UID 号,我将在软件部分对此进行评论。如果您不更改,您将始终显示访问被拒绝。
粘贴代码后,必须打开串行监视器,然后在扫描正确的卡和错误的卡后,您将看到如下图所示的信息。
伪代码
此伪代码旨在帮助您理解,如果我在软件部分提供的 Arduino 代码中的某些术语,您不会对定义产生任何疑问的语言中的代码。
Include Serial Peripheral Interface to sketch
Include external example, in this case the RFID Reader example
Give a constant value to the serial input pin
To make sure that the RFID resets after being used
To make the MFRC522 an instance
“While true”
Set the speed of communication between Arduino and serial monitor at 9600 bits per second.
Initiate the (BUS)
Initate MFRC522
Print “Approximate your card to the reader…”);
Print new line
Loop
If new card is present, turn on for limited time
Identify Card Serial
Print “UID tag :”)
Response required
Print (“Message : “)
If the UID is the specific UID number
Print “Authorised Access”)
With delay for 3 seconds
otherwise
Print “Access denied”
Then delay for 3 seconds
流程图
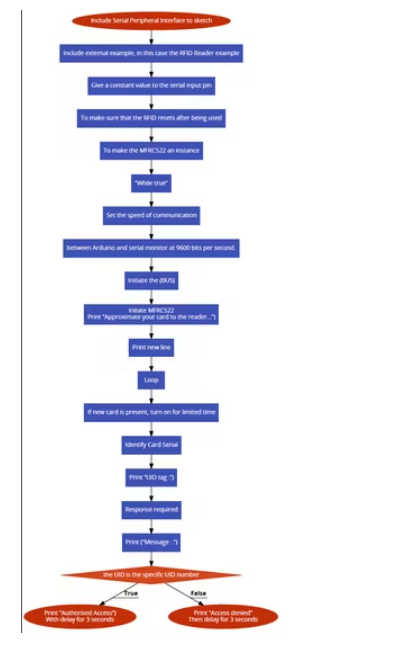
串行监视器的代码:
#include
#include
#define SS_PIN 10
#define RST_PIN 9
MFRC522 mfrc522(SS_PIN, RST_PIN);
void setup()
{
Serial.begin(9600);
SPI.begin();
mfrc522.PCD_Init();
Serial.println("Approximate your card to the reader...");
Serial.println();
}
void loop()
{
if ( ! mfrc522.PICC_IsNewCardPresent())
{
return;
}
if ( ! mfrc522.PICC_ReadCardSerial())
{
return;
}
Serial.print("UID tag :");
String content= "";
byte letter;
for (byte i = 0; i < mfrc522.uid.size; i++)
{
Serial.print(mfrc522.uid.uidByte[i] < 0x10 ? " 0" : " ");
Serial.print(mfrc522.uid.uidByte[i], HEX);
content.concat(String(mfrc522.uid.uidByte[i] < 0x10 ? " 0" : " "));
content.concat(String(mfrc522.uid.uidByte[i], HEX));
}
Serial.println();
Serial.print("Message : ");
content.toUpperCase();
if (content.substring(1) == "29 C2 07 5E") // Make sure you change this with your own UID number
{
Serial.println("Authorised access");
Serial.println();
delay(3000);
}
else {
Serial.println(" Access denied");
delay(3000);
}
-
大幅扫描仪扫描地图怎么操作2024-10-14 3141
-
RFID扫描仪完整教程2022-12-14 1002
-
手持扫描仪设计的应用2021-09-22 2906
-
扫描仪是怎么工作的2019-02-24 5672
-
扫描仪的种类2019-01-25 25673
-
基于USB接口的彩色扫描仪的优化设计2010-12-03 798
-
大幅面扫描仪的扫描幅面/大幅面扫描仪的光源2009-12-30 2261
-
扫描仪类型2009-12-29 1431
-
指纹扫描仪工作原理2009-07-29 6996
-
扫描仪购买指南2009-07-28 3098
全部0条评论

快来发表一下你的评论吧 !

