

如何利用Helium构建土壤湿度探头
描述
你是否需要一种快速的方法来监测您最喜欢的蕨类植物的土壤水分含量?正巧,这篇文章里就有答案。
本文涵盖的内容
以下是我们将要讨论的内容:
使用DF Robot重力电容式土壤湿度传感器、氦原子原型模块、氦 Arduino 适配器和 Arduino 板构建完整的土壤湿度探头;
在氦仪表板中注册您的氦元素和氦原子原型模块;建立自己的低功耗广域无线网络;
通过 Arduino IDE 对土壤湿度探头进行编程;
近乎实时地测量土壤水分数据并将其发送到氦仪表板;并将其通过管道传输到 Helium HTTP 通道。
让我们开始吧。
构建土壤湿度探头
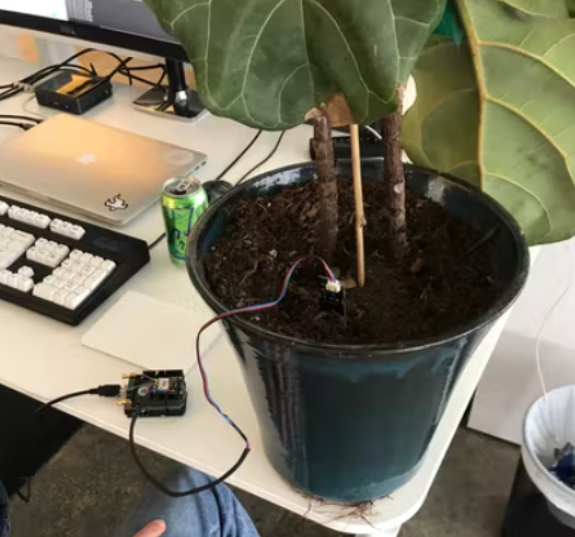
首先,我们需要构建传感单元。这是快速和容易的。完成后,您的完整探测应如下所示:
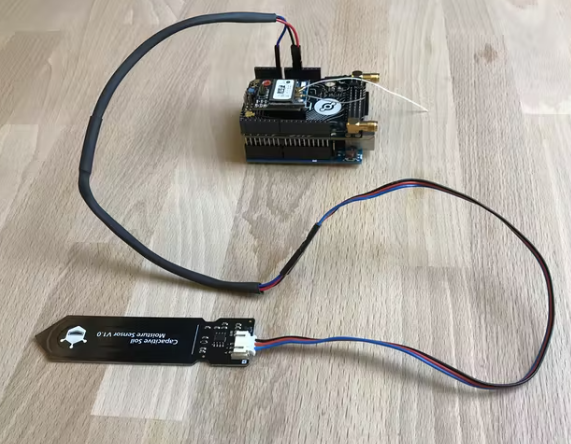
要构建这个,首先,将您的 Helium Atom 原型模块固定到 Helium Arduino 适配器中,然后将此组合单元连接到您选择的 Arduino 板。确保根据您使用的板相应地配置和跳线。
接下来,我们需要使用 DF Robot Soil Moisture Probe 随附的三线跨接电缆将实际的土壤湿度探头连接到 Helium Arduino 适配器。三种电线颜色是黑色、红色和蓝色。在 Helium Arduino 适配器上,黑线连接到GND; 红线连接到5V;蓝线连接到接头。正确接线后,我们的电路板如下所示:
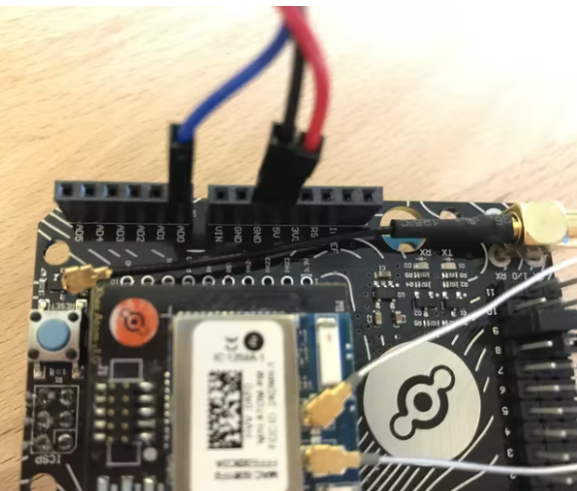
最后将跨接电缆上的白色接头连接到 DF 机器人土壤湿度探头。
部署 Helium 网络
现在是时候建立您自己的 Helium 网络了。这大约需要 30 秒。
要部署Element并为基于 Atom 的传感器创建网络覆盖范围,只需使用提供的电源线将其插入电源和带电以太网端口即可。
注意:如果您有支持蜂窝网络的元素,则使用以太网连接是可选的,但建议作为备份。
一旦插入,您将看到一些 LED 活动。当前置 LED 变为绿色(表示以太网连接)或蓝绿色(表示蜂窝连接)时,您的 Element 将被连接。
在 Helium Dashboard 中注册
现在我们的传感单元已经构建并且您的 Helium 网络已经部署,是时候在Helium Dashboard 中注册您的硬件了。Dashboard 是 Helium 的托管用户界面,用于监控和管理连接的硬件部署。Helium 发布的所有硬件都已在我们的系统中注册,但我们需要知道是谁在部署它。
首先,创建一个 Helium Dashboard 帐户。
要注册您的 Atom,首先选择New Atom 。在 UI 中,添加一个名称(例如Fern Saver ),然后输入其最后四个MAC Address及其四个 digit HVV Code。点击保存,你就完成了。
元素注册的完成方式完全相同。选择新元素,然后提供名称、其最后四个MAC Address及其四位数字HVV Code。还要确保为您的元素输入一个位置,以便仪表板可以在地图上显示它。
您可以通过查看仪表板中的状态和信号来验证您的元素是否在线:

部署 Helium HTTP 通道
Helium 平台的一个主要特点是通道。这些是 Web 服务(如 AWS IoT、Google Cloud IoT 和 Azure IoT)和协议(如MQTT和HTTP)的预构建连接器。借助 Channels,Helium 为您完成了与这些 Web 服务或协议之一集成的所有繁重工作。对于 Fern Saver,我们的土壤水分探测器,让我们启动一个HTTP 通道。这将使我们能够通过管道将数据传送到任何通过 HTTP 接受数据的 Web 服务。例如,您可以使用 HTTP 通道将此数据发送到IFTTT ,然后在每次 Fern Saver 报告湿度低于特定水平时接收文本。
在此示例中,我们将设置一个 HTTP 通道,将数据发送到requestb.in,这是一个方便、免费的 Web 服务,用于测试 HTTP 服务。请注意,在下面,当我们将 Sketch 上传到 Arduino 时,我们将HTTP在代码中引用此通道名称 , 以便我们知道将数据发送到哪里。
配置您的 Arduino IDE 并上传 Sketch
我们现在可以继续配置您的 Arduino IDE 并导入所需的库。开始:
确保您已下载最新的 Arduino IDE。
然后我们需要添加两个库:Helium和ArduinoJson. 您可以通过转到Sketch Include Library Manage Libraries 从 IDE 中添加库。搜索“helium”,选择它,然后点击Install 。为“ArduinoJson”库遵循相同的安装过程。(我们需要这个库,因为我们将记录的土壤水分日期格式为 JSON。)-》-》
一旦完成,就该进行一些实际的 Arduino 编程了。以下是完整的Soil_Humidity.ino 草图。
/*
* Copyright 2017, Helium Systems, Inc.
* All Rights Reserved. See LICENCE.txt for license information
*
* Taking humidity readings using the SEN0192 capacitive humidity
* sensor. Wiring instructions:
* https://www.dfrobot.com/wiki/index.php/Capacitive_Soil_Moisture_Sensor_SKU:SEN0193
*
* Install the following libraries through Sketch->Manage Libraries:
* - ArduinoJson
* - Helium
*/
#include "Board.h"
#include
#include
#include
#include
// This Channel Name should correspond the Channel you've deployed in Helium
// Dashboard to ingest this data.
#define CHANNEL_NAME "HTTP"
// Delay for one second #define CHANNEL_DELAY 5000
// Send very 60 cycles (seconds)
#define CHANNEL_SEND_CYCLE 12
Helium helium(&atom_serial);
Channel channel(&helium);
int channel_counter;
void report_status(int status, int result = 0)
{
if (helium_status_OK == status)
{
if (result == 0)
{
Serial.println(F("Succeeded"));
}
else
{
Serial.print(F("Failed - "));
Serial.println(result);
}
}
else
{
Serial.println(F("Failed"));
}
}
void
connect()
{
while (!helium.connected())
{
Serial.print(F("Connecting - "));
int status = helium.connect();
report_status(status);
if (helium_status_OK != status)
{
delay(1000);
}
}
}
void
channel_create(const char * channel_name)
{
int8_t result;
int status;
do
{
// Ensure we're connected
connect();
Serial.print(F("Creating Channel - "));
status = channel.begin(channel_name, &result);
// Print status and result
report_status(status, result);
if (helium_status_OK != status)
{
delay(1000);
}
} while (helium_status_OK != status || result != 0);
}
void
channel_send(const char * channel_name, void const * data, size_t len)
{
int status;
int8_t result;
do
{
// Try to send
Serial.print(F("Sending - "));
status = channel.send(data, len, &result);
report_status(status, result);
// Create the channel if any service errors are returned
if (status == helium_status_OK && result != 0)
{
channel_create(channel_name);
}
else if (status != helium_status_OK)
{
delay(1000);
}
} while (helium_status_OK != status || result != 0);
}
void
setup()
{
Serial.begin(9600);
Serial.println(F("Starting"));
helium.begin(HELIUM_BAUD_RATE);
channel_create(CHANNEL_NAME);
channel_counter = 0; }
#define DRY_VALUE 536 // Taken in air
#define WET_VALUE 303 // Taken in water
#define HUM_RANGE (DRY_VALUE - WET_VALUE)
void
loop()
{
Serial.print(F("Reading - "));
float reading = analogRead(A0);
float percent = 100 * (1 - (reading - WET_VALUE) / HUM_RANGE);
Serial.print(reading);
Serial.print(" - ");
Serial.println(percent);
if (--channel_counter <= 0)
{
StaticJsonBuffer
JsonObject & root = jsonBuffer.createObject();
root[F("value")] = reading;
root[F("percent")] = percent;
char buffer[HELIUM_MAX_DATA_SIZE];
size_t used = root.printTo(buffer, HELIUM_MAX_DATA_SIZE);
channel_send(CHANNEL_NAME, buffer, used);
channel_counter = CHANNEL_SEND_CYCLE;
}
delay(CHANNEL_DELAY);
}
安装Helium 和ArduinoJson 库后,创建一个新草图(从 Arduino IDE 中的File -》 New ),然后粘贴上面的代码。然后,将完整的土壤湿度探头硬件包通过 USB 电缆连接到您的工作站,点击上传按钮。
Atom Prototyping Module 上的 LED 应在片刻后开始闪烁。这是连接到 Helium 网络的 Atom(通过我们之前部署的 Element)。如果 Arduino IDE 在上传代码时没有抛出任何错误,则说明这是成功的,土壤湿度探头现在正在生成读数。
关于土壤水分数据的注释
如上所述,此 Sketch 将捕获土壤水分数据并对其进行编码,就像在发送到 Helium 平台之前一样。使用上面的 Sketch,一个数据点看起来像这样(as ):JSON JSON
{
“value”: 433,
“percent”: 55.5
}
值得注意的是,DFRobot 重力电容式土壤湿度传感器实际上将这些读数捕获为校准的干湿读数之间的模拟读数。
在 Helium Dashboard 中验证传感器连接性和数据
现在您的传感器已部署,我们可以验证它是否在线并正在传输数据。在 Dashboard 中,我们可以通过几种方式执行此操作,都可以通过您刚刚部署的传感器的Atom UI视图。
如果您的 Atom 在线,仪表板将显示其状态和信号,以及有关其状态的各种其他元数据。它看起来像这样:
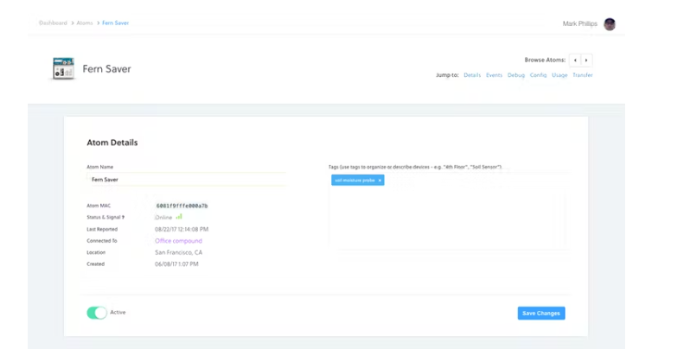
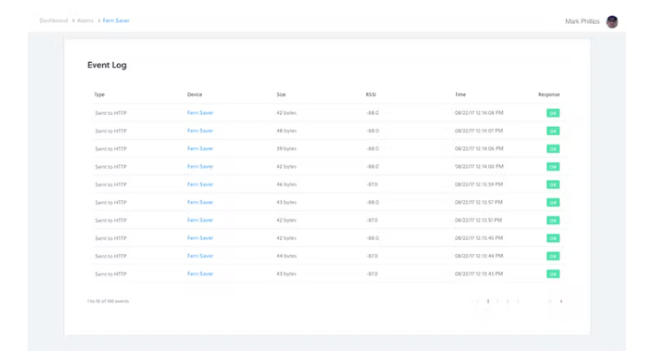
在同一个 Atom 界面的下方,我们还显示了一个事件日志,显示来自传感器的每个数据点以及它是否成功传输到氦通道。如上所述,这些是 Web 服务或原始协议的预构建连接器。之前我们为您的 Helium 组织部署了一个HTTP 通道。而上面的 Sketch 告诉 Soil Moisture probe 将数据发送到这个通道 - 称为HTTP。然而,在下图的示例中,我们将数据发送到 Helium HTTP 通道:
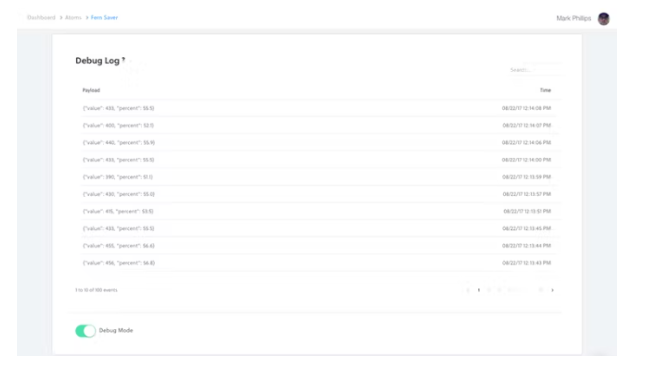
我们还为每个 Atom 提供了一个Debug界面,它将在您的读数进入时显示您的读数(一旦您启用了此选项)。这是仪表板的调试查看器中的一些土壤水分数据:
恭喜!本文到此结束。您现在已经使用无线土壤湿度探头为您的蕨类植物提供了面向未来的保障。
土壤湿度相关代码:
/*
* Copyright 2017, Helium Systems, Inc.
* All Rights Reserved. See LICENCE.txt for license information
*
* Taking humidity readings using the SEN0192 capacitive humidity
* sensor. Wiring instructions:
* https://www.dfrobot.com/wiki/index.php/Capacitive_Soil_Moisture_Sensor_SKU:SEN0193
*
* Install the following libraries through Sketch->Manage Libraries:
* - ArduinoJson
* - Helium
*/
#include "Board.h"
#include
#include
#include
#include
#define CHANNEL_NAME "Helium MQTT"
// Delay for one second
#define CHANNEL_DELAY 5000
// Send very 60 cycles (seconds)
#define CHANNEL_SEND_CYCLE 12
Helium helium(&atom_serial);
Channel channel(&helium);
int channel_counter;
void
report_status(int status, int result = 0)
{
if (helium_status_OK == status)
{
if (result == 0)
{
Serial.println(F("Succeeded"));
}
else
{
Serial.print(F("Failed - "));
Serial.println(result);
}
}
else
{
Serial.println(F("Failed"));
}
}
void
connect()
{
while (!helium.connected())
{
Serial.print(F("Connecting - "));
int status = helium.connect();
report_status(status);
if (helium_status_OK != status)
{
delay(1000);
}
}
}
void
channel_create(const char * channel_name)
{
int8_t result;
int status;
do
{
// Ensure we're connected
connect();
Serial.print(F("Creating Channel - "));
status = channel.begin(channel_name, &result);
// Print status and result
report_status(status, result);
if (helium_status_OK != status)
{
delay(1000);
}
} while (helium_status_OK != status || result != 0);
}
void
channel_send(const char * channel_name, void const * data, size_t len)
{
int status;
int8_t result;
do
{
// Try to send
Serial.print(F("Sending - "));
status = channel.send(data, len, &result);
report_status(status, result);
// Create the channel if any service errors are returned
if (status == helium_status_OK && result != 0)
{
channel_create(channel_name);
}
else if (status != helium_status_OK)
{
delay(1000);
}
} while (helium_status_OK != status || result != 0);
}
void
setup()
{
Serial.begin(9600);
Serial.println(F("Starting"));
helium.begin(HELIUM_BAUD_RATE);
channel_create(CHANNEL_NAME);
channel_counter = 0;
}
#define DRY_VALUE 536 // Taken in air
#define WET_VALUE 303 // Taken in water
#define HUM_RANGE (DRY_VALUE - WET_VALUE)
void
loop()
{
Serial.print(F("Reading - "));
float reading = analogRead(A0);
float percent = 100 * (1 - (reading - WET_VALUE) / HUM_RANGE);
Serial.print(reading);
Serial.print(" - ");
Serial.println(percent);
if (--channel_counter <= 0)
{
StaticJsonBuffer
JsonObject & root = jsonBuffer.createObject();
root[F("value")] = reading;
root[F("percent")] = percent;
char buffer[HELIUM_MAX_DATA_SIZE];
size_t used = root.printTo(buffer, HELIUM_MAX_DATA_SIZE);
channel_send(CHANNEL_NAME, buffer, used);
channel_counter = CHANNEL_SEND_CYCLE;
}
delay(CHANNEL_DELAY);
}
-
土壤湿度测量怎么校准?2023-10-30 510
-
土壤湿度检测电路的基本原理2023-03-13 3861
-
构建一个基于晶体管的简单土壤湿度检测器电路2022-11-22 4824
-
如何使用土壤湿度传感器2022-11-17 740
-
关于土壤湿度检测模块的使用2022-02-16 1455
-
土壤湿度传感器模块+Stduino Nano&UNO相关资料推荐2022-01-05 2776
-
InfraredReflectiveSensor如何检测土壤湿度?2020-11-09 2042
-
请问有土壤湿度测量的案例吗2019-01-10 2212
-
请问土壤湿度传感器原理是什么?2018-11-05 4247
-
土壤湿度检测代码怎么写?2018-05-02 3486
-
土壤湿度传感器怎么用_土壤湿度传感器种类2018-01-22 37682
-
土壤湿度程序2016-03-16 1033
全部0条评论

快来发表一下你的评论吧 !

