
史上最全的图片压缩方法总结
描述
前言
最近在研究图片压缩原理,看了大量资料,从上层尺寸压缩、质量压缩原理到下层的哈夫曼压缩,走成华大道,然后去二仙桥,全看了个遍,今天就来总结总结,做个技术分享,下面的内容可能会颠覆你对图片压缩的认知。图片基础知识
首先带着几个疑问来看这一小节:1、位深和色深有什么区别,他们是一个东西吗?
2、为什么Bitmap不能直接保存,Bitmap和PNG、JPG到底是什么关系?
3、图片占用的内存大小公式:图片分辨率 * 每个像素点大小,这种说法正确吗?
4、为什么有时候同一个 app,app >内的同个界面上的同张图片,但在不同设备上所耗内存却不一样?
5、同一张图片,在界面上显示的控件大小不同时,它的内存大小也会跟随着改变吗?
ARGB介绍
ARGB颜色模型:最常见的颜色模型,设备相关,四种通道,取值均为[0,255],即转化成二进制位0000 0000 ~ 1111 1111。
A:Alpha (透明度) R:Red (红) G:Green (绿) B:Blue (蓝)
Bitmap概念
Bitmap对象本质是一张图片的内容在手机内存中的表达形式。它将图片的内容看做是由存储数据的有限个像素点组成;每个像素点存储该像素点位置的ARGB值。每个像素点的ARGB值确定下来,这张图片的内容就相应地确定下来了。
色彩模式
Bitmap.Config是Bitmap的一个枚举内部类,它表示的就是每个像素点对ARGB通道值的存储方案。取值有以下四种:
ALPHA_8:每个像素占8位(1个字节),存储透明度信息,没有颜色信息。
RGB_565:没有透明度,R=5,G=6,B=5,,那么一个像素点占5+6+5=16位(2字节),能表示2^16种颜色。
ARGB_4444:由4个4位组成,即A=4,R=4,G=4,B=4,那么一个像素点占4+4+4+4=16位 (2字节),能表示2^16种颜色。
ARGB_8888:由4个8位组成,即A=8,R=8,G=8,B=8,那么一个像素点占8+8+8+8=32位(4字节),能表示2^24种颜色。
位深与色深
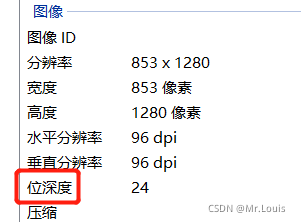
在windows上查看一张图片的信息会发现有位深度这个东西,但没看到有色深:

这里介绍一下位深与色深的概念:
色深:顾名思义,就是"色彩的深度",指是每一个像素点用多少bit来存储ARGB值,属于图片自身的一种属性。色深可以用来衡量一张图片的色彩处理能力(即色彩丰富程度)。
典型的色深是8-bit、16-bit、24-bit和32-bit等。上述的Bitmap.Config参数的值指的就是色深。比如ARGB_8888方式的色深为32位,RGB_565方式的色深是16位。色深是数字图像参数。
位深度是指在记录数字图像的颜色时,计算机实际上是用每个像素需要的二进制数值位数来表示的。当这些数据按照一定的编排方式被记录在计算机中,就构成了一个数字图像的计算机文件。每一个像素在计算机中所使用的这种位数就是“位深度”,位深是物理硬件参数,主要用来存储。
举个例子:某张图片100像素*100像素 色深32位(ARGB_8888),保存时位深度为24位,那么:
- 该图片在内存中所占大小为:100 * 100 * (32 / 8) Byte
- 在文件中所占大小为 100 * 100 * ( 24/ 8 ) * 压缩率 Byte
拓展小知识
24位颜色可称之为真彩色,色深度是24,它能组合成2的24次幂种颜色,即:16777216种颜色,超过了人眼能够分辨的颜色数量。
内存中Bitmap的大小
网上很多文章都会介绍说,计算一张图片占用的内存大小公式:分辨率 * 每个像素点的大小,但事实真的如此吗?
我们都知道我们的手机屏幕有着一定的分辨率(如:1920×1080),图像也有自己的像素(如拍摄图像的分辨率为4032×3024)。 如果将一张1920×1080的图片加载铺满1920×1080的屏幕上这就是最合适的了,此时显示效果最好。 如果将一张4032×3024的图像放到1920×1080的屏幕并不会得到更好的显示效果(和1920×1080的图像显示效果是一致的),反而会浪费更多的内存,如果按ARGB_8888来显示的话,需要48MB的内存空间(404830364 bytes),这么大的内存消耗极易引发OOM,后面我们会讲到针对大图加载的内存优化,在这里不过多介绍。 在 Android 原生的 Bitmap操作中,图片来源是res内的不同资源目录时,图片被加载进内存时的分辨率会经过一层转换,所以,虽然最终图片大小的计算公式仍旧是分辨率*像素点大小,但此时的分辨率已不是图片本身的分辨率了。
详细请看字节跳动面试官:一张图片占据的内存大小是如何计算,规则如下:
新分辨率 = 原图横向分辨率 * (设备的 dpi / 目录对应的 dpi ) * 原图纵向分辨率 * (设备的 dpi / 目录对应的 dpi )。 当使用 Glide时,如果有设置图片显示的控件,那么会自动按照控件的大小,降低图片的分辨率加载。图片来源是res 的分辨率转换规则对它也无效。
当使用 fresco 时,不管图片来源是哪里,即使是res,图片占用的内存大小仍旧以原图的分辨率计算。 其他图片的来源,如磁盘,文件,流等,均按照原图的分辨率来进行计算图片的内存大小。 那么如何计算Bitmap占用的内存?
来看BitmapFactory.decodeResource()的源码:
BitmapFactory.java public static Bitmap decodeResourceStream(Resources res, TypedValue value,InputStream is, Rect pad, Options opts) { if (opts == null) { opts = new Options(); } if (opts.inDensity == 0 && value != null) { final int density = value.density; if (density == TypedValue.DENSITY_DEFAULT) { //inDensity默认为图片所在文件夹对应的密度 opts.inDensity = DisplayMetrics.DENSITY_DEFAULT; } else if (density != TypedValue.DENSITY_NONE) { opts.inDensity = density; } } if (opts.inTargetDensity == 0 && res != null) { //inTargetDensity为当前系统密度。 opts.inTargetDensity = res.getDisplayMetrics().densityDpi; } return decodeStream(is, pad, opts); } BitmapFactory.cpp 此处只列出主要代码。 static jobject doDecode(JNIEnv* env, SkStreamRewindable* stream, jobject padding, jobject options) { //初始缩放系数 float scale = 1.0f; if (env->GetBooleanField(options, gOptions_scaledFieldID)) { const int density = env->GetIntField(options, gOptions_densityFieldID); const int targetDensity = env->GetIntField(options, gOptions_targetDensityFieldID); const int screenDensity = env->GetIntField(options, gOptions_screenDensityFieldID); if (density != 0 && targetDensity != 0 && density != screenDensity) { //缩放系数是当前系数密度/图片所在文件夹对应的密度; scale = (float) targetDensity / density; } } //原始解码出来的Bitmap; SkBitmap decodingBitmap; if (decoder->decode(stream, &decodingBitmap, prefColorType, decodeMode) != SkImageDecoder::kSuccess) { return nullObjectReturn("decoder->decode returned false"); } //原始解码出来的Bitmap的宽高; int scaledWidth = decodingBitmap.width(); int scaledHeight = decodingBitmap.height(); //要使用缩放系数进行缩放,缩放后的宽高; if (willScale && decodeMode != SkImageDecoder::kDecodeBounds_Mode) { scaledWidth = int(scaledWidth * scale + 0.5f); scaledHeight = int(scaledHeight * scale + 0.5f); } //源码解释为因为历史原因;sx、sy基本等于scale。 const float sx = scaledWidth / float(decodingBitmap.width()); const float sy = scaledHeight / float(decodingBitmap.height()); canvas.scale(sx, sy); canvas.drawARGB(0x00, 0x00, 0x00, 0x00); canvas.drawBitmap(decodingBitmap, 0.0f, 0.0f, &paint); // now create the java bitmap return GraphicsJNI::createBitmap(env, javaAllocator.getStorageObjAndReset(), bitmapCreateFlags, ninePatchChunk, ninePatchInsets, -1); }
Android中图片压缩的方法介绍
在 Android 中进行图片压缩是非常常见的开发场景,主要的压缩方法有两种:其一是质量压缩,其二是下采样压缩。 前者是在不改变图片尺寸的情况下,改变图片的存储体积,而后者则是降低图像尺寸,达到相同目的。质量压缩
在Android中,对图片进行质量压缩,通常我们的实现方式如下所示:
ByteArrayOutputStream outputStream = new ByteArrayOutputStream(); //quality 为0~100,0表示最小体积,100表示最高质量,对应体积也是最大 bitmap.compress(Bitmap.CompressFormat.JPEG, quality , outputStream);
在上述代码中,我们选择的压缩格式是CompressFormat.JPEG,除此之外还有两个选择: 其一,CompressFormat.PNG,PNG格式是无损的,它无法再进行质量压缩,quality这个参数就没有作用了,会被忽略,所以最后图片保存成的文件大小不会有变化; 其二,CompressFormat.WEBP,这个格式是google推出的图片格式,它会比JPEG更加省空间,经过实测大概可以优化30%左右。 在某些应用场景需要bitmap转换成ByteArrayOutputStream,需要根据你要压缩的图片格式来判断使用CompressFormat.PNG还是Bitmap.CompressFormat.JPEG,这时候quality为100。 Android质量压缩逻辑,函数compress经过一连串的java层调用之后,最后来到了一个native函数,如下:
//Bitmap.cpp static jboolean Bitmap_compress(JNIEnv* env, jobject clazz, jlong bitmapHandle, jint format, jint quality, jobject jstream, jbyteArray jstorage) { LocalScopedBitmap bitmap(bitmapHandle); SkImageEncoder::Type fm; switch (format) { case kJPEG_JavaEncodeFormat: fm = SkImageEncoder::kJPEG_Type; break; case kPNG_JavaEncodeFormat: fm = SkImageEncoder::kPNG_Type; break; case kWEBP_JavaEncodeFormat: fm = SkImageEncoder::kWEBP_Type; break; default: return JNI_FALSE; } if (!bitmap.valid()) { return JNI_FALSE; } bool success = false; std::unique_ptr strm(CreateJavaOutputStreamAdaptor(env, jstream, jstorage)); if (!strm.get()) { return JNI_FALSE; } std::unique_ptr encoder(SkImageEncoder::Create(fm)); if (encoder.get()) { SkBitmap skbitmap; bitmap->getSkBitmap(&skbitmap); success = encoder->encodeStream(strm.get(), skbitmap, quality); } return success ? JNI_TRUE : JNI_FALSE; }
可以看到最后调用了函数encoder->encodeStream(…)编码保存本地。该函数是调用skia引擎来对图片进行编码压缩,对skia的介绍将在后文讲解。
尺寸压缩 邻近采样(Nearest Neighbour Resampling)
BitmapFactory.Options options = new BitmapFactory.Options(); //或者 inDensity 搭配 inTargetDensity 使用,算法和 inSampleSize 一样 options.inSampleSize = 2; //设置图片的缩放比例(宽和高) , google推荐用2的倍数: Bitmap bitmap = BitmapFactory.decodeFile("xxx.png"); Bitmap compress = BitmapFactory.decodeFile("xxx.png", options);
在这里着重讲一下这个inSampleSize。从字面上理解,它的含义是: “设置取样大小”。它的作用是:设置inSampleSize的值(int类型)后,假如设为4,则宽和高都为原来的1/4,宽高都减少了,自然内存也降低了。 参考Google官方文档的解释,我们从中可以看到 x(x 为 2 的倍数)个像素最后对应一个像素,由于采样率设置为 1/2,所以是两个像素生成一个像素。
邻近采样的方式比较粗暴,直接选择其中的一个像素作为生成像素,另一个像素直接抛弃,这样就造成了图片变成了纯绿色,也就是红色像素被抛弃。 邻近采样采用的算法叫做邻近点插值算法。
双线性采样(Bilinear Resampling)
双线性采样(Bilinear Resampling)在 Android 中的使用方式一般有两种:
Bitmap bitmap = BitmapFactory.decodeFile("xxx.png"); Bitmap compress = Bitmap.createScaledBitmap(bitmap, bitmap.getWidth()/2, bitmap.getHeight()/2, true); 或者直接使用 matrix 进行缩放 Bitmap bitmap = BitmapFactory.decodeFile("xxx.png"); Matrix matrix = new Matrix(); matrix.setScale(0.5f, 0.5f); bm = Bitmap.createBitmap(bitmap, 0, 0, bit.getWidth(), bit.getHeight(), matrix, true);
看源码可以知道createScaledBitmap函数最终也是使用第二种方式的matrix进行缩放,双线性采样使用的是双线性內插值算法,这个算法不像邻近点插值算法一样,直接粗暴的选择一个像素,而是参考了源像素相应位置周围2x2个点的值,根据相对位置取对应的权重,经过计算之后得到目标图像。 双线性内插值算法在图像的缩放处理中具有抗锯齿功能, 是最简单和常见的图像缩放算法,当对相邻2x2个像素点采用双线性內插值算法时,所得表面在邻域处是吻合的,但斜率不吻合,并且双线性内插值算法的平滑作用可能使得图像的细节产生退化,这种现象在上采样时尤其明显。 双线性采样对比邻近采样的优势在于: 它的系数可以是小数,而不一定是整数,在某些压缩限制下,效果尤为明显处理文字比较多的图片在展示效果上的差别,双线性采样效果要更好还有双三次采样和**Lanczos **采样等,具体分析可以参考 Android 中图片压缩分析(下)这篇QQ音乐大佬的分享。
小节总结
在 Android 中,前两种采样方法根据实际情况去选择即可,如果对时间要求不高,倾向于使用双线性采样去缩放图片。如果对图片质量要求很高,双线性采样也已经无法满足要求,则可以考虑引入另外几种算法去处理图片,但是同时需要注意的是后面两种算法使用的都是卷积核去计算生成像素,计算量会相对比较大,Lanczos的计算量则是最大,在实际开发过程中根据需求进行算法的选择即可,往往我们是尺寸压缩和质量压缩搭配来使用。 下面我们要进入到实战中,参考一个仿微信朋友圈压缩策略的Android图片压缩工具——Luban,进入我们的下一章节鲁班压缩算法解析。
鲁班压缩的背景
鲁班压缩 —— Android图片压缩工具,仿微信朋友圈压缩策略。 目前做App开发总绕不开图片这个元素。但是随着手机拍照分辨率的提升,图片的压缩成为一个很重要的问题,随便一张图片都是好几M,甚至几十M,这样的照片加载到app,可想而知,随便加载几张图片,手机内存就不够用了,自然而然就造成了OOM ,所以,Android的图片压缩异常重要。 单纯对图片进行裁切,压缩已经有很多文章介绍。但是裁切成多少,压缩成多少却很难控制好,裁切过头图片太小,质量压缩过头则显示效果太差。于是自然想到App巨头——微信会是怎么处理,Luban(鲁班)就是通过在微信朋友圈发送近100张不同分辨率图片,对比原图与微信压缩后的图片逆向推算出来的压缩算法。效果与对比
因为是逆向推算,效果还没法跟微信一模一样,但是已经很接近微信朋友圈压缩后的效果,具体看以下对比!

Luban算法解析
微信的算法解析第一步进行采样率压缩; 第二步进行宽高的等比例压缩(微信对原图和缩略图限制了最大长宽或者最小长宽); 第三步就是对图片的质量进行压缩(一般75或者70); 第四步就是采用webP的格式。 经过这四部的处理,基本上和微信朋友圈的效果一致,包括文件大小和显示效果
Luban的算法解析
Luban压缩目前的步骤只占了微信算法中的第二与第三步,算法逻辑如下: 判断图片比例值,是否处于以下区间内。
- [1, 0.5625) 即图片处于 [1:1 ~ 9:16) 比例范围内
- [0.5625, 0.5) 即图片处于 [9:16 ~ 1:2) 比例范围内
- [0.5, 0) 即图片处于 [1:2 ~ 1:∞) 比例范围内
简单解释一下:获取图片的比例系数,如果在区间 [1, 0.5625) 中即图片处于 [1:1 ~ 9:16)比例范围内,比例以此类推,如果这个系数小于0.5,那么就给它放到 [1:2 ~ 1:∞)比例范围内。 判断图片最长边是否过边界值。
- [1, 0.5625) 边界值为:1664 * n(n=1), 4990 * n(n=2), 1280 * pow(2, n-1)(n≥3)
- [0.5625, 0.5) 边界值为:1280 * pow(2, n-1)(n≥1)
- [0.5, 0) 边界值为:1280 * pow(2, n-1)(n≥1)
步骤二:上去一看一脸懵,1664是什么,n是什么,pow又是什么。。。这写的估计只有作者自己能看懂了。其实就是判断图片最长边是否过边界值,此边界值是模仿微信的一个经验值,就是说1664、4990都是经验值,模仿微信的策略。 至于n,是返回的是options.inSampleSize的值,就是采样压缩的系数,是int型,Google建议是2的倍数,所以为了配合这个建议,代码中出现了小于10240返回的是4这种操作。最后说一下pow,其实是(长边/1280), 这个1280也是个经验值,逆向推出来的,解释到这里逻辑也清晰了。真是坑啊啊,哈哈哈 计算压缩图片实际边长值,以第2步计算结果为准,超过某个边界值则:
- width / pow(2, n-1)
- height/ pow(2, n-1)
步骤三:这个感觉没什么用,还是计算压缩图片实际边长值,人家也说了,以第2步计算结果为准,其实就是晃你的,乍一看 ,这么多步骤,哈哈哈哈,唬你呢! 计算压缩图片的实际文件大小,以第2、3步结果为准,图片比例越大则文件越大。 size = (newW * newH) / (width * height) * m;
- [1, 0.5625) 则 width & height 对应 1664,4990,1280 * n(n≥3),m 对应 150,300,300;
- [0.5625, 0.5) 则 width = 1440,height = 2560, m = 200;
- [0.5, 0) 则 width = 1280,height = 1280 / scale,m = 500;注:scale为比例值
步骤四:这个感觉也没什么用,这个m应该是压缩比。但整个过程就是验证一下压缩完之后,size的大小,是否超过了你的预期,如果超过了你的预期,将进行重复压缩。 判断第4步的size是否过小。
- [1, 0.5625) 则最小 size 对应 60,60,100
- [0.5625, 0.5) 则最小 size 都为 100
- [0.5, 0) 则最小 size 都为 100
步骤五:这一步也没啥用,也是为了后面循环压缩使用。这个size就是上面计算出来的,最小 size 对应的值公式为:size = (newW * newH) / (width * height) * m,对应的三个值,就是上面根据图片的比例分成的三组,然后计算出来的。 将前面求到的值压缩图片 width, height, size 传入压缩流程,压缩图片直到满足以上数值。 最后一步也没啥用,看字就知道是为了循环压缩,或许是微信也这样做?既然你已经有了预期,为什么不根据预期直接一步到位呢?但是裁剪的系数和压缩的系数怎么调整会达到最优一个效果,我的项目中已经对此功能进行了增加,目前还在内测,没有开源,后期稳定后会开源给大家使用。
将算法带入到开源代码中
咱们直接看算法所在类 Engine.java:
// 计算采样压缩的值,也就是模仿微信的经验值,核心内容 private int computeSize() { // 补齐宽度和长度 srcWidth = srcWidth % 2 == 1 ? srcWidth + 1 : srcWidth; srcHeight = srcHeight % 2 == 1 ? srcHeight + 1 : srcHeight; // 获取长边和短边 int longSide = Math.max(srcWidth, srcHeight); int shortSide = Math.min(srcWidth, srcHeight); // 获取图片的比例系数,如果在区间[1, 0.5625) 中即图片处于 [1:1 ~ 9:16) 比例 float scale = ((float) shortSide / longSide); // 开始判断图片处于那种比例中,就是上面所说的第一个步骤 if (scale <= 1 && scale > 0.5625) { // 判断图片最长边是否过边界值,此边界值是模仿微信的一个经验值,就是上面所说的第二个步骤 if (longSide < 1664) { // 返回的是 options.inSampleSize的值,就是采样压缩的系数,是int型,Google建议是2的倍数 return 1; } else if (longSide < 4990) { return 2; // 这个10240上面的逻辑没有提到,也是经验值,不用去管它,你可以随意调整 } else if (longSide > 4990 && longSide < 10240) { return 4; } else { return longSide / 1280 == 0 ? 1 : longSide / 1280; } // 这些判断都是逆向推导的经验值,也可以说是一种策略 } else if (scale <= 0.5625 && scale > 0.5) { return longSide / 1280 == 0 ? 1 : longSide / 1280; } else { // 此时图片的比例是一个长图,采用策略向上取整 return (int) Math.ceil(longSide / (1280.0 / scale)); } } // 图片旋转方法 private Bitmap rotatingImage(Bitmap bitmap, int angle) { Matrix matrix = new Matrix(); // 将传入的bitmap 进行角度旋转 matrix.postRotate(angle); // 返回一个新的bitmap return Bitmap.createBitmap(bitmap, 0, 0, bitmap.getWidth(), bitmap.getHeight(), matrix, true); } // 压缩方法,返回一个File File compress() throws IOException { // 创建一个option对象 BitmapFactory.Options options = new BitmapFactory.Options(); // 获取采样压缩的值 options.inSampleSize = computeSize(); // 把图片进行采样压缩后放入一个bitmap, 参数1是bitmap图片的格式,前面获取的 Bitmap tagBitmap = BitmapFactory.decodeStream(srcImg.open(), null, options); // 创建一个输出流的对象 ByteArrayOutputStream stream = new ByteArrayOutputStream(); // 判断是否是JPG图片 if (Checker.SINGLE.isJPG(srcImg.open())) { // Checker.SINGLE.getOrientation这个方法是检测图片是否被旋转过,对图片进行矫正 tagBitmap = rotatingImage(tagBitmap, Checker.SINGLE.getOrientation(srcImg.open())); } // 对图片进行质量压缩,参数1:通过是否有透明通道来判断是PNG格式还是JPG格式, // 参数2:压缩质量固定为60,参数3:压缩完后将bitmap写入到字节流中 tagBitmap.compress(focusAlpha ? Bitmap.CompressFormat.PNG : Bitmap.CompressFormat.JPEG, 60, stream); // bitmap用完回收掉 tagBitmap.recycle(); // 将图片流写入到File中,然后刷新缓冲区,关闭文件流和Byte流 FileOutputStream fos = new FileOutputStream(tagImg); fos.write(stream.toByteArray()); fos.flush(); fos.close(); stream.close(); return tagImg; }
Luban原框架问题分析
原框架问题分析
- 解码前没有对内存做出预判
- 质量压缩写死 60
- 没有提供图片输出格式选择
- 不支持多文件合理并行压缩,输出顺序和压缩顺序不能保证一致
- 检测文件格式和图像的角度多次重复创建InputStream,增加不必要开销,增加OOM风险
- 可能出现内存泄漏,需要自己合理处理生命周期
- 图片要是有大小限制,只能进行重复压缩
- 原框架用的还是RxJava1.0
技术改造方案
- 解码前利用获取的图片宽高对内存占用做出计算,超出内存的使用RGB-565尝试解码
- 针对质量压缩的时候,提供传入质量系数的接口
- 对图片输出支持多种格式,不局限于File
- 利用协程来实现异步压缩和并行压缩任务,可以在合适时机取消协程来终止任务
- 参考Glide对字节数组的复用,以及InputStream的mark()、reset()来优化重复打开开销
- 利用LiveData来实现监听,自动注销监听。
- 压缩前计算好大小,逆向推导出尺寸压缩系数和质量压缩系数
- 现在已经出了RxJava3和协程,但大多数项目中已经有了线程池,要利用项目中的线程池,而不是导入一个三方库就建一个线程池而造成资源浪费
小结
Luban压缩当初出来的时候号称 "可能是最接近微信朋友圈的图片压缩算法" ,但这个库已经三四年没有维护了,随着产品的迭代微信已经也不是当初的那个微信了,Luban压缩的库也要进行更新了。所以为了适应现在的项目,我之后会根据上面的技术改造方案对图片压缩出一个船新版本的库,更为强大。
Luban还有一个turbo分支,这个分支主要是为了兼容Android 7.0以前的系统版本,导入libjpeg-turbo的jni版本。 libjpeg-turbo是一个C语音编写的高效JPEG图像处理库,Android系统在7.0版本之前内部使用的是libjpeg非turbo版,并且为了性能关闭了Huffman编码。在7.0之后的系统内部使用了libjpeg-turbo库并且启用Huffman编码。 那么什么是Huffman编码呢?前面提到的skio引擎又是什么东西呢? / 底层哈夫曼压缩讲解 / 在前面的Android图片压缩必备基础知识中,提到的Skia是Android的重要组成部分。在鲁班压缩算法解析中提到哈夫曼压缩,那么他们之间到底是什么关系呢?
Android Skia 图像引擎
Skia 是一个2D向量图形处理函数库,2005年被Google收购后并自己维护的 c++ 实现的图像引擎,实现了各种图像处理功能,并且广泛地应用于谷歌自己和其它公司的产品中(如:Chrome、Firefox、 Android等),基于它可以很方便为操作系统、浏览器等开发图像处理功能。 Skia 在 Android 中提供了基本的画图和简单的编解码功能,可以挂接其他的第三方编码解码库或者硬件编解码库,例如libpng 和 libjpeg ,libgif等等。因此,这个函数调用bitmap.compress(Bitmap.CompressFormat.JPEG...),实际会调用 libjpeg.so动态库进行编码压缩。
最终Android编码保存图片的逻辑是Java层函数→Native函数→Skia函数→对应第三库函数(例如libjpeg)。所以skia就像一个 胶水层,用来链接各种第三方编解码库,不过Android也会对这些库做一些修改,比如修改内存管理的方式等等。 Android 在之前从某种程度来说使用的算是 libjpeg 的功能阉割版,压缩图片默认使用的是 standard huffman,而不是 optimized huffman,也就是说使用的是默认的哈夫曼表,并没有根据实际图片去计算相对应的哈夫曼表,Google 在初期考虑到手机的性能瓶颈,计算图片权重这个阶段非常占用 CPU 资源的同时也非常耗时,因为此时需要计算图片所有像素 argb 的权重,这也是 Android 的图片压缩率对比 iOS 来说差了一些的原因之一。
图像压缩与Huffman算法
这里简单介绍一下哈夫曼算法,哈夫曼算法是在多媒体处理里常用的算法之一。比如一个文件中可能会出现五个值 a,b,c,d,e,它们用二进制表达是:a. 1010 b. 1011 c. 1100 d. 1101 e. 1110 我们可以看到,最前面的一位数字是 1,其实是浪费掉了,在定长算法下最优的表达式为:
a. 010 b. 011 c. 100 d. 101 e. 110 这样我们就能做到节省一位的损耗,那哈夫曼算法比起定长算法改进的地方在哪里呢?在哈夫曼算法中我们可以给信息赋予权重,即为信息加权重,假设 a 占据了 60%,b 占据了 20%, c 占据了 20%,d,e 都是 0%:
a:010 (60%) b:011 (20%) c:100 (20%) d:101 (0%) e:110 (0%) 在这种情况下,我们可以使用哈夫曼树算法再次优化为:
a:1 b:01 c:00 所以思路当然就是出现频率高的字母使用短码,对出现频率低的使用长码,不出现的直接就去掉,最后 abcde 的哈夫曼编码就对应:1 01 00 定长编码下的abcde:010 011 100 101 110, 使用 哈夫曼树 加权重后的 编码则为 1 01 00,这就是哈夫曼算法的整体思路(关于算法的详细介绍可以参考哈夫曼树及编码讲解及例题)。 所以这个算法一个很重要的思路是必须知道每一个元素出现的权重,如果我们能够知道每一个元素的权重,那么就能够根据权重动态生成一个最优的哈夫曼表。 但是怎么去获取每一个元素,对于图片就是每一个像素中 argb 的权重呢,只能去循环整个图片的像素信息,这无疑是非常消耗性能的,所以早期 android 就使用了默认的哈夫曼表进行图片压缩。
libjpeg与optimize_coding
libjpeg在压缩图像时,有一个参数叫optimize_coding,关于这个参数,libjpeg.doc有如下解释:TRUE causes the compressor to compute optimal Huffman coding tables for the image. This requires an extra pass over the data and therefore costs a good deal of space and time. The default is FALSE, which tells the compressor to use the supplied or default Huffman tables. In most cases optimal tables save only a few percent of file size compared to the default tables. Note that when this is TRUE, you need not supply Huffman tables at all, and any you do supply will be overwritten.
由上可知,如果设置optimize_coding 为TRUE,将会使得压缩图像过程中,会先基于图像数据计算哈弗曼表。由于这个计算会显著消耗空间和时间,默认值被设置为FALSE。 那么optimize_coding参数的影响究竟会有多大呢?Skia的官方人员经过实际测试,分别设置optimize_coding=TRUE 和 FALSE 进行压缩,发现FALSE时的图片大小大约是 TRUE时的2倍+。换言之就是相同文件体积的图片,不使用哈夫曼编码图片质量会比使用哈夫曼低2倍+。 从Android 7.0版本开始,optimize_code标示已经设置为了TRUE,也就是默认使用图像生成哈夫曼表,而不是使用默认哈夫曼表。 以上内容借鉴了Android中图片压缩分析(上)中的内容,自认为不能比他写的更好,感谢QQ音乐技术团队,如有冒犯,请立即联系删除。
Android 中图片压缩分析(上):
https://cloud.tencent.com/developer/article/1006307
手写JPEG图像处理引擎
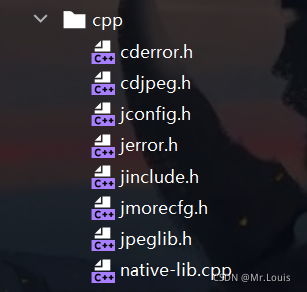
我们都知道bitmap是在native层被创建的,在Bitmap.cpp文件中,创建的bitmap其实是创建了一个SKBitmap的对象,交给了skia引擎去处理。导入jpeglib.h的头文件会需要其他的.h头文件,具体如下:
然后开始撸代码,照着安卓源码中libjpeg-turbo库里的example.c文件(系统提供的例子),开始编写native-lib.cpp文件:
#include #include #include #include #include // 因为头文件都是c文件,咱们写的是.cpp 是C++文件,这时候就需要混编,所以加入下面关键字 extern "C" { #include "jpeglib.h" } #define LOGE(...) __android_log_print(ANDROID_LOG_ERROR,LOG_TAG,__VA_ARGS__) #define LOG_TAG "louis" #define true 1 typedef uint8_t BYTE; // 写入图片函数 void writeImg(BYTE *data, const char *path, int w, int h) { // 信使:java与C沟通的桥梁,jpeg的结构体,保存的比如宽、高、位深、图片格式等信息 struct jpeg_compress_struct jpeg_struct; // 设置错误处理信息 当读完整个文件的时候就会回调my_error_exit,例如内置卡出错、没权限等 jpeg_error_mgr err; jpeg_struct.err = jpeg_std_error(&err); // 给结构体分配内存 jpeg_create_compress(&jpeg_struct); // 打开输出文件 FILE *file = fopen(path, "wb"); // 设置输出路径 jpeg_stdio_dest(&jpeg_struct, file); jpeg_struct.image_width = w; jpeg_struct.image_height = h; // 初始化 初始化 // 改成FALSE ---》 开启hufuman算法 jpeg_struct.arith_code = FALSE; // 是否采用哈弗曼表数据计算 品质相差2倍多,官方实测, 吹5-10倍的都是扯淡 jpeg_struct.optimize_coding = TRUE; // 设置结构体的颜色空间为RGB jpeg_struct.in_color_space = JCS_RGB; // 颜色通道数量 jpeg_struct.input_components = 3; // 其他的设置默认 jpeg_set_defaults(&jpeg_struct); // 设置质量 jpeg_set_quality(&jpeg_struct, 60, true); // 开始压缩,(是否写入全部像素) jpeg_start_compress(&jpeg_struct, TRUE); JSAMPROW row_pointer[1]; // 一行的rgb int row_stride = w * 3; // 一行一行遍历 如果当前的行数小于图片的高度,就进入循环 while (jpeg_struct.next_scanline < h) { // 得到一行的首地址 row_pointer[0] = &data[jpeg_struct.next_scanline * w * 3]; // 此方法会将jcs.next_scanline加1 jpeg_write_scanlines(&jpeg_struct, row_pointer, 1);//row_pointer就是一行的首地址,1:写入的行数 } jpeg_finish_compress(&jpeg_struct); jpeg_destroy_compress(&jpeg_struct); fclose(file); } extern "C" JNIEXPORT void JNICALL Java_com_maniu_wechatimagesend_MainActivity_compress(JNIEnv *env, jobject instance, jobject bitmap, jstring path_) { const char *path = env->GetStringUTFChars(path_, 0); // 获取Bitmap信息 AndroidBitmapInfo bitmapInfo; AndroidBitmap_getInfo(env, bitmap, &bitmapInfo); // 存储ARGB所有像素点 BYTE *pixels; // 1、读取Bitmap所有像素信息 AndroidBitmap_lockPixels(env, bitmap, (void **) &pixels); // 获取bitmap的 宽,高,format int h = bitmapInfo.height; int w = bitmapInfo.width; // 存储RGB所有像素点 BYTE *data,*tmpData; // 2、解析每个像素,去除A通量,取出RGB通量, // 假如图片的像素是1920*1080,只有RGB三个颜色通道的话,计算公式为 w*h*3 data= (BYTE *) malloc(w * h * 3); // 存储RGB首地址 tmpData = data; BYTE r, g, b; int color; for (int i = 0; i < h; ++i) { for (int j = 0; j < w; ++j) { color = *((int *) pixels); // 取出R G B r = ((color & 0x00FF0000) >> 16); g = ((color & 0x0000FF00) >> 8); b = ((color & 0x000000FF)); // 赋值 *data = b; *(data + 1) = g; *(data + 2) = r; // 指针后移 data += 3; pixels += 4; } } // 3、读取像素点完毕 解锁, AndroidBitmap_unlockPixels(env, bitmap); // 直接用data写数据 writeImg(tmpData, path, w, h); env->ReleaseStringUTFChars(path_, path); }
整个讲解已经在代码里已经做了注释。
小结
查阅源码发现: 在Android系统在7.0版本之前内部使用的是libjpeg非turbo版,并且为了性能关闭了Huffman编码计算,使用默认的哈夫曼表,而不是算数编码。 从Android 7.0版本开始,系统内部使用了libjpeg-turbo库并且启用Huffman编码,标示就是optimize_code已经设置为了TRUE,也就是默认使用Huffman压缩计算生成新的哈夫曼表。libjpeg-turbo是一个C语音编写的高效JPEG图像处理库,相当于是一个libjpeg的增强版。 这也就是Luban压缩为什么会给出一个turbo分支,其实是为了兼容Android 7.0版本之前。
审核编辑:汤梓红
声明:本文内容及配图由入驻作者撰写或者入驻合作网站授权转载。文章观点仅代表作者本人,不代表电子发烧友网立场。文章及其配图仅供工程师学习之用,如有内容侵权或者其他违规问题,请联系本站处理。
举报投诉
-
史上最全的红外遥控器编码协议2020-12-12 3641
-
linux下各种格式的压缩包的解压方法总结2019-07-04 1767
-
电脑上的图片怎么批量压缩2018-09-21 758
-
史上最全的51单片机指令集2016-09-27 8041
-
史上最全word用法2016-08-29 5124
-
史上最全的Protel99的元件库、封装库2015-08-04 29886
-
史上最全的PCB封装命名规范2015-06-12 39678
-
史上最全的示波器学习资料2013-04-21 10145
-
史上最全的Quartus II 中的warning及解决办法2012-11-28 22484
-
史上最全的毕业设计资料--欢迎下载2012-08-30 9572
-
史上最全LED贴片灯知识资料集合2012-08-16 14028
-
史上最全的运放资料(实战应用)2012-08-04 58872
-
史上最全面示波器教材2012-08-01 74448
-
吐血分享—史上最全51单片机工具2011-11-16 175682
全部0条评论

快来发表一下你的评论吧 !

