
描述u-boot驱动模型的数据结构
电子说
描述
一、描述u-boot驱动模型的数据结构
u-boot有一个功能强大的驱动模型,这一点与linux内核一致。驱动模型对设备驱动相关操作做了一个抽象:使用uclass来描述设备类,使用driver来描述驱动,使用udevice来描述设备。
(1-1)uclass
uclass表示以相同特征方式运行的一组device。uclass提供一种以相同接口方式访问组内单个设备的方式。例如:GPIO类提供了get/set值的操作。一个I2C类可能有10个I2C端口,其中4个用于一个驱动程序,6个用于另一个驱动程序。
该结构由struct uclass表示(/include/dm/uclass.h):
struct uclass {
 void *priv;  //这个类的私有数据
 struct uclass_driver *uc_drv; //类本身的驱动程序,不要与struct driver混淆。
 struct list_head dev_head; //该类中的设备列表(当设备的绑定方法被调用时,它们会被附加到它们的类上)。
 struct list_head sibling_node; //类链表中的下一个类。
};
(1-2)driver
用于提供与外设交互的高级接口。本文将分析这一点。
(1-3)udevice
与特定端口或外围设备绑定的驱动程序实例
二、声明驱动
通过分析u-boot的/drivers目录下的文件可以得出u-boot驱动程序具有共同的特征,驱动程序声明一般具有如下类似的结构(参见drivers/demo/demo-shape.c):
static const struct demo_ops shape_ops = {
        .hello = shape_hello,
        .status = shape_status,
};

U_BOOT_DRIVER(demo_shape_drv) = {
        .name   = "demo_shape_drv",
        .id     = UCLASS_DEMO,
        .ops    = &shape_ops,
        .priv_data_size = sizeof(struct shape_data),
};
例如上述代码所示,首先会创建一个xxx_ops结构,该结构与具体的设备驱动相关。然后使用U_BOOT_DRIVER宏将其声明为u-boot驱动。
在U_BOOT_DRIVER中,还可以指定用于绑定和解绑定的方法,这些方法会在适当的时候被调用。对于大多数驱动程序来说,一般只会使用到“probe”和“remove”方法。
设备驱动可以提供的方法记录在device.h头文件中:
struct driver {
 char *name;          //设备名称。
 enum uclass_id id;  //指示该驱动属于哪个uclass。
 const struct udevice_id *of_match; //要匹配的兼容字符串列表,以及每个字符串的标识数据。
 int (*bind)(struct udevice *dev);       //调用该函数将设备绑定到其驱动程序。
 int (*probe)(struct udevice *dev);   //用于探测设备,即激活设备。
 int (*remove)(struct udevice *dev); //调用该函数来移除一个设备。
 int (*unbind)(struct udevice *dev);  //调用该函数来解除设备与驱动程序的绑定。
 int (*ofdata_to_platdata)(struct udevice *dev); //在probe之前调用该函数以解码设备树数据。
 int (*child_post_bind)(struct udevice *dev); //在一个新子设备被绑后调用。
 int (*child_pre_probe)(struct udevice *dev); //在probe子设备之前调用。设备已经分配了内存,但还没有被probe到。
 int (*child_post_remove)(struct udevice *dev); //在子设备被移除后调用。设备已经分配了内存,但是它的device remove()方法已经被调用。
 int priv_auto_alloc_size;   //如果非零,这是在设备的->priv指针中分配的私有数据的大小。如果为零,则驱动负责分配所需的数据。

  //如果非零,这是在设备的->platdata中分配的平台数据的大小。这通常只对设备树驱动有用(那些有of_match的驱动),因为使用平台数据的驱动会在U_BOOT_DEVICE()实例化中提供数据。
 int platdata_auto_alloc_size;

  //每个设备都可以保存其父设备拥有的私有数据。如果这个值非零,这个将被自动分配。
 int per_child_auto_alloc_size;

  //bus存储关于它的子设备的信息。如果非零,该数值则是数据的大小,将分配在子进程的parent_platdata指针指向的区域中。
 int per_child_platdata_auto_alloc_size;

  //驱动特殊操作。这通常是一个由驱动定义的函数指针列表,用于实现类(uclass)所需要的驱动函数。
 const void *ops;

  //驱动标志。
 uint32_t flags;
};
在u-boot中,让一个设备工作的顺序是:

U_BOOT_DRIVER宏创建了一个可从C访问的数据结构,因此驱动模型可以找到可用的驱动程序。下文将分析该宏的具体实现。
三、U_BOOT_DRIVER宏分析
U_BOOT_DRIVER宏定义在/include/dm/device.h文件中:
/* Declare a new U-Boot driver */
#define U_BOOT_DRIVER(__name)
 ll_entry_declare(struct driver, __name, driver)
ll_entry_declare同样是一个宏定义,用于声明链接器生成的数组项,定义在/include/linker_lists.h中:
#define ll_entry_declare(_type, _name, _list)
 _type _u_boot_list_2_##_list##_2_##_name __aligned(4)
   __attribute__((unused,
   section(".u_boot_list_2_"#_list"_2_"#_name)))
-
_type:条目的数据类型。
-
_name:条目的名称。
-
_list:列表名称。只包含在C变量中允许的字符。
ll_entry_declare宏声明了一个变量,该变量被放置在链接器生成的数组中。使用此宏声明的变量必须在编译时初始化。
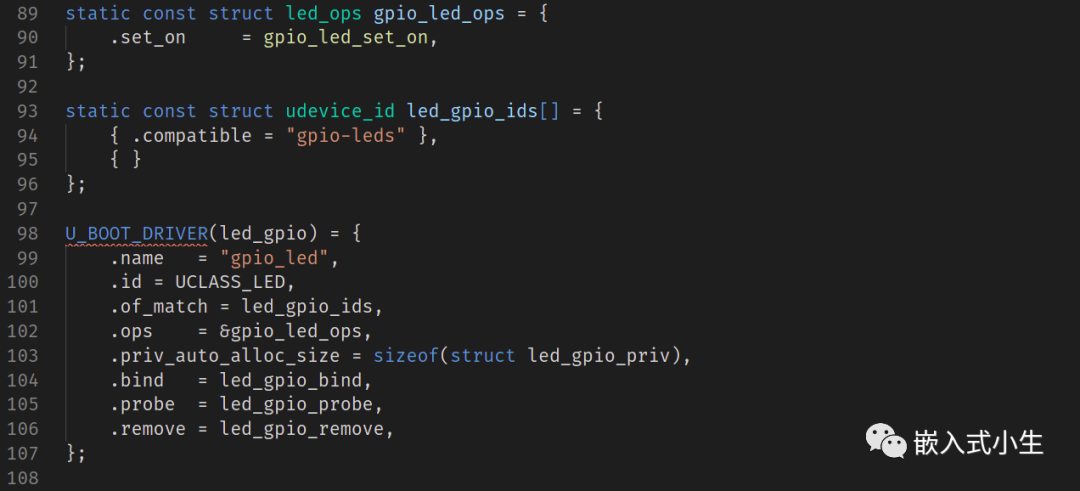
此处以/drivers/led目录下的led_gpio.c驱动为例,在该文件的末尾使用U_BOOT_DRIVER进行了驱动声明:
那么将98行宏定义展开则是:
struct driver _u_boot_list_2_driver_2_led_gpio __aligned(4)
   __attribute__((unused,
   section(".u_boot_list_2_driver_2_led_gpio"))) = {
       .name = "gpio_led",
        .id = UCLASS_LED,
        .of_match = led_gpio_ids,
        .ops = &gpio_led_ops,
        .priv_auto_alloc_size = sizeof(struct led_gpio_priv),
        .bind = led_gpio_bind,
        .probe = led_gpio_probe,
        .remove = led_gpio_remove,
      }
从上述代码片段可知,宏定义展开后本质则是定义一个struct driver的驱动结构变量,并初始化结构变量中的元素。然后将其放到.u_boot_list_2_driver_2_led_gpio节段中。在u-boot源码/drivers目录下存在大量使用U_BOOT_DRIVER声明的驱动,这些驱动会形成一张表(本质为数组)。
至此,分析完U_BOOT_DRIVER这个宏定义,则有一个疑问产生了?u-boot是如何使用这张表的呢?
我们继续查看/include/linker_lists.h文件,该文件中以宏定义的方式提供了访问这张表的首元素和尾元素和数组总数的接口:
(1)指向连接器生成数组的第一个条目:
#define ll_entry_start(_type, _list)
({
 static char start[0] __aligned(4) __attribute__((unused,
  section(".u_boot_list_2_"#_list"_1")));
 (_type *)&start;
})
(2)指向在连接器生成的数组的最后一个条目的后面:
#define ll_entry_end(_type, _list)
({
 static char end[0] __aligned(4) __attribute__((unused,
  section(".u_boot_list_2_"#_list"_3")));
 (_type *)&end;
})
(3)返回链接器生成数组中条目的数量:
#define ll_entry_count(_type, _list)
 ({
  _type *start = ll_entry_start(_type, _list);
  _type *end = ll_entry_end(_type, _list);
  unsigned int _ll_result = end - start;
  _ll_result;
 })
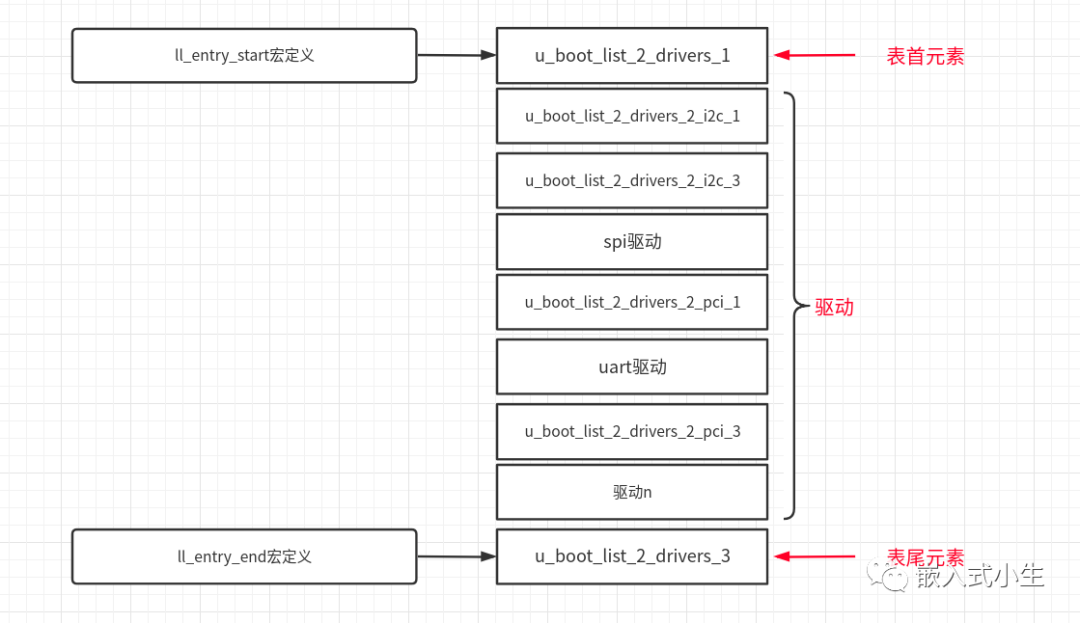
综上,终于拨开迷雾,实则这张表开始的表项则是:u_boot_list_2_drivers_1,表尾项则是:u_boot_list_2_drivers_3,大量的驱动则在这两者之间。三者关系如下图所示:

在u-boot源码中,当需要操作这张表的时候,则会使用到这三个宏定义来完成这张表的循环遍历操作。
四、总结
本文描述了u-boot驱动模型的大致组成,重点描述在驱动程序中U_BOOT_DRIVER宏定义的使用以及背后的实现机制。
下回会接着分析u-boot驱动模型是如何起来的,如何“雄霸一方”。
审核编辑:汤梓红
-
U-boot的基本介绍2023-07-14 4016
-
U-boot驱动SPLASH_SCREEN驱动移植方法2023-06-09 1837
-
U-boot的QSPI驱动移植方法及验证方法2023-04-14 4624
-
Linux U-Boot开发指南2023-03-06 2158
-
深度解析U-Boot网络实现2022-02-07 735
-
浅析U-Boot NAND FLASH驱动2019-07-08 2684
-
你了解u-boot与linux内核间的参数传递过程?2019-05-13 2313
-
u-boot简介2017-10-14 3901
-
U-Boot结构功能介绍2010-07-30 1388
-
u-boot的Makefile分析2010-05-17 2212
-
Porting U-Boot to the Control2010-01-25 603
全部0条评论

快来发表一下你的评论吧 !

