

基于PCB的64键原型键盘矩阵
音视频及家电
描述
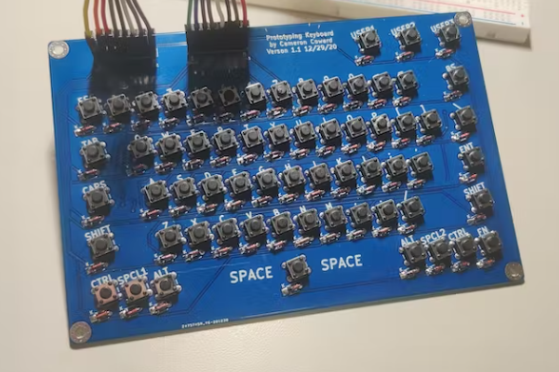
这是一个简单的 PCB 键盘,您可以轻松地将其用于您的 Arduino 项目。
我目前正在做一个将有一个集成键盘的项目,做的时候碰上了一个问题:我如何在开发板原型中包含一个键盘?我不能使用 USB 键盘或现有的基于 Arduino 的键盘,因为实际项目中的键盘直接连接到处理所有其他功能的微控制器。所以我设计了这个基本的基于 PCB 的 64 键原型键盘矩阵。
此 PCB 不包含任何 IC 。键盘矩阵的行和列直接连接到排针,以便键盘可以连接到 Arduino 或任何其他微控制器。它非常适合对包含集成键盘的项目进行原型设计。
项目需要包含详细的、大量注释的代码,以使其与任何具有足够 I/O 引脚可用的 Arduino 兼容开发板一起工作——需要 11 个引脚。键盘有 64 个键,包括 shift、caps、ctrl、alt、fn 和“special”的修饰符。还有六个额外的键可用于定制您喜欢的任何内容。可以单独定义每个键的功能,包括激活修饰符时每个键的功能。在我看来,这比现有的键盘代码更有用,后者严重限制了您自定义按键行为的能力。
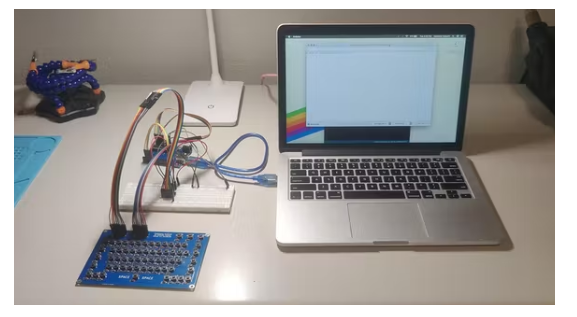
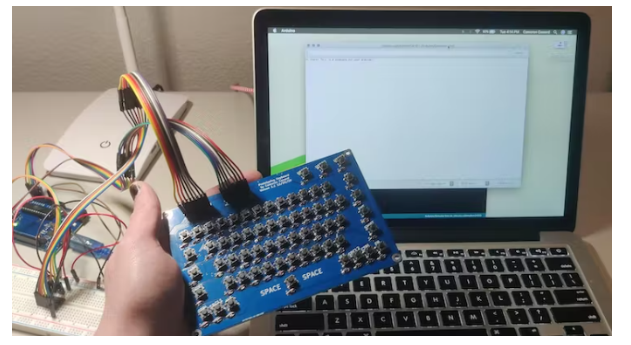
提供的代码会将文本打印到 Serial。如果您希望文本转到其他地方,则可以轻松更改此设置。
关于程序大小的说明:
项目代码非常大,因为它不使用任何现有的库。我完全从头开始编写这段代码,以实现我需要的可定制性。在 Arduino UNO 上,这将使用 9100 字节 (28%) 的程序存储空间,全局变量使用 394 字节 (19%) 的动态内存。
我的代码可能会更高效,并且键盘的库和草图肯定更小,但这是我可以设计的唯一方法,可以为每个修饰符的每个键提供完全的灵活性。它还考虑了现实世界的键盘使用情况。例如,我的代码在启用 Caps Lock 的情况下按 Shift 键将生成应有的小写字母。默认情况下,按住 FN 键的同时按 ESC 不会执行任何操作。但是这种行为是完全可定制的,所以你可以随意改变它。
所需:
定制PCB
6x6x5mm 触觉瞬时按钮(x64)
1N4148 开关二极管(x64)
1x8 排针,母头或公头(x2)
74HC595移位寄存器
跳线
面包板
Arduino Uno或任何与 Arduino 兼容的微控制器开发板
第 1 步:键盘矩阵的工作原理
为什么需要键盘矩阵?
这个键盘有 64 个键。如果您要将这些按钮中的每一个都直接连接到您的开发板,则需要 64 个 I/O 引脚。那是很多引脚,比大多数开发板都可用。为了将它降低到一个更合理的数字,我们可以使用键盘矩阵,它只需要与键数的平方根(向上取整)相等的引脚数。
设置了键盘矩阵,因此连接了行中的每个键开关,并且连接了列中的每个键开关。当我们想查看按下了哪些键时,我们“激活”第一行,然后检查每一列。如果特定列处于活动状态,我们就知道该列和第 1 行中的键已被按下。然后我们停用第 1 行并激活第 2 行,然后再次检查所有列。在所有行都被激活后,我们只需从第一行重新开始。
如何扫描键盘矩阵:
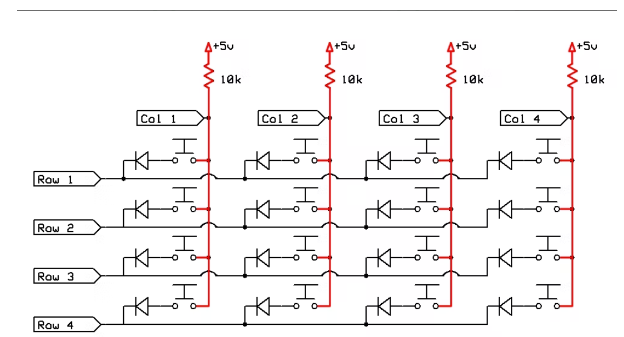
因为我们使用的是微控制器,所以“激活”意味着将该行设置为 LOW 或 HIGH。在这种情况下,我们将行设置为低,因为我们在列输入引脚上使用了微控制器的内置上拉电阻。如果没有上拉或下拉电阻,输入引脚将因接口而做出不可预测的反应,这将记录错误的按钮按下。
Arduino UNO 中使用的 ATmega328P 微控制器没有任何内置下拉电阻,只有上拉电阻。所以我们正在使用这些。上拉电阻将每个输入引脚连接到 5V,确保在按下按钮之前它们始终读取为高电平。
所有的行通常也设置为 HIGH,这可以防止列引脚连接到行引脚,无论是否按下按钮。但是当我们准备好检查一行时,我们可以将该行设置为 LOW 。如果按下该行中的按钮,这将为输入引脚提供一个被拉到地的路径——导致该列现在读取为 LOW 。
因此,总而言之:我们将一行设置为 LOW,然后检查哪些列引脚现在读取 LOW。这些对应于按下的按钮。这个过程发生得非常快,因此我们可以每秒多次扫描整个键盘。我的代码将其限制为每秒 200 次,以平衡性能、弹跳和确保每个按键都被捕获。
二极管、重影和 n 键翻转:
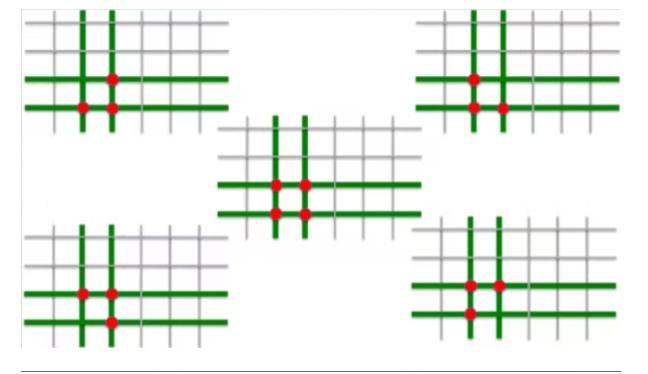
当按住某些按钮组合时,电路中的二极管可以防止意外按键。二极管只允许电流沿一个方向流动,从而防止重影。如果我们不使用二极管,那么按下某些键可能会导致另一个未按下的键被注册,因为电流流过相邻的开关。这在简化的图形中显示,其中按下任何三个相邻的键都会导致第四个角的键被注册,即使它没有被按下。二极管可以防止这种情况并启用“n键翻转”,这意味着我们可以按我们想要的任何组合按我们想要的任意数量的键,而不会出现任何问题。
用移位寄存器保存引脚:
精明的你们可能注意到我说键盘矩阵需要的引脚数等于键数的平方根,但我也说过我的键盘设计只需要 11 个引脚。应该是16吧?不,因为我们使用的是 74HC595 移位寄存器。这个移位寄存器让我们只使用 Arduino 的三个 I/O 引脚来控制多达八个输出引脚。这三个引脚让我们向移位寄存器发送一个字节(八位),它将其八个输出引脚设置为高电平或低电平。通过对输出行引脚使用移位寄存器,我们节省了 5 个完整的 I/O 引脚!
“那么为什么不对输入引脚也使用移位寄存器呢?” 你问。最简单的答案是输入需要不同类型的移位寄存器,而我手头没有那种类型。但是使用移位寄存器进行输入也会使我们读取列的方式复杂化,并可能导致噪声和“弹跳”问题。我只想说在这种情况下我不需要承担这个头疼的事。
第 2 步:PCB 设计
原理图设计
现在您了解了键盘矩阵的工作原理,我的 PCB 设计应该很简单。我在 KiCAD 中设计了 PCB,并从原理图开始。我只是放置了一个按钮符号和一个二极管符号,然后复制并粘贴它们,直到我拥有 64 个键的网格。然后我添加了两个 1x8 针头符号,一个用于行,一个用于列。按钮的一侧连接成列,按钮的另一侧连接成行。
下一步是将 PCB 封装分配给每个原理图符号。KiCAD 包含的封装库内置了必要的封装。当您设计自己的 PCB 时,您必须非常小心地选择正确的封装,因为这些实际上最终会出现在您的 PCB 上。有许多组件具有非常相似的足迹,但间距或其他方面略有不同。确保选择与您的实际组件相匹配的组件。
封装和引脚编号
请特别注意引脚编号。KiCAD 有一个奇怪的问题,即原理图二极管符号引脚编号与封装引脚编号不匹配。这导致二极管反向,考虑到它们的极性,这是一个严重的问题,必须创建一个自定义二极管封装并交换引脚号。
PCB布局
完成原理图并分配足迹后,我开始进行实际的 PCB 布局。电路板轮廓在 Autodesk Fusion 360 中创建,导出为 DXF,然后在 Edge Cuts 图层上导入 KiCAD。之后的大部分工作只是简单地排列按钮,使它们的布局类似于普通键盘。
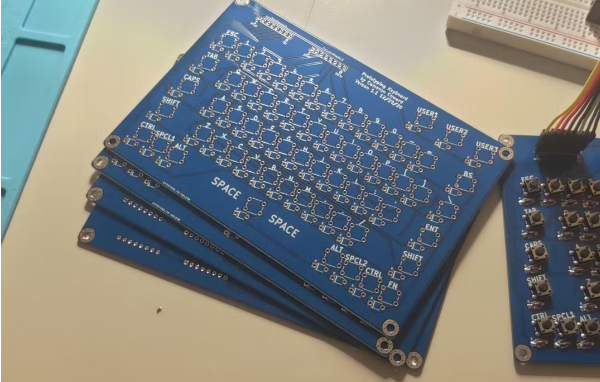
PCB制造
设计好电路板后,我简单地绘制了所有层并将它们添加到一个 zip 文件夹中。该文件夹在此处提供,可以直接上传到 JLCPCB 等 PCB 制造服务。
第 3 步:PCB 组装
这是整个项目中最简单但最繁琐的一步。只需将所有组件焊接到位。它们都是通孔元件,易于焊接。特别注意二极管的方向。二极管上的标记应与 PCB 上的标记相匹配。
根据我的经验,最简单的方法是用第三只手将 PCB 固定到位,然后将所有二极管先放入。然后翻转电路板并将它们全部焊接,然后夹住引线。然后放置所有按钮并焊接它们。然后将排针焊接到位。您可以使用母头或公头排针,这完全取决于您。如果你使用公头然后放在板子下面,间距是正确的,可以将它们直接粘在面包板上。
第 4 步:将键盘连接到您的 Arduino
接线看起来很复杂,但是当您注意到细节时,它其实并没有那么糟糕。
八根跳线将从列标题直接进入以下 Arduino 引脚:
第 1 列 》 A0
第 2 栏 》 A1
第 3 栏 》 A2
第 4 栏 》 A3
第 5 栏 》 A4
第 6 栏 》 A5
第 7 栏 》 5
第 8 栏 》 6
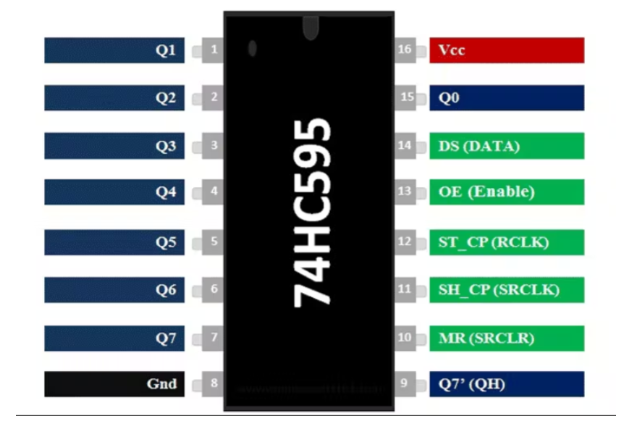
接下来,将 74HC595 移位寄存器放在面包板上,横跨中间休息处。注意芯片的方向,圆点表示引脚 1。
查看接线图,了解 5V 和接地连接的位置。移位寄存器有两个连接到 5V 的引脚和两个接地的引脚。
只需三根线即可将移位寄存器连接到 Arduino。他们是:
Shift(时钟)11 》 4
Shift(闩锁)12 》 3
Shift(数据)14 》 2
出于某种原因,移位寄存器的输出引脚以违反直觉的方式排列。将移位寄存器连接到行引脚时,请特别注意移位寄存器引脚图。他们是:
第 1 行 》 Shift (Q0) 15
第 2 行 》 Shift (Q1) 1
第 3 行 》 Shift (Q2) 2
第 4 行 》 Shift (Q3) 3
第 5 行 》 Shift (Q4) 4
第 6 行 》 Shift (Q5) 5
Shift 7 》 Shift (Q6) 6
Shift 8 》 Shift (Q7) 7
没有任何东西连接到 Arduino 0 或 1 引脚,因为它们也用于串行端口并导致冲突。
第 5 步:刷新 Arduino 代码
这一步没有什么特别之处,只需像使用任何其他 Arduino 项目一样上传代码即可。
代码中的所有内容都有详细的注释,您可以阅读,因此我不会在这里详细介绍。基本上,引脚设置为输入和输出。主循环只包含一个计时器功能。每5ms,它调用函数扫描键盘。在检查每一列之前,该函数调用一个单独的函数来设置移位寄存器。按下的键将其值打印到串行。
如果要更改按键时打印的内容,只需更改Serial.print(“_”); 在与条件相对应的 if 语句中。例如,您可以设置按住 FN 并按 N 时打印的内容。对于每个其他带有每个修饰符的键也是如此。
许多键在这段代码中根本不做任何事情,因为它只是打印到串行。这意味着退格键不起作用,因为您无法从串行监视器中删除该数据已经收到。但是,如果您愿意,可以随意使用更改。
在项目中使用键盘
打印到串口很好,但这并不是这个键盘的真正意义。该键盘的目的是为更复杂的项目制作原型。这就是为什么很容易改变功能的原因。例如,如果您想将键入的文本打印到 OLED 屏幕上,您可以简单地将每个Serial.print(替换为display.print(或您的特定显示器需要的任何内容。Arduino IDE 的Replace All工具非常适合替换所有这些一步到位。
ProtoKeyboardV1-Bits.ino:
/* Sketch for Prototyping Keyboard V1.2
* by Cameron Coward 1/30/21
*
* Tested on Arduino Uno. Requires custom PCB
* and a 74HC595 shift register.
*
* More info: https://www.hackster.io/cameroncoward/64-key-prototyping-keyboard-matrix-for-arduino-4c9531
*/
const int rowData = 2; // shift register Data pin for rows
const int rowLatch = 3; // shift register Latch pin for rows
const int rowClock = 4; // shift register Clock pin for rows
// these are our column input pins. Pin 0 and Pin 1 are not used,
// because they cause issues (presumably because they're TX and RX)
const int colA = A0;
const int colB = A1;
const int colC = A2;
const int colD = A3;
const int colE = A4;
const int colF = A5;
const int colG = 5;
const int colH = 6;
// shiftRow is the required shift register byte for each row, rowState will contain pressed keys for each row
const byte shiftRow[] = {B01111111, B10111111, B11011111, B11101111, B11110111, B11111011, B11111101, B11111110};
byte rowState[] = {B00000000, B00000000, B00000000, B00000000, B00000000, B00000000, B00000000, B00000000};
byte prevRowState[] = {B00000000, B00000000, B00000000, B00000000, B00000000, B00000000, B00000000, B00000000};
// ASCII codes for keys with no modifiers pressed. Modifiers are NULL (0),
// because we will check those separately and their values should not be printed.
const char key[] = {
0, 49, 50, 51, 52, 53, 54, 55,
56, 57, 48, 45, 61, 0, 9, 113,
119, 101, 114, 116, 121, 117, 105, 111,
112, 91, 93, 92, 7, 97, 115, 100,
102, 103, 104, 106, 107, 108, 59, 39,
0, 0, 122, 120, 99, 118, 98, 110,
109, 44, 46, 47, 0, 0, 0, 0,
32, 0, 0, 0, 0, 0, 0, 0
};
// ASCII codes for keys with shift pressed AND caps is active
const char capsShiftKey[] = {
0, 33, 64, 35, 36, 37, 94, 38,
42, 40, 41, 95, 43, 0, 9, 113,
119, 101, 114, 116, 121, 117, 105, 111,
112, 123, 125, 124, 7, 97, 115, 100,
102, 103, 104, 106, 107, 108, 58, 22,
0, 0, 122, 120, 99, 118, 98, 110,
109, 44, 46, 47, 0, 0, 0, 0,
32, 0, 0, 0, 0, 0, 0, 0
};
// ASCII codes for keys with shift pressed.
const char shiftKey[] = {
0, 33, 64, 35, 36, 37, 94, 38,
42, 40, 41, 95, 43, 0, 9, 81,
87, 69, 82, 84, 89, 85, 73, 79,
80, 123, 125, 124, 7, 65, 83, 68,
70, 71, 72, 74, 75, 76, 58, 22,
0, 0, 90, 88, 67, 86, 66, 78,
77, 44, 46, 47, 0, 0, 0, 0,
32, 0, 0, 0, 0, 0, 0, 0
};
// ASCII codes for keys with ctrl pressed.
const char ctrlKey[] = {
0, 0, 0, 0, 0, 0, 0, 0,
0, 0, 0, 0, 0, 0, 9, 0,
0, 0, 0, 0, 0, 0, 0, 0,
0, 0, 0, 0, 0, 0, 0, 0,
0, 0, 0, 0, 0, 0, 0, 0,
0, 0, 0, 0, 0, 0, 0, 0,
0, 0, 0, 0, 0, 0, 0, 0,
32, 0, 0, 0, 0, 0, 0, 0
};
// ASCII codes for keys with spcl pressed.
const char spclKey[] = {
0, 0, 0, 0, 0, 0, 0, 0,
0, 0, 0, 0, 0, 0, 0, 0,
0, 0, 0, 0, 0, 0, 0, 0,
0, 0, 0, 0, 0, 0, 0, 0,
0, 0, 0, 0, 0, 0, 0, 0,
0, 0, 0, 0, 0, 0, 0, 0,
0, 0, 0, 0, 0, 0, 0, 0,
0, 0, 0, 0, 0, 0, 0, 0
};
// ASCII codes for keys with alt pressed.
const char altKey[] = {
0, 0, 0, 0, 0, 0, 0, 0,
0, 0, 0, 0, 0, 0, 0, 0,
0, 0, 0, 0, 0, 0, 0, 0,
0, 0, 0, 0, 0, 0, 0, 0,
0, 0, 0, 0, 0, 0, 0, 0,
0, 0, 0, 0, 0, 0, 0, 0,
0, 0, 0, 0, 0, 0, 0, 0,
0, 0, 0, 0, 0, 0, 0, 0
};
// ASCII codes for keys with fn pressed.
const char fnKey[] = {
0, 0, 0, 0, 0, 0, 0, 0,
0, 0, 0, 0, 0, 0, 0, 0,
0, 0, 0, 0, 0, 0, 0, 0,
0, 0, 0, 0, 0, 0, 0, 0,
0, 0, 0, 0, 0, 0, 0, 0,
0, 0, 0, 0, 0, 0, 0, 0,
0, 0, 0, 0, 0, 0, 0, 0,
0, 0, 0, 0, 0, 0, 0, 0
};
// ASCII codes for keys with caps is active
const char capsKey[] = {
0, 49, 50, 51, 52, 53, 54, 55,
56, 57, 48, 45, 61, 0, 9, 81,
87, 69, 82, 84, 89, 85, 73, 79,
80, 91, 93, 92, 7, 65, 83, 68,
70, 71, 72, 74, 75, 76, 59, 39,
0, 0, 90, 88, 67, 86, 66, 78,
77, 44, 46, 47, 0, 0, 0, 0,
32, 0, 0, 0, 0, 0, 0, 0
};
long previousKeyboardMicros = 0; // will store last time keyboard was checked
// the follow variables is a long because the time, measured in miliseconds,
// will quickly become a bigger number than can be stored in an int.
long keyboardInterval = 500; // interval at which to check keyboard (microseconds)
int rowToCheck = 0; // We check one row per loop of checkKeyboard(), this combined with keyboardInterval
// gives the shiftRegister time to fully update between row checks
bool caps = false; // is caps lock on?
bool shift = false; // is either left or right shift pressed?
bool capsShift = false; // are shift AND caps active?
bool ctrl = false; // is the ctrl key pressed?
bool spcl = false; // is the spcl key pressed?
bool alt = false; // is the alt key pressed?
bool fn = false; // is the function key pressed?
void setup() {
Serial.begin(9600);
// setup all column pin as inputs with internal pullup resistors
pinMode(colA, INPUT_PULLUP);
pinMode(colB, INPUT_PULLUP);
pinMode(colC, INPUT_PULLUP);
pinMode(colD, INPUT_PULLUP);
pinMode(colE, INPUT_PULLUP);
pinMode(colF, INPUT_PULLUP);
pinMode(colG, INPUT_PULLUP);
pinMode(colH, INPUT_PULLUP);
// the outputs needed to control the 74HC595 shift register
pinMode(rowLatch, OUTPUT);
pinMode(rowClock, OUTPUT);
pinMode(rowData, OUTPUT);
updateShiftRegister(B11111111); // make sure shift register starts at all HIGH
}
void loop() {
mainTimer();
}
void mainTimer() {
unsigned long currentMicros = micros(); // how many microseconds has the Arduino been running?
if(currentMicros - previousKeyboardMicros > keyboardInterval) { // if elapsed time since last check exceeds the interval
// save the last time the keyboard was checked
previousKeyboardMicros = currentMicros;
checkKeyboard(); // check all of the keys and print out the results to serial
}
}
void updateShiftRegister(byte row) {
//this function sets the shift register according to the byte that was passed to it
digitalWrite(rowLatch, LOW); // set latch to low so we can write an entire byte at once
shiftOut(rowData, rowClock, MSBFIRST, row); // write that byte
digitalWrite(rowLatch, HIGH); // set latch back to high so it shift register will remain stable until next change
}
void checkKeyboard() {
// set the shift register to the current row's byte value, from the shiftRow[] byte array
updateShiftRegister(shiftRow[rowToCheck]);
// Check each column
if (digitalRead(colA) == LOW) {
bitSet(rowState[rowToCheck], 0);
} else {
bitClear(rowState[rowToCheck], 0);
}
if (digitalRead(colB) == LOW) {
bitSet(rowState[rowToCheck], 1);
} else {
bitClear(rowState[rowToCheck], 1);
}
if (digitalRead(colC) == LOW) {
bitSet(rowState[rowToCheck], 2);
} else {
bitClear(rowState[rowToCheck], 2);
}
if (digitalRead(colD) == LOW) {
bitSet(rowState[rowToCheck], 3);
} else {
bitClear(rowState[rowToCheck], 3);
}
if (digitalRead(colE) == LOW) {
bitSet(rowState[rowToCheck], 4);
} else {
bitClear(rowState[rowToCheck], 4);
}
if (digitalRead(colF) == LOW) {
bitSet(rowState[rowToCheck], 5);
} else {
bitClear(rowState[rowToCheck], 5);
}
if (digitalRead(colG) == LOW) {
bitSet(rowState[rowToCheck], 6);
} else {
bitClear(rowState[rowToCheck], 6);
}
if (digitalRead(colH) == LOW) {
bitSet(rowState[rowToCheck], 7);
} else {
bitClear(rowState[rowToCheck], 7);
}
// set all shift register pins to HIGH, this keeps values from "bleeding" over to the next loop
updateShiftRegister(B11111111);
rowToCheck = rowToCheck + 1; // iterate to next row
// after checking the 8th row, check the states (button presses) and then start over on the 1st row
if (rowToCheck > 7 ) {
checkPressedKeys();
rowToCheck = 0;
}
}
void checkPressedKeys() {
// check if either shift key is pressed
if (bitRead(rowState[5], 1) | bitRead(rowState[6], 4)) {
shift = true;
} else {
shift = false;
}
// check if either ctrl key is pressed
if (bitRead(rowState[6], 5) | bitRead(rowState[7], 3)) {
ctrl = true;
} else {
ctrl = false;
}
// check if either spcl key is pressed
if (bitRead(rowState[6], 6) | bitRead(rowState[7], 2)) {
spcl = true;
} else {
spcl = false;
}
// check if either alt key is pressed
if (bitRead(rowState[6], 7) | bitRead(rowState[7], 1)) {
alt = true;
} else {
alt = false;
}
// check if FN key is pressed
if (bitRead(rowState[7], 4)) {
fn = true;
} else {
fn = false;
}
// check caps is active and shift is pressed
if (shift == true && caps == true) {
capsShift = true;
} else {
capsShift = false;
}
for (int i = 8; i >= 0; i--) { // iterate through each row
for (int j = 7; j >= 0; j--) { // iterate through each bit in that row
bool newBit = bitRead(rowState[i], j); // check the state of that bit
bool prevBit = bitRead(prevRowState[i], j); // check the previous state of that bit
if ((newBit == 1) && (prevBit == 0)) { // only allows button press if state has changed to true
int thisChar = (i * 8) + j; // calculate which position in char array to select
if (capsShift == true) {
processKey(capsShiftKey[thisChar]);
} else if (shift == true) {
processKey(shiftKey[thisChar]);
} else if (ctrl == true) {
processKey(ctrlKey[thisChar]);
} else if (alt == true) {
processKey(altKey[thisChar]);
} else if (spcl == true) {
processKey(spclKey[thisChar]);
} else if (fn == true) {
processKey(fnKey[thisChar]);
} else if (caps == true) {
processKey(capsKey[thisChar]);
} else {
processKey(key[thisChar]);
}
}
if (newBit == 1) {
bitSet(prevRowState[i], j); // set previous bit state to true if a key is pressed
} else {
bitClear(prevRowState[i], j); // set previous bit state to false if key isn't pressed, so it can be pressed again
}
}
}
}
void processKey(char receivedKey) {
if (receivedKey == 7) { // check for special functions in the same way as caps (add new "else if" statements)
caps = !caps;
} else {
Serial.print(receivedKey); // if char does not correspond to a special function, simply print that char
}
}
-
矩阵键盘专题2011-10-25 16239
-
矩阵键盘2012-04-19 2213
-
多键同时按下的矩阵键盘扫描应该怎么写2012-11-23 10389
-
请问矩阵键盘中组合键怎么扫描?2019-05-15 2289
-
基于CPLD 的矩阵键盘扫描模块设计2021-06-25 3834
-
矩阵键盘控制接口设计实验2008-09-24 4225
-
CH452组成64键的键盘扫描电路 (8X8键盘扫描电路)2010-01-07 6528
-
4x4矩阵键盘程序及原理图PCB2015-12-21 4796
-
矩阵键盘识别-翻转识键代码2016-09-07 775
-
矩阵键盘有什么用_矩阵键盘有何用途2018-02-24 17708
-
BMC64键盘/操纵杆PCB2022-07-22 896
-
PCB设计的两键键盘2022-07-29 936
-
FPGA PCB使用ICE40驱动64乘64 LED矩阵2022-10-31 712
-
Arduino的64键原型键盘矩阵2022-12-30 943
-
20键键盘矩阵开源分享2023-06-12 690
全部0条评论

快来发表一下你的评论吧 !
