

 如何通过RT-Thread Studio配置片上外设UART
描述
通过 RT-Thread Studio 配置 AB32VG1 片上外设 UART 的功能,实现开发板和 PC 进行
通信。
1.2. 模块介绍
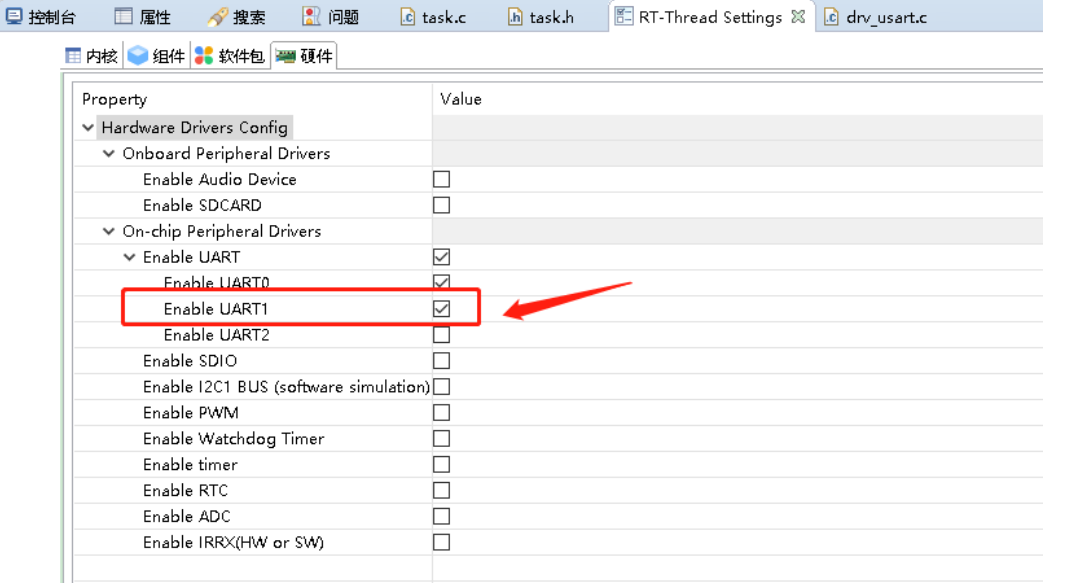
AB32VG1 的串口 0 被用作系统调试串口,串口 1 可以用作通讯端口。RT-Thread 里做好了
UART0 和 UART1 的驱动,只要打开相应的设备即可。
开发板上串口部分的电路图如下图所示:
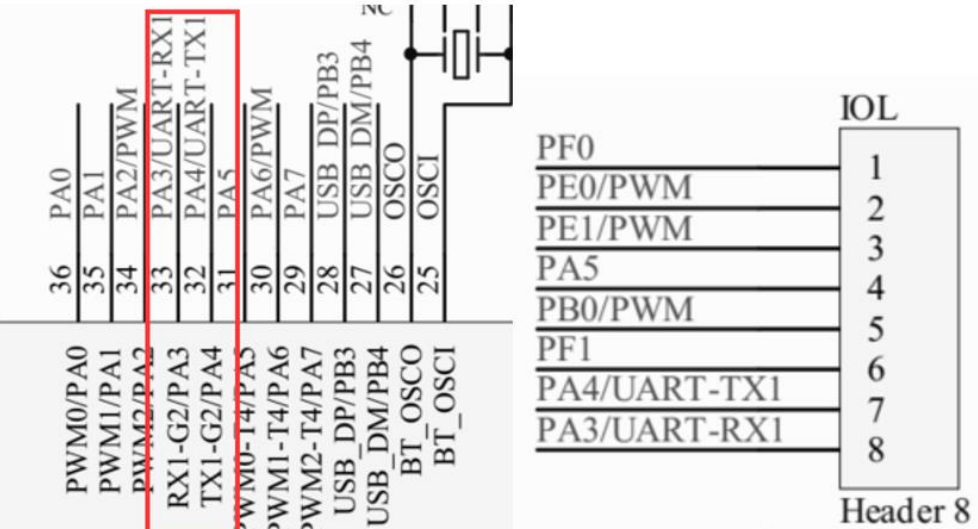
从电路图上看,串口 1 使用的是 PA3 和 PA4。
新建工程
2.1.1.文件->新键->RT-Thread 项目。
2.1.2.选择基于开发板,填写工程名字。
2.1.3.开发板:AB32VG1-AB-PROUGEN。
2.1.4.BSP:1.0.8。
2.1.3.其他默认,点完成。一个新的项目就建成了。
2.2. 编写测试程序
在 applications 新键 task.c 文件。此例程源自 RT-Thread 文档中心,引用时有修改。
/*
* 程序清单:这是一个 串口 设备使用例程
* 例程导出了 uart_sample 命令到控制终端
* 命令调用格式:uart_sample uart1
* 命令解释:命令第二个参数是要使用的串口设备名称,为空则使用默认的串口设备
* 程序功能:通过串口输出字符串"hello RT-Thread!",然后错位输出输入的字符
*/
#include
#define SAMPLE_UART_NAME "uart1"
/* 用于接收消息的信号量 */
static struct rt_semaphore rx_sem;
static rt_device_t serial;
/* 接收数据回调函数 */
static rt_err_t uart_input(rt_device_t dev, rt_size_t size)
{
 /* 串口接收到数据后产生中断,调用此回调函数,然后发送接收信号量 */
 rt_sem_release(&rx_sem);
 return RT_EOK;
}
static void serial_thread_entry(void *parameter)
{
 char ch;
 while (1)
 {
 /* 从串口读取一个字节的数据,没有读取到则等待接收信号量 */
 while (rt_device_read(serial, -1, &ch, 1) != 1)
 {
 /* 阻塞等待接收信号量,等到信号量后再次读取数据 */
 rt_sem_take(&rx_sem, RT_WAITING_FOREVER);
 }
 /* 读取到的数据通过串口错位输出 */
 ch = ch + 1;
 rt_device_write(serial, 0, &ch, 1);
 } }
static int uart_sample(int argc, char *argv[])
{
 rt_err_t ret = RT_EOK;
 char uart_name[RT_NAME_MAX];
 char str[] = "hello RT-Thread!\r\n";
 if (argc == 2)
 {
 rt_strncpy(uart_name, argv[1], RT_NAME_MAX);
 }
 else
 {
 rt_strncpy(uart_name, SAMPLE_UART_NAME, RT_NAME_MAX);
 }
 /* 查找系统中的串口设备 */
 serial = rt_device_find(uart_name);
 if (!serial)
 {
 rt_kprintf("find %s failed!\n", uart_name);
 return RT_ERROR;
 }
 /* 初始化信号量 */
 rt_sem_init(&rx_sem, "rx_sem", 0, RT_IPC_FLAG_FIFO);
 /* 以中断接收及轮询发送模式打开串口设备 */
 rt_device_open(serial, RT_DEVICE_FLAG_INT_RX);
 /* 设置接收回调函数 */
 rt_device_set_rx_indicate(serial, uart_input);
 /* 发送字符串 */
 rt_device_write(serial, 0, str, (sizeof(str) - 1));
 /* 创建 serial 线程 */
 rt_thread_t thread = rt_thread_create("serial", serial_thread_entry, RT_NULL, 1024, 25, 10);
 /* 创建成功则启动线程 */
 if (thread != RT_NULL)
 {
 rt_thread_startup(thread);
 }
 else
 {
 ret = RT_ERROR;
 }
 return ret;
}
/* 导出到 msh 命令列表中 */
MSH_CMD_EXPORT(uart_sample, uart device sample);
由于在初始化串口时,默认波特率是 1500000,可以在 libraries->hal_drivers->drv_usart.c
中 int rt_hw_usart_init(void)做些修改。
int rt_hw_usart_init(void)
{
 rt_size_t obj_num = sizeof(uart_obj) / sizeof(struct ab32_uart);
 struct serial_configure config = RT_SERIAL_CONFIG_DEFAULT;
 rt_err_t result = 0;
 rt_hw_interrupt_install(IRQ_UART0_2_VECTOR, uart_isr, RT_NULL, "ut_isr");
 for (int i = 0; i < obj_num; i++)
 {
 /* init UART object */
 uart_obj[i].config = &uart_config[i];
 uart_obj[i].rx_idx = 0;
 uart_obj[i].rx_idx_prev = 0;
 uart_obj[i].serial.ops = &ab32_uart_ops;
 uart_obj[i].serial.config = config;
 uart_obj[i].serial.config.baud_rate = 1500000;
 uart_obj[i].rx_buf = rt_malloc(uart_config[i].fifo_size);
 if (uart_obj[i].rx_buf == RT_NULL) {
 LOG_E("uart%d malloc failed!", i);
 continue;
 }
 //如果是串口 1,修改波特率位 115200
 if (i == 1)
 {
 uart_obj[i].serial.config.baud_rate = 115200;
 }
 //------------------
 /* register UART device */
 result = rt_hw_serial_register(&uart_obj[i].serial, uart_obj[i].config->name,
 RT_DEVICE_FLAG_RDWR
 | RT_DEVICE_FLAG_INT_RX
 | RT_DEVICE_FLAG_INT_TX
 | uart_obj[i].uart_dma_flag
 , NULL);
 RT_ASSERT(result == RT_EOK);
 }
 return result;
}
声明:本文内容及配图由入驻作者撰写或者入驻合作网站授权转载。文章观点仅代表作者本人,不代表电子发烧友网立场。文章及其配图仅供工程师学习之用,如有内容侵权或者其他违规问题,请联系本站处理。
举报投诉
-
通过RT-Thread Studio配置AB32VG1片上外设GPIO引脚控制RGB彩灯2021-11-03 14734
-
N32L40XCL-STB开发板模块之UART评测2023-08-10 2385
-
在RT-Thread Studio上配置rtthread CANFD驱动来控制M3508电机2023-10-08 2310
-
在 RT-Thread Studio 上使用 RT-Thread Nano2021-05-18 2968
-
基于RT-Thread Studio的ADC外设使用方案介绍2022-03-28 2971
-
RT-Thread Studio 主要亮点功能2020-06-19 7339
-
RT-Thread Studio快速配置GPIO进行点灯2021-12-14 1164
-
RT-Thread Studio配置连接WIFI模块2021-12-20 1157
-
RT-Thread Studio驱动SD卡2021-12-27 1612
-
RT-Thread Studio配置片上外设GPIO的引脚2022-08-21 4168
-
RT-Thread文档_UART 设备2023-02-22 1484
-
基于RT-Thread Studio学习2023-05-15 6804
-
使用RT-Thread Studio进行智能家居终端的设计2023-07-28 3309
-
通过RT-Thread Studio配置N32L406片上外设DAC的功能2023-08-15 2841
-
试用RT-Thread Studio(VSCode)2023-10-12 2322
全部0条评论

快来发表一下你的评论吧 !
