
 rt-thread操作系统下ADC采样
描述
AD采样是应用非常广泛的一种模式,其中包括DMA方式和非DMA方式。


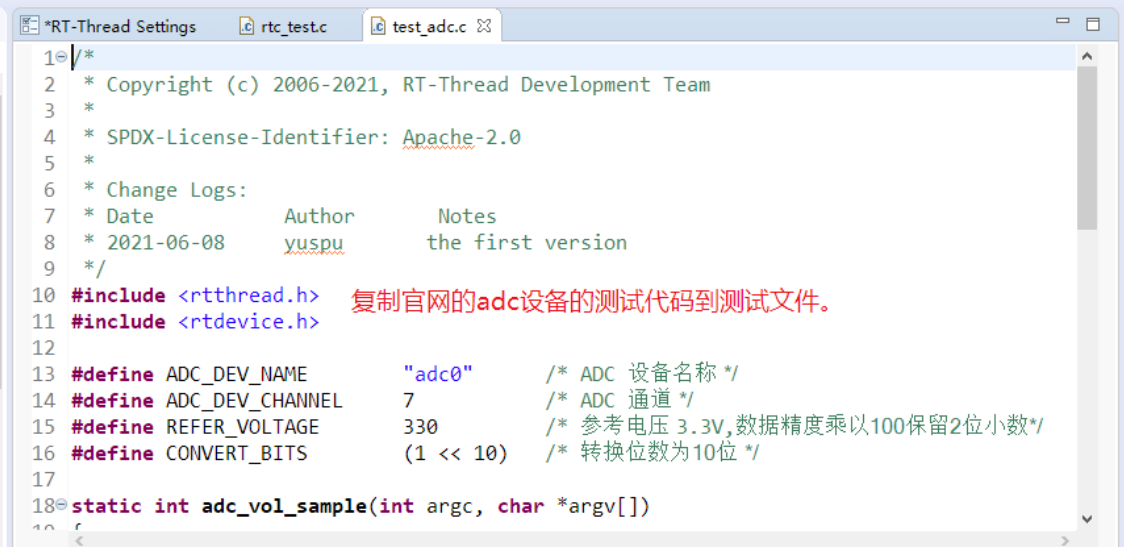
部分代码如下:
#include
#include
#define ADC_DEV_NAME "adc0" /* ADC 设备名称 */
#define ADC_DEV_CHANNEL 7 /* ADC 通道 */
#define REFER_VOLTAGE 330 /* 参考电压 3.3V,数据精度乘以 100 保留 2 位小数*/
#define CONVERT_BITS (1 << 10) /* 转换位数为 10 位 */
static int adc_vol_sample(int argc, char *argv[])
{
 rt_adc_device_t adc_dev;
 rt_uint32_t value, vol;
 rt_err_t ret = RT_EOK;
 /* 查找设备 */
 adc_dev = (rt_adc_device_t)rt_device_find(ADC_DEV_NAME);
 if (adc_dev == RT_NULL)
 {
 rt_kprintf("adc sample run failed! can't find %s device!\n", ADC_DEV_NAME);
 return RT_ERROR;
 }
 /* 使能设备 */
 ret = rt_adc_enable(adc_dev, ADC_DEV_CHANNEL);
 /* 读取采样值 */
 value = rt_adc_read(adc_dev, ADC_DEV_CHANNEL);
 rt_kprintf("the value is :%d \n", value);
 /* 转换为对应电压值 */
 vol = value * REFER_VOLTAGE / CONVERT_BITS;
 rt_kprintf("the voltage is :%d.%02d \n", vol / 100, vol % 100);
 /* 关闭通道 */
 ret = rt_adc_disable(adc_dev, ADC_DEV_CHANNEL);
 return ret;
}
/* 导出到 msh 命令列表中 */
MSH_CMD_EXPORT(adc_vol_sample, adc voltage convert sample);
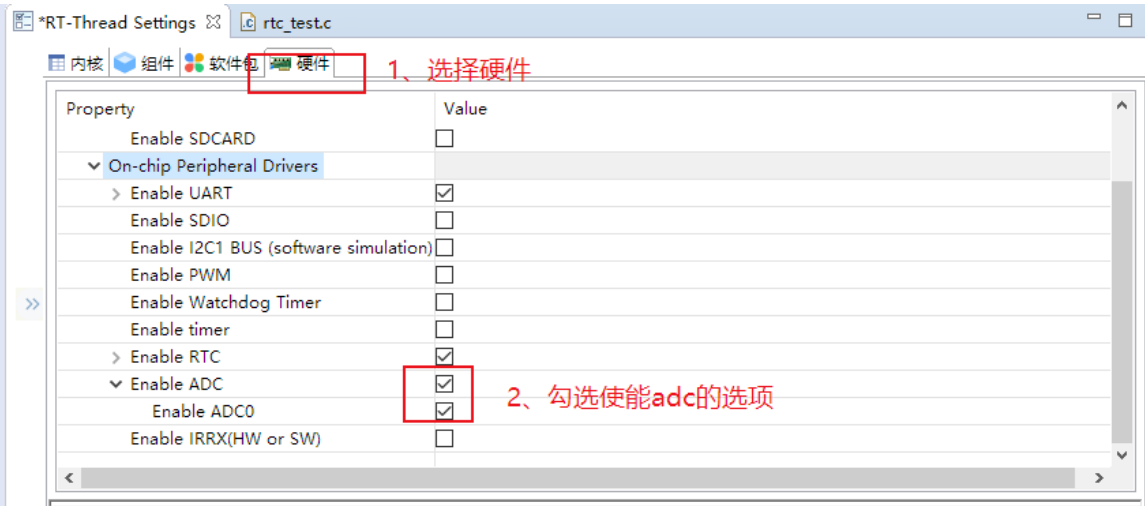
最后做一个总结,首先新建一个 rt-thread studio 的工程,接着配置 rt-thread setting,使能 sdk 的 adc,配置完后 crtl+s 保存,接着在 application 文件夹下新建测试源文件,在源文件中添加官方的 adc 设备测试代码,后面编译好后下载到开发板就可以开始测量电压了。
审核编辑:汤梓红
声明:本文内容及配图由入驻作者撰写或者入驻合作网站授权转载。文章观点仅代表作者本人,不代表电子发烧友网立场。文章及其配图仅供工程师学习之用,如有内容侵权或者其他违规问题,请联系本站处理。
举报投诉
-
RT-Thread操作系统应用开发寒假师资培训2024-12-06 993
-
新书发布——《实时操作系统应用技术:RT-Thread与ARM编程实践》2024-05-11 1973
-
RT-Thread荣获“最具影响力IoT操作系统奖”2024-04-12 928
-
RT-Thread操作系统的FreeRTOS兼容层2023-01-14 3090
-
RT-Thread操作系统已经成功部署至芯驰E32022-09-09 2093
-
RT-Thread学习笔记 RT-Thread的架构概述2022-07-09 5618
-
基于RT-Thread操作系统衍生rt-smart实时操作系统简介2022-06-22 5459
-
RT-Thread实时操作系统安装向导2022-04-02 707
-
国民技术携手RT-Thread共同推进MCU与RT-Thread操作系统广泛适配2021-12-16 2981
-
RT-Thread Studio操作系统2021-08-24 1363
-
STm32与RT-thread操作系统的配合使用2021-08-04 1511
-
RT-Thread Smart微内核操作系统发布!2020-09-09 3349
-
RT Thread操作系统教程及资料2016-05-11 1278
-
RT-Thread编程指南2015-11-26 2199
全部0条评论

快来发表一下你的评论吧 !

