

基于MCU的FFT音乐频谱显示方案
音视频及家电
描述
音频采集硬件电路
音频采集的硬件电路比较简单,主要的器件就是麦克风和LM358运放。
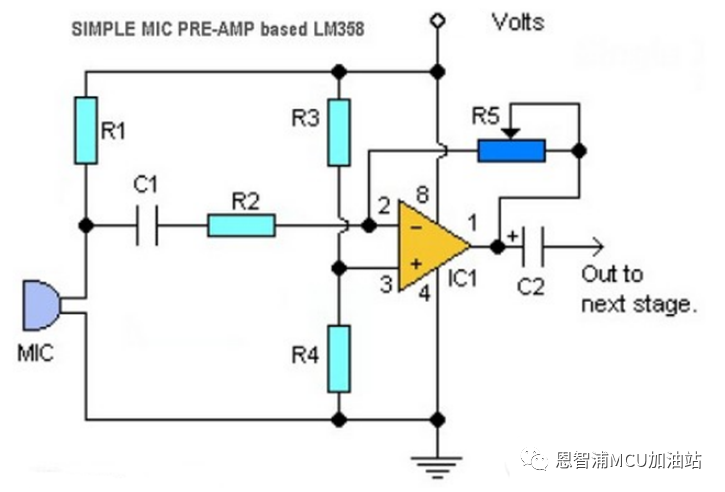
图中电路R5可调电阻的作用是来调节运放的增益。R4的作用的是给运放一个VDD*R4/(R3+R4) 的直流偏置,这里加直流偏置是由于ADC只能采集正电压值,为了不丢失负电压的音频信号,给信号整体加了一个直流偏置。
但是这个图还有一个小问题,运放的输出端加了一个电容C2,C2会把直流偏置给隔掉。在设计时,这个电容可以去掉。
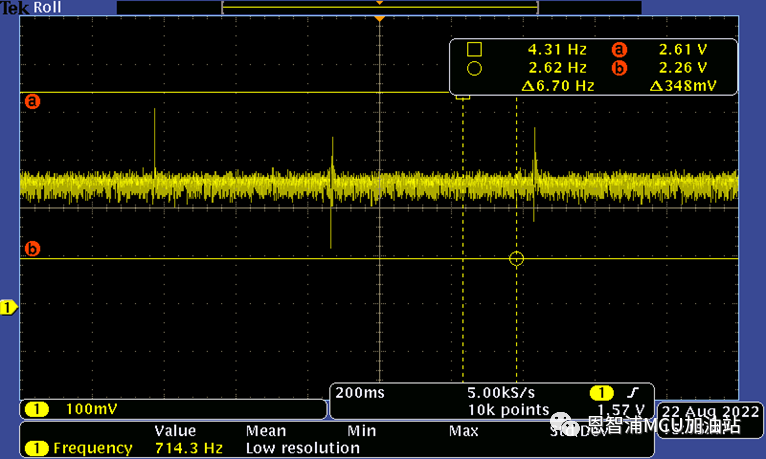
下图是按照上图搭建的音频采集电路的输出信号,图中波动信号是施加的外部音频,是我们需要做音乐频谱显示需要的信号。该信号有一个2.3v的直流偏置,在后续处理时需要减去这个偏置。
CTimer+ADC+DMA 音频信号采集
为了呼应标题,我们选择的MCU是LPC845,这是NXP的一款低成本的MCU。考虑到我们平常听的音乐频率大都低于5kHz,在软件设计时设置ADC采样频率为10kHz。不要问为什么,问就是采样定理。
LPC845的ADC有8个触发源,我们使用CTiimer match3来触发ADC,将寄存器SEQA_CTRL的bit 14:12设置为0x5。CTimer match 3的输出频率为10kHz。
为了确保我们采集数据的实时性,DMA建议配置成双buffer模式,以防止采样的数据被覆盖掉。
FFT音频信号处理
在DMA搬运ADC采样值时,使用了双buffer来搬,ADC采样值需要减去一个2.3V的直流偏置。Samples[]数组用于FFT计算。
    //Calculate the FFT input buffer
   if(g_DmaTransferDoneFlag_A == true)
   {
   for (i=0; i<128; i++)
   {
  Samples[i] =(int16_t)(((g_AdcConvResult_A[i] & 0xfff0) >> 4) - 2979);//substract the 2.3v offset in the Amplifier output
    }
  g_DmaTransferDoneFlag_A = false;

    }
   else if(g_DmaTransferDoneFlag_B == true)
   {
   for (i=0; i<128; i++)
   {
  Samples[i] =(int16_t)(((g_AdcConvResult_B[i] & 0xfff0) >> 4) - 2979);//substract the 2.3v offset in the Amplifier output
   }
   g_DmaTransferDoneFlag_B = false;
   }
根据FFT算法的原理,在进行FFT计算之前,还需要将ADC的采样值Samples[]乘上一个窗函数,这里我们使用的汉宁窗函数,由于篇幅限制,具体原理可以去查看FFT算法相关的资料。
    //If 'Window' isn't rectangular, apply window
    if(Window == Triangular){
        //Apply a triangular window to the data.
        for(Cnt = 0; Cnt>L2Len;
            else Samples[Cnt] = ((int32_t)Samples[Cnt]*((Len/2)-Cnt))>>L2Len;
        }
    }
    else if(Window == Hann){
        //Use the cosine window wavetable to apply a Hann windowing function to the samples
        for(Cnt = 0; Cnt>L2Len;
            Samples[Cnt] = ((int32_t)Samples[Cnt]*(int32_t)CosWindow[Index])>>(CWBD);
        }
    }
前面说了这么多,FFT算法才是实现音乐频谱显示的关键部分(其实上边每一步都缺一不可)。
我在网上找了好多FFT算法的资料,大家在做频谱显示时,用到最多的就是CMSIS DSP的算法库。于是乎,采用CMSIS DSP的库貌似是首选。
但是不用不知道,一用才发现,由于CMSIS DSP的库使用的是查表的方式,我的64K Flash的LPC845轻轻松松就被撑爆了。没办法,只能改用其他方案。经过不懈的查阅资料,在GitHub找到一份FFT算法的代码,这个代码写的非常简洁,而且用起来很好用,感谢发布者pyrohaz,下面是FFT代码的一部分。
/*
  FIX_MPY() - fixed-point multiplication & scaling.
  Substitute inline assembly for hardware-specific
  optimization suited to a particluar DSP processor.
  Scaling ensures that result remains 16-bit.
*/
inline short FIX_MPY(short a, short b)
{
    /* shift right one less bit (i.e. 15-1) */
    int c = ((int)a * (int)b) >> 14;
    /* last bit shifted out = rounding-bit */
    b = c & 0x01;
    /* last shift + rounding bit */
    a = (c >> 1) + b;
    return a;
}
fix_fft(short fr[], short fi[], short m, short inverse)函数,FFT计算函数
int fix_fft(short fr[], short fi[], short m, short inverse)
{
    int mr, nn, i, j, l, k, istep, n, scale, shift;
    short qr, qi, tr, ti, wr, wi;

    n = 1 << m;

    /* max FFT size = N_WAVE */
    if (n > N_WAVE)
        return -1;

    mr = 0;
    nn = n - 1;
    scale = 0;

    /* decimation in time - re-order data */
    for (m=1; m<=nn; ++m) {
        l = n;
        do {
            l >>= 1;
        } while (mr+l > nn);
        mr = (mr & (l-1)) + l;

        if (mr <= m)
            continue;
        tr = fr[m];
        fr[m] = fr[mr];
        fr[mr] = tr;
        ti = fi[m];
        fi[m] = fi[mr];
        fi[mr] = ti;
    }
接 fix_fft(short fr[], short fi[], short m, short inverse)函数
    l = 1;
    k = LOG2_N_WAVE-1;
    while (l < n) {
        if (inverse) {
            /* variable scaling, depending upon data */
            shift = 0;
            for (i=0; i 16383 || m > 16383) {
                    shift = 1;
                    break;
                }
            }
            if (shift)
                ++scale;
        } else {
            /*
                fixed scaling, for proper normalization --
                there will be log2(n) passes, so this results
                in an overall factor of 1/n, distributed to
                maximize arithmetic accuracy.
            */
            shift = 1;
        }
接fix_fftr(short f[], int m, int inverse)函数
        /*
            it may not be obvious, but the shift will be
            performed on each data point exactly once,
            during this pass.
        */
        istep = l << 1;
        for (m=0; m>= 1;
                wi >>= 1;
            }
            for (i=m; i>= 1;
                    qi >>= 1;
                }
                fr[j] = qr - tr;
                fi[j] = qi - ti;
                fr[i] = qr + tr;
                fi[i] = qi + ti;
            }
        }
        --k;
        l = istep;
    }
    return scale;
}
/*
  fix_fftr() - forward/inverse FFT on array of real numbers.
  Real FFT/iFFT using half-size complex FFT by distributing
  even/odd samples into real/imaginary arrays respectively.
  In order to save data space (i.e. to avoid two arrays, one
  for real, one for imaginary samples), we proceed in the
  following two steps: a) samples are rearranged in the real
  array so that all even samples are in places 0-(N/2-1) and
  all imaginary samples in places (N/2)-(N-1), and b) fix_fft
  is called with fr and fi pointing to index 0 and index N/2
  respectively in the original array. The above guarantees
  that fix_fft "sees" consecutive real samples as alternating
  real and imaginary samples in the complex array.
*/
int fix_fftr(short f[], int m, int inverse)
{
    int i, N = 1<<(m-1), scale = 0;
    short tt, *fr=f, *fi=&f[N];

    if (inverse)
        scale = fix_fft(fi, fr, m-1, inverse);
    for (i=1; i
int fix_fft(short fr[], short fi[], short m, short inverse) 是FFT算法的计算函数,fr[]是ADC采集到信号值的实部,fi[]是ADC采集到信号值的虚部。经过fix_fft函数处理之后,fr[]是FFT计算所得实部,fi[]是计算所得的虚部。
我们最终要显示的音乐频谱其实是FFT频域中音频的幅值,幅值的计算是实部的平方+虚部的平方开根号。下面是具体的幅值计算部分的代码,每一个幅值点对应OLED的一列像素点。
    //Calculate the magnitude
    for(Cnt = 0; Cnt>ColumnFilter; //calculate the DB
            }
            else{
                Col[Index] += (BufSum-Col[Index])>>ColumnFilter;  //calculate the amplitude
            }

            //Limit maximum column value
            if(Col[Index] >= YPix-9) Col[Index] = YPix-10;

            IndO = Index;
            BufSum = 0;
        }
    }
效果展示
下面是实际频谱显示的测试效果。
-
前几天做的一个音乐fft频谱显示效果2012-11-10 20247
-
单片机制作音乐频谱显示器2012-08-25 19566
-
怎样实现根据音乐跳动的频谱显示2012-09-16 4746
-
关于音乐频谱算法问题2014-04-09 2629
-
求FFT音乐频谱资料2018-08-21 1408
-
STM32F103+FFT+OLED25664的音乐频谱制作资料分享2022-02-09 1702
-
基于RT-Thread+RA6M4的FFT音乐频谱显示器制作方案2022-07-25 5083
-
基于Matlab的系统信号FFT频谱分析与显示pdf2008-06-19 731
-
基于MATLAB系统的信号FFT频谱分析与显示2010-02-08 1073
-
音乐频谱-PCB及代码2016-02-29 1148
-
STM32F103+FFT+OLED25664的音乐频谱制作分享(继续干货)2021-12-05 2180
-
stm32音乐频谱OLED屏显示2022-06-17 1179
-
MCU如何实现FFT音乐频谱显示2022-09-08 6008
-
基于STM32单片机的音乐频谱显示器设计2023-08-22 10428
-
如何用低成本MCU实现音乐频谱显示2023-10-18 1996
全部0条评论

快来发表一下你的评论吧 !
