

构建一个音频反应台灯
音视频及家电
描述
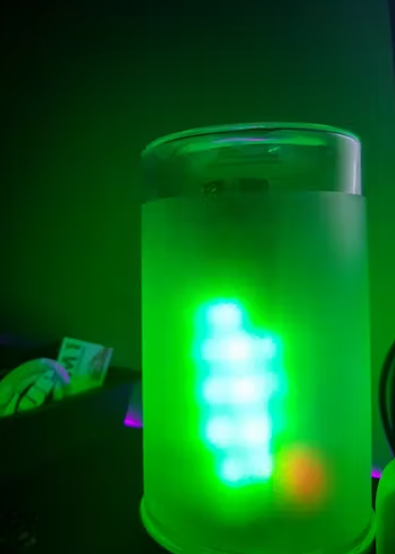
这是个会使你惊讶其妙的 RGB LED 台灯。它将对周围的声音和音乐做出反应,并将像可视化器一样播放。
在这个项目构建中,我们将使用简单的组件和一些基本的Arduino编程来制作一个与所有声音和音乐共舞的漂亮灯。站在桌子上玩游戏、播放音乐和其他任何真正能发出声音的东西时,它都会产生令人惊叹的效果。让我们开始吧!
第 1 步:主要用品
首先要做的事情是:规划我们需要什么样的用品,它们的成本是多少?它们在很大程度上是可选的,并且可以通过所需功能进行变动。但虽然如此,还是有一些关键的东西是必需的:
Arduino Nano(或任何同样小的 Arduino 类型)
声音检测模块(RM 5.90 购买链接)
5伏电源(或12伏降压模块)
每个可单独寻址的 LED 灯条 60 个 LED
根据您想要的外观,您可能希望以不同的方式排列条带或以其他方式漫射光。这是你可以发挥创造力的地方。如果您喜欢我的方法,我使用了以下项目:
最高的宜家 Droppar 罐
一小段PVC管。
泡沫板
热胶枪
第 2 步:为组件供电
为组件供电将是一种直接的方法。我只是使用 Arduino Nano 的 USB 线直接插入电脑。如果您使用 AC 到 DC 电源等外部电源,您将需要一个降压模块来帮助您减少流向电路的电流量。否则,如果您不使用它,您可能很有可能会烧毁 Arduino,包括连接的组件。
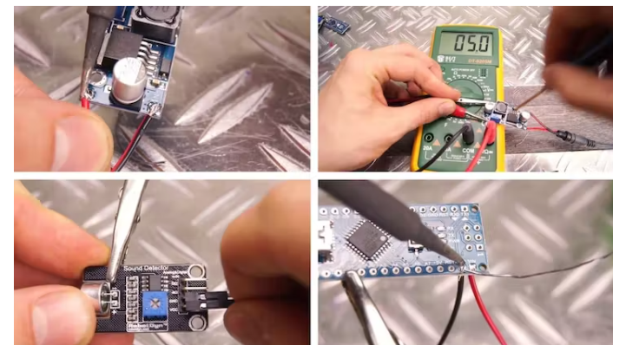
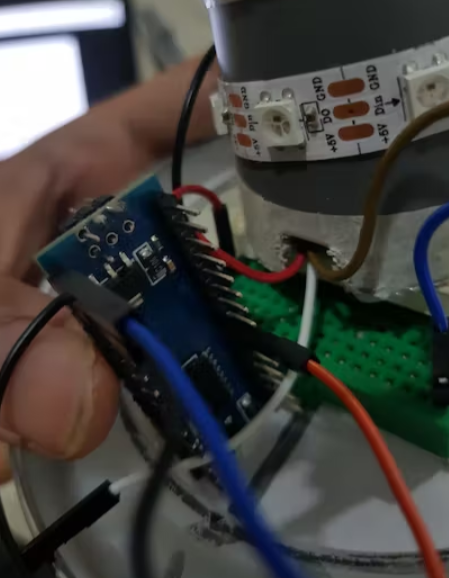
该部分的核心是声音检测器模块。这将为 Arduino 提供模拟信号,我们可以用它巧妙地点亮 RGB 灯。为了能够做到这一点,我们需要为这两个设备供电。幸运的是,它们都需要 5 伏输入。我正在使用降压模块从 12 伏降到 5 伏,但直接使用 5 伏电源会更容易。将 Arduino 和声音检测器板上的 VIN 连接到正极输入。然后将 Arduino 上的 GND 和检测器连接到负极。我们还需要将 LED 灯条上的正负输入连接到电源。
第 3 步:检测器和条带
将所有三个部分连接到电源后,我们需要将它们相互连接。
声音检测器模块将通过模拟输入引脚与 Arduino 通信。在这种情况下,我将使用 0 号引脚。
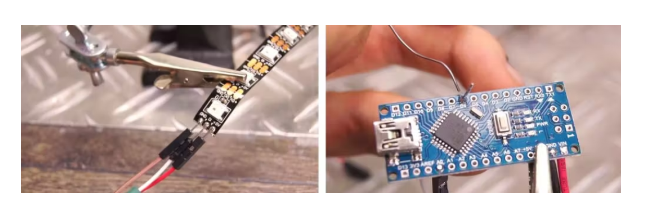
LED 灯条需要一个数字脉冲才能了解我们要处理的 LED。因此,我们需要将数字输出引脚连接到 Arduino nano。我将使用 6 号引脚。
在选择区域使用收缩管,这样电缆以后就不会在狭窄的空间内相互碰撞。
太棒了,现在我们大部分都完成了电子设备!
第 4 步:上传代码
这个构建中最重要的部分可以说是代码。它可以将这个构建从非常酷变为非常棒。主要原理是将我们从传感器获得的模拟值映射到要显示的 LED 数量。
第 5 步:准备外壳
一开始我以为盖子是亚克力做的,后来我买了罐子,发现它不是亚克力而是玻璃。所以我需要重新调整我的计划,制作一个易于戳和安装 Arduino 和 LED 的盖子。所以我选择了泡沫板。
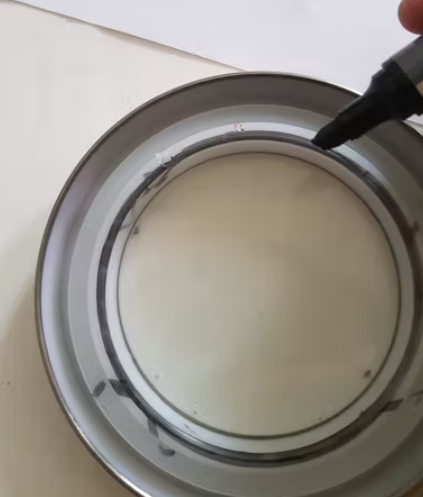
第一步,我需要切割泡沫板,使其完全呈圆形,并且与罐子的玻璃盖具有相同的直径。我没有合适的测量直径工具,所以我使用湿记号笔即兴创作了该方法,并标记了玻璃的直径并将其印在一张纸上。之后,我将纸粘贴到泡沫板上,但沿着纸上圆圈的边缘粘贴到板上。它并不完美,但应该足以容纳所有 Arduino 和 LED 组件。
第二步,我需要打破罐盖上的玻璃。警告!请用厚塑料袋盖住罐子,以防止玻璃散落在房间周围,并在空旷的地方进行。了解您的周围环境。打碎玻璃后,请确保所有粘在罐盖侧面裂缝处的玻璃都被清除。这是为了防止您或其他人因将它们自己切割到卡住的玻璃上而受伤。
第三步,将圆形泡沫板放在罐盖的中心。确保泡沫是紧的,不要太松,它们正好适合罐子。

第四步,我才意识到我需要改变这个项目的布局。我想让用户在出现故障时可以轻松访问 Arduino 组件。所以,我决定使用迷你面包板并将其放在盖子的中心。不仅如此,我还为声音模块上的电缆剪了两个孔,我将把它们放在罐盖的底部,进入罐子和面包板上,还有一个孔让 Arduino 与 USB 电缆连接以发挥作用作为电路的电源。
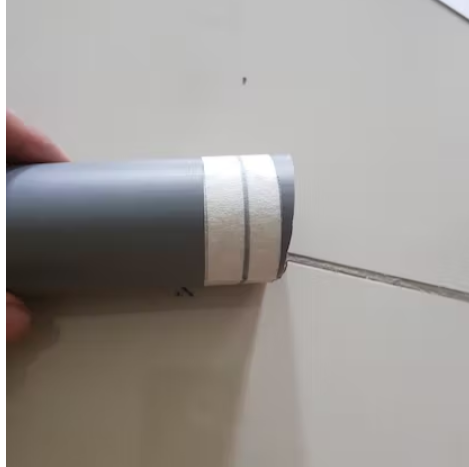
第五步,我用胶带标记pvc管并在胶带的中心画线。然后,我把它贴在 pvc 管上。标记是我均匀切割 pvc 管并尝试干净切割的指标。
在测量了我需要使用的 pvc 长度后,我按照我提供的标记仔细切割它。pvc 管的长度取决于您的罐子高度。你可以使用任何你想要的长度。
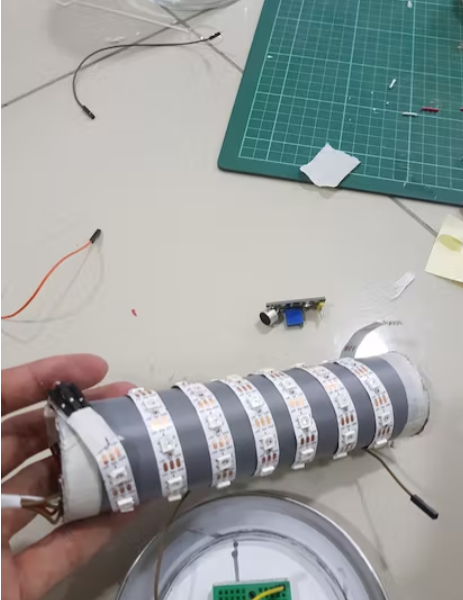
第六步,我将用 LED 灯条切割的 PVC 管翘曲,使其略微倾斜并螺旋到 PVC 的顶部。我确保为多余的电缆长度创建一个小孔,以便将其隐藏在 PVC 罐内以进行电缆管理。然后我需要找到一种方法将 PVC 放在面包板上。使用热胶枪或双面胶带,我可以将 PVC 管粘在额外的泡沫板上,然后将其粘贴到面包板上未使用的区域。在这一步中,我能够将一些组件连接到面包板。面包板的左侧区域为正极,面包板的右侧区域为负极。
第七步,我把声音模块放在罐盖的外面。这样做是为了便于模块稍后在 jar 外拾取声音。放置模块后,将其与电缆连接并按照给出的示意图进行匹配。然后,将所有电缆与传感器和 Arduino 连接到面包板。Arduino 是垂直安装的,因此用于为电路供电的电缆将能够通过泡沫板轻松地与 Arduino 板连接。
到此,这个项目就完成了。我花了一段时间加上尝试和错误,但最终我依旧设法完成了它。
Coding For the Arduino:
#include
/** BASIC CONFIGURATION **/
//The amount of LEDs in the setup
#define NUM_LEDS 60
//The pin that controls the LEDs
#define LED_PIN 6
//The pin that we read sensor values form
#define ANALOG_READ 0
//Confirmed microphone low value, and max value
#define MIC_LOW 0.0
#define MIC_HIGH 200.0
/** Other macros */
//How many previous sensor values effects the operating average?
#define AVGLEN 5
//How many previous sensor values decides if we are on a peak/HIGH (e.g. in a song)
#define LONG_SECTOR 20
//Mneumonics
#define HIGH 3
#define NORMAL 2
//How long do we keep the "current average" sound, before restarting the measuring
#define MSECS 30 * 1000
#define CYCLES MSECS / DELAY
/*Sometimes readings are wrong or strange. How much is a reading allowed
to deviate from the average to not be discarded? **/
#define DEV_THRESH 0.8
//Arduino loop delay
#define DELAY 1
float fscale( float originalMin, float originalMax, float newBegin, float newEnd, float inputValue, float curve);
void insert(int val, int *avgs, int len);
int compute_average(int *avgs, int len);
void visualize_music();
//How many LEDs to we display
int curshow = NUM_LEDS;
/*Not really used yet. Thought to be able to switch between sound reactive
mode, and general gradient pulsing/static color*/
int mode = 0;
//Showing different colors based on the mode.
int songmode = NORMAL;
//Average sound measurement the last CYCLES
unsigned long song_avg;
//The amount of iterations since the song_avg was reset
int iter = 0;
//The speed the LEDs fade to black if not relit
float fade_scale = 1.2;
//Led array
CRGB leds[NUM_LEDS];
/*Short sound avg used to "normalize" the input values.
We use the short average instead of using the sensor input directly */
int avgs[AVGLEN] = {-1};
//Longer sound avg
int long_avg[LONG_SECTOR] = {-1};
//Keeping track how often, and how long times we hit a certain mode
struct time_keeping {
unsigned long times_start;
short times;
};
//How much to increment or decrement each color every cycle
struct color {
int r;
int g;
int b;
};
struct time_keeping high;
struct color Color;
void setup() {
Serial.begin(9600);
//Set all lights to make sure all are working as expected
FastLED.addLeds
for (int i = 0; i < NUM_LEDS; i++)
leds[i] = CRGB(0, 0, 255);
FastLED.show();
delay(1000);
//bootstrap average with some low values
for (int i = 0; i < AVGLEN; i++) {
insert(250, avgs, AVGLEN);
}
//Initial values
high.times = 0;
high.times_start = millis();
Color.r = 0;
Color.g = 0;
Color.b = 1;
}
/*With this we can change the mode if we want to implement a general
lamp feature, with for instance general pulsing. Maybe if the
sound is low for a while? */
void loop() {
switch(mode) {
case 0:
visualize_music();
break;
default:
break;
}
delay(DELAY); // delay in between reads for stability
}
/**Funtion to check if the lamp should either enter a HIGH mode,
or revert to NORMAL if already in HIGH. If the sensors report values
that are higher than 1.1 times the average values, and this has happened
more than 30 times the last few milliseconds, it will enter HIGH mode.
TODO: Not very well written, remove hardcoded values, and make it more
reusable and configurable. */
void check_high(int avg) {
if (avg > (song_avg/iter * 1.1)) {
if (high.times != 0) {
if (millis() - high.times_start > 200.0) {
high.times = 0;
songmode = NORMAL;
} else {
high.times_start = millis();
high.times++;
}
} else {
high.times++;
high.times_start = millis();
}
}
if (high.times > 30 && millis() - high.times_start < 50.0)
songmode = HIGH;
else if (millis() - high.times_start > 200) {
high.times = 0;
songmode = NORMAL;
}
}
//Main function for visualizing the sounds in the lamp
void visualize_music() {
int sensor_value, mapped, avg, longavg;
//Actual sensor value
sensor_value = analogRead(ANALOG_READ);
//If 0, discard immediately. Probably not right and save CPU.
if (sensor_value == 0)
return;
//Discard readings that deviates too much from the past avg.
mapped = (float)fscale(MIC_LOW, MIC_HIGH, MIC_LOW, (float)MIC_HIGH, (float)sensor_value, 2.0);
avg = compute_average(avgs, AVGLEN);
if (((avg - mapped) > avg*DEV_THRESH)) //|| ((avg - mapped) < -avg*DEV_THRESH))
return;
//Insert new avg. values
insert(mapped, avgs, AVGLEN);
insert(avg, long_avg, LONG_SECTOR);
//Compute the "song average" sensor value
song_avg += avg;
iter++;
if (iter > CYCLES) {
song_avg = song_avg / iter;
iter = 1;
}
longavg = compute_average(long_avg, LONG_SECTOR);
//Check if we enter HIGH mode
check_high(longavg);
if (songmode == HIGH) {
fade_scale = 3;
Color.r = 5;
Color.g = 3;
Color.b = -1;
}
else if (songmode == NORMAL) {
fade_scale = 2;
Color.r = -1;
Color.b = 2;
Color.g = 1;
}
//Decides how many of the LEDs will be lit
curshow = fscale(MIC_LOW, MIC_HIGH, 0.0, (float)NUM_LEDS, (float)avg, -1);
/*Set the different leds. Control for too high and too low values.
Fun thing to try: Dont account for overflow in one direction,
some interesting light effects appear! */
for (int i = 0; i < NUM_LEDS; i++)
//The leds we want to show
if (i < curshow) {
if (leds[i].r + Color.r > 255)
leds[i].r = 255;
else if (leds[i].r + Color.r < 0)
leds[i].r = 0;
else
leds[i].r = leds[i].r + Color.r;
if (leds[i].g + Color.g > 255)
leds[i].g = 255;
else if (leds[i].g + Color.g < 0)
leds[i].g = 0;
else
leds[i].g = leds[i].g + Color.g;
if (leds[i].b + Color.b > 255)
leds[i].b = 255;
else if (leds[i].b + Color.b < 0)
leds[i].b = 0;
else
leds[i].b = leds[i].b + Color.b;
//All the other LEDs begin their fading journey to eventual total darkness
} else {
leds[i] = CRGB(leds[i].r/fade_scale, leds[i].g/fade_scale, leds[i].b/fade_scale);
}
FastLED.show();
}
//Compute average of a int array, given the starting pointer and the length
int compute_average(int *avgs, int len) {
int sum = 0;
for (int i = 0; i < len; i++)
sum += avgs[i];
return (int)(sum / len);
}
//Insert a value into an array, and shift it down removing
//the first value if array already full
void insert(int val, int *avgs, int len) {
for (int i = 0; i < len; i++) {
if (avgs[i] == -1) {
avgs[i] = val;
return;
}
}
for (int i = 1; i < len; i++) {
avgs[i - 1] = avgs[i];
}
avgs[len - 1] = val;
}
//Function imported from the arduino website.
//Basically map, but with a curve on the scale (can be non-uniform).
float fscale( float originalMin, float originalMax, float newBegin, float
newEnd, float inputValue, float curve){
float OriginalRange = 0;
float NewRange = 0;
float zeroRefCurVal = 0;
float normalizedCurVal = 0;
float rangedValue = 0;
boolean invFlag = 0;
// condition curve parameter
// limit range
if (curve > 10) curve = 10;
if (curve < -10) curve = -10;
curve = (curve * -.1) ; // - invert and scale - this seems more intuitive - postive numbers give more weight to high end on output
curve = pow(10, curve); // convert linear scale into lograthimic exponent for other pow function
// Check for out of range inputValues
if (inputValue < originalMin) {
inputValue = originalMin;
}
if (inputValue > originalMax) {
inputValue = originalMax;
}
// Zero Refference the values
OriginalRange = originalMax - originalMin;
if (newEnd > newBegin){
NewRange = newEnd - newBegin;
}
else
{
NewRange = newBegin - newEnd;
invFlag = 1;
}
zeroRefCurVal = inputValue - originalMin;
normalizedCurVal = zeroRefCurVal / OriginalRange; // normalize to 0 - 1 float
// Check for originalMin > originalMax - the math for all other cases i.e. negative numbers seems to work out fine
if (originalMin > originalMax ) {
return 0;
}
if (invFlag == 0){
rangedValue = (pow(normalizedCurVal, curve) * NewRange) + newBegin;
}
else // invert the ranges
{
rangedValue = newBegin - (pow(normalizedCurVal, curve) * NewRange);
}
return rangedValue;
}
-
如何用一个简单的电路测试你的反应速度2019-01-24 0
-
如何使用LM386构建一个音频配音电路2022-10-28 8838
-
构建一个简单的电路来使用Li-Fi传输音频数据2022-11-11 1276
-
分享一个不错的NeoPixel台灯项目2022-07-18 2143
-
LED台灯与COB台灯怎么区分2018-01-16 4919
-
如何制作一个简易的吸管小台灯?2018-08-03 20614
-
如何制作一个简易的瓷器柔光台灯?2018-08-06 7351
-
如何使用TDA2822构建一个音频放大器电路2022-07-11 13371
-
构建一个简单的模拟音频混音器2022-08-23 10566
-
构建一个计时器电路的教程2023-03-19 5333
-
基于Arduino DIY音频反应台灯2023-04-17 2009
-
构建一个基于耳机音频放大器的两个晶体管电路2023-05-16 2973
-
构建一个开源式生物反应器2023-06-14 637
-
PC中的音频频谱反应式NeoPixel2023-06-25 934
-
由Alexa控制的台灯构建2023-07-12 626
全部0条评论

快来发表一下你的评论吧 !
