

【开鸿智谷NiobeU4开发板免费试用体验】控温(1)
描述
本文来源电子发烧友社区,作者:卢松涛, 帖子地址:https://bbs.elecfans.com/jishu_2310064_1_1.html
接上文| # 【开鸿智谷NiobeU4开发板免费试用体验】Demo例程; |
感谢开鸿智谷研发人员依然小烨哥和 大佬们的支持指导。
想用开鸿智谷NiobeU4开发板资源 (GPIO02、GPIO27)输出,(ADC1_CH0上有SW4和SW5两个按键)模拟输入,板(GPIO02控制双色LED的红色、GPIO27控制双色LED的蓝色)LED,板(ADC1_CH0上有SW4和SW5两个按键)button,来通过光耦中间继电器控制加热设备。
程序根据厂家提供资料 ,想采用鸿蒙LiteOS系统。
开发自己的应用程序,
方法1:
- 需要在menuconfig中关闭 use openvalley niobeu4 application选项,然后在niobeu4_src/vendor/openvalley/niobeu4/demo/BUILD.gn文件中modules选项中填入自己的应用程序目录名,目录下内容可参考其它示例程序。
方法2:
- 拷贝一份demo 案例目录重新命名新案例目录名,
- 修改niobeu4_src/vendor/openvalley/niobeu4/demo/Kconfig.liteos_m.applications
- 修改新案例目录名下.application_config
- 修改新案例目录名下BUILD.gn
- 修改新案例目录名下程序
准备采用 方法2。
控温程序(1)
起动系统及MobaXterm,
1. 新案例目录
拷贝一份niobeu4_src/vendor/openvalley/niobeu4/demo/002_system_los_thread
重新命名 niobeu4_src/vendor/openvalley/niobeu4/demo/301_user

2. 修改Kconfig.liteos_m.applications
在MobaXterm右侧
在niobeu4_src/vendor/openvalley/niobeu4/demo/目录
下打开Kconfig.liteos_m.applications文件,在最后的位置添加default "301_user" if NIOBEU4_APPLICATION_301:
# Copyright (c) 2022 Hunan OpenValley Digital Industry Development Co., Ltd.
# Licensed under the Apache License, Version 2.0 (the "License");
# you may not use this file except in compliance with the License.
# You may obtain a copy of the License at
#
#     http://www.apache.org/licenses/LICENSE-2.0
#
# Unless required by applicable law or agreed to in writing, software
# distributed under the License is distributed on an "AS IS" BASIS,
# WITHOUT WARRANTIES OR CONDITIONS OF ANY KIND, either express or implied.
# See the License for the specific language governing permissions and
# limitations under the License.


config USE_OPENVALLEY_APPLICATION
    bool "use openvalley niobeu4 application"
    default n
    help
        This is a switch for use openvalley niobeu4 application.
        If you want to write your application code, please close it.

choice
        prompt "niobeu4 application choose"
        depends on USE_OPENVALLEY_APPLICATION
        default NIOBEU4_APPLICATION_001
        help
            This is a choose for application name
        orsource "*/.application_config"
endchoice

config NIOBEU4_APPLICATION_NAME
    string
    depends on USE_OPENVALLEY_APPLICATION
    default "001_quick_start" if NIOBEU4_APPLICATION_001
    default "002_system_los_thread" if NIOBEU4_APPLICATION_002
    default "003_system_los_timer" if NIOBEU4_APPLICATION_003
    default "004_system_los_event" if NIOBEU4_APPLICATION_004
    default "005_system_los_mutex" if NIOBEU4_APPLICATION_005
    default "006_system_los_semp" if NIOBEU4_APPLICATION_006
    default "007_system_los_message" if NIOBEU4_APPLICATION_007
    default "101_hdf_adc" if NIOBEU4_APPLICATION_101
    default "102_hdf_gpio" if NIOBEU4_APPLICATION_102
    default "103_hdf_uart" if NIOBEU4_APPLICATION_103
    default "104_hdf_watchdog" if NIOBEU4_APPLICATION_104
    default "105_hdf_pwm" if NIOBEU4_APPLICATION_105
    default "106_hdf_i2c" if NIOBEU4_APPLICATION_106
    default "107_hdf_spi" if NIOBEU4_APPLICATION_107
    default "201_bluetooth" if NIOBEU4_APPLICATION_201
    default "202_wifi" if NIOBEU4_APPLICATION_202
    default "301_user" if NIOBEU4_APPLICATION_301
3. 修改.application_config
在MobaXterm右侧
在niobeu4_src/vendor/openvalley/niobeu4/demo/301_user目录
下打开# .application_config文件,修改内容:
# Copyright (c) 2022 Hunan OpenValley Digital Industry Development Co., Ltd.
# Licensed under the Apache License, Version 2.0 (the "License");
# you may not use this file except in compliance with the License.
# You may obtain a copy of the License at
#
#     http://www.apache.org/licenses/LICENSE-2.0
#
# Unless required by applicable law or agreed to in writing, software
# distributed under the License is distributed on an "AS IS" BASIS,
# WITHOUT WARRANTIES OR CONDITIONS OF ANY KIND, either express or implied.
# See the License for the specific language governing permissions and
# limitations under the License.


config NIOBEU4_APPLICATION_301
    bool "301_user"
    select DRIVERS
    select DRIVERS_HDF
    select DRIVERS_HDF_PLATFORM
    select DRIVERS_HDF_CONFIG_MACRO
    select DRIVERS_HDF_PLATFORM_GPIO
    select DRIVERS_HDF_PLATFORM_ADC
4. 修改BUILD.gn
在MobaXterm右侧
在niobeu4_src/vendor/openvalley/niobeu4/demo/301_user目录
下打开BUILD.gn文件,修改内容:
# Copyright (c) 2022 Hunan OpenValley Digital Industry Development Co., Ltd.
# Licensed under the Apache License, Version 2.0 (the "License");
# you may not use this file except in compliance with the License.
# You may obtain a copy of the License at
#
#     http://www.apache.org/licenses/LICENSE-2.0
#
# Unless required by applicable law or agreed to in writing, software
# distributed under the License is distributed on an "AS IS" BASIS,
# WITHOUT WARRANTIES OR CONDITIONS OF ANY KIND, either express or implied.
# See the License for the specific language governing permissions and
# limitations under the License.

import("//kernel/liteos_m/liteos.gni")
assert(defined(LOSCFG_DRIVERS_HDF_CONFIG_MACRO), "Must Config LOSCFG_DRIVERS_HDF_CONFIG_MACRO in kernel/liteos_m menuconfig!")
assert(defined(LOSCFG_DRIVERS_HDF_PLATFORM_GPIO), "Must Config LOSCFG_DRIVERS_HDF_PLATFORM_GPIO in kernel/liteos_m menuconfig!")
module_name = get_path_info(rebase_path("."), "name")
kernel_module(module_name) {
    sources = [
        "os_thread_example.c"
    ]

    include_dirs = [
        "//kernel/liteos_m/kernel/include"
        "//drivers/hdf_core/framework/include/platform/",
        "//drivers/hdf_core/framework/include/utils/",
        "//drivers/hdf_core/framework/support/platform/include/gpio",
        "//drivers/hdf_core/adapter/khdf/liteos_m/osal/include/",
        "//drivers/hdf_core/framework/include/core/",
        "//drivers/hdf_core/framework/include/osal/",
        "//device/soc/esp/esp32/components/esp_adc_cal/include/",
        "//device/soc/esp/esp32/components/driver/esp32/include/"
    ]
}
5. 修改主程序
修改新案例目录名下 主程序
在MobaXterm右侧打
在niobeu4_src/vendor/openvalley/niobeu4/demo/301_user
下打开os_thread_example.c文件,修改内容:
/*
 * Copyright (c) 2022 Hunan OpenValley Digital Industry Development Co., Ltd.
 * Licensed under the Apache License, Version 2.0 (the "License");
 * you may not use this file except in compliance with the License.
 * You may obtain a copy of the License at
 *
 *    http://www.apache.org/licenses/LICENSE-2.0
 *
 * Unless required by applicable law or agreed to in writing, software
 * distributed under the License is distributed on an "AS IS" BASIS,
 * WITHOUT WARRANTIES OR CONDITIONS OF ANY KIND, either express or implied.
 * See the License for the specific language governing permissions and
 * limitations under the License.
 */

#include
#include
#include
#include "los_task.h"
#include "ohos_run.h"
#include "gpio_types.h"
#include "gpio_if.h"
#include "cmsis_os2.h"//cmsis 2.0 接口osThreadNew()
#include "hdf_log.h"
#include "ohos_run.h"
#include "esp_adc_cal.h"

UINT32 g_taskHiId;
UINT32 g_taskLoId;
#define TSK_PRIOR_HI 24
#define TSK_PRIOR_LO 25

#define SYS_DELAY_TICKS 200
#define TASK_STACK_SIZE 4096
#define TASK_PRIO 25

#define KEY_LED_OFF 0
#define KEY_LED_ON  1

//在hcs文件中对应具体的GPIO口
#define RED_LED_PIN_INDEX   0       // 红色LED
#define BLUE_LED_PIN_INDEX  1       // 蓝色LED
#define PWR_SW_PIN_INDEX    2       // VCC_3.3 电源使能

osThreadId_t g_taskID = NULL;
UINT32 button_o=0;
//key_led_test
UINT32 Example_TaskHi(UINT32 arg)
{
    int raw;

    GpioSetDir(PWR_SW_PIN_INDEX, GPIO_DIR_OUT);     // 设置VCC_3.3电源使能
    GpioWrite(PWR_SW_PIN_INDEX, KEY_LED_ON);

    GpioSetDir(RED_LED_PIN_INDEX, GPIO_DIR_OUT);    // 红灯对应GPIO配置为输出
    GpioWrite(RED_LED_PIN_INDEX, KEY_LED_OFF);//默认红灯为关

    GpioSetDir(BLUE_LED_PIN_INDEX, GPIO_DIR_OUT); // 蓝灯对应GPIO配置为输出
    GpioWrite(BLUE_LED_PIN_INDEX, KEY_LED_OFF);//默认蓝灯为关

    HDF_LOGE("[key_led] GPIO initn");

    //因为niobeu4开发板ADC hdf代码需要重新适配所以先是用esp32原生接口
    adc1_config_width(ADC_WIDTH_12Bit); //设置采样精度,2^12=4096
    adc1_config_channel_atten(ADC1_CHANNEL_0, ADC_ATTEN_DB_11); //设置电压采样范围

    HDF_LOGE("[key_led] ADC initn");

	while (1)
	{
		raw = adc1_get_raw(ADC1_CHANNEL_0); //获取ADC1通道0的原始值
		UINT32 button_s=0;
		//HDF_LOGE("[key_led] raw: %dn", raw);
        if (raw < 100)
        {
            LOS_Msleep(30);
            raw = adc1_get_raw(ADC1_CHANNEL_0); //获取ADC1通道0的原始值
                    if (raw < 100)
                        {
                            button_o=55;
                            button_s++;
                            HDF_LOGE("[key_led] sw4 pressed raw: %dn", raw);
                            while(adc1_get_raw(ADC1_CHANNEL_0)< 100){                             LOS_Msleep(30);
                            button_s++;
                            if (button_s>34){
//                                HDF_LOGE("[key_led] sw4 pressed long: %dn", raw);
                            }
                            if (button_s>240){button_s=240;}

//                            GpioWrite(RED_LED_PIN_INDEX, KEY_LED_ON);
//                            GpioWrite(BLUE_LED_PIN_INDEX, KEY_LED_OFF);
                            }
                            button_s=0;
                    HDF_LOGE("[key_led] sw4 pressed up: %dn", raw);
//                    GpioWrite(RED_LED_PIN_INDEX, KEY_LED_ON);
//                    GpioWrite(BLUE_LED_PIN_INDEX, KEY_LED_OFF);

                        }

        }
        else if (raw >2000 && raw < 3000)
        {

            LOS_Msleep(30);
            raw = adc1_get_raw(ADC1_CHANNEL_0); //获取ADC1通道0的原始值
                    if (raw >2000 && raw < 3000)
                        {
                            button_o=66;
                            button_s++;
                            HDF_LOGE("[key_led] sw5 pressed raw: %dn", raw);
                            raw = adc1_get_raw(ADC1_CHANNEL_0); //获取ADC1通道0的原始值
                            while(raw >2000 && raw < 3000){                             LOS_Msleep(30);
                            button_s++;
                            if (button_s>34){
                                //                                HDF_LOGE("[key_led] sw5 pressed long: %dn", raw);
                            }
                            if (button_s>240){button_s=240;}
                            raw = adc1_get_raw(ADC1_CHANNEL_0);

//                            GpioWrite(RED_LED_PIN_INDEX, KEY_LED_ON);
//                            GpioWrite(BLUE_LED_PIN_INDEX, KEY_LED_OFF);
                            }
                            button_s=0;
                    HDF_LOGE("[key_led] sw5 pressed up: %dn", raw);
//                    GpioWrite(RED_LED_PIN_INDEX, KEY_LED_ON);
//                    GpioWrite(BLUE_LED_PIN_INDEX, KEY_LED_OFF);

                        }


//            HDF_LOGE("[key_led] sw5 pressed raw: %dn", raw);
//            GpioWrite(RED_LED_PIN_INDEX, KEY_LED_OFF);
//            GpioWrite(BLUE_LED_PIN_INDEX, KEY_LED_ON);
        }
        LOS_Msleep(SYS_DELAY_TICKS);
	}

}

/* 低优先级任务入口函数 */
UINT32 Example_TaskLo(UINT32 arg)
{uint16_t key_state = 0;
   while(1){
        LOS_Msleep(30);
   if (button_o==55){

                       GpioRead(RED_LED_PIN_INDEX, &key_state);
                       button_o=0;
                       HDF_LOGE("[key_state] sw4 : %dn", key_state);
                       if (key_state){
                            	GpioWrite(RED_LED_PIN_INDEX, KEY_LED_OFF);
                            HDF_LOGE("[RED_LED] sw4 : Offn");
                            }
                            else{
                            GpioWrite(RED_LED_PIN_INDEX, KEY_LED_ON);
                            HDF_LOGE("[RED_LED] sw4 : ONn");
                            }
   }
//                            GpioWrite(RED_LED_PIN_INDEX, KEY_LED_ON);
//                            GpioWrite(BLUE_LED_PIN_INDEX, KEY_LED_OFF);


   if (button_o==66){
                       GpioRead(BLUE_LED_PIN_INDEX, &key_state);
                       button_o=0;
                       HDF_LOGE("[key_state] sw5 : %dn", key_state);
                       if (key_state){GpioWrite(BLUE_LED_PIN_INDEX, KEY_LED_OFF);
                            HDF_LOGE("[RED_LED] sw5 : Offn");
                            }
                            else{
                            GpioWrite(BLUE_LED_PIN_INDEX, KEY_LED_ON);
                            HDF_LOGE("[RED_LED] sw5 : ONn");}
   }
//    UINT32 ret;
//    printf("Enter TaskLo Handler.n");
//    /* 延时100个Ticks,延时后该任务会挂起,执行剩余任务中最高优先级的任务 */
//    ret = LOS_TaskDelay(100);
//    if (ret != LOS_OK) {
//        printf("Delay TaskLo Failed.n");
//        return LOS_NOK;
//    }
//
//    printf("TaskHi LOS_TaskSuspend Success.n");
//
//    /* 恢复被挂起的任务g_taskHiId */
//    ret = LOS_TaskResume(g_taskHiId);
//    if (ret != LOS_OK) {
//        printf("Resume TaskHi Failed.n");
//        return LOS_NOK;
//    }
//    return ret;


}

/* 任务测试入口函数,创建两个不同优先级的任务 */
UINT32 Example_TskCaseEntry(VOID)
{
    UINT32 ret;
    TSK_INIT_PARAM_S initParam = {0};
    /* 锁任务调度,防止新创建的任务比本任务高而发生调度 */
    LOS_TaskLock();
    printf("LOS_TaskLock() Success!n");
    UINT32 curTaskID = LOS_CurTaskIDGet();
    TSK_INFO_S taskInfo;
    ret = LOS_TaskInfoGet(curTaskID, &taskInfo);
    if (ret == LOS_OK) {
        printf("curTask prio = %dn", taskInfo.usTaskPrio);
    }

    initParam.pfnTaskEntry = (TSK_ENTRY_FUNC)Example_TaskHi;
    initParam.usTaskPrio = TSK_PRIOR_HI;
    initParam.pcName = "TaskHi";
    initParam.uwStackSize = LOSCFG_BASE_CORE_TSK_DEFAULT_STACK_SIZE;
    initParam.uwResved = LOS_TASK_ATTR_JOINABLE; /* detach 属性 允许使用LOS_TaskJoin */

    /* 创建高优先级任务,由于锁任务调度,任务创建成功后不会马上执行 */
    ret = LOS_TaskCreate(&g_taskHiId, &initParam);
    if (ret != LOS_OK) {
        LOS_TaskUnlock();

        printf("Example_TaskHi create Failed!n");
        return LOS_NOK;
    }
    printf("Example_TaskHi create Success!n");

    initParam.pfnTaskEntry = (TSK_ENTRY_FUNC)Example_TaskLo;
    initParam.usTaskPrio = TSK_PRIOR_LO;
    initParam.pcName = "TaskLo";
    initParam.uwStackSize = LOSCFG_BASE_CORE_TSK_DEFAULT_STACK_SIZE;
    /* 创建低优先级任务,由于锁任务调度,任务创建成功后不会马上执行 */
    ret = LOS_TaskCreate(&g_taskLoId, &initParam);
    if (ret != LOS_OK) {
        LOS_TaskUnlock();
        printf("Example_TaskLo create Failed!n");
        return LOS_NOK;
    }

    printf("Example_TaskLo create Success!n");
    /* 解锁任务调度,此时会发生任务调度,执行就绪队列中最高优先级任务 */
    LOS_TaskUnlock();
//    ret = LOS_TaskJoin(g_taskHiId, NULL);
//    if (ret != LOS_OK) {
//        printf("Join Example_TaskHi Failed!n");
//    } else {
//        printf("Join Example_TaskHi Success!n");
//    }
    return LOS_OK;
}

OHOS_APP_RUN(Example_TskCaseEntry);
构建源码
- 进入源码根目录,执行hb set命令并选择openvalley下的iotlink。
hb set
- 执行hb build –f脚本构建产生固件。
hb build –f
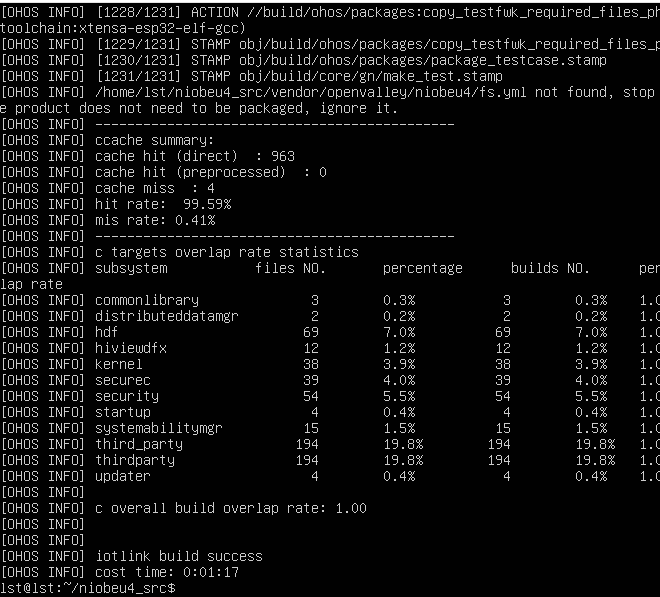
- 如图所示,编译成功,并查看生产的固件。
构建成功会提示类似如下信息。
[OHOS INFO] iotlink build success
[OHOS INFO] cost time: 0:03:28
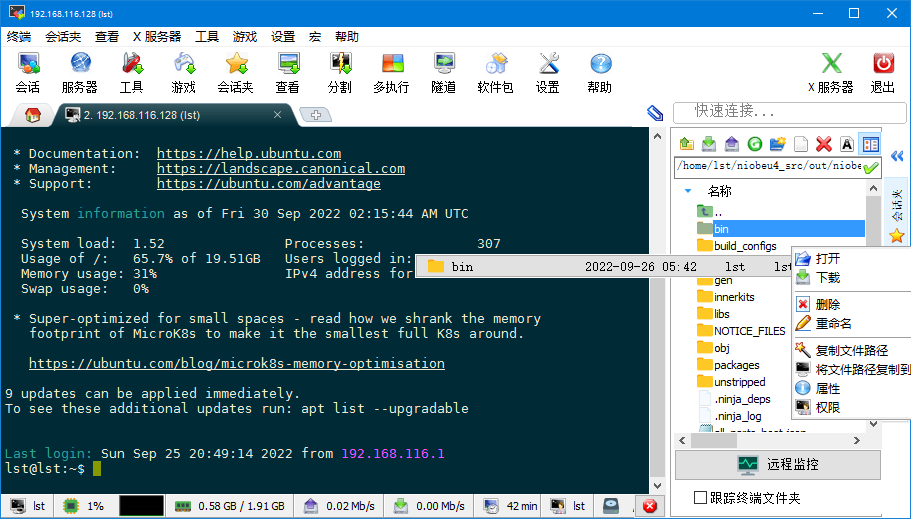
- 查看生成的固件。
ls /home/lst/niobeu4_src/out/niobeu4/iotlink/bin/
| 固件名称       | 用途                          |
| ---------------- | ------------------------------- |
| OHOS_Image.bin | OpenHarmony内核及应用镜像文件 |
| bootloader.bin | 启动引导镜像文件              |
| partitions.bin | 分区表镜像文件                |
烧录镜像
- 通过MobaXterm软件ssh登录服务器,将生成的文件Download到Windows系统下,如图所示。
Windows下可以使用Flash_Download_Tool工具进行烧录,点击这里开始下载。
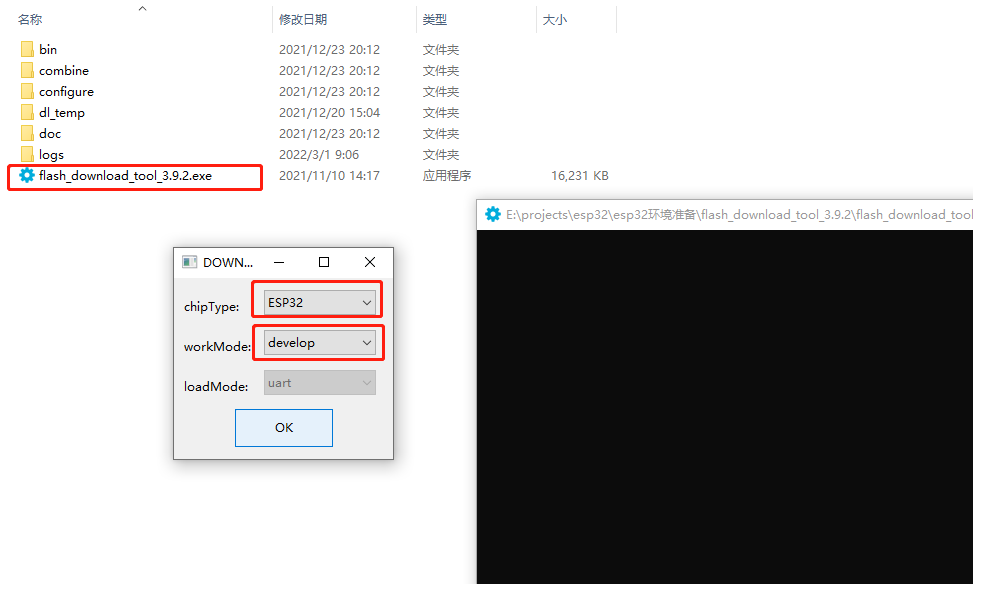
- 在windows下解压flash_download_tool_3.9.2.rar。
- 双击解压后得到的烧录工具flash_download_tool_3.9.2.exe,chipType选择 ESP32, workMode选择 develop,进入主界面。
图4 Flash_Download_Tool打开页面图
- 连接开发板的TypeC口到PC,查看设备管理器,确定串口端口号。
图5 设备管理器图

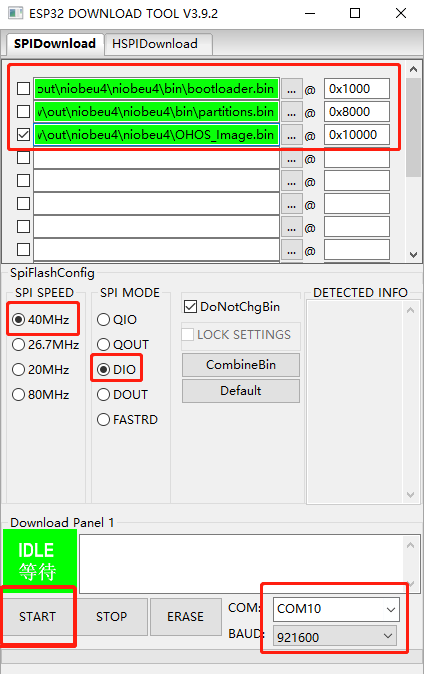
- 进入下载页面,填入需要烧录的 bin 文件和对应的烧录地址,并根据自己实际 需求填入 SPI SPEED、SPI MODE、COM 及 BAUD。
固件对应烧录地址如下。
//out/niobeu4/iotlink/bin/bootloader.bin ---------->  0x1000
//out/niobeu4/iotlink/bin/partitions.bin ---------->  0x8000
//out/niobeu4/iotlink/OHOS_Image.bin ---------->  0x10000
图6 烧录设置页面图
-
点击 START 开始下载。下载过程中,下载工具会读取 flash 的信息和芯片的 MAC 地址。我们可以通过勾选框选择是否烧录该文件,一般我们在首次烧录时会全部烧录,为了加快开发效率,调试时只需烧录
OHOS_Image.bin即可。下载完成后,可以看到如下提示。
图7 烧录成功页面图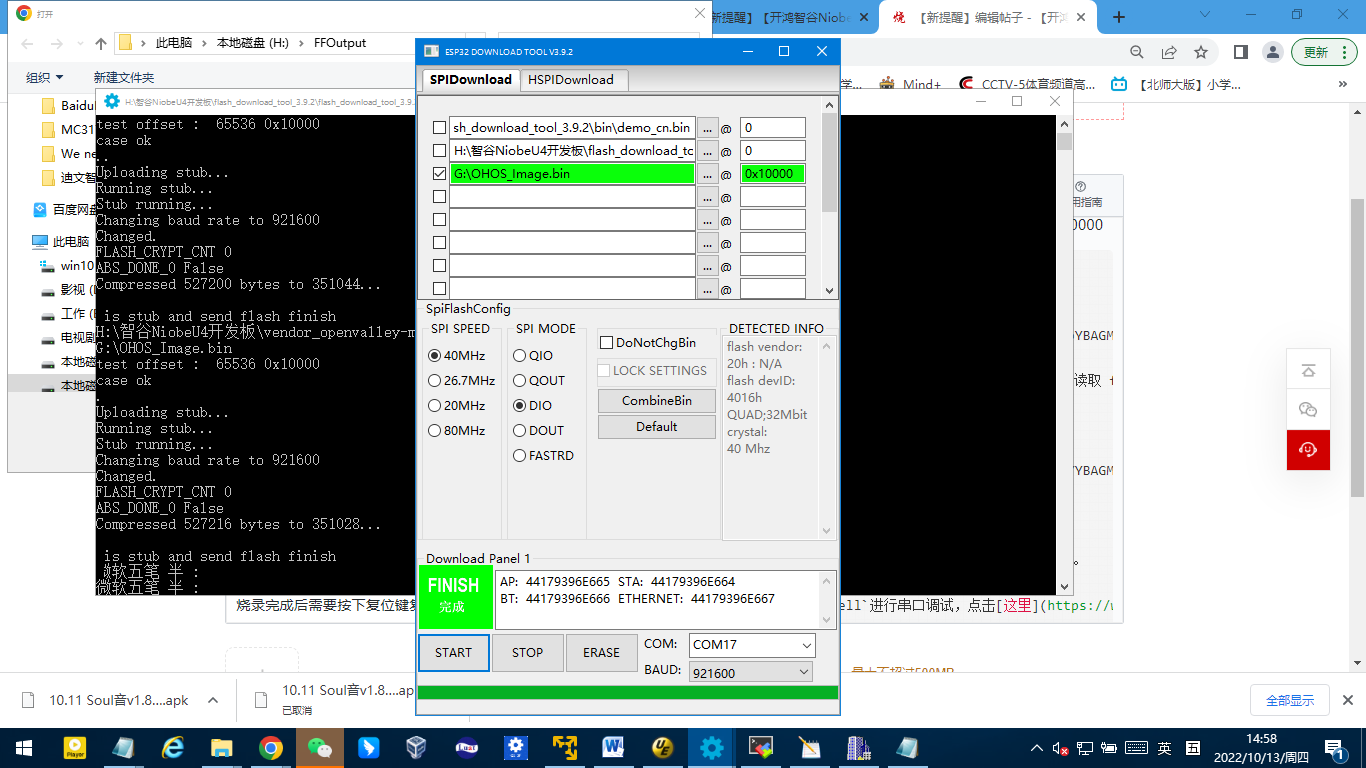
运行镜像
烧录完成后需要按下复位键复位设备,程序才会启动。
推荐使用xshell进行串口调试,点击这里进行下载。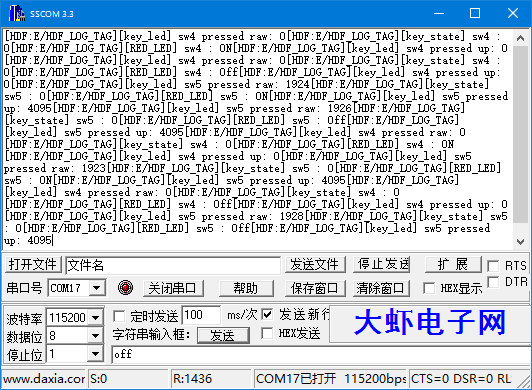
达到预期状态。
开发板体验视频,详见作者原帖子文章。
-
【开鸿智谷NiobeU4开发板免费试用体验】基于Ubuntu22.04的NiobeU4开发环境搭建2022-10-17 3059
-
【开鸿智谷NiobeU4开发板免费试用体验】lvgl移植及实现ADC按键状态显示2022-10-14 2599
-
【开鸿智谷NiobeU4开发板免费试用体验】控温(1)2022-10-12 9001
-
【开鸿智谷NiobeU4开发板免费试用体验】Demo例程加载2022-10-10 3846
-
【开鸿智谷NiobeU4开发板免费试用体验】2.NiobeU4编程基础--gpio与uart联合使用示例2022-10-05 5710
-
【开鸿智谷NiobeU4开发板免费试用体验】1.Windows物理机上构建Linux开发环境2022-10-01 10167
-
【开鸿智谷NiobeU4开发板免费试用体验】开箱体验编译环境搭建及烧录2022-09-11 6497
全部0条评论

快来发表一下你的评论吧 !
