

使用KeyPointRCNN轻松获取人体的17个关键点
描述
前言
TorchVision支持主流姿态评估模型关键点检测模型KeyPointRCNN,通过它可以轻松获取人体的17个关键点,跟OpenPose等模型相比,KeyPointRCNN基于TorchVision框架,迁移学习训练简单,支持一键导出ONNX格式,可以部署到ONNXRUNTIME与OpenVINO,支持C++与Python的SDK部署,可以说在易用性上丝毫不差!
KeyPointRCNN模型介绍
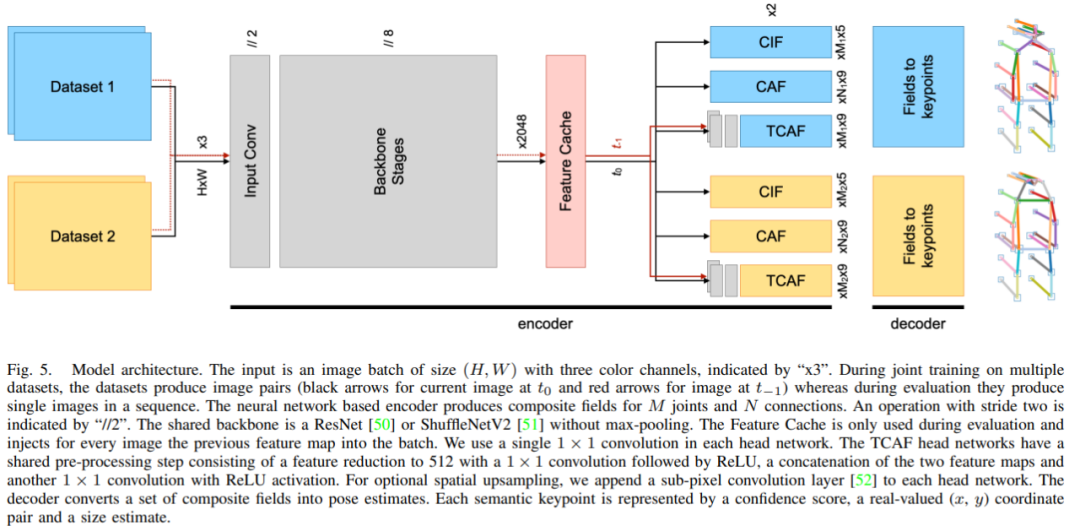
Torchvision中KeyPointRCNN已经是基于2021年的论文中的最新版本,效果非常好,2021年论文比2019论文最大的改动在预测的编码与解码部分,提出了CIF与CAF两种新的编码方法,模型结构图示如下:
上述一段英文交代的比较清楚,模型输入就是一张RGB彩色图像,模型最终的输出有四个部分组成,分别是boxes、labels、scores、keypoints,它们的输出结构如下:
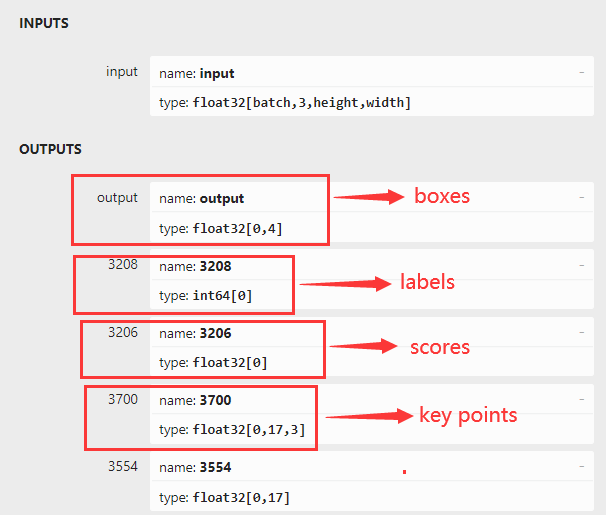
不是还有最后一个输出层没有解释吗,最后一个输出层其实是各个关键点的得分信息,小于的基本上应该都被干掉,不可信。
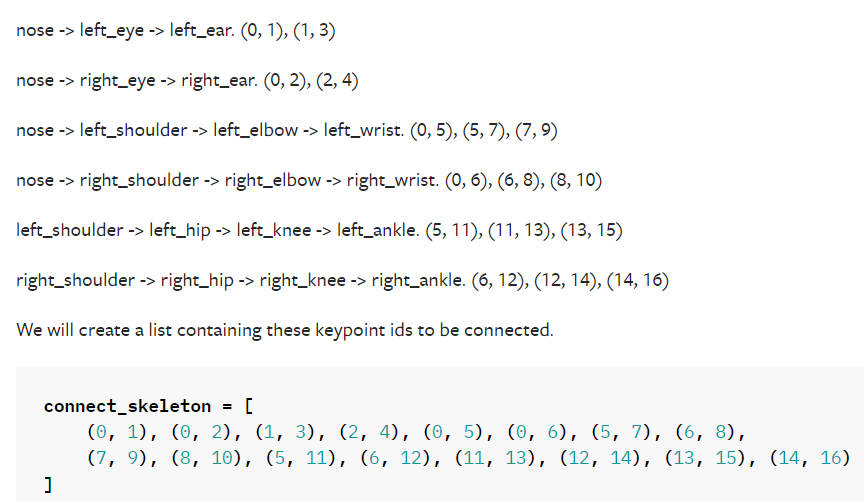
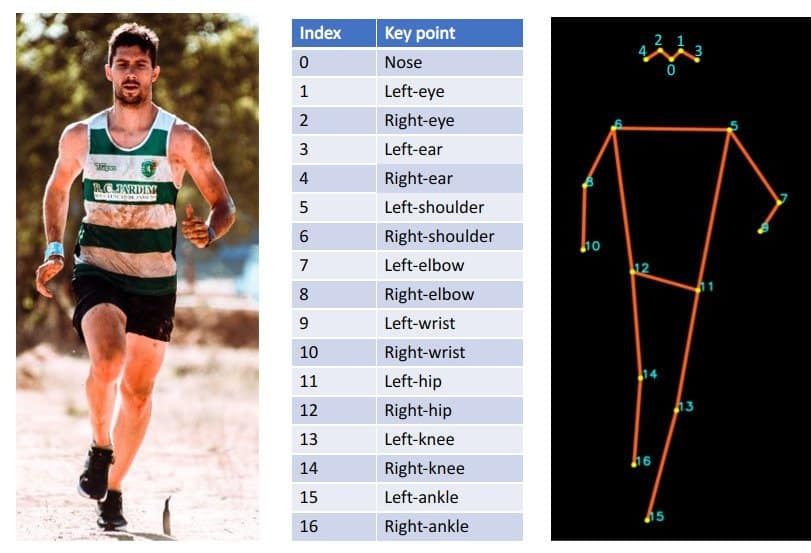
另外KeyPoint部分输出是17x3,3表示x、y、v其中v表示是否可见,v为1表示该关键点可见、v为0表示该关键点不可见。 各个关节点的连接顺序与编码坐标如下(写代码有用的):
KeyPointRCNN推理演示
Torchvision官方提供了预训练的模型,直接下载之后,通过下面的脚本就可以转换为ONNX格式模型,然后通过ONNXRUNTIME就可以完成推理演示。
第一步,转ONNX格式
相关脚本如下
model = torchvision.models.detection.keypointrcnn_resnet50_fpn(weights=KeypointRCNN_ResNet50_FPN_Weights.DEFAULT)
model.eval()
x = [torch.rand(3, 300, 400), torch.rand(3, 500, 400)]
predictions = model(x)

# optionally, if you want to export the model to ONNX:
torch.onnx.export(model, x, "keypoint_rcnn.onnx", opset_version = 11)
如果不工作,请参考这里的转换脚本修改之: TorchVision对象检测RetinaNet推理演示
第二步:ONNRUNTIME推理演示
这部分跟之前发过一篇RetinaNet推理文章非常相似,这篇文章的连接如下,代码只是稍微改了那么一点点,增加了KeyPoint部分的可视化,推理部分的代码如下:
import onnxruntime as ort
import cv2 as cv
import numpy as np
import torchvision

coco_names = {'0': 'background', '1': 'person', '2': 'bicycle', '3': 'car', '4': 'motorcycle', '5': 'airplane', '6': 'bus',
         '7': 'train', '8': 'truck', '9': 'boat', '10': 'traffic light', '11': 'fire hydrant', '13': 'stop sign',
         '14': 'parking meter', '15': 'bench', '16': 'bird', '17': 'cat', '18': 'dog', '19': 'horse', '20': 'sheep',
         '21': 'cow', '22': 'elephant', '23': 'bear', '24': 'zebra', '25': 'giraffe', '27': 'backpack',
         '28': 'umbrella', '31': 'handbag', '32': 'tie', '33': 'suitcase', '34': 'frisbee', '35': 'skis',
         '36': 'snowboard', '37': 'sports ball', '38': 'kite', '39': 'baseball bat', '40': 'baseball glove',
         '41': 'skateboard', '42': 'surfboard', '43': 'tennis racket', '44': 'bottle', '46': 'wine glass',
         '47': 'cup', '48': 'fork', '49': 'knife', '50': 'spoon', '51': 'bowl', '52': 'banana', '53': 'apple',
         '54': 'sandwich', '55': 'orange', '56': 'broccoli', '57': 'carrot', '58': 'hot dog', '59': 'pizza',
         '60': 'donut', '61': 'cake', '62': 'chair', '63': 'couch', '64': 'potted plant', '65': 'bed',
         '67': 'dining table', '70': 'toilet', '72': 'tv', '73': 'laptop', '74': 'mouse', '75': 'remote',
         '76': 'keyboard', '77': 'cell phone', '78': 'microwave', '79': 'oven', '80': 'toaster', '81': 'sink',
         '82': 'refrigerator', '84': 'book', '85': 'clock', '86': 'vase', '87': 'scissors', '88': 'teddybear',
         '89': 'hair drier', '90': 'toothbrush'}

transform = torchvision.transforms.Compose([torchvision.transforms.ToTensor()])

sess_options = ort.SessionOptions()
# Below is for optimizing performance
sess_options.intra_op_num_threads = 24
# sess_options.execution_mode = ort.ExecutionMode.ORT_PARALLEL
sess_options.graph_optimization_level = ort.GraphOptimizationLevel.ORT_ENABLE_ALL
ort_session = ort.InferenceSession("keypointrcnn_resnet50_fpn.onnx", sess_options=sess_options,
                                   providers=['CUDAExecutionProvider'])
src = cv.imread("D:/images/messi_player.jpg")
cv.namedWindow("KeyPointRCNN Detection Demo", cv.WINDOW_AUTOSIZE)
image = cv.cvtColor(src, cv.COLOR_BGR2RGB)
blob = transform(image)
c, h, w = blob.shape
input_x = blob.view(1, c, h, w)
def to_numpy(tensor):
    return tensor.detach().cpu().numpy() if tensor.requires_grad else tensor.cpu().numpy()

# compute ONNX Runtime output prediction
ort_inputs = {ort_session.get_inputs()[0].name: to_numpy(input_x)}
ort_outs = ort_session.run(None, ort_inputs)
#  (N,4) dimensional array containing the absolute bounding-box
boxes = ort_outs[0]
# labels
labels = ort_outs[1]
# scores
scores = ort_outs[2]
# key_points
multi_key_points = ort_outs[3]

print(boxes.shape, boxes.dtype, labels.shape, labels.dtype, scores.shape, scores.dtype, multi_key_points.shape)

index = 0
for x1, y1, x2, y2 in boxes:
    if scores[index] > 0.5:
        cv.rectangle(src, (np.int32(x1), np.int32(y1)),
                     (np.int32(x2), np.int32(y2)), (140, 199, 0), 2, 8, 0)
        label_id = labels[index]
        label_txt = coco_names[str(label_id)]
        cv.putText(src, label_txt, (np.int32(x1), np.int32(y1)), cv.FONT_HERSHEY_SIMPLEX, 0.75, (0, 0, 255), 1)
        kpts = np.int32(multi_key_points[index])

        # nose -> left_eye -> left_ear.(0, 1), (1, 3)
        cv.line(src, (kpts[0][0], kpts[0][1]), (kpts[1][0], kpts[1][1]), (255, 255, 0), 2, 8, 0)
        cv.line(src, (kpts[1][0], kpts[1][1]), (kpts[3][0], kpts[3][1]), (255, 255, 0), 2, 8, 0)
        # nose -> right_eye -> right_ear.(0, 2), (2, 4)
        cv.line(src, (kpts[0][0], kpts[0][1]), (kpts[2][0], kpts[2][1]), (255, 255, 0), 2, 8, 0)
        cv.line(src, (kpts[2][0], kpts[2][1]), (kpts[4][0], kpts[4][1]), (255, 255, 0), 2, 8, 0)
        # nose -> left_shoulder -> left_elbow -> left_wrist.(0, 5), (5, 7), (7, 9)
        cv.line(src, (kpts[0][0], kpts[0][1]), (kpts[5][0], kpts[5][1]), (255, 255, 0), 2, 8, 0)
        cv.line(src, (kpts[5][0], kpts[5][1]), (kpts[7][0], kpts[7][1]), (255, 255, 0), 2, 8, 0)
        cv.line(src, (kpts[7][0], kpts[7][1]), (kpts[9][0], kpts[9][1]), (255, 255, 0), 2, 8, 0)
        # nose -> right_shoulder -> right_elbow -> right_wrist.(0, 6), (6, 8), (8, 10)
        cv.line(src, (kpts[0][0], kpts[0][1]), (kpts[6][0], kpts[6][1]), (255, 255, 0), 2, 8, 0)
        cv.line(src, (kpts[6][0], kpts[6][1]), (kpts[8][0], kpts[8][1]), (255, 255, 0), 2, 8, 0)
        cv.line(src, (kpts[8][0], kpts[8][1]), (kpts[10][0], kpts[10][1]), (255, 255, 0), 2, 8, 0)
        # left_shoulder -> left_hip -> left_knee -> left_ankle.(5, 11), (11, 13), (13, 15)
        cv.line(src, (kpts[5][0], kpts[5][1]), (kpts[11][0], kpts[11][1]), (255, 255, 0), 2, 8, 0)
        cv.line(src, (kpts[11][0], kpts[11][1]), (kpts[13][0], kpts[13][1]), (255, 255, 0), 2, 8, 0)
        cv.line(src, (kpts[13][0], kpts[13][1]), (kpts[15][0], kpts[15][1]), (255, 255, 0), 2, 8, 0)
        # right_shoulder -> right_hip -> right_knee -> right_ankle.(6, 12), (12, 14), (14, 16)
        cv.line(src, (kpts[6][0], kpts[6][1]), (kpts[12][0], kpts[12][1]), (255, 255, 0), 2, 8, 0)
        cv.line(src, (kpts[12][0], kpts[12][1]), (kpts[14][0], kpts[14][1]), (255, 255, 0), 2, 8, 0)
        cv.line(src, (kpts[14][0], kpts[14][1]), (kpts[16][0], kpts[16][1]), (255, 255, 0), 2, 8, 0)
        for x, y, _, in kpts:
            cv.circle(src, (int(x), int(y)), 3, (0, 0, 255), 2, 8, 0)

    index += 1
cv.imshow("KeyPointRCNN Detection Demo", src)
cv.waitKey(0)
cv.destroyAllWindows()
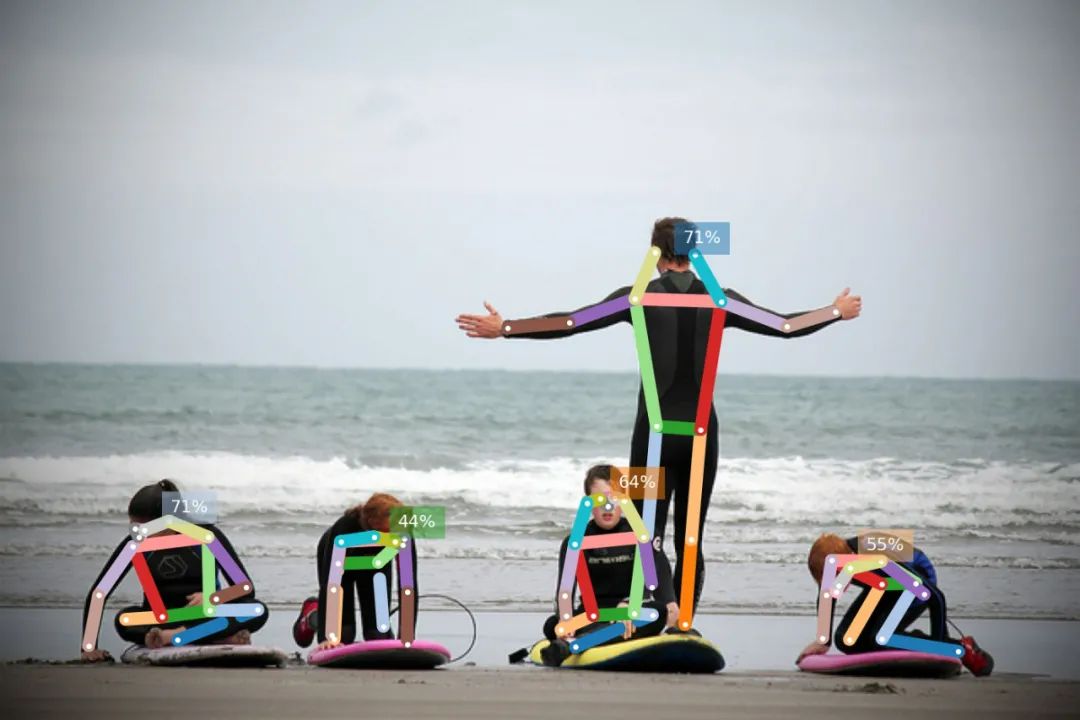
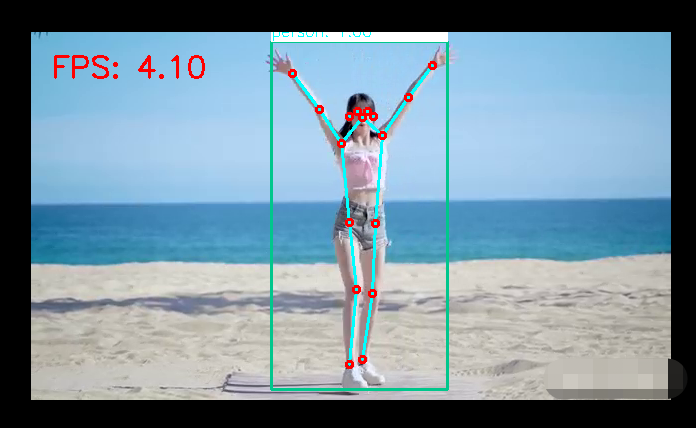
测试与运行结果如下:
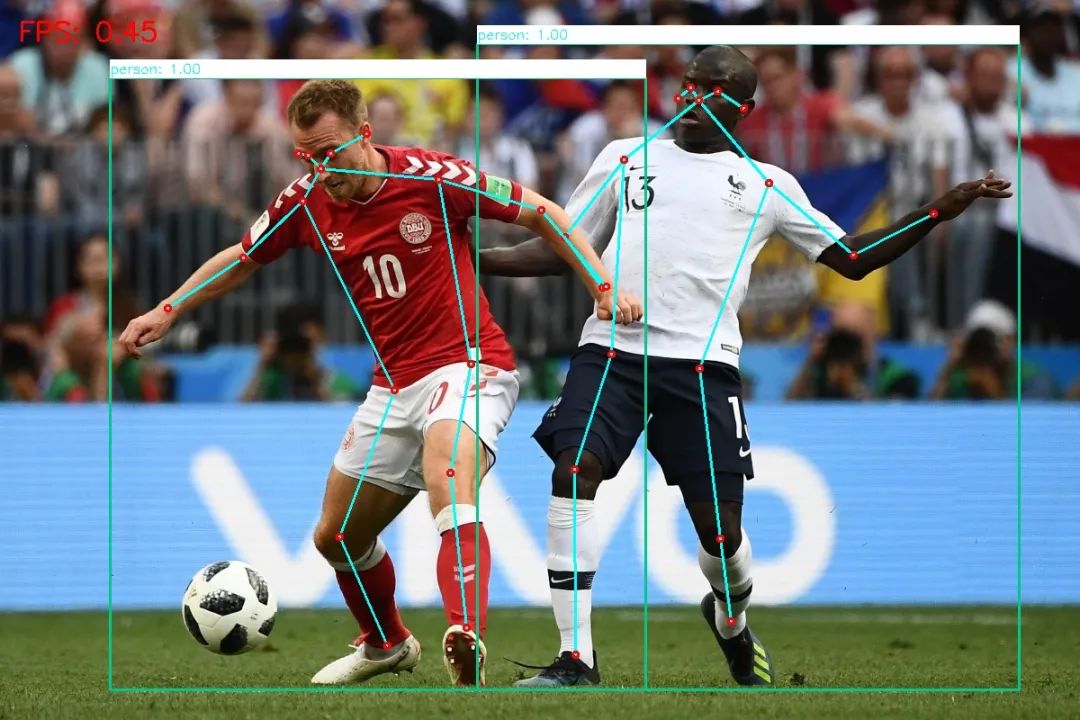
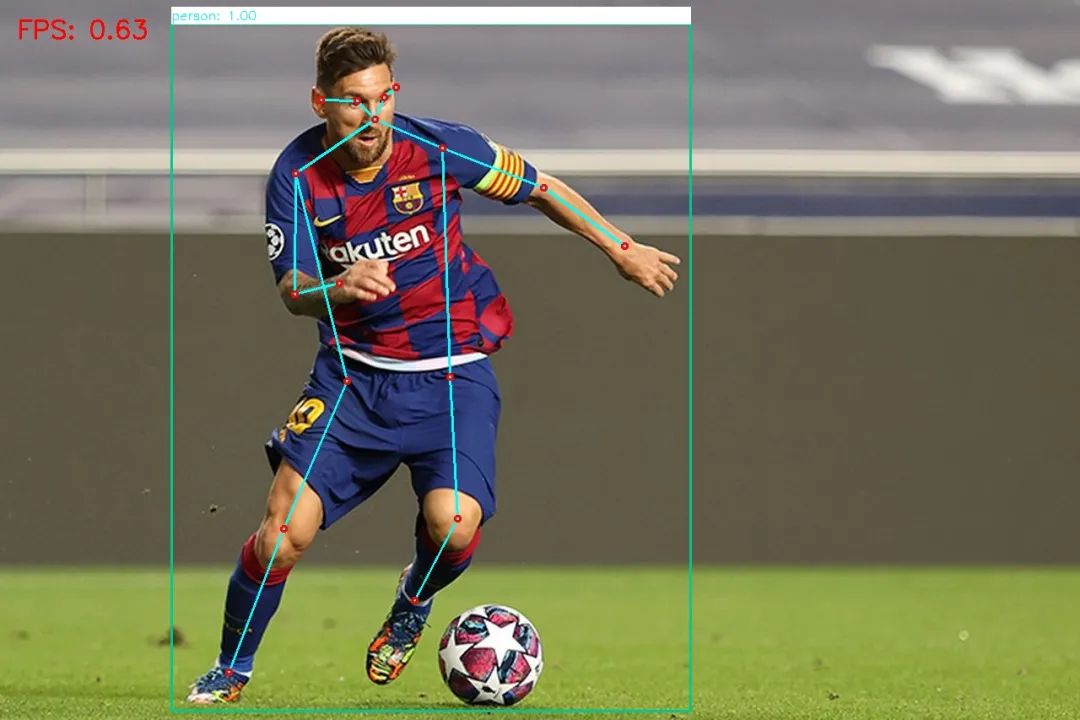
基于3050的卡,GPU推理,速度!没办法模型有点大,速度有点慢,需要好N卡加持才能实时检测!
审核编辑:刘清
-
瑞芯微(EASY EAI)RV1126B 人体关键点识别2026-01-23 4295
-
瑞芯微RK3576人体关键点识别算法(骨骼点)2025-08-27 1275
-
【开发实例】基于BPI-CanMV-K230D-Zero开发板实现人体关键点的实时动态识别2025-07-08 1712
-
【BPI-CanMV-K230D-Zero开发板体验】人体关键点检测2025-06-28 1509
-
IC针脚测量方案|全自动影像仪轻松测量关键尺寸2022-10-28 1940
-
PCB设计的一个关键点2022-08-05 1741
-
17个PCB布局的知识点2022-07-10 927
-
怎样使用Rock-X SDK对人体骨骼点关键点进行开发获取呢2022-06-29 2385
-
一种改进的人体关键点检测算法2021-05-14 1131
-
新型着装人体多特征提取和尺寸测量算法2021-03-16 1150
-
人体互联网有利于获取人体健康数据2021-03-08 2718
-
基于Dragonboard 410c的kinect应用系列之四——获取人体骨骼图2017-02-21 3458
-
运动人体检测和二维关键点提取2012-02-08 1372
-
基于计算机图像序列的人体步态参数的快速获取方法2009-12-08 1193
全部0条评论

快来发表一下你的评论吧 !
