
【米尔MYD-YT507开发板试用体验】使用mjpeg_streamer建立摄像头图传
描述
本文来源电子发烧友社区,作者:HonestQiao, 帖子地址:https://bbs.elecfans.com/jishu_2294644_1_1.html
在之前的研究中,已经实现了米尔MYD-YT507开发板接入海康威视USB摄像头,并进行摄像头数据的获取,具体可查看:USB摄像头使用从入门到放弃。
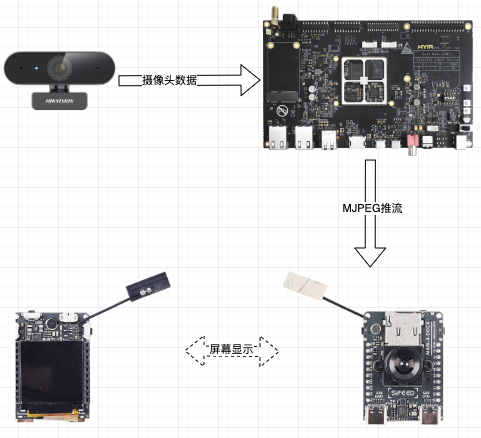
在此基础上,进一步实现了米尔MYD-YT507开发提供MJPEG推流,矽速M2 Dock读取该MJPEG推流,并显示到屏幕上,其逻辑如下:
最终的效果,可以查看:M2 Dock获取MJPEG推流数据
这篇文章,分享的就是 米尔MYD-YT507开发板 实现MJPEG推流的部分。
最开始,我尝试了使用nginx + nginx-rtmp-module模块,来实现rtmp视频推流。
具体操作如下:
- 安装nginx,及nginx-rtmp-module模块:
# Ubuntu18.04操作系统
# 安装pcre

sudo apt install libpcre3 libpcre3-dev
sudo apt install openssl libssl-dev
sudo apt install zlib1g-dev

# 安装nginx
wget http://nginx.org/download/nginx-1.22.0.tar.gz
git git clone https://github.com/arut/nginx-rtmp-module
tar -zxvf nginx-1.22.0.tar.gz
cd nginx-1.22.0
./configure --prefix=/usr/local/nginx  --add-module=../nginx-rtmp-module  --with-http_ssl_module
make -j4
sudo make install
-
使用ffmpeg获取摄像头数据并推流:
ffmpeg -input_format mjpeg -s:v 640x480 -framerate 30 -i /dev/video0 -f flv "rtmp://127.0.0.1:1935/live/test" -
使用支持视频流的播放器,播放流地址(注意IP修改为开发板实际的IP):rtmp://192.168.1.207:1935/live/test
...
在矽速M2 Dock上,使用的开发环境是MaixPy。
在Python中,对于MJPEG数据,可以很方便的获取。
于是又了解了Ubuntu系统下MJPEG推流的资料,使用mjpeg_streamer就能很方便的实现。
具体操作如下:
sudo apt install cmake libjpeg9-dev

git clone https://github.com/jacksonliam/mjpg-streamer.git
cd mjpg-streamer/mjpg-streamer-experimental
make all
sudo make install

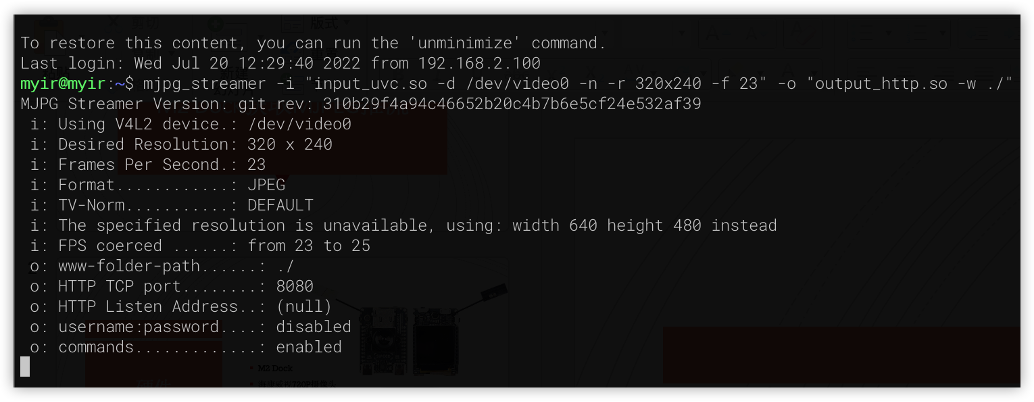
mjpg_streamer -i "input_uvc.so -d /dev/video0 -n -r 320x240 -f 10" -o "output_http.so -w ./"
执行 mjpg_streamer 后,就会启动对应的服务:
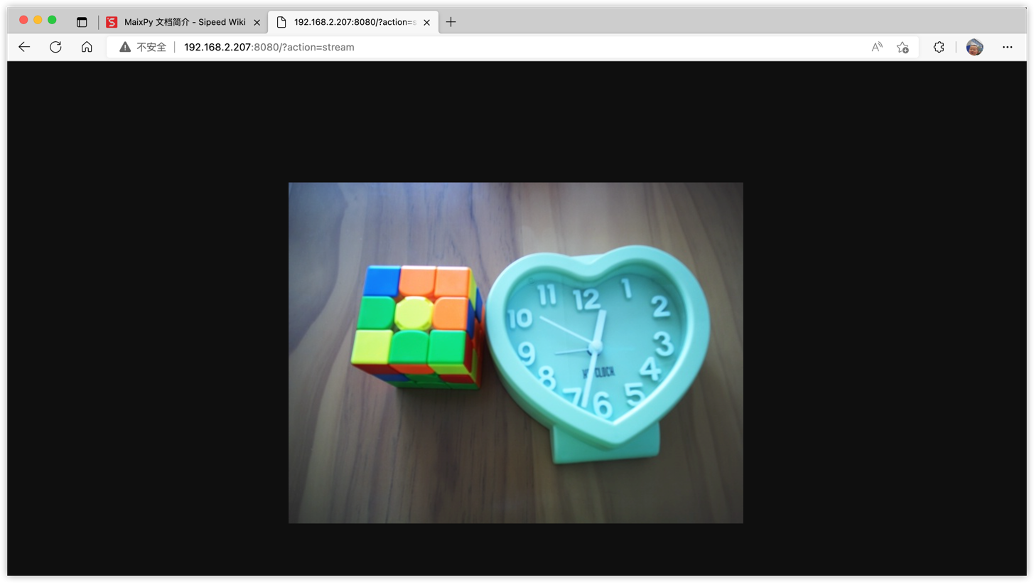
然后,通过浏览器访问 http://192.168.2.207:8080/?action=stream 即可:
提供的MJPEG服务,可以用浏览器直接播放,也可以在Python程序中调用并呈现。
可供测试的代码如下:
import numpy as np
import platform

if platform.uname().node == "sipeed":
    from io import BytesIO
    from PIL import Image
    from maix import camera, mjpg, utils, display, image
else:
    import cv2

READ_TYPE = "socket"    # url socket

MJPEG_HOST = "192.168.2.207"
MJPEG_PORT = 8080
MJPEG_QUERY = "/?action=stream"


def img_data_show(jpg):
    global img_bytes
    global tmp_file
    global is_sipeed
    global BytesIO
    global Image
    global np
    global image
    global display

    if is_sipeed:
        if True:
            bytes_stream = BytesIO(jpg)
            pimg = Image.open(bytes_stream)
            img = image.load(pimg)
            display.show(img)
        else:
            with open(tmp_file, "wb") as binary_file:
                binary_file.write(jpg)
                img = image.open(tmp_file)
                display.show(img)
    else:
        img = cv2.imdecode(np.frombuffer(
            jpg, dtype=np.uint8), cv2.IMREAD_COLOR)
        cv2.imshow('i', img)
        if cv2.waitKey(1) == 27:
            exit(0)


def img_data_match(chunk):
    global img_bytes
    global tmp_file
    global is_sipeed
    global BytesIO
    global Image
    global np
    global image
    global display
    global img_data_show

    img_bytes += chunk
    a = img_bytes.find(b'xffxd8')
    b = img_bytes.find(b'xffxd9')
    if a != -1 and b != -1:
        jpg = img_bytes[a:b+2]
        img_bytes = img_bytes[b+2:]
        img_data_show(jpg)


img_bytes = b''
tmp_file = "/tmp/test.jpg"
is_sipeed = platform.uname().node == "sipeed"

print("Connect to %s:%d with %s on %s" % (MJPEG_HOST, MJPEG_PORT, READ_TYPE, platform.uname().node))

if READ_TYPE == "url":
    import requests

    MJPEG_URL = "http://%s:%s%s" % (MJPEG_HOST, MJPEG_PORT, MJPEG_QUERY)

    r = requests.get(MJPEG_URL, stream=True)
    if(r.status_code == 200):
        print("connect success!")
        for chunk in r.iter_content(chunk_size=1024):
            img_data_match(chunk)
    else:
        print("Received unexpected status code {}".format(r.status_code))
elif READ_TYPE == "socket":
    import socket

    client = socket.socket()  # 创建socket套接字
    ret = client.connect((MJPEG_HOST, MJPEG_PORT))  # 状态位,判定是否连接成功
    request_url = "GET %s HTTP/1.1rnHost:%srnConnection:Closernrn" % (
        MJPEG_QUERY, MJPEG_HOST)

    if(ret == -1):  # 连接失败,退出程序
        print("connet error!")
        exit(-1)
    else:  # 连接成功
        print("connect success!")

    client.send(request_url.encode())  # 发送socket请求,开始接收数据
    chunk = client.recv(1024)  # 第一个recv返回信息,跟图片无关
    chunk = client.recv(1024)  # 这个信息开始跟图片有关系,放到接收变量里
    while chunk:  # 判断是否还有信息
        img_data_match(chunk)
        chunk = client.recv(1024)  # 继续接收
在电脑上,将上述代码保存为mjpeg_display_demo.py,并修改代码中MJPEG_HOST为实际的开发板ip地址,然后使用python mjpeg_display_demo.py运行,就能查看显示了。
如果上述代码运行在矽速M2 Dock中,那么对应的效果就是显示到屏幕上了。
- 相关推荐
- 热点推荐
- 米尔科技
-
【Sipeed M2 Dock开发板试用体验】M2 Dock获取MJPEG推流数据2022-10-28 2022
-
【米尔MYD-YT507开发板试用体验】Ubuntu系统烧录到eMMC和完全调教指南!2022-10-27 1896
-
【米尔MYD-YT507开发板试用体验】基于Fluter+Django+OpenCV的米尔行车记录仪2022-10-26 3617
-
实操丨米尔MYD-YT507H开发板基于Fluter+Django+OpenCV的行车记录仪2022-09-30 5061
-
快速上手国产车规级开发板?汽车仪表盘、数据图传、内网穿透案例分享2022-09-16 2796
-
国产开发板各项性能测试--米尔MYD-YT507H开发板2022-09-14 2620
-
试用视频丨国产开发板各项性能测试--米尔MYD-YT507H开发板2022-09-02 1579
-
国产处理器丨如何在Ubuntu建立xfce桌面环境,远程穿透访问家中米尔MYD-YT507H开发板2022-08-28 2627
-
【米尔MYD-YT507开发板试用体验】使用mjpeg_streamer建立摄像头图传2022-07-20 22536
-
【米尔MYD-YT507开发板试用体验】+3.系统烧录2022-07-19 21526
-
【米尔MYD-YT507开发板试用体验】USB摄像头使用从入门到放弃2022-07-17 22933
-
【米尔MYD-YT507开发板试用体验】Ubuntu的xfce桌面环境建立及远程穿透访问家中米尔MYD-YT507开发板2022-07-15 22279
-
【米尔MYD-YT507开发板试用体验】米尔MYD-YT507开发板初体验2022-07-14 20375
全部0条评论

快来发表一下你的评论吧 !

