
【赛昉科技昉·星光RISC-V单板计算机试用体验】Debian系统内核编译与安装升级
描述
本文来源电子发烧友社区,作者:HonestQiao, 帖子地址:https://bbs.elecfans.com/jishu_2288624_1_1.html
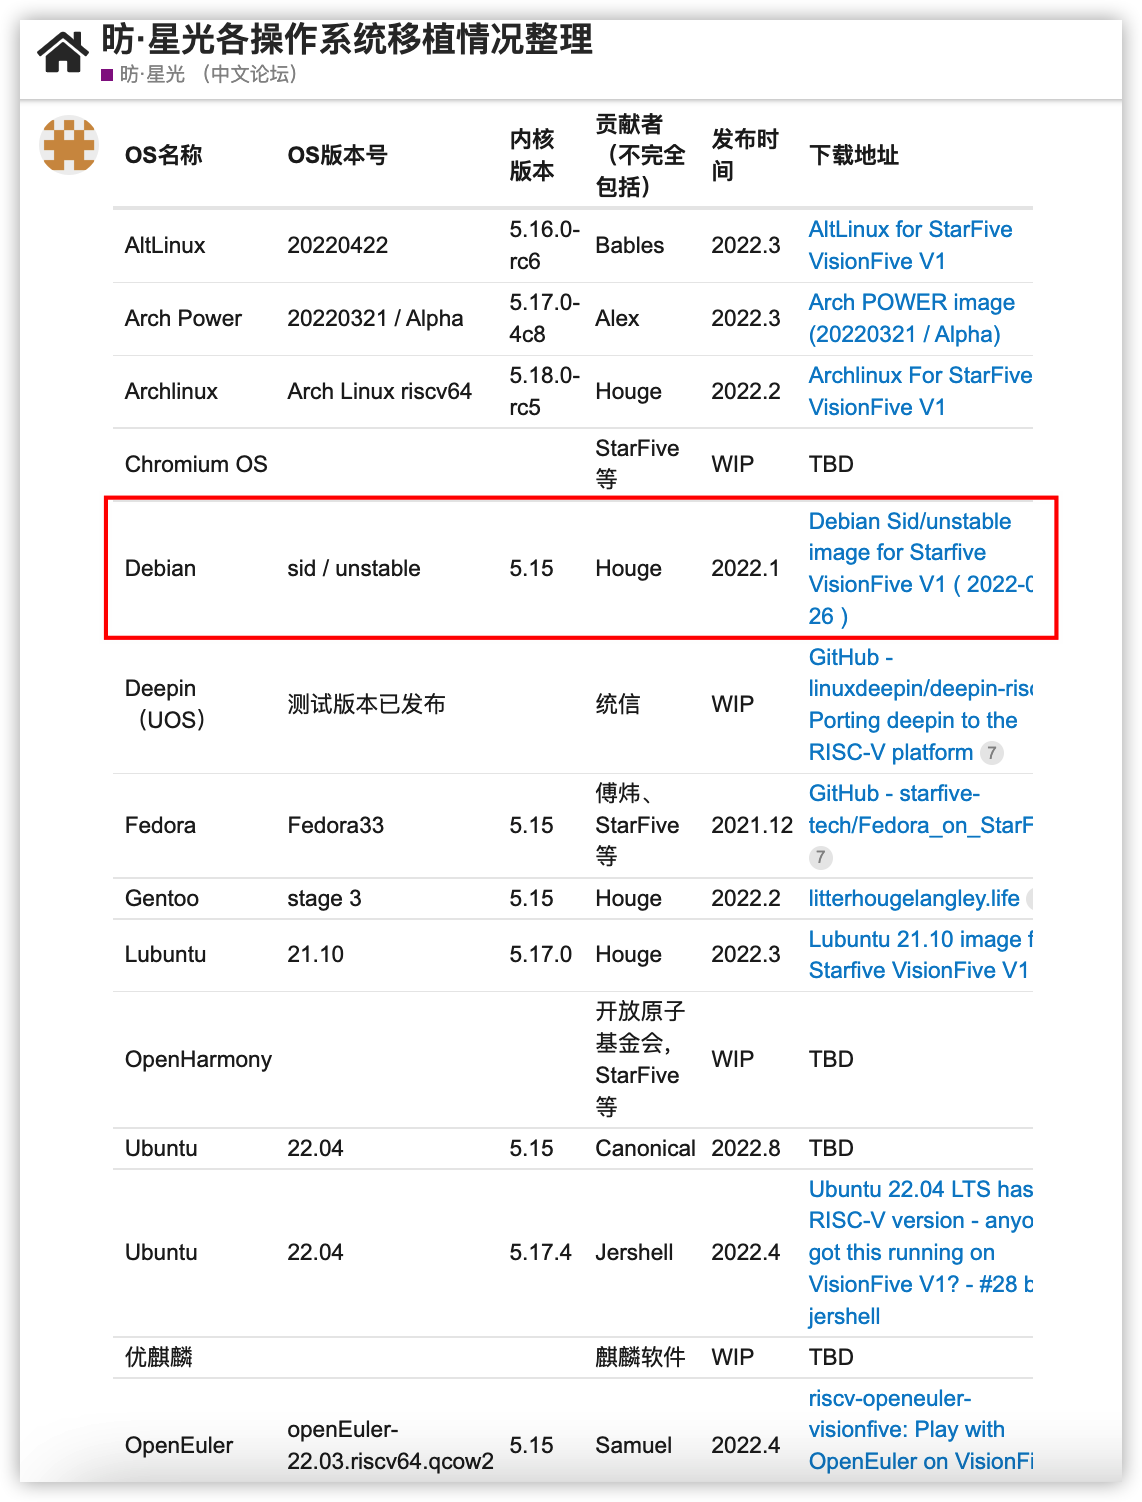
在赛昉的RVSPACE社区上,提供了很多当前已经适配的操作系统:

我比较喜欢的是Debian系统,比纯粹稳定,所以这次下载Debian系统进行安装。当然,我也进行过包括包括boot、kernel、系统在内的从头构建。不过对于新上手的玩家,建议先下载已经做好的镜像,基本玩上了,再考虑从头构建。
在上一篇文章 昉·星光RISC-V单板机上手之Debian系统烧录 访问 点灯,我已经分享过如何烧录Debian镜像到SD卡上。
目前这个Debian镜像安装后,内核是5.17.0-rc4版本的。
而赛昉官方,在 starfive-tech/linux (github.com) 提供了最新的内核代码,我们可以自己编译安装。
要编译内核,我们可以在一台Debian/Ubuntu服务器上进行,在虚拟机或者Docker中,也完全可以进行,需要的环境普普通通即可,没有特殊需要。
有一点要注意,不要在咱们的星光派单板计算机上进行内核的编译。当前的星光派单板计算机受限于主频和内核数的原因,编译内核会非常耗时。
我在一台普通的老旧电脑上跑的Ubuntu服务器上编译,用时20分钟。
以下是整个编译操作过程:
一、编译内核
注意:以下操作,在一台Debian/Ubuntu服务器上进行
# 登录到一台debian/ubuntu服务器上操作
  ssh ubuntu@ubuntu-server

  # 下载最新内核代码:如果下载速度不理想,可以提前下载了压缩包拷贝上来
  wget https://github.com/starfive-tech/linux/archive/refs/heads/visionfive.tar.gz
  tar xzvf visionfive.tar.gz
  cd linux-visionfive
  # 或者
  git clone https://github.com/starfive-tech/linux.git
  cd linux

  # 安装编译工具链
  sudo apt install libncurses-dev libssl-dev bc flex bison make gcc gcc-riscv64-linux-gnu screen

  # 编译:此处使用screen,防止中途中断
  screen -S make-kernel
  make ARCH=riscv CROSS_COMPILE=riscv64-linux-gnu- olddefconfig
  time nice make ARCH=riscv CROSS_COMPILE=riscv64-linux-gnu- -j$(nproc) bindeb-pkg LOCALVERSION=-starfive > make.log 2>make.err

  # ctrl   a 同时按,然后松开,再马上按 d,即可将上述编译转入后台运行
  # 查看编译进度
  tail -f make.*

  # 显示如下部分的时候,表示编译完成
  > dpkg-deb: 正在 '../linux-headers-5.19.0-rc3-starfive_5.19.0-rc3-starfive-1_riscv64.deb' 中构建软件包 'linux-headers-5.19.0-rc3-starfive'。
  >   INSTALL debian/linux-libc-dev/usr/include
  > dpkg-deb: 正在 '../linux-libc-dev_5.19.0-rc3-starfive-1_riscv64.deb' 中构建软件包 'linux-libc-dev'。
  > dpkg-deb: 正在 '../linux-image-5.19.0-rc3-starfive_5.19.0-rc3-starfive-1_riscv64.deb' 中构建软件包 'linux-image-5.19.0-rc3-starfive'。
  > dpkg-buildpackage: info: binary-only upload (no source included)

  # 查看编译生成的内核包
  ls -lh ../linux-*.deb
  -rw-r--r-- 1 honestqiao honestqiao 7.7M 6月  22 19:03 ../linux-headers-5.19.0-rc3-starfive_5.19.0-rc3-starfive-1_riscv64.deb
  -rw-r--r-- 1 honestqiao honestqiao  67M 6月  22 19:03 ../linux-image-5.19.0-rc3-starfive_5.19.0-rc3-starfive-1_riscv64.deb
  -rw-r--r-- 1 honestqiao honestqiao 1.2M 6月  22 19:03 ../linux-libc-dev_5.19.0-rc3-starfive-1_riscv64.deb

  # 提供临时web服务
  python3 -m http.server -d ../
  > Serving HTTP on 0.0.0.0 port 8888 (http://0.0.0.0:8888/) ...
二、在赛昉星光派单板计算机上安装新内核
# 登录到赛昉星光派单板计算机上
ssh user@赛昉单板计算机ip

# 下载生成的内核包:通过编译服务器提供的临时web服务下载,下载的具体文件名,请根据编译生成的实际deb文件名修改
wget http://ubuntu-server:8888/linux-headers-5.19.0-rc3-starfive_5.19.0-rc3-starfive-1_riscv64.deb
wget http://ubuntu-server:8888/linux-image-5.19.0-rc3-starfive_5.19.0-rc3-starfive-1_riscv64.deb
wget http://ubuntu-server:8888/linux-libc-dev_5.19.0-rc3-starfive-1_riscv64.deb

# 安装内核包
sudo apt install ./linux-*.deb
> 正在读取软件包列表... 完成
> 正在分析软件包的依赖关系树... 完成
> 正在读取状态信息... 完成
> 注意,选中 'linux-headers-5.19.0-rc3-starfive' 而非 './linux-headers-5.19.0-rc3-starfive_5.19.0-rc3-starfive-1_riscv64.deb'
> 注意,选中 'linux-image-5.19.0-rc3-starfive' 而非 './linux-image-5.19.0-rc3-starfive_5.19.0-rc3-starfive-1_riscv64.deb'
> 注意,选中 'linux-libc-dev' 而非 './linux-libc-dev_5.19.0-rc3-starfive-1_riscv64.deb'
> 升级了 0 个软件包,新安装了 3个软件包,重新安装了 0 个软件包,要卸载 0 个软件包,有 4 个软件包未被升级。

# 查看安装后的文件:ls -lh /boot/*5.19*
> -rw-r--r-- 1 root root 218K  6月 22 17:39 /boot/config-5.19.0-rc3-starfive
> -rw-r--r-- 1 root root  22M  6月 22 19:43 /boot/initrd.img-5.19.0-rc3-starfive
> -rw-r--r-- 1 root root    0  6月 22 20:50 /boot/initrd.img-5.19.0-rc3-starfive.new
> -rw-r--r-- 1 root root 5.1M  6月 22 17:39 /boot/System.map-5.19.0-rc3-starfive
> -rw-r--r-- 1 root root 9.1M  6月 22 17:39 /boot/vmlinuz-5.19.0-rc3-starfive
> ...
> update-initramfs: Generating /boot/initrd.img-5.19.0-rc3-starfive

# 记住好上面的具体版本,下面配置的时候,务必要配置准确
三、配置使用新内核
# 配置内核启动
# 查看现有配置
cat /boot/grub.cfg | grep -E 'menuentry' -A 4

# 将上述显示的menuentry配置内容进行复制并修改,然后添加到内核配置中。【具体版本号,请根据实际版本的修改,我当前的最新版本为5.19.0-rc3-starfive_5.19】
# /boot/grub.cfg最终内容如下:
set default=1
set timeout_style=menu
set timeout=3

set debug="linux,loader,mm"
set term="vt100"

menuentry 'Debian vmlinux-5.17.0-riscv starfive' {
linux	/vmlinuz-5.17.0-rc4-starfive-rc4 rw root=UUID=3e6da6ef-00b2-4d25-b826-7645050f678d rhgb console=tty0 console=ttyS0,115200 earlycon=sbi rootwait stmmaceth=chain_mode:1 selinux=0 LANG=en_US.UTF-8
devicetree	/jh7100-starfive-visionfive-v1.dtb
initrd	/initrd.img-5.17.0-rc4-starfive-rc4
}

menuentry 'Debian vmlinux-5.19.0-rc3-starfive' {
linux	/vmlinuz-5.19.0-rc3-starfive rw root=UUID=3e6da6ef-00b2-4d25-b826-7645050f678d rhgb console=tty0 console=ttyS0,115200 earlycon=sbi rootwait stmmaceth=chain_mode:1 selinux=0 LANG=en_US.UTF-8
devicetree      /jh7100-starfive-visionfive-v1.dtb
initrd	/initrd.img-5.19.0-rc3-starfive
}

# 查看当前版本,然后重启生效
uname -r
> 5.17.0-rc4-starfive-rc4
unamr -a
> Linux Debian-StarFive 5.17.0-rc4-starfive-rc4 #1 SMP PREEMPT Wed Feb 16 00:47:02 CST 2022 riscv64 GNU/Linux
# 重启
sudo reboot

# 重启后,重新登录
# 查看新的内核版本
uname -r
> 5.19.0-rc3-starfive
uname -a
Linux Debian-StarFive 5.19.0-rc3-starfive #1 SMP Wed Jun 22 17:39:59 CST 2022 riscv64 GNU/Linux

# 更新系统
sudo apt update
sudo apt upgrade
sudo apt autoremove
四、问题排除
因为 /boot/grub.cfg 为系统启动GRUB配置文件,如果修改不正确,可能会无法正常启动。
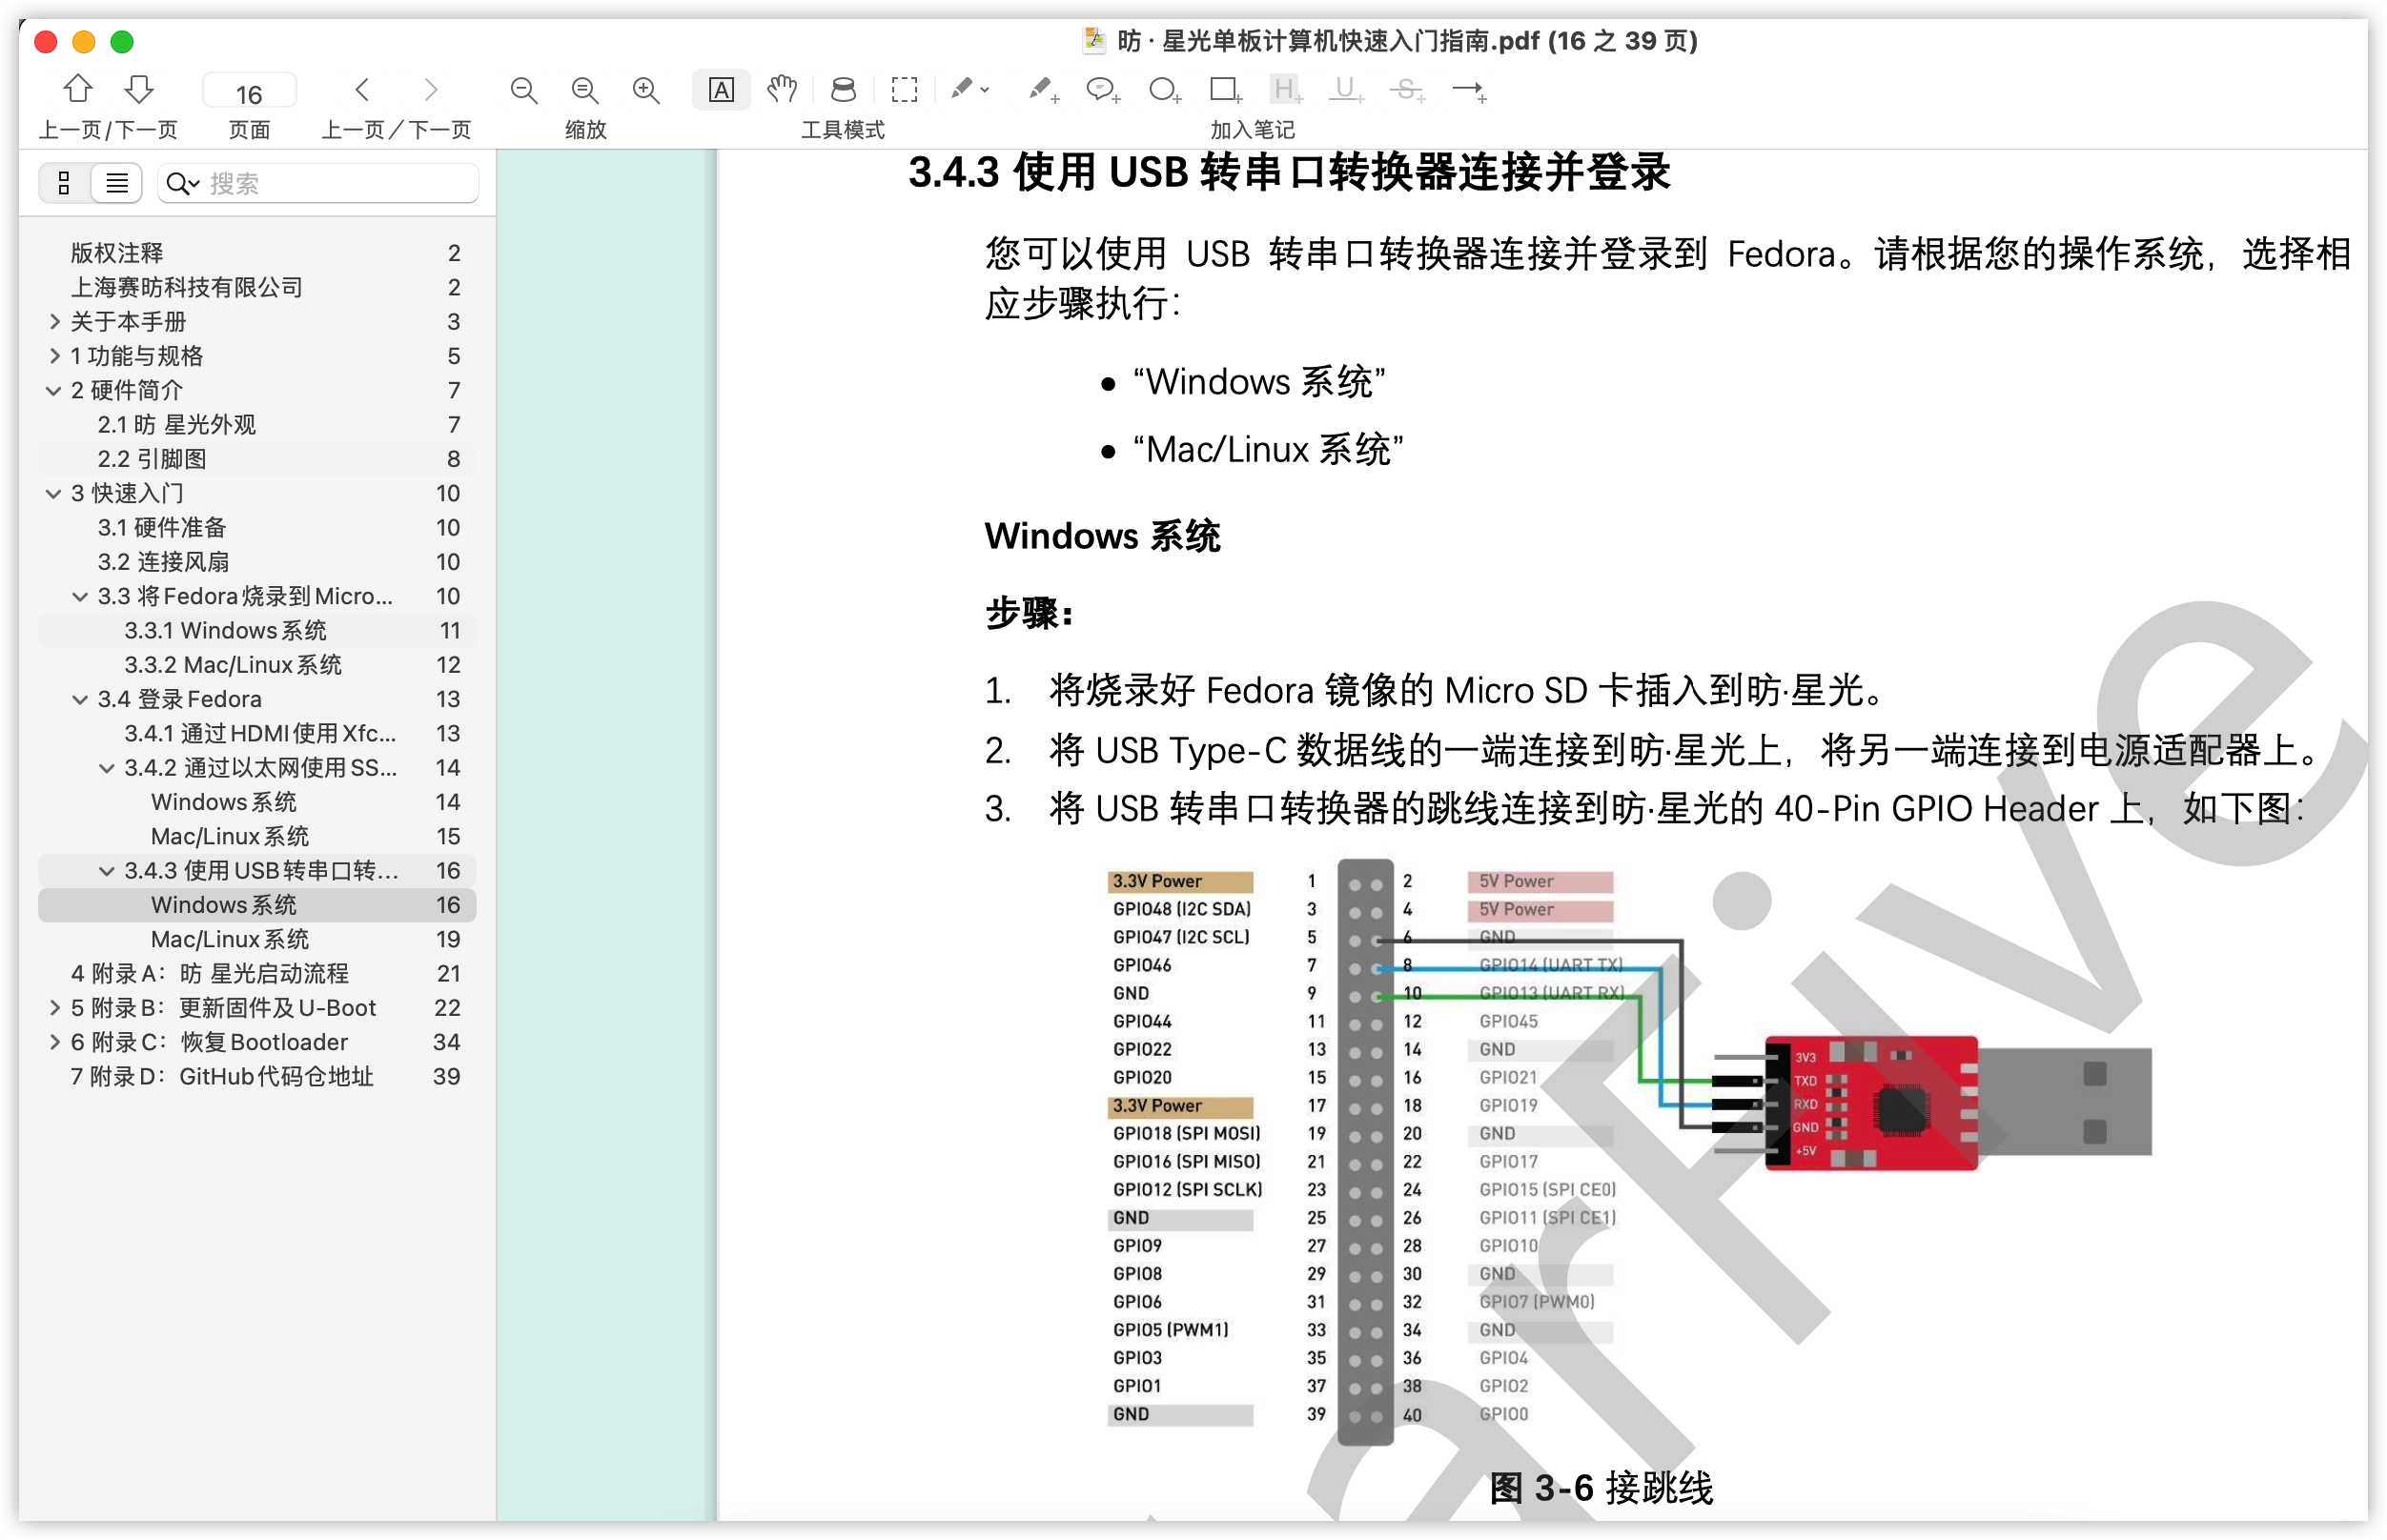
如果确实无法启动,则可以按照官方资料,用串口线连接登录到串口终端,查看具体情况:

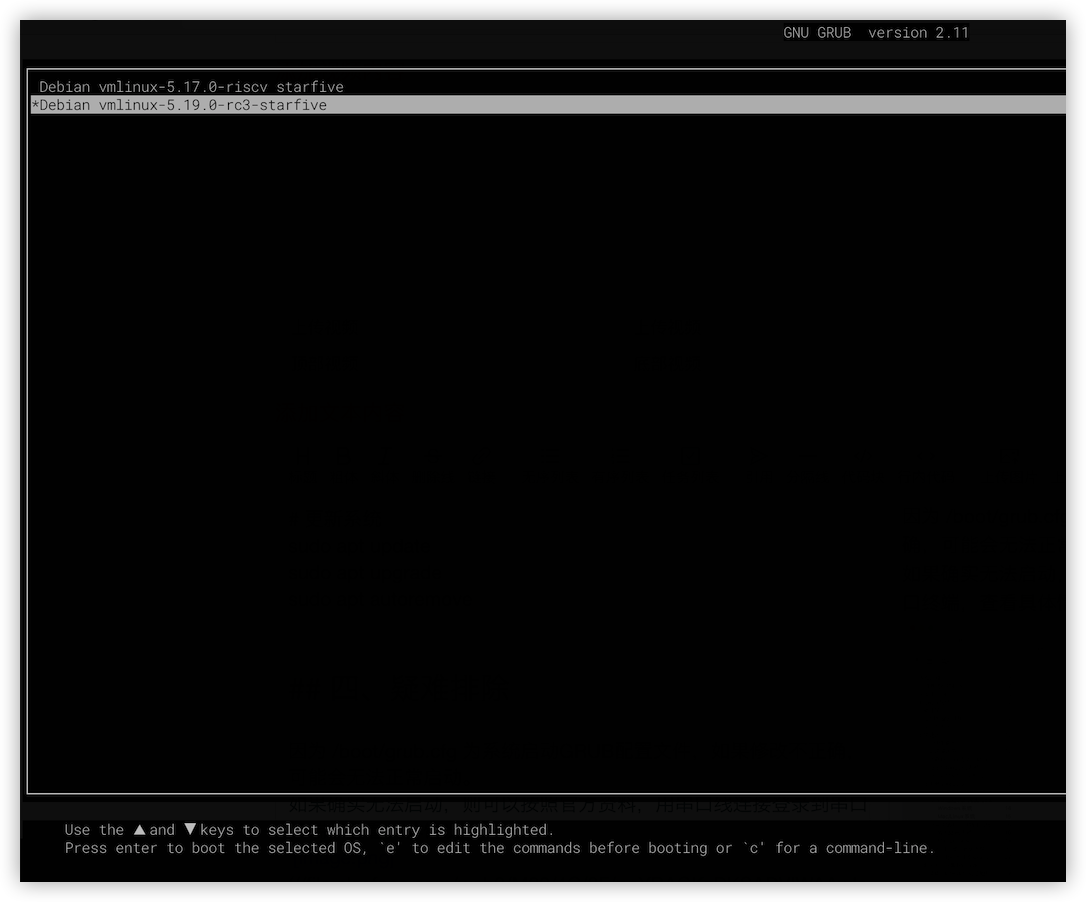
等显示GRUB 菜单界面的时候:

可以按上下键,选择进入老的5.17的内核;也可以选择新的内核,然后按e进入编辑,按照界面提示编辑即可,编辑后按ctrl x使用该配置启动。
我曾经使用apt安装了5.18内核,但是修改配置的时候,把linuz写成了linux,导致无法启动,就用上面的办法简单处理就能进入了。
-
【昉·星光 2 高性能RISC-V单板计算机试用体验】开箱及装载Debian系统2024-01-24 2570
-
【昉·星光 2 高性能RISC-V单板计算机体验】2更换Debian操作系统2023-08-31 2158
-
【昉·星光 2 高性能RISC-V单板计算机体验】+3、系统功能测试2023-07-26 1919
-
【昉·星光 2(VisionFive 2)RISC-V单板计算机】SDL开发2023-07-21 2400
-
【赛昉科技昉·星光RISC-V单板计算机试用体验】开箱+心得2022-07-06 2958
-
【赛昉科技昉·星光RISC-V单板计算机试用体验】开箱报告2022-06-26 6232
-
【赛昉科技昉·星光RISC-V单板计算机试用体验】Debian系统内核编译与安装升级2022-06-22 3120
-
【赛昉科技昉·星光RISC-V单板计算机试用体验】昉·星光RISC-V单板机上手之Debian系统烧录+访问+点灯2022-06-03 2861
-
RISC-V VisionFive (昉星光单板计算机)系列课程2022-04-15 3353
-
【RISC-V专题】赛昉科技昉·星光RISC-V单板计算机首发试用2022-04-14 4242
-
赛昉科技昉·星光RISC-V单板计算机首发试用2022-04-12 2196
-
昉·星光单板计算机正式发售,加速RISC-V生态发展2021-12-09 1537
-
赛昉科技推出基于RISC-V的AI单板计算机2021-01-15 2670
全部0条评论

快来发表一下你的评论吧 !

