

如何使用Arduino通过手势控制计算机
描述
最近手势控制的笔记本电脑或计算机变得非常有名。这种技术称为Leap运动,它使我们能够通过简单地在计算机/笔记本电脑前挥手来控制计算机/笔记本电脑上的某些功能。这样做非常酷和有趣,但这些笔记本电脑的价格确实很高。因此,在这个项目中,让我们尝试通过结合Arduino和Python的强大功能来构建我们自己的手势控制笔记本电脑/计算机。
我们将使用两个超声波传感器来确定我们手的位置并根据位置控制媒体播放器 (VLC)。我已经使用它进行演示,但是一旦您了解了该项目,您只需更改几行代码并以您喜欢的方式控制您最喜欢的应用程序,您就可以做任何事情。
项目背后的概念:
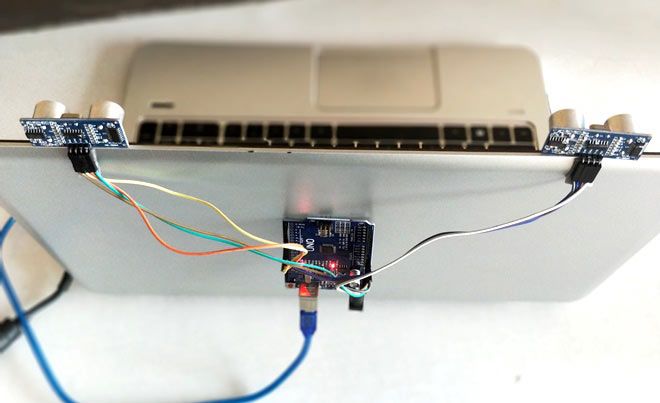
该项目背后的概念非常简单。我们将在显示器顶部放置两个超声波(US)传感器,并使用Arduino读取显示器和手之间的距离,根据此距离值,我们将执行某些操作。为了在我们的计算机上执行操作,我们使用Pythonpyautogui库。来自Arduino的命令通过串行端口(USB)发送到计算机。然后,该数据将由计算机上运行的python读取,并根据读取的数据执行操作。
电路图:
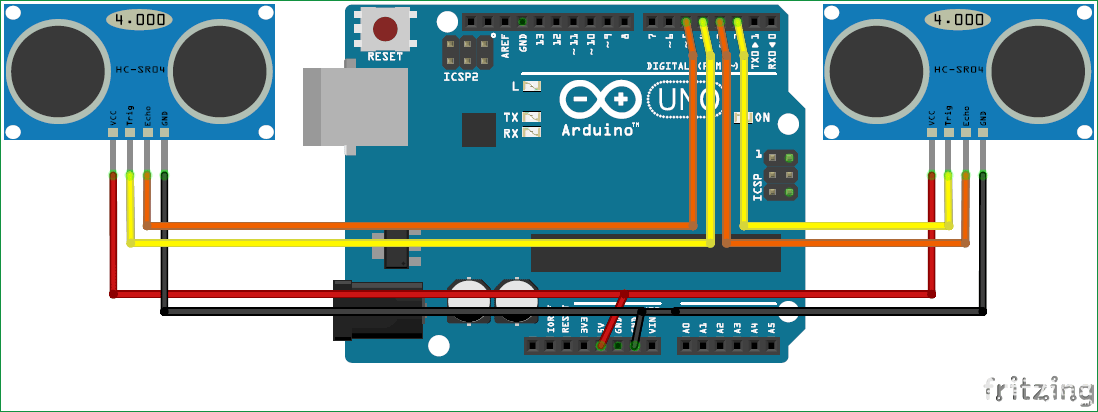
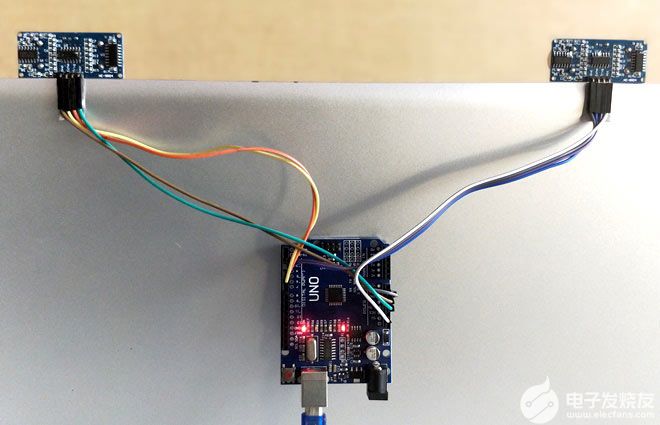
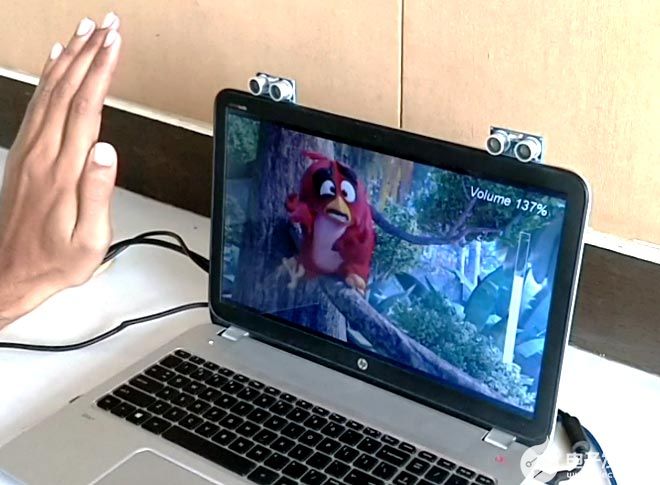
要使用手势控制PC,只需将两个超声波传感器与Arduino连接即可。我们知道美国传感器使用 5V 工作,因此它们由 Arduino 的板载稳压器供电。Arduino可以连接到PC /笔记本电脑,为模块供电,也可以进行串行通信。连接完成后,将它们放在显示器上,如下所示。我用双面胶带把它贴在我的显示器上,但你可以发挥自己的创造力。将其固定在一个地方后,我们可以继续进行编程。
对 Arduino 进行编程:
Arduino应该被编程为读取手与美国传感器的距离。本页末尾给出了完整的程序;就在下面,我已经给出了该程序的解释。如果您不熟悉超声波传感器,只需通过Arduino和超声波传感器基于距离测量。
通过读取距离的值,我们可以到达某些要用手势控制的动作,例如,在这个程序中,我已经编程了5 个动作作为演示。
操作 1:当两只手都放在传感器前的特定远距离时,VLC播放器中的视频应播放/暂停。
行动2:当右手放在传感器前的特定远距离时,视频应快进一步。
行动3:当左手放在传感器前的特定远距离时,视频应倒带一步。
行动4:当右手放在传感器前的特定近距离,然后如果向传感器移动,视频应快进,如果移开,视频应倒带。
行动5:当左手以特定的近距离放在传感器之前,然后如果朝向传感器移动,视频的音量应该增加,如果移开,音量应该减小。
让我们看看如何编写程序来执行上述操作。因此,像所有程序一样,我们从定义I / O引脚开始,如下所示。两个美国传感器连接到数字引脚2、3、4和5,由+5V引脚供电。触发引脚是输出引脚,回显引脚是输入引脚。
Arduino和python之间的串行通信以9600的波特率进行。
const int trigger1 = 2; //Trigger pin of 1st Sesnor
const int echo1 = 3; //Echo pin of 1st Sesnor
const int trigger2 = 4; //Trigger pin of 2nd Sesnor
const int echo2 = 5;//Echo pin of 2nd Sesnor
void setup() {
Serial.begin(9600);
pinMode(trigger1, OUTPUT);
pinMode(echo1, INPUT);
pinMode(trigger2, OUTPUT);
pinMode(echo2, INPUT);
}
在结束任何动作之前,我们需要每次计算传感器和手之间的距离。所以我们必须做很多次,这意味着这段代码应该作为一个函数使用。我们编写了一个名为 calculate_distance() 的函数,它将返回传感器和手之间的距离。
/*###Function to calculate distance###*/
void calculate_distance(int trigger, int echo)
{
digitalWrite(trigger, LOW);
delayMicroseconds(2);
digitalWrite(trigger, HIGH);
delayMicroseconds(10);
digitalWrite(trigger, LOW);
time_taken = pulseIn(echo, HIGH);
dist= time_taken*0.034/2;
if (dist>50)
dist = 50;
}
在我们的主循环中,我们检查距离的值并执行上述操作。在此之前,我们使用两个变量 distL 和 distR,它们使用当前距离值进行更新。
calculate_distance(trigger1,echo1);
distL =dist; //get distance of left sensor
calculate_distance(trigger2,echo2);
distR =dist; //get distance of right sensor
由于我们知道两个传感器之间的距离,因此我们现在可以将其与预定义的值进行比较并得出某些操作。例如,如果两只手都放在 40 mc 的距离,那么我们播放/暂停视频。这里“播放/暂停”一词将通过串口发送出去
if ((distL >40 && distR>40) && (distL <50 && distR<50)) //Detect both hands
{Serial.println("Play/Pause"); delay (500);}
如果将右手单独放在模块之前,那么我们将视频快进一步,如果是左手,我们将倒带一步。根据动作,这里“倒带”或“转发”一词将通过串口发送出去
if ((distL >40 && distL<50) && (distR ==50)) //Detect Left Hand
{Serial.println("Rewind"); delay (500);}
if ((distR >40 && distR<50) && (distL ==50)) //Detect Right Hand
{Serial.println("Forward"); delay (500);}
敌人对音量和轨道的详细控制我们使用不同的方法来防止错误触发。为了控制音量,我们必须将左手放在大约。在距离 15 厘米 ,然后您可以将其移向传感器以减少体积,将其移离传感器以增加体积。相同的代码如下所示。根据动作,这里“Vup”或“Vdown”一词将通过串口发送出去
//Lock Left - Control Mode
if (distL>=13 && distL<=17)
{
delay(100); //Hand Hold Time
calculate_distance(trigger1,echo1);
distL =dist;
if (distL>=13 && distL<=17)
{
Serial.println("Left Locked");
while(distL<=40)
{
calculate_distance(trigger1,echo1);
distL =dist;
if (distL<10) //Hand pushed in
{Serial.println ("Vup"); delay (300);}
if (distL>20) //Hand pulled out
{Serial.println ("Vdown"); delay (300);}
}
}
}
我们也可以对右侧传感器使用相同的方法来控制视频的轨迹。也就是说,如果我们将右手移向传感器,它将快进电影,如果您将其移离传感器,它将倒带电影。根据动作,这里“倒带”或“转发”一词将通过串口发送出去
您现在可以阅读页面末尾给出的此手势控制PC的完整代码,并尝试将其作为一个整体进行轻描淡写,然后将其复制到Arduino IDE。
对你的 Python 进行编程:
这个项目的python程序非常简单。我们只需要通过正确的波特率与Arduino建立串行通信,然后执行一些基本的键盘操作。python的第一步是安装pyautogui模块。确保遵循此步骤,因为如果没有pyautogui模块,该程序将无法运行。
为 Windows 安装 pyautogui 模块:
请按照以下步骤安装 pyautogui for Windows。如果您使用的是其他平台,则步骤也或多或少相似。确保您的计算机/笔记本电脑已连接到互联网,然后继续执行以下步骤
第 1 步:打开Windows命令提示符,并将目录更改为已安装python的文件夹。默认情况下,该命令应为
cd C:Python27
第 2 步:在你的 python 目录中使用命令 python –m pip install –upgrade pip 来升级你的 pip。Pip 是 python 中的一个工具,可以帮助我们轻松安装 python 模块。升级此模块后(如下图所示),继续下一步。
python –m pip install –upgrade pip
第 3 步:使用命令“python –m pip install pyautogui”来安装 pyautogui 模块。该过程成功后,您应该会看到类似于下面的屏幕。
python –m pip install –upgrade pip
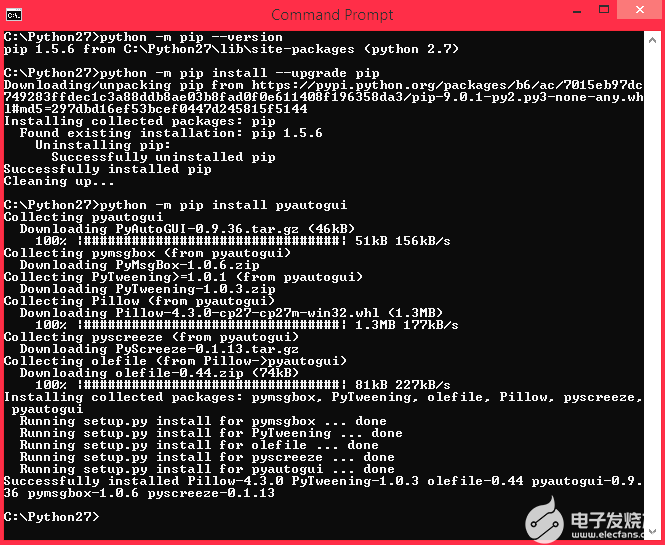
现在 pyautogui 模块和 pyserial 模块(安装在前面的教程中)已成功与 python 一起安装,我们可以继续使用 python 程序了。完整的 python 代码在本教程末尾给出,但解释如下。
让我们导入此项目所需的所有三个模块。它们是pyautogui,serial python和time。
import serial #Serial imported for Serial communication
import time #Required to use delay functions
import pyautogui
接下来,我们通过COM端口与Arduino建立连接。在我的电脑中,Arduino连接到COM 18。使用设备管理器查找Arduino连接到的COM端口,并相应地更正以下行。
ArduinoSerial = serial.Serial('com18',9600) #Create Serial port object called arduinoSerialData
time.sleep(2) #wait for 2 seconds for the communication to get established
在无限的while循环中,我们反复收听COM端口,并将关键字与任何预先确定的作品进行比较,并相应地按下键盘。
while 1:
incoming = str (ArduinoSerial.readline()) #read the serial data and print it as line
print incoming
if 'Play/Pause' in incoming:
pyautogui.typewrite(['space'], 0.2)
if 'Rewind' in incoming:
pyautogui.hotkey('ctrl', 'left')
if 'Forward' in incoming:
pyautogui.hotkey('ctrl', 'right')
if 'Vup' in incoming:
pyautogui.hotkey('ctrl', 'down')
if 'Vdown' in incoming:
pyautogui.hotkey('ctrl', 'up')
如您所见,要按下一个键,我们只需要使用命令“pyautogui.typewrite(['space'], 0.2)”,它将按下键空格 0.2 秒。如果您需要像ctrl + S这样的热键,那么您可以使用热键命令“pyautogui.hotkey('ctrl', 's')”。
我使用这些组合是因为它们适用于 VLC 媒体播放器,您可以按照您喜欢的任何方式调整它们,以创建自己的应用程序以通过手势控制计算机中的任何内容。
动作中的手势控制计算机:
按照上面定义建立连接,并将Arduino代码上传到Arduino板上。然后使用下面的python脚本并在笔记本电脑/计算机上启动该程序。
现在,您可以使用VLC媒体播放器在计算机上播放任何电影,并用手控制电影,如下面的视频所示。
Arduino Code:
/*
* Program for gesture control VLC Player
* Controlled uisng Python
* Code by B.Aswinth Raj
* Dated: 11-10-2017
*/
const int trigger1 = 2; //Trigger pin of 1st Sesnor
const int echo1 = 3; //Echo pin of 1st Sesnor
const int trigger2 = 4; //Trigger pin of 2nd Sesnor
const int echo2 = 5;//Echo pin of 2nd Sesnor
long time_taken;
int dist,distL,distR;
void setup() {
Serial.begin(9600);
pinMode(trigger1, OUTPUT);
pinMode(echo1, INPUT);
pinMode(trigger2, OUTPUT);
pinMode(echo2, INPUT);
}
/*###Function to calculate distance###*/
void calculate_distance(int trigger, int echo)
{
digitalWrite(trigger, LOW);
delayMicroseconds(2);
digitalWrite(trigger, HIGH);
delayMicroseconds(10);
digitalWrite(trigger, LOW);
time_taken = pulseIn(echo, HIGH);
dist= time_taken*0.034/2;
if (dist>50)
dist = 50;
}
void loop() { //infinite loopy
calculate_distance(trigger1,echo1);
distL =dist; //get distance of left sensor
calculate_distance(trigger2,echo2);
distR =dist; //get distance of right sensor
//Uncomment for debudding
/*Serial.print("L=");
Serial.println(distL);
Serial.print("R=");
Serial.println(distR);
*/
//Pause Modes -Hold
if ((distL >40 && distR>40) && (distL <50 && distR<50)) //Detect both hands
{Serial.println("Play/Pause"); delay (500);}
calculate_distance(trigger1,echo1);
distL =dist;
calculate_distance(trigger2,echo2);
distR =dist;
//Control Modes
//Lock Left - Control Mode
if (distL>=13 && distL<=17)
{
delay(100); //Hand Hold Time
calculate_distance(trigger1,echo1);
distL =dist;
if (distL>=13 && distL<=17)
{
Serial.println("Left Locked");
while(distL<=40)
{
calculate_distance(trigger1,echo1);
distL =dist;
if (distL<10) //Hand pushed in
{Serial.println ("Vup"); delay (300);}
if (distL>20) //Hand pulled out
{Serial.println ("Vdown"); delay (300);}
}
}
}
//Lock Right - Control Mode
if (distR>=13 && distR<=17)
{
delay(100); //Hand Hold Time
calculate_distance(trigger2,echo2);
distR =dist;
if (distR>=13 && distR<=17)
{
Serial.println("Right Locked");
while(distR<=40)
{
calculate_distance(trigger2,echo2);
distR =dist;
if (distR<10) //Right hand pushed in
{Serial.println ("Rewind"); delay (300);}
if (distR>20) //Right hand pulled out
{Serial.println ("Forward"); delay (300);}
}
}
}
delay(200);
}
Python Code:
import serial #Serial imported for Serial communication
import time #Required to use delay functions
import pyautogui
ArduinoSerial = serial.Serial('com18',9600) #Create Serial port object called arduinoSerialData
time.sleep(2) #wait for 2 seconds for the communication to get established
while 1:
incoming = str (ArduinoSerial.readline()) #read the serial data and print it as line
print incoming
if 'Play/Pause' in incoming:
pyautogui.typewrite(['space'], 0.2)
if 'Rewind' in incoming:
pyautogui.hotkey('ctrl', 'left')
if 'Forward' in incoming:
pyautogui.hotkey('ctrl', 'right')
if 'Vup' in incoming:
pyautogui.hotkey('ctrl', 'down')
if 'Vdown' in incoming:
pyautogui.hotkey('ctrl', 'up')
incoming = "";
-
贸泽电子开售全新Arduino UNO Q单板计算机2025-11-08 1104
-
数控加工计算机辅助编程步骤2023-10-18 1593
-
使用APDS9960和NodeMCU通过手势控制Chromecast2023-06-26 822
-
将量子计算机连接到Arduino2023-06-25 626
-
如何将文件内容从Arduino无线发送到计算机?2023-05-04 588
-
手势识别:让你的手成为计算机的新界面2023-04-25 1533
-
手势识别数据集:让计算机了解你的表情与手势2023-04-13 1944
-
使用手势通过Arduino控制YouTube播放2022-12-21 797
-
使用带有计算机视觉的手势控制伺服电机2022-11-02 666
-
基于Arduino创建一个手势控制车2022-06-22 1025
-
怎样通过手势隔空控制电脑?2022-02-11 2100
-
计算机模糊控制的相关知识2021-09-10 1320
-
计算机控制技术简介2021-09-01 1316
-
计算机控制设备改造2012-08-20 2739
全部0条评论

快来发表一下你的评论吧 !

