

如何使用Telegram控制树莓派上的GPIO引脚
描述
电报是与树莓派结合的最佳应用程序,用于我们所有的移动控制目的。它具有非常好的开发人员支持,并且计划很快发布许多功能,以提高电报机器人的性能。
现在,我们将继续下一步,学习如何使用 Telegram 控制树莓引脚上的 GPIO 引脚,以便我们为机器人提供一些硬件支持。在本教程中,我们将四个 LED 连接到 Raspberry Pi GPIO 引脚,并使用 Telegram 中的自然语言(像聊天一样)切换它们。听起来很有趣吧?让我们开始吧。
所需材料:
四个指示灯(任何颜色)
树莓派(带互联网连接)
面包板
连接线
先决条件:
在继续本教程之前,请确保您的树莓派已连接到互联网,并且可以在 Pi 上运行 python 程序。另请阅读前面的教程以了解如何使用Raspberry Pi Pi设置Telegram机器人,因为我假设您熟悉这些东西以继续进行该项目。
如果您不熟悉树莓派,请按照我们的树莓派介绍文章和其他树莓派教程进行操作。
电路图:
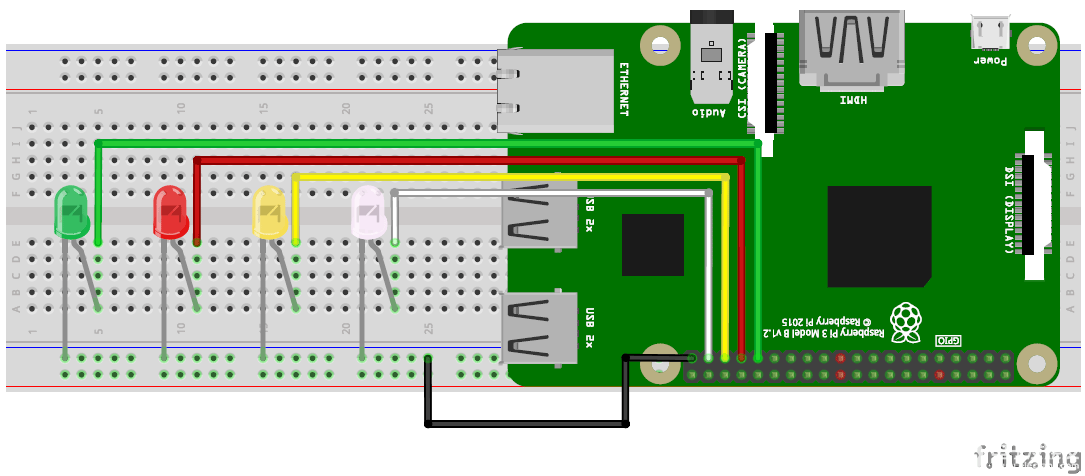
使用Raspberry Pi和Telegram Android应用程序控制LED的电路图无非是四个LED和一些连接线。我们不需要限流电阻,因为Raspberry Pi GPIO引脚在3.3V TTL上工作。按照下面的电路连接您的 LED。
下表将帮助您确定连接四个 LED 的引脚编号和 GPIO 编号。
| 发光二极管端子 | 引脚编号 | 通用信息办公室编号 |
| 绿色阳极 | 引脚 31 | GPIO 6 |
| 红色阳极 | 引脚 33 | 通用信息总局 13 |
| 黄色阳极 | 引脚 35 | GPIO 19 |
| 白色阳极 | 引脚 37 | GPIO 26 |
| 所有四个阴极 | 引脚 39 | 地 |
下面是根据上表连接四个LED的电路图:
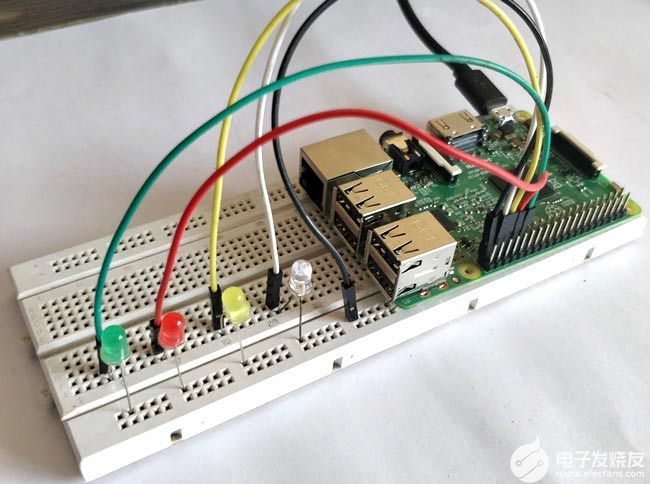
连接后,您的硬件设置应如下所示。
Raspberry Python Program:
硬件准备就绪后,我们可以继续进行 Python 程序。在这个程序中,我们必须读取从电报机器人发送的数据(消息)并相应地切换 LED。为了使它更自然,我们可以检查单词并相应地进行相应的操作,而不是检查每个句子并在程序中对这些句子进行硬编码。
因此,程序将主要检查两个单词,它们是打开和关闭的。一旦检测到这两个单词中的任何一个,它将查找其他关键字,如白色、黄色、绿色和红色。仅当检测到单词时,才会切换相应的颜色 LED。我们还将更新检测到的单词的字符串,以将消息发送回电报机器人。
完整的程序可以在此页面底部找到;就在下面,我通过将程序分解为有意义的小垃圾来解释该程序。
为了使该程序正常工作,我们需要将telepot下载并导入到我们的树莓派中。在我们之前的教程中,我们已经在树莓派中下载了传送,所以现在我们只需要将其与 GPIO 库一起导入我们的程序,如下所示。
import RPi.GPIO as GPIO
import telepot
from telepot.loop import MessageLoop
我们将使用此程序控制 LED 灯,LED 的颜色将为白色、黄色、红色和绿色。它们连接到电路图所示的引脚;让我们根据颜色定义这些LED的引脚名称,以便在程序中使用它们。
white = 26
yellow = 19
red = 13
green = 6
下一步是将所有这些 LED 引脚定义为输出引脚,并使用以下行将它们定义为默认关闭。
#LED White
GPIO.setup(white, GPIO.OUT)
GPIO.output(white, 0) #Off initially
#LED Yellow
GPIO.setup(yellow, GPIO.OUT)
GPIO.output(yellow, 0) #Off initially
#LED Red
GPIO.setup(red, GPIO.OUT)
GPIO.output(red, 0) #Off initially
#LED green
GPIO.setup(green, GPIO.OUT)
GPIO.output(green, 0) #Off initially
正如我们在前面的教程中学到的那样,Raspberry 机器人必须完成的所有操作都将在函数操作中定义。在这里,我们必须让机器人收听从移动设备发送的消息,将其与某些关键字进行比较并相应地切换 LED。
对于我们从移动设备发送的每条消息,都会有一个聊天ID和命令。程序需要此聊天 ID 才能回复发件人。因此,我们保存聊天ID和消息,如下所示。
chat_id = msg['chat']['id']
command = msg['text']
现在,我们从手机发送的任何内容都将在变量命令中保存为字符串。因此,我们所要做的就是检查此变量中的关键字。Python有一个命令使事情变得简单。例如,如果我们必须检查存储在命令变量中的字符串中是否存在单词“on”,我们可以简单地使用以下行。
if 'on' in command:
同样,我们检查所有关键字,一旦收到“on”,我们继续检查用户提到的颜色。这也是通过比较相同的关键字来使用相同的命令来完成的。我们还更新名为 message 的字符串,该字符串可以作为状态消息回复给用户。
if 'on' in command:
message = "Turned on "
if 'white' in command:
message = message + "white "
GPIO.output(white, 1)
if 'yellow' in command:
message = message + "yellow "
GPIO.output(yellow, 1)
if 'red' in command:
message = message + "red "
GPIO.output(red, 1)
if 'green' in command:
message = message + "green "
GPIO.output(green, 1)
if 'all' in command:
message = message + "all "
GPIO.output(white, 1)
GPIO.output(yellow, 1)
GPIO.output(red, 1)
GPIO.output(green, 1)
message = message + "light(s)"
telegram_bot.sendMessage (chat_id, message)
如上所示,我们仅查找“绿色”、“白色”、“红色”、“黄色”和“全部”和“打开”等关键字。工作完成后,我们会向用户发送一条关于刚刚发生的事情的消息。同样的方法可以用来关灯。
if 'off' in command:
message = "Turned off "
if 'white' in command:
message = message + "white "
GPIO.output(white, 0)
if 'yellow' in command:
message = message + "yellow "
GPIO.output(yellow, 0)
if 'red' in command:
message = message + "red "
GPIO.output(red, 0)
if 'green' in command:
message = message + "green "
GPIO.output(green, 0)
if 'all' in command:
message = message + "all "
GPIO.output(white, 0)
GPIO.output(yellow, 0)
GPIO.output(red, 0)
GPIO.output(green, 0)
message = message + "light(s)"
telegram_bot.sendMessage (chat_id, message)
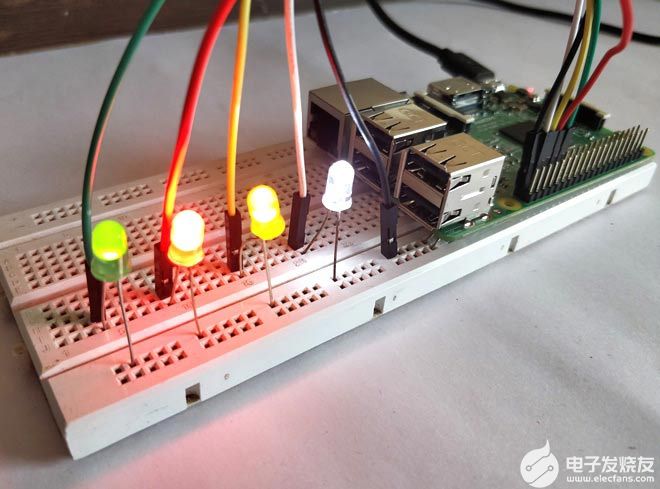
使用 Raspberry Pi 和 Telegram bot 控制 LED:
连接您的 LED 并在 python 上启动您的程序。确保已更改机器人的令牌地址。并开始输入您想要的命令。例如,要打开红灯和黄灯,您可以使用以下命令中的任何一个。
1.开启红黄灯
2.打开红色和黄色右边
3.关于红色和黄色
4.请亮起黄灯和红灯
什么不是。
如您所见,机器人仅查找关键字,并会忽略句子中的其他单词,这样您就可以自然地与之交谈。该项目的完整工作可以在本页末尾的视频中找到。
import time, datetime
import RPi.GPIO as GPIO
import telepot
from telepot.loop import MessageLoop
white = 26
yellow = 19
red = 13
green = 6
now = datetime.datetime.now()
GPIO.setmode(GPIO.BCM)
GPIO.setwarnings(False)
#LED White
GPIO.setup(white, GPIO.OUT)
GPIO.output(white, 0) #Off initially
#LED Yellow
GPIO.setup(yellow, GPIO.OUT)
GPIO.output(yellow, 0) #Off initially
#LED Red
GPIO.setup(red, GPIO.OUT)
GPIO.output(red, 0) #Off initially
#LED green
GPIO.setup(green, GPIO.OUT)
GPIO.output(green, 0) #Off initially
def action(msg):
chat_id = msg['chat']['id']
command = msg['text']
print 'Received: %s' % command
if 'on' in command:
message = "Turned on "
if 'white' in command:
message = message + "white "
GPIO.output(white, 1)
if 'yellow' in command:
message = message + "yellow "
GPIO.output(yellow, 1)
if 'red' in command:
message = message + "red "
GPIO.output(red, 1)
if 'green' in command:
message = message + "green "
GPIO.output(green, 1)
if 'all' in command:
message = message + "all "
GPIO.output(white, 1)
GPIO.output(yellow, 1)
GPIO.output(red, 1)
GPIO.output(green, 1)
message = message + "light(s)"
telegram_bot.sendMessage (chat_id, message)
if 'off' in command:
message = "Turned off "
if 'white' in command:
message = message + "white "
GPIO.output(white, 0)
if 'yellow' in command:
message = message + "yellow "
GPIO.output(yellow, 0)
if 'red' in command:
message = message + "red "
GPIO.output(red, 0)
if 'green' in command:
message = message + "green "
GPIO.output(green, 0)
if 'all' in command:
message = message + "all "
GPIO.output(white, 0)
GPIO.output(yellow, 0)
GPIO.output(red, 0)
GPIO.output(green, 0)
message = message + "light(s)"
telegram_bot.sendMessage (chat_id, message)
telegram_bot = telepot.Bot('470583174:AAG7MPZc93qchp-tjqA_K2meRYcQiOR7X7Y')
print (telegram_bot.getMe())
MessageLoop(telegram_bot, action).run_as_thread()
print 'Up and Running....'
while 1:
time.sleep(10)
-
技能+1!如何在树莓派上使用C++控制GPIO?2025-08-06 4843
-
树莓派控制gpio2015-07-23 9290
-
通过Python RPi.GPIO控制树莓派引脚2021-08-31 1697
-
HiHope的产品,是否有类似于树莓派的GPIO引脚的设计?2022-07-14 1237
-
树莓派gpio接口及编程方法2017-11-22 75891
-
树莓派上MAX7219的字符驱动程序编写2018-01-17 7789
-
怎样在树莓派上使用Telegram发送和接收消息2019-07-31 7455
-
怎样在树莓派上设置Telegram Bot2019-09-26 4096
-
如何在树莓派上运行Fedora2020-09-08 4920
-
如何将ubuntu安装到树莓派上2022-08-08 4530
-
用网页控制树莓派的GPIO引脚2022-11-16 960
-
树莓派上的Kubernetes2022-11-17 775
-
树莓派gpio有什么用,树莓派gpio接口及编程方法2024-10-22 4819
-
GPIO在树莓派中的应用2025-01-09 1885
-
你真的懂树莓派5嘛?树莓派5引脚图全面指南:理解GPIO引脚及其功能!2025-07-04 4579
全部0条评论

快来发表一下你的评论吧 !
