

开关抖动及消除设计
描述
当按下和释放微动按键时,会由短时间的抖动现象才会到达想要的状态。如下图所示:
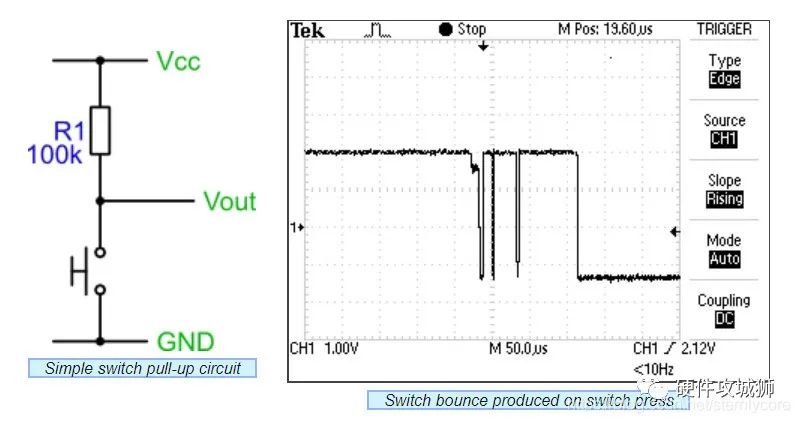
从上图可知。按键抖动时间大概为150us。
在一些对按键抖动敏感的情况下需要进行消抖设计,目前常见的消抖设计如下:
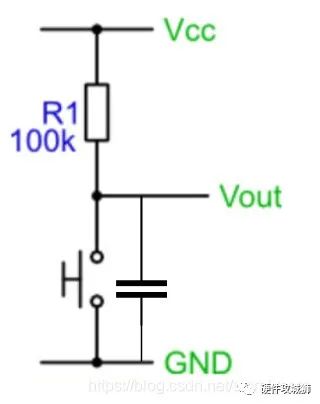
滤波电容
关于去抖硬件最简单的方式并联一颗100nF陶瓷电容,进行滤波处理。
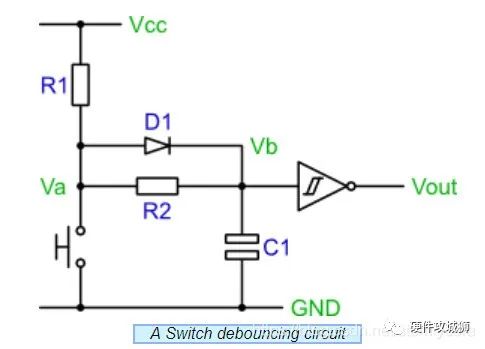
RC滤波+施密特触发器
要想更严谨设计消抖电路,会增加施密特触发器,更大程度的保证后端不受按键抖动影响,电路如下:
分别来看按键闭合断开时电路状态:
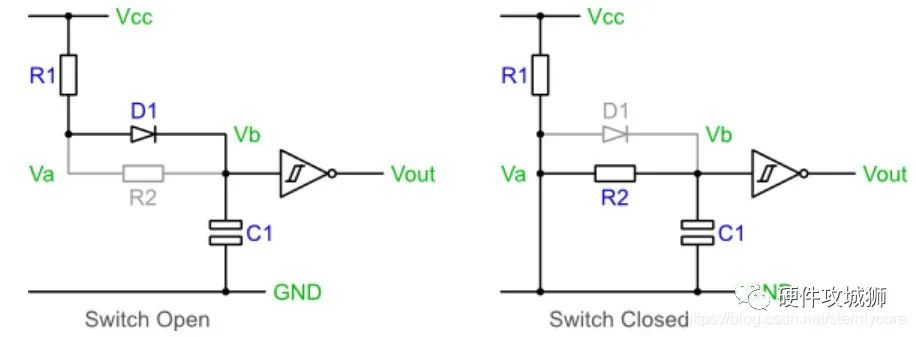
开关打开时:
电容C1通过R1 D1回路充电,Vb电压=Vcc-0.7为高电平,后通过反向施密特触发器使Vout输出为低。
开关闭合时:
电容C1通过R2进行放电,最后Vb电压变为0,通过反向施密特触发器使Vout输出为高。
当按下按键出现快速抖动现象时,通过电容会使Vb点电压快速变成Vcc或GND。在抖动过程时对电容会有轻微的充电或放电,但后端的施密特触发器有迟滞效果不会导致Vout发现抖动现象。
此电路中D1的使用使为了限制R1 R2一起给C1供电,增加充电时间影响效果。如果减小R1的值会使电流增加,功耗较高。
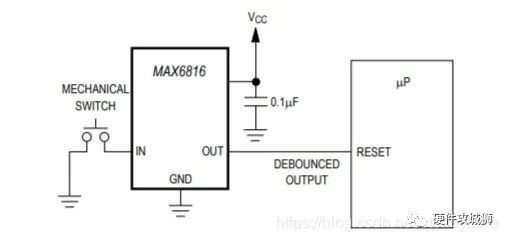
专用消抖芯片
一些厂家会提供专用芯片,避免自搭电路的不稳定性, 如美信-Max6816:
软件滤波
软件消除抖动也是很常见的方式,一般形式是延时查询按键状态或者中断形式来消除抖动。
下面是Arduino的软件消抖代码:
/* SoftwareDebounce
*
* At each transition from LOW to HIGH or from HIGH to LOW
* the input signal is debounced by sampling across
* multiple reads over several milli seconds. The input
* is not considered HIGH or LOW until the input signal
* has been sampled for at least "debounce_count" (10)
* milliseconds in the new state.
*
* Notes:
* Adjust debounce_count to reflect the timescale
* over which the input signal may bounce before
* becoming steady state
*
* Based on:
* http://www.arduino.cc/en/Tutorial/Debounce
*
* Jon Schlueter
* 30 December 2008
*
* http://playground.arduino.cc/Learning/SoftwareDebounce
*/
int inPin = 7; // the number of the input pin
int outPin = 13; // the number of the output pin
int counter = 0; // how many times we have seen new value
int reading; // the current value read from the input pin
int current_state = LOW; // the debounced input value
// the following variable is a long because the time, measured in milliseconds,
// will quickly become a bigger number than can be stored in an int.
long time = 0; // the last time the output pin was sampled
int debounce_count = 10; // number of millis/samples to consider before declaring a debounced input
void setup()
{
pinMode(inPin, INPUT);
pinMode(outPin, OUTPUT);
digitalWrite(outPin, current_state); // setup the Output LED for initial state
}
void loop()
{
// If we have gone on to the next millisecond
if(millis() != time)
{
reading = digitalRead(inPin);
if(reading == current_state && counter > 0)
{
counter--;
}
if(reading != current_state)
{
counter++;
}
// If the Input has shown the same value for long enough let's switch it
if(counter >= debounce_count)
{
counter = 0;
current_state = reading;
digitalWrite(outPin, current_state);
}
time = millis();
}
}
审核编辑:汤梓红
-
如何实现软件与硬件的开关抖动设计2021-03-04 5350
-
verilog写cpld的程序如何消除按键的抖动?2014-04-02 4558
-
消除按键抖动的两种方法分享2020-09-02 5389
-
如何通过软件编程实现消除键盘的抖动2021-07-22 1829
-
如何消除无刷电机的静态抖动2021-08-09 4581
-
单片机如何消除按键抖动?2021-10-21 1771
-
如何消除按键抖动的影响2022-01-17 2910
-
运用外部中断函数消除按键抖动2022-03-02 1238
-
sr锁存器是如何消除脉冲抖动的?2023-04-26 1248
-
请问sr锁存器是如何消除脉冲抖动的?2023-05-10 3618
-
模拟开关型防抖动电路2017-09-11 1310
-
按键抖动消除verilog设计2023-04-27 2676
-
rs触发器消除按键抖动的原因2023-11-17 3925
-
FPGA如何消除时钟抖动2024-08-19 4362
-
14路差分输出时钟抖动消除器SC6302,兼容HMC70442025-03-05 1209
全部0条评论

快来发表一下你的评论吧 !
