

启鸿开发板试用体验:简单使用-接豆子游戏
描述
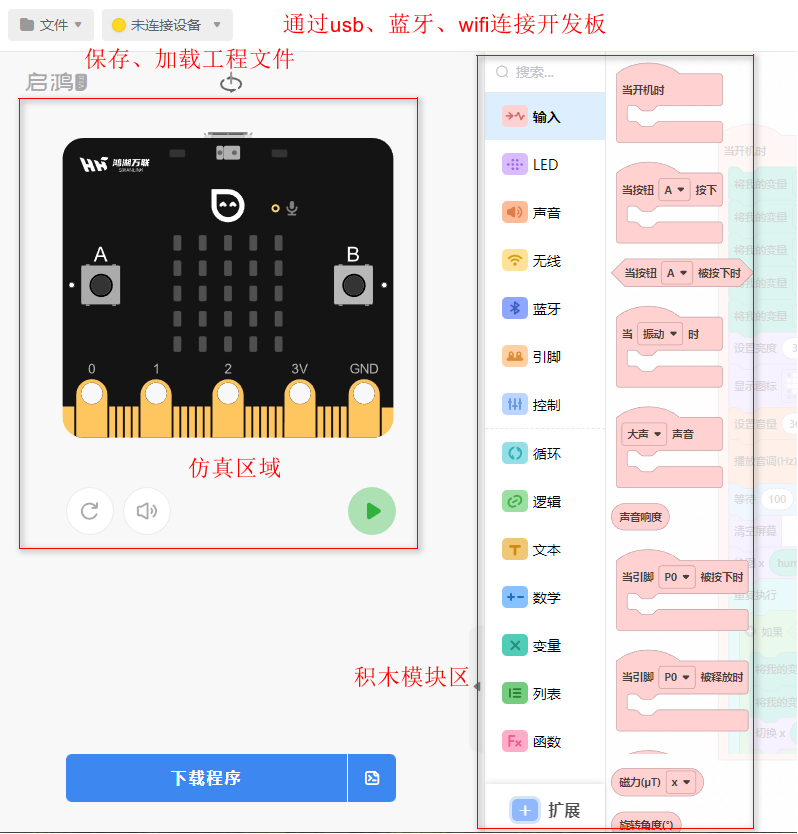 最右边是编程区域,通过拖动积木模块相互组合,即可完成程序编写,同时会生成对应的python脚本,此时可以直接在仿真区域运行程序,直接观察程序效果。这一点非常的好用,无需实物,且反应非常快。
在连接的情况下,直接点击下载程序,即可将积木对应的固件下载到模块中,下载完成后,模块会主动复位并运行下载的程序。(如果出现下载到98%后停止下载的情况,多下载几次即可)
我这里做了个简单的游戏程序,利用led矩阵和A/B按键完成功能,在最底下的一行存在一个光点1,由AB键控制在最底行左右移动,在最顶行随机生成一个光点2并下落,让光点1接住光点2即可。积木图如下,工程文件放最后。
最右边是编程区域,通过拖动积木模块相互组合,即可完成程序编写,同时会生成对应的python脚本,此时可以直接在仿真区域运行程序,直接观察程序效果。这一点非常的好用,无需实物,且反应非常快。
在连接的情况下,直接点击下载程序,即可将积木对应的固件下载到模块中,下载完成后,模块会主动复位并运行下载的程序。(如果出现下载到98%后停止下载的情况,多下载几次即可)
我这里做了个简单的游戏程序,利用led矩阵和A/B按键完成功能,在最底下的一行存在一个光点1,由AB键控制在最底行左右移动,在最顶行随机生成一个光点2并下落,让光点1接住光点2即可。积木图如下,工程文件放最后。
 python脚本如下:
import QHos,QHled,QHaudio,QHinput,QHmathdef pre_run():returndef aftrer_run():returnmonster_1_x = Nonemonster_1_y = Nonehuman_x = Nonestep_time_ms = Nonemonster_1_refresh = Nonedef powerOn():global monster_1_x monster_1_x = 0global monster_1_y monster_1_y = 0global human_x human_x = 0global step_time_ms step_time_ms = 400global monster_1_refresh monster_1_refresh = 0 QHled.set_brightness(3) QHled.show_pic(QHled.HEART) QHaudio.set_volume(2) QHaudio.tone_ring(7) QHos.usleep(100) QHled.clear_led() QHled.show_pixel(human_x,4) while True: if not monster_1_y and not monster_1_refresh: monster_1_refresh= 1 monster_1_x = QHmath.random(0, 4) QHled.change_pixel(monster_1_x,monster_1_y) QHos.usleep(step_time_ms) QHled.cancel_pixel(monster_1_x,monster_1_y) monster_1_y = (monster_1_y if isinstance(monster_1_y, int) else 0) + 1 QHled.change_pixel(monster_1_x,monster_1_y) if monster_1_y == 4: if human_x == monster_1_x: monster_1_y = 0 monster_1_refresh = 0 QHled.change_pixel(human_x,4) else: break QHled.show_pic(QHled.NO) returndef buttonA_func():global human_x QHled.cancel_pixel(human_x,4) human_x = (human_x if isinstance(human_x, int) else 0) - 1if human_x <= 0: human_x = 0 QHled.change_pixel(human_x,4) returndef buttonB_func(): global human_x QHled.cancel_pixel(human_x,4) human_x = (human_x if isinstance(human_x, int) else 0) + 1if human_x >= 4: human_x = 4 QHled.change_pixel(human_x,4) returnQHinput.buttonA_listener(buttonA_func)QHinput.buttonB_listener(buttonB_func)powerOn()
总结:非常切合开发板的少儿编程的产品定位,上手完全没有难度,减少了环境搭建环节,也无需编程语言的知识,而且板载交互性外设较多,能引起儿童的兴趣心理,作为入门级产品,我认为是成功的。 目前厂家未能提供sdk、也未开放python库文件,这也一定程度上限制了自由开发的特性,建议厂家早日提供,技术性购买者刚需,大众购买者可能用不上,但购买时他也会希望有更大的自由拓展度。 可能led是通过iic拓展io芯片控制,在运行时发现按键改变led光点的动作有些不流畅,可能与sdk任务设计有一定关系,不过没有源码,也就不再分析了。 更多热点文章阅读
- 玩转OpenHarmony PID:教你打造两轮平衡车
- 基于 OpenHarmony 的智联北斗海防系统
- 玩转OpenHarmony智能家居:如何实现树莓派“碰一碰”设备控制
- 带你玩转OpenHarmony AI:基于Seetaface2的人脸识别
-
带你玩转OpenHarmony AI:打造智能语音子系统
提示:本文由电子发烧友社区发布,转载请注明以上来源。如需社区合作及入群交流,请添加微信EEFans0806,或者发邮箱liuyong@huaqiu.com。
原文标题:启鸿开发板试用体验:简单使用-接豆子游戏
文章出处:【微信公众号:电子发烧友开源社区】欢迎添加关注!文章转载请注明出处。
声明:本文内容及配图由入驻作者撰写或者入驻合作网站授权转载。文章观点仅代表作者本人,不代表电子发烧友网立场。文章及其配图仅供工程师学习之用,如有内容侵权或者其他违规问题,请联系本站处理。
举报投诉
-
【飞凌i.MX9352开发板试用】+机械臂游戏3—游戏源代码(开源)原创首发2023-07-26 1992
-
【鸿湖万联启鸿开发板试用体验】简单使用-接豆子游戏2022-12-18 1258
-
【鸿湖万联启鸿开发板试用体验】学生护眼小助手2022-12-08 812
-
【鸿湖万联启鸿开发板试用体验】利用光照传感器控制LED亮度2022-11-23 982
-
【鸿湖万联启鸿开发板试用体验】+音频功能的使用2022-11-22 962
-
【鸿湖万联启鸿开发板试用体验】传感器检测及显示2022-11-21 1235
-
【鸿湖万联启鸿开发板试用体验】开箱与初步测试2022-11-17 1245
-
【软通动力鸿湖万联扬帆系列“竞”开发板试用体验】鸿湖万联扬帆系列“竞”开发板试用测评报告二 开发板2022-10-13 2474
-
【OH专题】软通动力启鸿OpenHarmony开发板免费试用2022-10-09 8255
-
鸿湖万联启鸿开发板成功通过OpenHarmony3.0 LTS版本兼容性测评2022-09-09 2041
全部0条评论

快来发表一下你的评论吧 !
