
LoRa模块SX1278与ESP32结合使用的方法-下
电子说
描述
在这里,我们主要解释一些重要的代码片段。
首先,包括所有必需的库。SPI.h用于ESP32与LoRa之间的SPI通信,Wire.h库用于I2C设备之间的通信。您可以从此处下载所需的库:
● Wire.h
● SH1106.h
● Sandeep Mistry提供的LoRa库。
#include 然后为OLED显示器创建一个实例,该实例包括地址和连接显示器的引脚。
SH1106 display(0x3c, 21, 22);
之后,输入Wi-Fi名称和密码。ESP32需要互联网连接从网站获取天气数据。
const char* ssid = "Wi-fi Name";
const char* pass = "Password";
在接下来的几行代码中,定义连接LoRa模块的引脚。
#define ss 5
#define rst 14
#define dio0 2
现在,输入之前生成的API链接。使用此链接,我们将获得Jaipur的温度和湿度数据。
Const char* url = "http://api.weatherapi.com/v1/current.json?key=ade61a8aef37445d8c0100632202407&q=Jaipur";
在*setup()*函数中,我们将使用115200的波特率初始化串口监视器,并使用begin()函数初始化OLED显示屏和LoRa通信。
Serial.begin(115200);
  Serial.println(ssid);
  WiFi.begin(ssid, pass);
  while (WiFi.status() != WL_CONNECTED)
  {
    delay(500);
  }
  LoRa.setPins(ss, rst, dio0);
  while (!LoRa.begin(433E6)) {
  }
  LoRa.setSyncWord(0xF3);
}
在void loop()函数中,我们将检查ESP32是否接收到JSON文件,并使用以下代码在串口监视器上打印输出JSON数据。
int httpCode = https.GET();
  if (httpCode > 0) {
    String payload = https.getString();
    char charBuf[500];
    payload.toCharArray(charBuf, 500);
    Serial.println(payload);
之后,使用通过ArduinoJson Assistant生成的分词程序。此分词程序将为我们提供Jaipur的温度和湿度数据。
const size_t capacity = JSON_OBJECT_SIZE(2) + JSON_OBJECT_SIZE(3) + JSON_OBJECT_SIZE(8) + JSON_OBJECT_SIZE(23) + 490;
  DynamicJsonDocument doc(capacity);
  const char* json = "{"location":{"name":"Jaipur","region":"Rajasthan","country":"India","lat":26.92,"lon":75.82,"tz_id":"Asia/Kolkata","localtime_epoch":1595741089,"localtime":"2020-07-26 10:54"},"current":{"last_updated_epoch":1595740520,"last_updated":"2020-07-26 10:45","temp_c":31,"temp_f":87.8,"is_day":1,"condition":{"text":"Mist","icon":"//cdn.weatherapi.com/weather/64x64/day/143.png","code":1030},"wind_mph":0,"wind_kph":0,"wind_degree":0,"wind_dir":"N","pressure_mb":1008,"pressure_in":30.2,"precip_mm":0,"precip_in":0,"humidity":66,"cloud":50,"feelslike_c":32.2,"feelslike_f":89.9,"vis_km":5,"vis_miles":3,"uv":8,"gust_mph":7.2,"gust_kph":11.5}}";
  deserializeJson(doc, json);
  long current_last_updated_epoch = current["last_updated_epoch"];
  const char* current_last_updated = current["last_updated"]; //
  int current_temp_c = current["temp_c"]; // 31
  int current_humidity = current["humidity"]; // 66
最后,我们将温度和湿度值发送到LoRa接收器。
LoRa.beginPacket();
LoRa.print("Temperature: ");
LoRa.print(current_temp_c);
LoRa.print("c");
LoRa.print("Humidity: ");
LoRa.print(current_humidity);
LoRa.endPacket();
Arduino LoRa接收器代码
同样,首先我们添加LoRa模块和LCD的库,并定义LCD连接到的引脚。
#include 在loop()函数中,我们接收来自发送器模块的数据包。收到数据包后,Arduino开始读取它们作为字符并将其打印在LCD上。当它收到关键字“ c”时,它将剩余信息打印在第二行。
void loop() {
intpacketSize = LoRa.parsePacket();
if (packetSize) {
Serial.print("Received packet '");
while (LoRa.available()) {
char incoming = (char)LoRa.read();
if (incoming == 'c')
      {
lcd.setCursor(0, 1);
      }
else
      {
lcd.print(incoming);
      }
ESP32 LoRa设置的工作过程
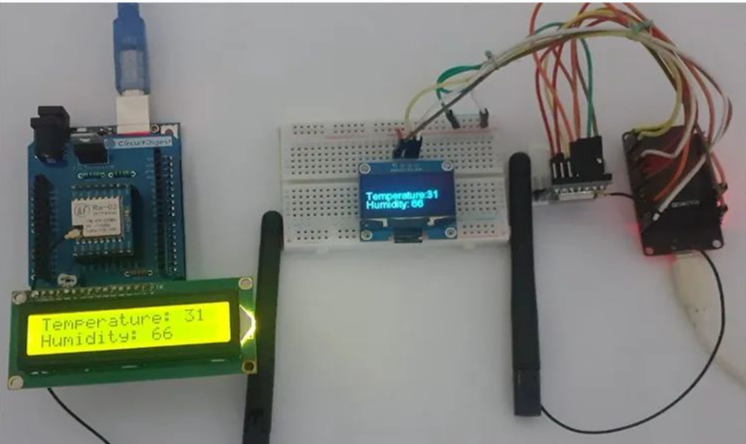
我们将硬件和程序准备就绪后,将代码上传到ESP32和Arduino模块中。发射器模块会将温度和湿度值发送到接收器模块。接收器LoRa模块将数值在LCD上进行显示,如下所示。
!
-
LLCC68与SX1278 LoRa模块的优势对比?2024-03-08 1680
-
LoRa模块 SX1278详解2024-02-28 3755
-
LLCC68与SX1278 LoRa模块的优势对比2023-05-05 2888
-
LoRa模块SX1278与ESP32结合使用的方法-上2023-01-21 5314
-
SX1278无线串口透传模块LoRa扩频远距离通信2022-09-19 855
-
基于流行的SX1276/SX1278无线模块的E32 UART LoRa设备配置2022-02-22 1195
-
怎样去移植SX1278模块的LoRa功能呢2022-02-21 1273
-
如何使用Lora模块SX1278实现ESP8266之间的无线通讯2022-02-16 1167
-
用于Arduino、esp32或esp8266的Ebyte LoRa E32(SX1278)设备:配置 - 第三部分2021-12-27 1046
-
STM32实现SX1278 Lora无线组网2019-08-26 3879
-
使用SX1278无线模块进行Lora接收和发送demo的代码资料免费下载2019-06-17 2594
-
请问LORA SX1278芯片如何实现点对点唤醒?2019-01-16 6619
-
SX1278无线模块特点及引脚功能2017-12-26 42236
-
SX1278产品手册2017-05-18 4651
全部0条评论

快来发表一下你的评论吧 !

