

鸿蒙推箱子小游戏:UI界面美化
描述
在上文笔者向大家分享了推箱子小游戏基础功能的实现,本文将继续向大家介绍如何做 UI 界面美化,以及如何利用轻量级偏好数据库做数据的存储和读取。
UI 界面美化
①MainAbilitySlice
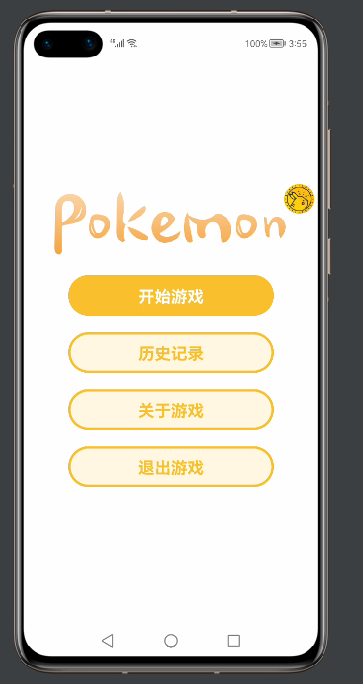
我们可以看到,所有的界面都是采用无框全屏化设计,因此第一步是要修改 config.json 文件。
打开文件,将代码做出如下修改:
    ......
 "launchType": "standard"
      }
    ],
    "metaData": {
      "customizeData": [
        {
          "name": "hwc-theme",
          "value": "androidhwext:style/Theme.Emui.Light.NoTitleBar",
          "extra": ""
        }
      ]
    }
  }
}
然后设计按钮样式,首先新建一个 graphic 文件:

接着在里面添加美化代码:
现在分析界面需求,其中带有“Pokemon”字样的是本地图片,因此我们需要的控件有四个按钮以及一张图片,布局采用 DirectionalLayout 即可。 代码如下:
至此第一个界面就美化完成了。
②SelectSlice
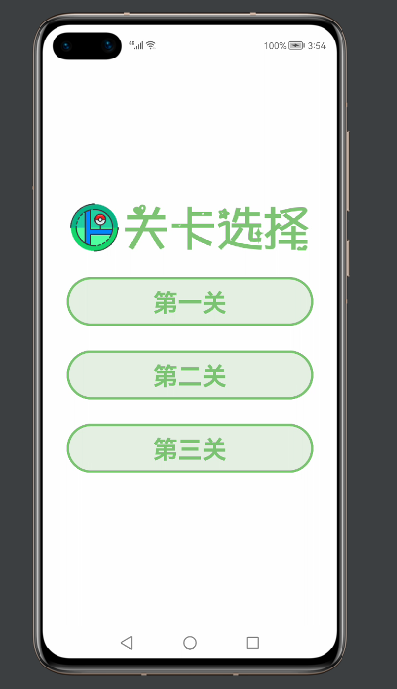
这个界面的布局跟第一个界面大同小异,只是少了一个按钮,还有就是按钮的样式有点不同,因此需要再写一个 graphic 文件,方法同上。
这里直接给出代码:
界面的代码如下:
③InitSlice
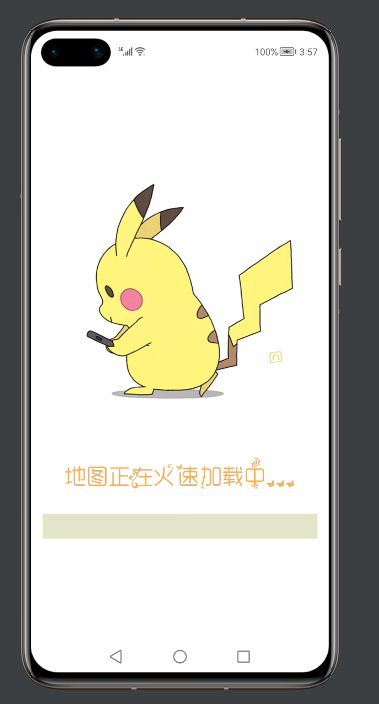
在加载界面中,只是用到了一个播放 gif 的第三方组件,以及一张图片(文字图片)一个进度条组件,布局也使用最常规的 DirectionalLayout 即可实现。
④GameSlice
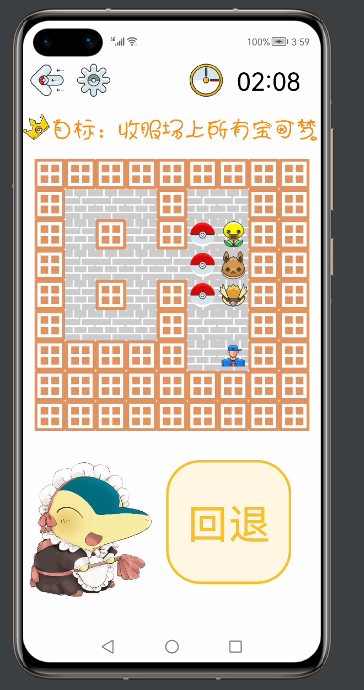
游戏界面的 UI 就稍微复杂一点,需要用到嵌套,之前说过,地图类继承自布局,所以实际上地图也是一个组件,理解了这一点之后,再来看代码会容易理解很多。 整体布局用了 DirectionalLayout 纵向布局,在里面有需要横向布局的,则添加 DirectionalLayout 的横向布局,做一个简单的嵌套。
四个界面美化完毕!接下来做一些细节的调整。在按下历史记录按钮时,会显示每个关卡最近的一次历史记录,效果如下:
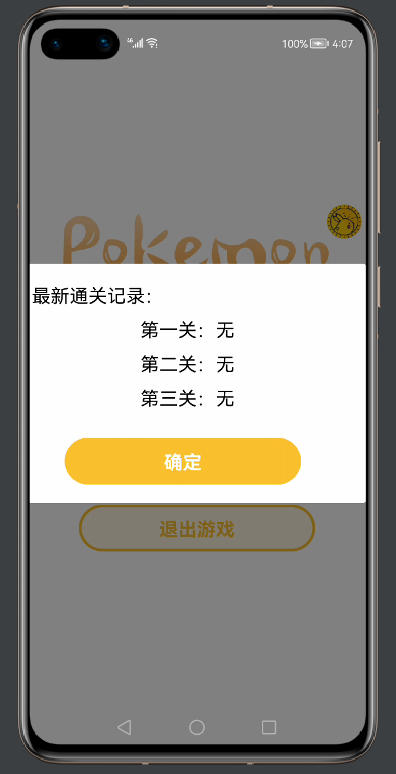
这实际上是一个自定义样式的 CommonDialog,如何自定义?首先创建一个自定义的 RecordDialog 类和美化用的 xml 文件,然后在类里面添加自己的 xml 文件。
具体方法可以看代码:
public class RecordDialog {
    static CommonDialog commonDialog;

    static void showDialog(Context context,String s1,String s2,String s3){
        DirectionalLayout dl = (DirectionalLayout) LayoutScatter.getInstance(context)
                .parse(ResourceTable.Layout_recordlayout,null,false);
        commonDialog = new CommonDialog(context);
        commonDialog.setAutoClosable(true);

        Button Btn = (Button) dl.findComponentById(ResourceTable.Id_Btn);

        Text first = (Text) dl.findComponentById(ResourceTable.Id_firstText);
        first.setText(s1);

        Text second = (Text) dl.findComponentById(ResourceTable.Id_secondText);
        second.setText(s2);

        Text third = (Text) dl.findComponentById(ResourceTable.Id_thirdText);
        third.setText(s3);

        Btn.setClickedListener(new Component.ClickedListener() {
            @Override
            public void onClick(Component component) {
                commonDialog.destroy();
            }
        });
        commonDialog.setCornerRadius(15);
        commonDialog.setContentCustomComponent(dl).show();
    }
}
xml 文件如下:
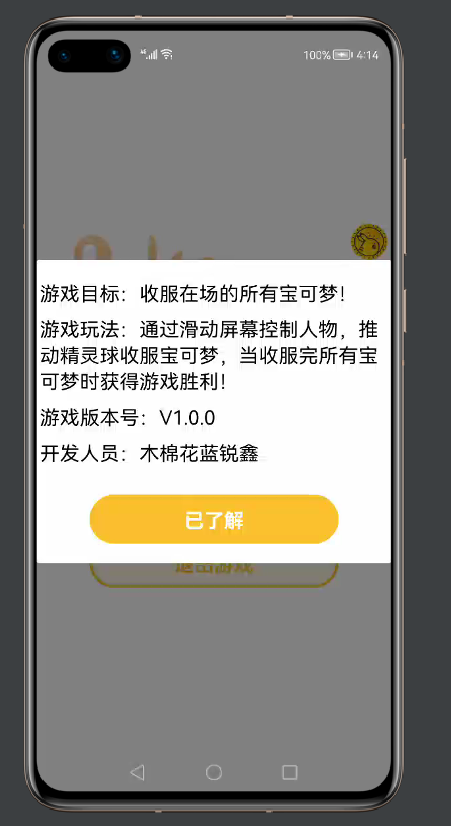
关于这样的设计,这个小游戏中还有一处,点击关于游戏弹出的界面同样也是这么实现的:
代码如下:
public class MyDialog {
    private static Text version;
    static void showDialog(Context context){
        DirectionalLayout dl = (DirectionalLayout) LayoutScatter.getInstance(context)
                .parse(ResourceTable.Layout_mydialoglayout,null,false);
        CommonDialog commonDialog = new CommonDialog(context);
        commonDialog.setAutoClosable(true);

        Button knowBtn = (Button) dl.findComponentById(ResourceTable.Id_knowBtn);


        knowBtn.setClickedListener(new Component.ClickedListener() {
            @Override
            public void onClick(Component component) {
                commonDialog.destroy();
            }
        });


        commonDialog.setCornerRadius(15);
        commonDialog.setContentCustomComponent(dl).show();
    }
    static String getVersion(){
        return version.getText();
    }
}
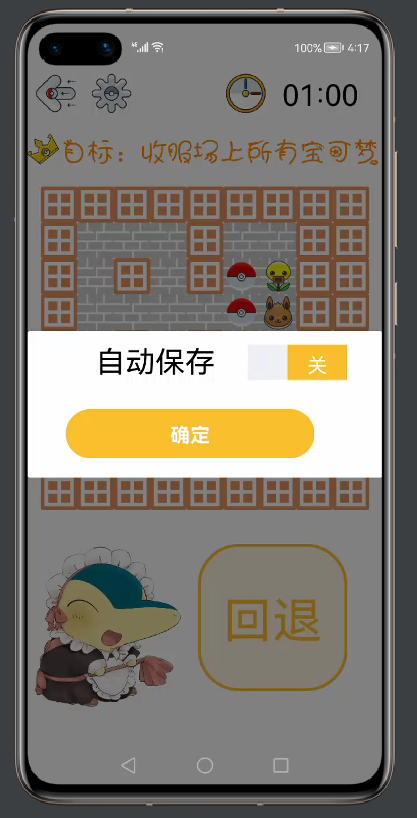
游戏中最后一处 UI 设计,就是点击设置按钮时出现的一个滑动块组件,可以保存一些全局设置:
public class SetDialog {
    static void showDialog(Context context){
        DirectionalLayout dl = (DirectionalLayout) LayoutScatter.getInstance(context)
                .parse(ResourceTable.Layout_setlayout,null,false);
        CommonDialog commonDialog = new CommonDialog(context);
        commonDialog.setAutoClosable(true);

        Button sureBtn = (Button) dl.findComponentById(ResourceTable.Id_sureBtn);
        Switch choose = (Switch) dl.findComponentById(ResourceTable.Id_choose);

        String value = MyDB.getString(dl.getContext(),"save");
        if(value != null){
            if(value.compareTo("开") == 0){
                choose.setChecked(true);
            }
            else if(value.compareTo("关") == 0){
                choose.setChecked(false);
            }
        }

        choose.setCheckedStateChangedListener(new AbsButton.CheckedStateChangedListener() {
            @Override
            public void onCheckedChanged(AbsButton absButton, boolean b) {
                String key = "save";
                if(b){
                    MyDB.putString(dl.getContext(),key,"开");
                }
                else {
                    MyDB.putString(dl.getContext(), key,"关");
                }
            }
        });


        sureBtn.setClickedListener(new Component.ClickedListener() {
            @Override
            public void onClick(Component component) {
                commonDialog.destroy();
            }
        });

        commonDialog.setCornerRadius(15);
        commonDialog.setContentCustomComponent(dl).show();
    }
}
至此,UI 美化部分已经全部完成。
数据存储
这里用到轻量级偏好数据库,关于数据库怎么使用,可以看这篇文章,文章写得很详细!
https://ost.51cto.com/posts/7911利用数据库存储每个关卡的信息,首先要新建一个数据库类 MyDB:
public class MyDB {
    private static final String PREFERENCE_FILE_NAME = "DB";
    private static Preferences preferences;
    private static DatabaseHelper databaseHelper;
    private static Preferences.PreferencesObserver mPreferencesObserver;

    private static void initPreference(Context context){
        if(databaseHelper==null){
            databaseHelper = new DatabaseHelper(context);
        }
        if(preferences==null){
            preferences = databaseHelper.getPreferences(PREFERENCE_FILE_NAME);
        }

    }

    public static void putString(Context context, String key, String value) {
        initPreference(context);
        preferences.putString(key, value);
        preferences.flush();
    }

    public static String getString(Context context, String key) {
        initPreference(context);
        return preferences.getString(key, null);
    }

    public static boolean deletePreferences(Context context) {
        initPreference(context);
        boolean isDelete= databaseHelper.deletePreferences(PREFERENCE_FILE_NAME);
        return isDelete;
    }

    public static void registerObserver(Context context, Preferences.PreferencesObserver preferencesObserver){
        initPreference(context);
        mPreferencesObserver=preferencesObserver;
        preferences.registerObserver(mPreferencesObserver);
    }

    public static void unregisterObserver(){
        if(mPreferencesObserver!=null){
            // 向preferences实例注销观察者
            preferences.unregisterObserver(mPreferencesObserver);
        }
    }
}
在结束游戏时,如果打开了自动保存按钮,则进行存储:
                        if(gameMap.isWin()){
                            tickTimer.stop();
                            CommonDialog commonDialog = new CommonDialog(getContext());
                            commonDialog.setSize(800,400);
                            commonDialog.setTitleText("  注意");
                            commonDialog.setContentText("             恭喜您完成游戏!!!");
                            commonDialog.setButton(0, "确定", new IDialog.ClickedListener() {
                                @Override
                                public void onClick(IDialog iDialog, int i) {
                                    commonDialog.destroy();
                                    String value = MyDB.getString(getContext(),"save");
                                    if(value != null){
                                        if(value.compareTo("开") == 0){
                                            MyDB.putString(getContext(),key,tickTimer.getText());
                                        }
                                    }
                                    present(new SelectSlice(),new Intent());
                                    terminate();
                                }
                            });
                            commonDialog.show();


                        }
在点击历史记录时,会进行数据读取:
        //历史记录按钮
        recordBtn.setClickedListener(new Component.ClickedListener() {
            @Override
            public void onClick(Component component) {
                String[] s = {"第一关:无","第二关:无","第三关:无"};
                String first = MyDB.getString(getContext(),"first");
                String second = MyDB.getString(getContext(),"second");
                String third = MyDB.getString(getContext(),"third");

                if(first == null){
                    first = s[0];
                }
                else {
                    first = "第一关:" + first;
                }
                if(second == null){
                    second = s[1];
                }
                else {
                    second = "第二关:" + second;
                }
                if(third == null){
                    third = s[2];
                }
                else {
                    third = "第三关:" + third;
                }

                RecordDialog.showDialog(getContext(),first,second,third);
            }
        });
开启自动保存,才会在游戏结束时存进数据库,实际上也是利用数据库中某个 key 中的 value 控制。 具体实现如下:
        choose.setCheckedStateChangedListener(new AbsButton.CheckedStateChangedListener() {
            @Override
            public void onCheckedChanged(AbsButton absButton, boolean b) {
                String key = "save";
                if(b){
                    MyDB.putString(dl.getContext(),key,"开");
                }
                else {
                    MyDB.putString(dl.getContext(), key,"关");
                }
            }
        });
至此,项目已经全部分享完成,由于作品中涉及大量的图片资源均是网络资源(避免侵权),故仅作学习交流使用,实际上,绝大部分代码已经在文章中了,剩下的就是读者理解之后动手衔接起来!一定要动手!
后续作者也会开发更多的小游戏供大家学习交流~(下期可能就是 ArkUI 的小游戏啦!)期待与大家一起进步!!!
审核编辑:汤梓红
声明:本文内容及配图由入驻作者撰写或者入驻合作网站授权转载。文章观点仅代表作者本人,不代表电子发烧友网立场。文章及其配图仅供工程师学习之用,如有内容侵权或者其他违规问题,请联系本站处理。
举报投诉
- 相关推荐
- 热点推荐
- 游戏
- ui界面
- 鸿蒙
- OpenHarmony
-
基于JAVA UI开发的“推箱子”小游戏2023-01-05 1459
-
鸿蒙上实现“数字华容道”小游戏2022-12-26 2419
-
基于C语言设计编写的ARM推箱子2021-12-14 1130
-
如何利用STM32制作贪吃蛇和推箱子游戏?2021-09-27 2765
-
基于labview开发的10个小游戏(贪吃蛇、俄罗斯方块、五子棋、象棋、2048、推箱子等)2021-09-15 16805
-
LabView资料分享:推箱子游戏2020-06-14 4413
-
语音识别的推箱子游戏设计2017-11-13 1105
-
推箱子小游戏设计2017-06-09 1623
-
基于单片机推箱子的游戏设计与制作2012-12-14 3711
-
基于单片机的推箱子游戏仿真结果2012-07-09 1636
-
基于PROTEUS的推箱子游戏(proteus仿真电路+汇编源程序)2012-07-06 4742
-
单片机推箱子游戏程序模拟仿真2008-11-06 4218
全部0条评论

快来发表一下你的评论吧 !
