
Tesseract-OCR中如何实现结构化的文档分析
编程语言及工具
描述
引言
之前一篇介绍了Tesseract-OCR安装与测试,已经对中文字符的识别支持。大家反馈比较多,所以决定在写一篇,主要是介绍用它做项目时候需要注意的问题与一些比较重要的函数使用。主要介绍一下Tesseract-OCR中如何实现结构化的文档分析以及相关区域的定位识别。
术语名词
OEM - OCR Engine Mode
Tesseract-OCR从4.x版本开始支持LSTM,可以通过OEM参数熟悉设置,oem参数选项的值与表示分别如下:
0:3.x以前的识别引擎
1:神经网络LSTM的识别引擎
2:混合模式,传统+LSTM
3:默认,那种支持就用那种
PSM-Page Segmentation Mode
Tesseract-OCR支持对每页文档进行结构化分析,并输出结构化分析的结果,PSM文档结构化分析可以获取很多有用的文档信息。总计支持13种模式,默认的PSM的选项参数位PSM_AUTO=3,该选项支持对文档的结构化输出信息包括:
dict_keys(['level', 'page_num', 'block_num', 'par_num', 'line_num', 'word_num', 'left', 'top', 'width', 'height', 'conf', 'text']),其中比较重要的包括:
'left', 'top', 'width', 'height' 表示位置信息
'text' 表示每个的外接矩形左上角与右下角坐标
'conf' 表示置信度,值在0~100之间,小于0的应该自动排除
其它有用的选项包括:
0   角度与语言检测,不识别不分析文档结构
1   角度 + PSM模式
更多模型,懒得翻译,请直接看下面:
0    Orientation and script detection (OSD) only.
1    Automatic page segmentation with OSD.
2    Automatic page segmentation, but no OSD, or OCR.
3    Fully automatic page segmentation, but no OSD. (Default)
4    Assume a single column of text of variable sizes.
5    Assume a single uniform block of vertically aligned text.
6    Assume a single uniform block of text.
7    Treat the image as a single text line.
8    Treat the image as a single word.
9    Treat the image as a single word in a circle.
10    Treat the image as a single character.
11    Sparse text. Find as much text as possible in no particular order.
12    Sparse text with OSD.
13    Raw line. Treat the image as a single text line, bypassing hacks that are Tesseract-specific.
03
函数说明
PSD分析函数
def image_to_data(
    image,
    lang=None,
    config='',
    nice=0,
    output_type=Output.STRING,
    timeout=0,
    pandas_config=None,
)
3.5以上版本支持,分析返回文档结构,完成PSD分析与输出。
文档角度与语言检测
def image_to_osd(
    image,
    lang='osd',
    config='',
    nice=0,
    output_type=Output.STRING,
    timeout=0,
):
OSD检测,返回文档的旋转角度与语言检测信息
代码演示部分
使用PSD实现文档结构分析
image = cv.imread("D:/images/text_xt.png")
h, w, c = image.shape

# 文档结构分析
config = ('-l chi_sim --oem 1 --psm 6')
dict = tess.image_to_data(image, config=config, output_type=tess.Output.DICT)
print(dict.keys())
print(dict['conf'])
n_boxes = len(dict['text'])
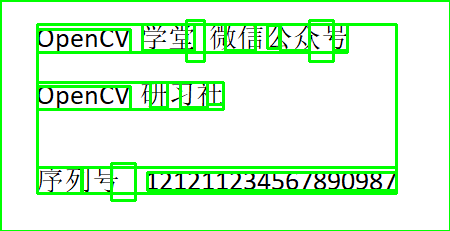
绘制所有BOX框
# 全部文档结构
text_img = np.copy(image)
for i in range(n_boxes):
    (x, y, w, h) = (dict['left'][i], dict['top'][i], dict['width'][i], dict['height'][i])
    cv.rectangle(text_img, (x, y), (x + w, y + h), (0, 255, 0), 2)
cv.imwrite('D:/layout-text1.png', text_img)
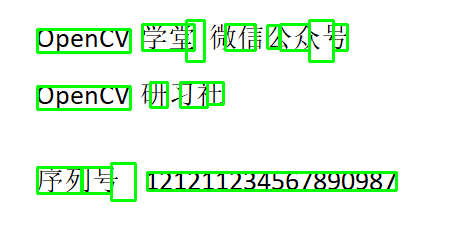
显示如下:

使用conf属性过滤小于0的BOX框
# 根据conf>0过滤之后
for i in range(n_boxes):
    if int(dict['conf'][i]) > 0:
        (x, y, w, h) = (dict['left'][i], dict['top'][i], dict['width'][i], dict['height'][i])
        cv.rectangle(image, (x, y), (x + w, y + h), (0, 255, 0), 2)
cv.imwrite('D:/layout-text2.png', image)

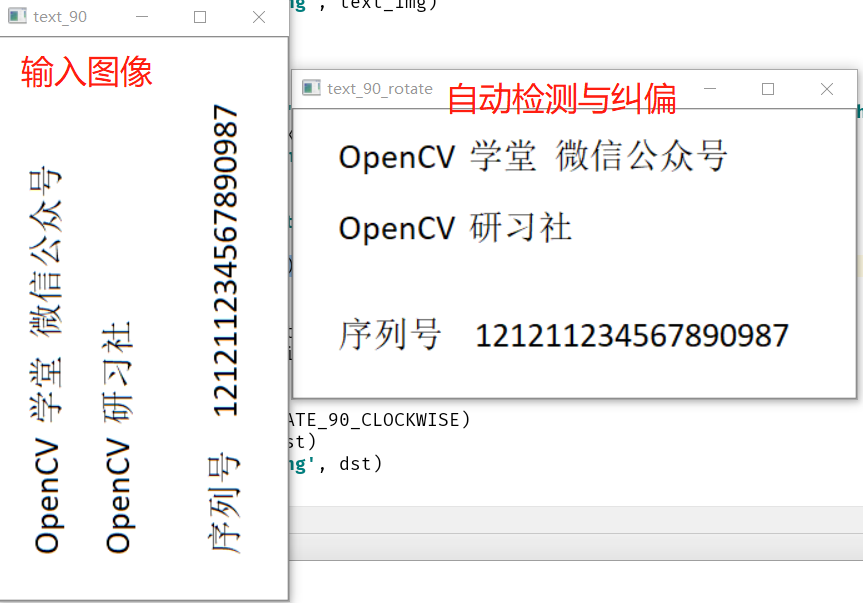
OSD检测文档偏斜与语言类别
# 检测倾斜角度
image = cv.imread("D:/images/text_90.png")
cv.imshow("text_90", image)
osd = tess.image_to_osd(image)
print(osd)
osd_array = osd.split("
")
angle = int(osd_array[2].split(":")[1])
conf = float(osd_array[3].split(":")[1])
print("angle: ", angle)
print("conf: ", conf)
dst = cv.rotate(image, cv.ROTATE_90_CLOCKWISE)
cv.imshow("text_90_rotate", dst)
cv.imwrite('D:/layout-text3.png', dst)

检测配置与白名单机制过滤
# 只检测数字
custom_config = r'--oem 1 --psm 6 outputbase digits'
ocr_result = tess.image_to_string(dst, config=custom_config)
print(ocr_result)

# 采用白名单方式只检测数字
custom_config = r'-c tessedit_char_whitelist=0123456789 --psm 6'
ocr_result = tess.image_to_string(dst, config=custom_config)
print("白名单方式数字检测
",ocr_result)

# 检测中文
ocr_result = tess.image_to_string(dst, lang="chi_sim")
print("
中文检测与输出:
", ocr_result.replace("f", "").split("
"))

# 检测中文情况下,只输出数字
ocr_result = tess.image_to_string(dst, lang="chi_sim", config=custom_config)
print("
中文检测+数字输出:
",ocr_result.replace("f", "").split("
"))

cv.waitKey(0)
cv.destroyAllWindows()
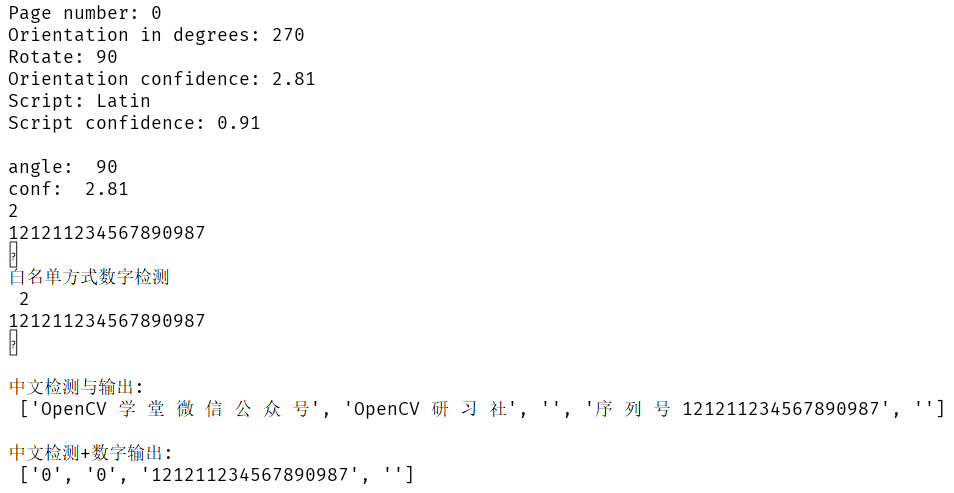
运行结果:
最后一个,可以看出把O检测成0了,其它OK!这个是OCR的死穴,永远分不清0跟O。最后还有一句话,Tesseract-OCR如果输入是二值图像,背景永远是白色才是正确之选!
编辑:黄飞
-
结构化布线系统有哪些难题2016-05-19 3085
-
MaxCompute读取分析OSS非结构化数据的实践经验总结2018-06-20 3185
-
TrustZone结构化消息是什么?2019-03-20 2119
-
linux的tesseract-ocr安装2019-07-15 2542
-
怎么实现基于结构化方法的无线传感器网络设计?2021-05-31 1153
-
结构化设计分为哪几部分?结构化设计的要求有哪些2021-12-23 1952
-
结构化综合布线系统的问题分析2011-02-22 2246
-
中文商品属性结构化方法2018-01-02 1038
-
什么叫结构化的算法_算法和结构化数据初识2018-01-03 13202
-
东方网力“天眼”结构化一体机实现实时视频流结构化分析2018-08-14 5950
-
FPGA模块化设计与AlteraHardCopy结构化ASIC2021-01-20 986
-
如何在Pixie中收集大量非结构化数据2021-08-10 3532
-
CFD 设计利器:结构化和非结构化网格的组合使用2023-12-23 4041
-
什么是网络系统中的结构化布线?2024-04-07 1046
全部0条评论

快来发表一下你的评论吧 !

