

一文详解STM32串口通信
描述
1 什么是串口通讯?
串行通讯是指仅用一根接收线和一根发送线就能将数据以位进行传输的一种通讯方式。尽管串行通讯的比按字节传输的并行通信慢,但是串口可以在仅仅使用两根线的情况下就能实现数据的传输。
典型的串口通信使用3根线完成,分别是地线、发送、接收。由于串口通信是异步的,所以端口能够在一根线上发送数据同时在另一根线上接收数据。串口通信最重要的参数是波特率、数据位、停止位和奇偶的校验。对于两个需要进行串口通信的端口,这些参数必须匹配,这也是能够实现串口通讯的前提。如下是串行通讯示数据传输意图。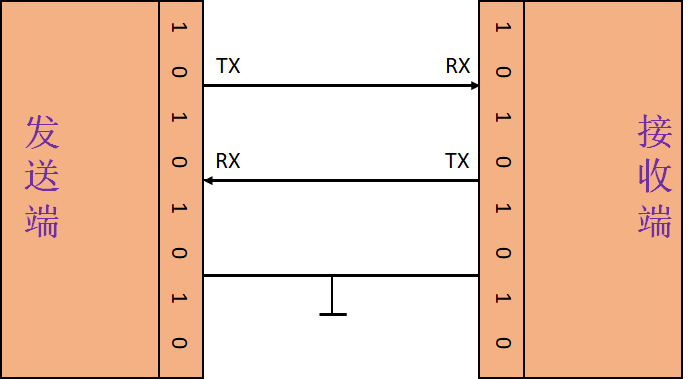 2 串口通讯的通讯协议
最初数据是模拟信号输出简单过程量,后来仪表接口出现了RS232接口,这种接口可以实现点对点的通信方式,但这种方式不能实现联网功能,这就促生了RS485。 我们知道串口通信的数据传输都是0和1,在单总线、I2C、UART中都是通过一根线的高低电平来判断逻辑1或者逻辑0,但这种信号线的GND再与其他设备形成共地模式的通信,这种共地模式传输容易产生干扰,并且抗干扰性能也比较弱。所以差分通信、支持多机通信、抗干扰强的RS485就被广泛的使用了。 RS485通信最大特点就是传输速度可以达到10Mb/s以上,传输距离可以达到3000米左右。大家需要注意的是虽然485最大速度和最大传输距离都很大,但是传输的速度是会随距离的增加而变慢的,所以两者是不可以兼得的。
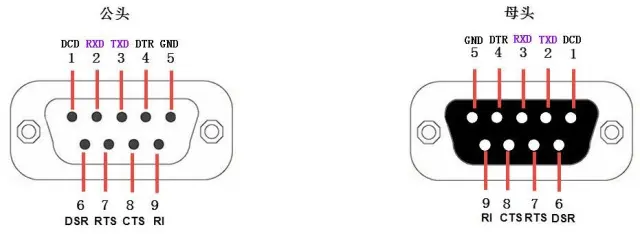
 在上面的通讯方式中,两个通讯设备的"DB9接口"之间通过串口信号线建立起连接,串口信号线中使用"RS-232标准"传输数据信号。由于RS-232电平标准的信号不能直接被控制器直接识别,所以这些信号会经过一个"电平转换芯片"转换成控制器能识别的"TTL校准"的电平信号,才能实现通讯。 下图为DB9标准串口通讯接口:
 DB9引脚说明:
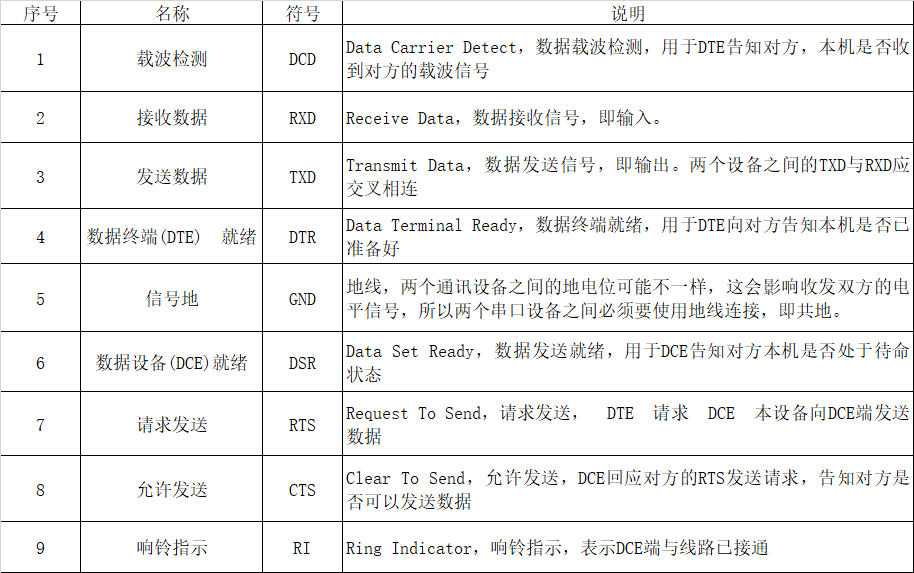 上表中的是计算机端的DB9公头标准接法,由于两个通讯设备之间的收发信号(RXD与TXD)应交叉相连,所以调制调解器端的DB9母头的收发信号接法一般与公头的相反,两个设备之间连接时,只要使用"直通型"的串口线连接起来即可。
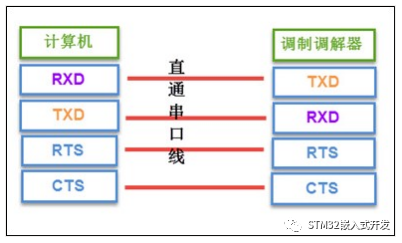 串口线中的RTS、CTS、DSR、DTR及DCD信号,使用逻辑 1表示信号有效,逻辑0表示信号无效。例如,当计算机端控制DTR信号线表示为逻辑1时,它是为了告知远端的调制调解器,本机已准备好接收数据,0则表示还没准备就绪。
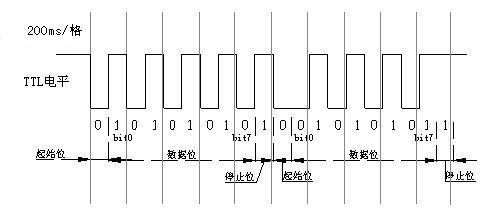 比如波特率为9600bps;代表的就是每秒中传输9600bit,也就是相当于每一秒中划分成了9600等份。 因此,那么每1bit的时间就是1/9600秒=104.1666...us。约0.1ms。既然是9600等份,即每1bit紧接着下一个比特,不存在额外的间隔。两台设备要想实现串口通讯,这收发端设置的波特率必须相同,否则是没办法实现通讯的。 收发波特率一致可以实现通讯:
 收发波特率不一致,导致RX端不能正常接收:
 起始位: 起始位必须是持续一个比特时间的逻辑0电平,标志传输一个字符的开始,接收方可用起始位使自己的接收时钟与发送方的数据同步。 数据位: 数据位紧跟在起始位之后,是通信中的真正有效信息。数据位的位数可以由通信双方共同约定。传输数据时先传送字符的低位,后传送字符的高位。 奇偶校验位: 奇偶校验位仅占一位,用于进行奇校验或偶校验,奇偶检验位不是必须有的。如果是奇校验,需要保证传输的数据总共有奇数个逻辑高位;如果是偶校验,需要保证传输的数据总共有偶数个逻辑高位。 停止位: 停止位可以是是1位、1.5位或2位,可以由软件设定。它一定是逻辑1电平,标志着传输一个字符的结束。 空闲位: 空闲位是指从一个字符的停止位结束到下一个字符的起始位开始,表示线路处于空闲状态,必须由高电平来填充。
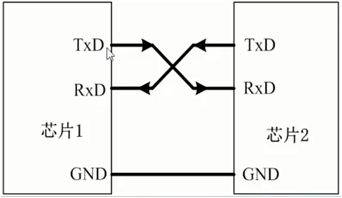 TXD:数据发送引脚; RXD:数据输入引脚 对于两芯片的间的连接,两个芯片GND共地,同时TXD和RXD交叉连接,这样两个芯片间可进行TTL电平通信。 但如果对于芯片和PC机相连,除了共地条件外,不能使用如上的直接交叉连接,虽然两者都有TXD和RXD引脚,但通常PC机使用的是RS232接口(9针),通常是TXC和RXD经过电平转换得到,故如果要使芯片与PC机的RS232接口直接通信,需要将芯片的输入输出端口也电平转换为RS232类型,再交叉连接。 二者的电平标准不同:
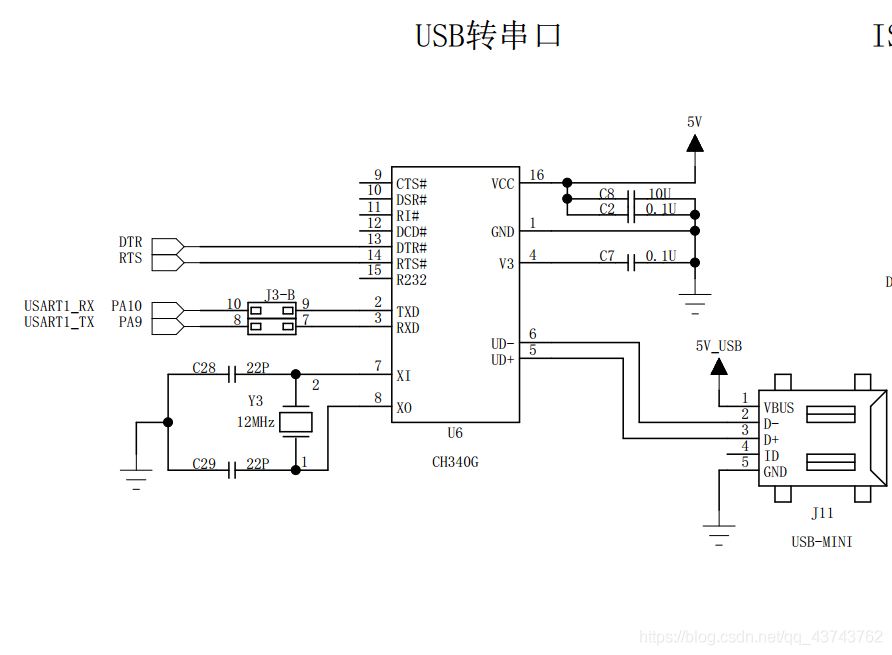
 因此单片机与PC机进行串口通信应该遵循:在单片机串口与上位机给出的RS232口之间,通过电平转换电路实现TTL电平与RS232电平间的转换。 如果使用USB转串口也可以实现串口通讯,USB转串口电路图如下所示。
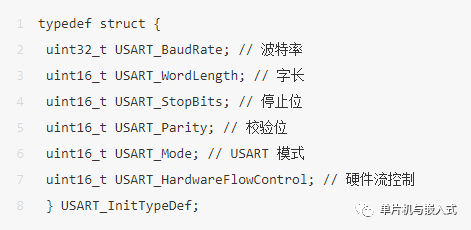
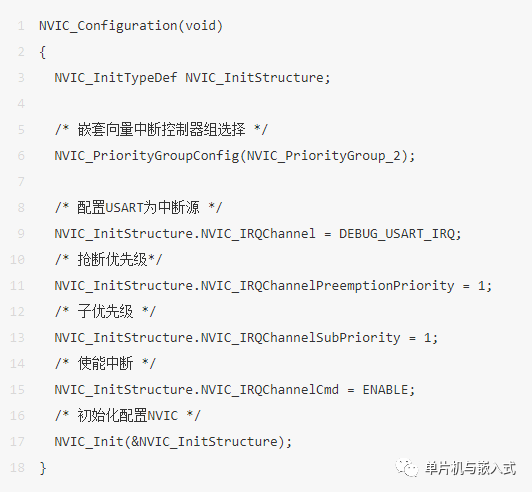
 STM32中串口通讯已经给大家建好了相应的库函数,大家在使用和配置串口的时候直接进行调用库函数和配置就行了,STM32串口通信库函数实例相关文章学习STM32单片机,绕不开的串口 STM32实例-用按键控制串口发送数据,文末附代码 请大家参照一下代码:1、初始化结构体代码
 2、NVIC配置中断优先级
 2 串口通讯的通讯协议
最初数据是模拟信号输出简单过程量,后来仪表接口出现了RS232接口,这种接口可以实现点对点的通信方式,但这种方式不能实现联网功能,这就促生了RS485。 我们知道串口通信的数据传输都是0和1,在单总线、I2C、UART中都是通过一根线的高低电平来判断逻辑1或者逻辑0,但这种信号线的GND再与其他设备形成共地模式的通信,这种共地模式传输容易产生干扰,并且抗干扰性能也比较弱。所以差分通信、支持多机通信、抗干扰强的RS485就被广泛的使用了。 RS485通信最大特点就是传输速度可以达到10Mb/s以上,传输距离可以达到3000米左右。大家需要注意的是虽然485最大速度和最大传输距离都很大,但是传输的速度是会随距离的增加而变慢的,所以两者是不可以兼得的。
2 串口通讯的通讯协议
最初数据是模拟信号输出简单过程量,后来仪表接口出现了RS232接口,这种接口可以实现点对点的通信方式,但这种方式不能实现联网功能,这就促生了RS485。 我们知道串口通信的数据传输都是0和1,在单总线、I2C、UART中都是通过一根线的高低电平来判断逻辑1或者逻辑0,但这种信号线的GND再与其他设备形成共地模式的通信,这种共地模式传输容易产生干扰,并且抗干扰性能也比较弱。所以差分通信、支持多机通信、抗干扰强的RS485就被广泛的使用了。 RS485通信最大特点就是传输速度可以达到10Mb/s以上,传输距离可以达到3000米左右。大家需要注意的是虽然485最大速度和最大传输距离都很大,但是传输的速度是会随距离的增加而变慢的,所以两者是不可以兼得的。3 串口通讯的物理层
串口通讯的物理层有很多标准,例如上面提到的,我们主要讲解RS-232标准,RS-232标准主要规定了信号的用途、通讯接口以及信号的电平标准。 在上面的通讯方式中,两个通讯设备的"DB9接口"之间通过串口信号线建立起连接,串口信号线中使用"RS-232标准"传输数据信号。由于RS-232电平标准的信号不能直接被控制器直接识别,所以这些信号会经过一个"电平转换芯片"转换成控制器能识别的"TTL校准"的电平信号,才能实现通讯。 下图为DB9标准串口通讯接口:
 DB9引脚说明:
 上表中的是计算机端的DB9公头标准接法,由于两个通讯设备之间的收发信号(RXD与TXD)应交叉相连,所以调制调解器端的DB9母头的收发信号接法一般与公头的相反,两个设备之间连接时,只要使用"直通型"的串口线连接起来即可。
 串口线中的RTS、CTS、DSR、DTR及DCD信号,使用逻辑 1表示信号有效,逻辑0表示信号无效。例如,当计算机端控制DTR信号线表示为逻辑1时,它是为了告知远端的调制调解器,本机已准备好接收数据,0则表示还没准备就绪。
4 波特率
波特率是指数据信号对载波的调制速率,它用单位时间内载波调制状态改变的次数来表示。 比如波特率为9600bps;代表的就是每秒中传输9600bit,也就是相当于每一秒中划分成了9600等份。 因此,那么每1bit的时间就是1/9600秒=104.1666...us。约0.1ms。既然是9600等份,即每1bit紧接着下一个比特,不存在额外的间隔。两台设备要想实现串口通讯,这收发端设置的波特率必须相同,否则是没办法实现通讯的。 收发波特率一致可以实现通讯:
 收发波特率不一致,导致RX端不能正常接收:
5 串口通讯的数据结构
 起始位: 起始位必须是持续一个比特时间的逻辑0电平,标志传输一个字符的开始,接收方可用起始位使自己的接收时钟与发送方的数据同步。 数据位: 数据位紧跟在起始位之后,是通信中的真正有效信息。数据位的位数可以由通信双方共同约定。传输数据时先传送字符的低位,后传送字符的高位。 奇偶校验位: 奇偶校验位仅占一位,用于进行奇校验或偶校验,奇偶检验位不是必须有的。如果是奇校验,需要保证传输的数据总共有奇数个逻辑高位;如果是偶校验,需要保证传输的数据总共有偶数个逻辑高位。 停止位: 停止位可以是是1位、1.5位或2位,可以由软件设定。它一定是逻辑1电平,标志着传输一个字符的结束。 空闲位: 空闲位是指从一个字符的停止位结束到下一个字符的起始位开始,表示线路处于空闲状态,必须由高电平来填充。
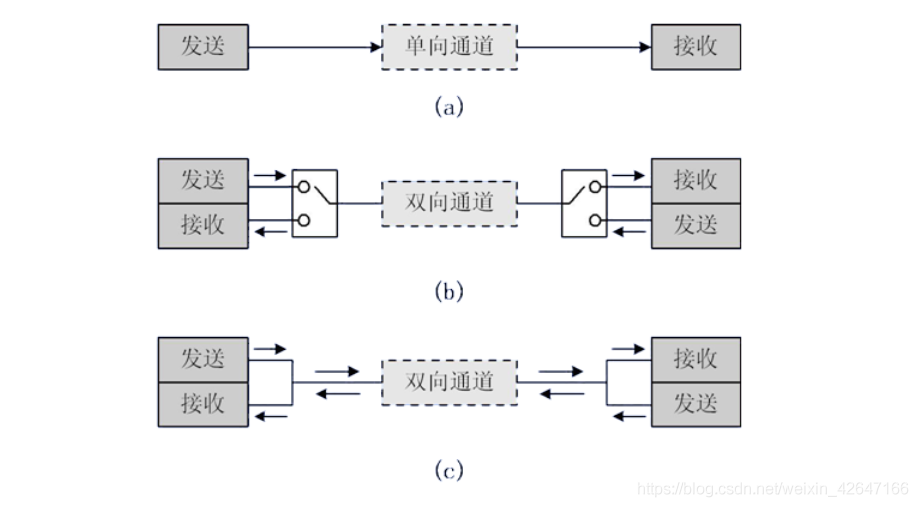
6 单双工通讯
单工: 数据传输只支持数据在一个方向上传输; 半双工: 允许数据在两个方向上传输,但某一时刻只允许数据在一个方向上传输,实际上是一种切换方向的单工通信,不需要独立的接收端和发送端,两者可合并为一个端口; 全双工: 允许数据同时在两个方向上传输,因此全双工通信是两个单工方式的结合,需要独立的接收端和发送端。
7 STM32中的串口通讯
STM32串口通信接口有两种,分别是:UART(通用异步收发器)、USART(通用同步异步收发器),对于大容量STM32F10x系列芯片,分别由3个USART和两个UART。 TXD:数据发送引脚; RXD:数据输入引脚 对于两芯片的间的连接,两个芯片GND共地,同时TXD和RXD交叉连接,这样两个芯片间可进行TTL电平通信。 但如果对于芯片和PC机相连,除了共地条件外,不能使用如上的直接交叉连接,虽然两者都有TXD和RXD引脚,但通常PC机使用的是RS232接口(9针),通常是TXC和RXD经过电平转换得到,故如果要使芯片与PC机的RS232接口直接通信,需要将芯片的输入输出端口也电平转换为RS232类型,再交叉连接。 二者的电平标准不同:
- 单片机的点评标准(TTL电平):+5V表示1,0V表示0;
- RS232电平标准:+15/+13V表示0,-15/-13表示1。
 因此单片机与PC机进行串口通信应该遵循:在单片机串口与上位机给出的RS232口之间,通过电平转换电路实现TTL电平与RS232电平间的转换。 如果使用USB转串口也可以实现串口通讯,USB转串口电路图如下所示。
 STM32中串口通讯已经给大家建好了相应的库函数,大家在使用和配置串口的时候直接进行调用库函数和配置就行了,STM32串口通信库函数实例相关文章学习STM32单片机,绕不开的串口 STM32实例-用按键控制串口发送数据,文末附代码 请大家参照一下代码:1、初始化结构体代码
 2、NVIC配置中断优先级
3、USART配置函数
void DEBUG_USART_Config(void)
{
 GPIO_InitTypeDef GPIO_InitStructure;
 USART_InitTypeDef USART_InitStructure;


 /* 第一步:初始化GPIO */
  // 打开串口GPIO的时钟
 DEBUG_USART_GPIO_APBxClkCmd(DEBUG_USART_GPIO_CLK, ENABLE);
  // 将USART Tx的GPIO配置为推挽复用模式
 GPIO_InitStructure.GPIO_Pin = DEBUG_USART_TX_GPIO_PIN;
 GPIO_InitStructure.GPIO_Mode = GPIO_Mode_AF_PP;
 GPIO_InitStructure.GPIO_Speed = GPIO_Speed_50MHz;
 GPIO_Init(DEBUG_USART_TX_GPIO_PORT, &GPIO_InitStructure);


  // 将USART Rx的GPIO配置为浮空输入模式
 GPIO_InitStructure.GPIO_Pin = DEBUG_USART_RX_GPIO_PIN;
 GPIO_InitStructure.GPIO_Mode = GPIO_Mode_IN_FLOATING;
 GPIO_Init(DEBUG_USART_RX_GPIO_PORT, &GPIO_InitStructure);


 /* 第二步:配置串口的初始化结构体 */
  // 打开串口外设的时钟
 DEBUG_USART_APBxClkCmd(DEBUG_USART_CLK, ENABLE);
 // 配置串口的工作参数
 // 配置波特率
 USART_InitStructure.USART_BaudRate = DEBUG_USART_BAUDRATE;
 // 配置 针数据字长
 USART_InitStructure.USART_WordLength = USART_WordLength_8b;
 // 配置停止位
 USART_InitStructure.USART_StopBits = USART_StopBits_1;
 // 配置校验位
 USART_InitStructure.USART_Parity = USART_Parity_No ;
 // 配置硬件流控制
 USART_InitStructure.USART_HardwareFlowControl = USART_HardwareFlowControl_None;
 // 配置工作模式,收发一起
 USART_InitStructure.USART_Mode = USART_Mode_Rx | USART_Mode_Tx;
 // 完成串口的初始化配置
 USART_Init(DEBUG_USARTx, &USART_InitStructure);


/*--------------------------------------------------------*/
 // 串口中断优先级配置
 NVIC_Configuration();


 // 使能串口接收中断
 USART_ITConfig(DEBUG_USARTx, USART_IT_RXNE, ENABLE);
/*--------------------------------------------------------*/


 /* 第三步:使能串口 */
  // 使能串口
 USART_Cmd(DEBUG_USARTx, ENABLE);
}
审核编辑:陈陈
声明:本文内容及配图由入驻作者撰写或者入驻合作网站授权转载。文章观点仅代表作者本人,不代表电子发烧友网立场。文章及其配图仅供工程师学习之用,如有内容侵权或者其他违规问题,请联系本站处理。
举报投诉
-
STM32串口通信简明知识2023-10-25 2221
-
(二)STM32串口总结(库函数版)2022-01-14 900
-
STM32串口通信晶振导致问题出现2021-12-24 1257
-
"2个STM32串口之间的串口通信(RX,TX)"2021-12-09 2464
-
Stm32串口通信基础实验2021-12-07 1146
-
STM32串口通讯2021-12-06 1025
-
STM32f103串口通信详解原理2021-08-12 2123
-
STM32串口通信数据乱码的相关问题2018-06-22 12497
-
STM32串口DMA问题详解2017-10-27 9125
-
RS232-RS485串口通信详解2016-08-09 1315
-
stm32f407串口通信的代码2016-03-21 1480
-
stm32串口调试软件2015-09-06 1254
全部0条评论

快来发表一下你的评论吧 !

