
STM32G0开发笔记:LED灯示例
描述
使用Platformio平台的libopencm3开发框架来开发STM32G0,下面为LED灯示例。
1 新建项目
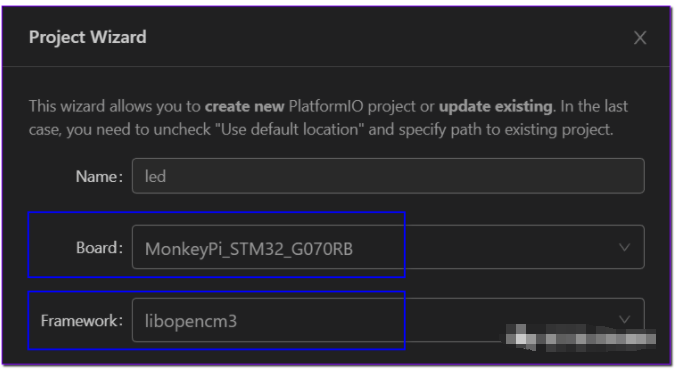
在PIO的Home页面新建项目,项目名称led,选择开发板为上一次建立的自定义开发板型号 MonkeyPi_STM32_G070RB,开发框架选择libopencm3:

2 LED灯程序
在项目文件夹的src目录下新建文件main.c,内容如下:
1/**
2 * @file main.c
3 * @author MakerInChina (makerinchina.cn)
4 * @brief
5 * @version 0.01
6 * @date 2022-09-04
7 *
8 * @copyright Copyright (c) 2022
9 *
10 */
11
12#include - libopencm3头文件引用:
1#include /stm32/rcc.h>
2#include /stm32/gpio.h>
- 定义LED引脚
1#define     LED_GPIO_CLK     RCC_GPIOC
2#define     LED_GPIO_PORT    GPIOC
3#define     LED_GPIO_PIN     GPIO12
- 设置系统时钟
1rcc_clock_setup(&rcc_clock_config[RCC_CLOCK_CONFIG_HSI_PLL_64MHZ]);
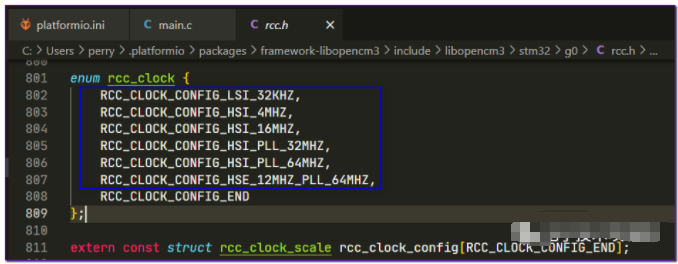
这个是设置为内部PLL到64MHz,还可以根据自己的实际情况选择如下配置:
1RCC_CLOCK_CONFIG_LSI_32KHZ,
2RCC_CLOCK_CONFIG_HSI_4MHZ,
3RCC_CLOCK_CONFIG_HSI_16MHZ,
4RCC_CLOCK_CONFIG_HSI_PLL_32MHZ,
5RCC_CLOCK_CONFIG_HSI_PLL_64MHZ,
6RCC_CLOCK_CONFIG_HSE_12MHZ_PLL_64MHZ,
这个在rcc头文件有相关定义:

- 打开GPIO外设时钟
1rcc_periph_clock_enable(LED_GPIO_CLK);
- 设置GPIO输入输出和上下拉:
1gpio_mode_setup(LED_GPIO_PORT,GPIO_MODE_OUTPUT,GPIO_PUPD_NONE,LED_GPIO_PIN);
- 设置GPIO输出选项:
1gpio_set_output_options(LED_GPIO_PORT,GPIO_OTYPE_OD,GPIO_OSPEED_MED,LED_GPIO_PIN);
- GPIO输出操作:
1gpio_toggle(LED_GPIO_PORT,LED_GPIO_PIN);
其功能为翻转GPIO,还有其他输出操作函数:
1void gpio_set(uint32_t gpioport, uint16_t gpios);
2void gpio_clear(uint32_t gpioport, uint16_t gpios);
3void gpio_port_write(uint32_t gpioport, uint16_t data);
- 软件延时
1for(int i=0; i<2000000; i++){
2    __asm__("nop;");
3}
使用指令 'nop' 进行延时操作;
3 烧写验证
这里使用DAPLink SWD方式下载,因此更改项目配置文件 platformio.ini 文件如下:
1[env:MonkeyPi_STM32_G070RB]
2platform = ststm32
3board = MonkeyPi_STM32_G070RB
4framework = libopencm3
5
6upload_protocol=cmsis-dap
7debug_tool=cmsis-dap
更改后,点击 platformio:Upload 按钮上传到开发板即可验证,按 ‘F5’ 可以进行调试。
声明:本文内容及配图由入驻作者撰写或者入驻合作网站授权转载。文章观点仅代表作者本人,不代表电子发烧友网立场。文章及其配图仅供工程师学习之用,如有内容侵权或者其他违规问题,请联系本站处理。
举报投诉
-
STM32G0开发笔记:SD卡模块的使用方法2023-01-19 3245
-
STM32G0开发笔记:SPI接口的基本使用2023-01-17 4187
-
STM32G0开发笔记:FreeRTOS和FreeModbus库使用2023-01-16 7792
-
AN5096_介绍STM32G0系列硬件开发2022-11-21 626
全部0条评论

快来发表一下你的评论吧 !

