

请问PyQT5是如何构建YOLOv8界面应用程序的
描述
引言
在PyQT5中引用OpenMV2023版本支持SDK,实现二次开发使用。OpenMV算法层已经开放SDK调用支持,从图像处理、分析、测量到深度学习推理全部支持SDK调用方式实现第三方应用与程序集成。
图像分析SDK支持
YOLOv8推理SDK支持
OpenMV中YOLOv8推理支持包导入,从dlcore包中导入:
from dlcore.dl_infer_settings import DLInferSettings
from dlcore.yolov8_vino_ort_infer import YOLOv8Detector
OpenCV库导入支持
import cv2 as cv然后完成下面的代码
settings = DLInferSettings()
settings.weight_file_path = self.weight_file_path.text()
settings.label_map_file_path = "D:/projects/classes.txt"
settings.target_deploy = 1
detector = YOLOv8Detector(settings)
image = cv.imread(image_file)
detector.infer_image(image)
cv.waitKey("result", image)
即可实现YOLOv8图像推理与结果显示。 关于OpenMVSDK支持与上述更详细的资料参考见《Open Machine Vision Toolkit Software2023.1开发者手册》PDF文档。
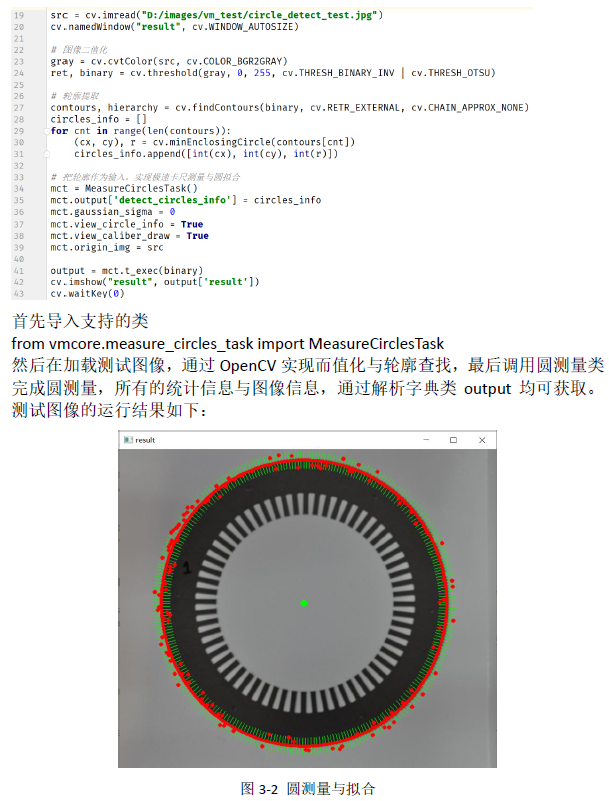
综合代码演示
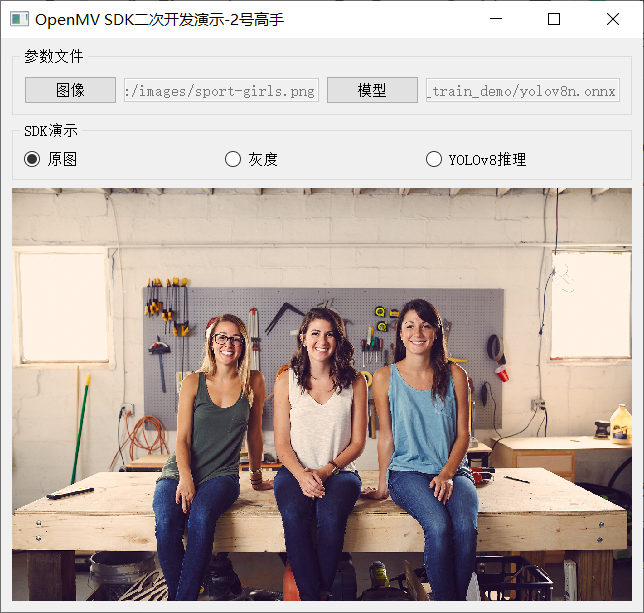
灰度
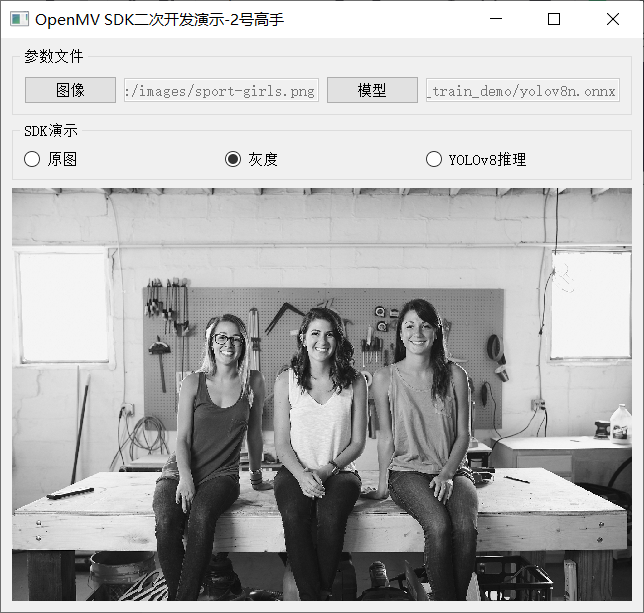
YOLOv8推理
相关实现代码如下:
  1from dlcore.yolov8_vino_ort_infer import YOLOv8Detector
  2from dlcore.dl_infer_settings import DLInferSettings
  3import cv2 as cv
  4from PyQt5 import QtWidgets, QtCore, QtGui
  5from vmcore.color_space_task import ColorSpaceTask
  6import sys
  7
  8
  9class RadioCheckBoxDemoPanel(QtWidgets.QWidget):
 10    def __init__(self, parent=None):
 11        super().__init__(parent)
 12        # 文本标签
 13        self.rbtn0 = QtWidgets.QRadioButton("原图")
 14        self.rbtn1 = QtWidgets.QRadioButton("灰度")
 15        self.rbtn3 = QtWidgets.QRadioButton("YOLOv8推理")
 16        self.rbtn0.setChecked(True)
 17
 18        hbox_layout1 = QtWidgets.QHBoxLayout()
 19        hbox_layout1.addWidget(self.rbtn0)
 20        hbox_layout1.addWidget(self.rbtn1)
 21        hbox_layout1.addWidget(self.rbtn3)
 22
 23        panel1 = QtWidgets.QGroupBox("SDK演示")
 24        panel1.setLayout(hbox_layout1)
 25
 26        # 输入文本框
 27        self.image_file_edit = QtWidgets.QLineEdit()
 28        self.image_file_edit.setMinimumWidth(100)
 29        self.image_file_edit.setEnabled(False)
 30        fileBtn = QtWidgets.QPushButton("图像")
 31        self.weight_file_path = QtWidgets.QLineEdit()
 32        self.weight_file_path.setMinimumWidth(100)
 33        self.weight_file_path.setEnabled(False)
 34        modelBtn = QtWidgets.QPushButton("模型")
 35
 36        hbox_layout2 = QtWidgets.QHBoxLayout()
 37        hbox_layout2.addWidget(fileBtn)
 38        hbox_layout2.addWidget(self.image_file_edit)
 39        hbox_layout2.addWidget(modelBtn)
 40        hbox_layout2.addWidget(self.weight_file_path)
 41
 42        panel2 = QtWidgets.QGroupBox("参数文件")
 43        panel2.setLayout(hbox_layout2)
 44
 45        # 输入文本框
 46        self.label = QtWidgets.QLabel()
 47        pixmap = QtGui.QPixmap("images/wp.jpg")
 48        pix = pixmap.scaled(QtCore.QSize(620, 500), QtCore.Qt.KeepAspectRatio)
 49        self.label.setPixmap(pix)
 50        self.label.setAlignment(QtCore.Qt.AlignCenter)
 51        self.label.setStyleSheet("background-color:black; color: green")
 52
 53        # 添加到布局管理器中
 54        vbox_layout = QtWidgets.QVBoxLayout()
 55        vbox_layout.addWidget(panel2)
 56        vbox_layout.addWidget(panel1)
 57        vbox_layout.addWidget(self.label)
 58        vbox_layout.addStretch(1)
 59
 60        # 面板容器
 61        self.setLayout(vbox_layout)
 62
 63        # setup listener
 64        self.rbtn0.toggled.connect(self.on_update_original)
 65        self.rbtn1.toggled.connect(self.on_update_gray)
 66        self.rbtn3.toggled.connect(self.on_yolov8_infer)
 67        modelBtn.clicked.connect(self.on_weight_select)
 68        fileBtn.clicked.connect(self.on_update_image)
 69
 70    def on_update_original(self):
 71        image_file = self.image_file_edit.text()
 72        if len(image_file) == 0 or image_file is None:
 73            QtWidgets.QMessageBox.warning(self, "警告", "图像文件未选择...")
 74            return
 75        pixmap = QtGui.QPixmap(image_file)
 76        pix = pixmap.scaled(QtCore.QSize(620, 500), QtCore.Qt.KeepAspectRatio)
 77        self.label.setPixmap(pix)
 78
 79    def on_update_gray(self):
 80        image_file = self.image_file_edit.text()
 81        if len(image_file) == 0 or image_file is None:
 82            QtWidgets.QMessageBox.warning(self, "警告", "图像文件未选择...")
 83            return
 84        image = cv.imread(image_file)
 85        cst = ColorSpaceTask()
 86        cst.low_scalar = (0, 0, 0)
 87        cst.high_scalar = (0, 0, 0)
 88        # 0 - BGR, 1 - HSV, 2 - gray
 89        cst.color_type = 2
 90        output = cst.t_exec(image)
 91        gray = output['result']
 92        dst = cv.cvtColor(gray, cv.COLOR_GRAY2RGB)
 93
 94        height, width, channel = dst.shape
 95        bytesPerLine = 3 * width
 96        img = QtGui.QImage(dst.data, width, height, bytesPerLine, QtGui.QImage.Format_RGB888)
 97        pixmap = QtGui.QPixmap(img)
 98        pix = pixmap.scaled(QtCore.QSize(620, 500), QtCore.Qt.KeepAspectRatio)
 99        self.label.setPixmap(pix)
100
101    def on_yolov8_infer(self):
102        image_file = self.image_file_edit.text()
103        if len(image_file) == 0 or image_file is None:
104            QtWidgets.QMessageBox.warning(self, "警告", "图像文件未选择...")
105            return
106
107        settings = DLInferSettings()
108        settings.weight_file_path = self.weight_file_path.text()
109        settings.label_map_file_path = "D:/projects/classes.txt"
110        settings.target_deploy = 1
111        detector = YOLOv8Detector(settings)
112        image = cv.imread(image_file)
113        detector.infer_image(image)
114
115        dst = cv.cvtColor(image, cv.COLOR_BGR2RGB)
116        height, width, channel = dst.shape
117        bytesPerLine = 3 * width
118        img = QtGui.QImage(dst.data, width, height, bytesPerLine, QtGui.QImage.Format_RGB888)
119        pixmap = QtGui.QPixmap(img)
120        pix = pixmap.scaled(QtCore.QSize(620, 500), QtCore.Qt.KeepAspectRatio)
121        self.label.setPixmap(pix)
审核编辑:刘清
声明:本文内容及配图由入驻作者撰写或者入驻合作网站授权转载。文章观点仅代表作者本人,不代表电子发烧友网立场。文章及其配图仅供工程师学习之用,如有内容侵权或者其他违规问题,请联系本站处理。
举报投诉
-
使用PyQt5自动初始化OpenVINO™环境出现报错怎么解决?2025-03-07 360
-
利用PyQt5编辑软件界面的简单步骤2021-09-16 1548
-
如何使用Python配合PyQT5模块来开发图形化应用程序2021-12-24 1544
-
PyQt5的中文教程电子书免费下载2020-08-06 2187
-
使用pycharm开发上位机配置pyqt5的环境2023-05-29 906
-
如何实现YOLOv8 + ONNRUNTIME推理界面化与多线程支持2023-05-22 4315
-
PyQT5案例开发2023-05-25 1527
-
解锁YOLOv8修改+注意力模块训练与部署流程2023-08-11 9991
-
如何修改YOLOv8的源码2023-09-04 4133
-
基于PyQT5与ONNXRUNTIME实现风格迁移应用2023-10-25 1469
-
如何快速开发出功能强大、界面美观的GUI 应用程序2023-11-02 5578
-
基于YOLOv8的自定义医学图像分割2023-12-20 2021
-
YOLOv8+PyQT5打造细胞计数与识别应用说明2024-01-15 2255
-
RV1126 yolov8训练部署教程2025-04-16 1878
-
使用ROCm™优化并部署YOLOv8模型2025-09-24 1181
全部0条评论

快来发表一下你的评论吧 !
