
Python-mysql 深入
描述
数据库设计
**三范式
**
- 经过研究和对使用中问题的总结,对于设计数据库提出了一些规范,这些规范被称为范式 (Nomal Form),目前有迹可录的共有8种范式,一般需要遵守3范式即可
- 第一范式(1NF) : 强调列的原子性,即列不能再分成其他几列
- 举例: 设计一个表,有 姓名、年龄,电话 字段,如果电话有 移动电话和固定电话,就不符合 这一范式。应这么设计: 姓名、年龄、移动电话、固定电话
- 第二范式(2NF) :基于1NF之后,另外表里面必须有一个主键; 没有包含在主键中的列必须完全依赖于主键,而不能只依赖于主键的一部分
- 举例: 设计一个订单收货地址表,有 订单号、区域价、收货记录id、收货人详细地址、收货人名称, 这时的主键应为 (订单号、收货记录id), 区域价 需要依赖主键(订单号、收货记录id),而 收货人名称和收货人详细地址,则只需依赖(收货记录id),所以这不符合这一范式。 应这么设计:将订单收货地址表拆分成两个, 订单信息表、收货地址信息表。订单信息表的字段为(订单号、收货记录id、区域价);收货地址信息表(收货记录id、收货人名称、收货人详细地址)
- 第三范式(3NF) :基于2NF之后,另外非主键列必须直接依赖于主键,不能传递依赖,即不能存在 非主键A依赖非主键B,非主键B依赖主键的情况
- 举例:设计一个订单表,有 订单号、订单金额、下单时间、采购人ID、采购人名称、采购人地址,主键是(订单号)。 这里面 采购人名称、采购人地址是直接依赖 采购人id,不是直接依赖主键。应这么设计: 拆分成 订单表和 采购人信息表, 订单表字段为(订单号、订单金额、下单时间、采购人ID),采购人信息表(采购人ID、采购人名称、采购人地址)
Python与MySql交互
步骤
- 安装模块: 使用pip命令安装pymysql
-
pip install pymysql
-
- 引入模块: 在py文件中引入pymysql模块
-
from pymysql import *
-
- Connection对象
-
用于建立Python与数据库的连接
-
创建对象:调用connect()方法
-
conn=connect(参数列表)- 参数host:连接的mysql主机,当前机器可以写成 localhost
- 参数post:连接mysql的端口,默认是 3306
- 参数database:数据库的名称
- 参数user:连接的用户名
- 参数password:连接的密码
- 参数charset:通信采用的编码方式,推荐使用utf8
-
Connection对象的方法
- close() 关闭连接
- commit() 提交
- cursor() 返回Cursor对象,用于执行sql语句并获得结果
-
- Cursor对象
- 用于执行sql语句,使用频率最高的语句是 select、insert、update、delete
- 获取Cursor对象:调用Connection对象的cursor()方法
-
cus=conn.cursor()
-
- Cursor对象的方法
- close() 关闭
- execute(self, query, args) 执行语句,接收的参数为sql语句本身和使用的参数列表,返回值为受影响的行数
- fetchone()执行查询语句,获取查询结果集的第一行数据,返回一个元组
- fetchmany()执行查询时,获取所有结果行,每行是一个元组,再将这些元组放入一个元组中返回
- 对象的属性
- rowcount只读属性,表示最近一次execute()执行后受影响的行数
- connection获得当前连接对象
示例
from pymysql import *


# 建立数据库连接
conn=connect(host="localhost",port=3306,user="root",password="123456",database="python01",charset="utf8")
# 获取Cursor对象
cursor=conn.cursor()


# 查询数据表
cursor.execute("select *from person")
# 获取所有结果集
lines=cursor.fetchall()
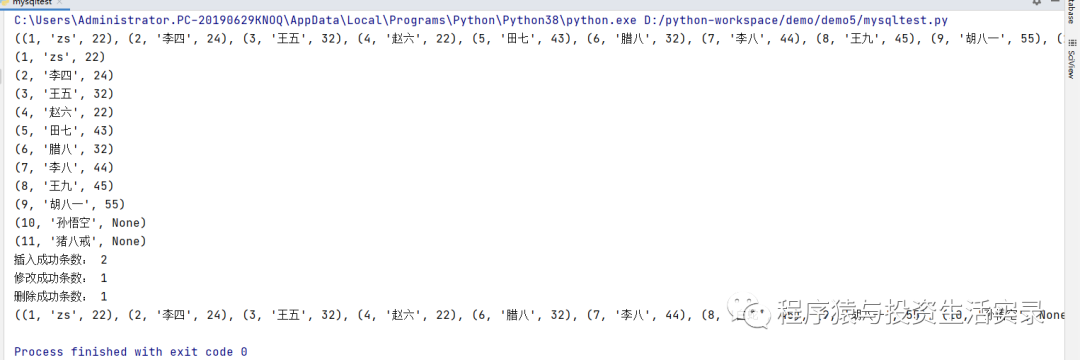
print(lines)
for line in lines:
    print(line)


# 插入数据
count=cursor.execute("insert into person(id,name,age) values(12,'李天王',333),(13,'哪吒',222)")
print("插入成功条数:",count)


# 修改表数据
count=cursor.execute("update person set name='白蛇' where id=8")
print("修改成功条数:",count)


# 删除表数据
count=cursor.execute("delete from person where id=5")
print("删除成功条数:",count)


# 修改数据表后,需要提交
conn.commit()


# 再次查询数据表
cursor.execute("select *from person")
print(cursor.fetchall())


# 关闭Cursor对象,关闭数据库连接
cursor.close()
conn.close()
**输出结果
**

MySQL高级
**视图
**
- 视图就是一条 SELECT 语句执行后返回的结果集 ,所以我们在创建视图的时候,主要的工作就落在了SELECT查询语句上
- 视图是对若干张基本表的引用,一张虚表,查询语句执行的结果,不存储具体的数据(基本表数据发生了改变,视图也会跟着改变)
定义视图
- 建议以 v_ 开头
create view 视图名称 as select 语句;
查看视图
- 查看表会将所有的视图也列出来
show tables;
使用视图
- 视图的用途就是查询
select * from v_person
删除视图
drop view 视图名称;
视图的作用
- 提高了重用性,就像是一个函数
- 创建视图的源数据被修改了,视图中的数据也会被修改,与windows的快捷方式很像(对数据库重构,却不影响程序的运行)
- 提高了安全性,可以对不同的用户
- 让数据更加清晰
示例
# 创建视图, 查询订单与订单收货 信息表,生成一个虚拟表(视图)
create view v_order_info as  SELECT a.order_no,a.order_price,b.receive_name,b.receive_phone FROM `order` a, order_receive b where a.order_no=b.order_no;


# 查看视图的内容
SELECT * from v_order_info;

**事务
**
- 所谓事务,它是一个操作序列,这些操作要么都执行成功,要么都执行失败, 是一个不可分割的工作单位。
- 举例:银行转账,第一次转100,第二次转200,都放到一个事务里面,要么全部转成功,要么都失败
事务的四大特性(ACID)
- 原子性
- 强调事务不可分割,整个事务中的所有操作要么全部成功,要么全部失败
- 一致性
- 事务的执行的前后数据的完整性保持一致,即上面转账的例子中,如果转了一半的钱,系统崩溃了,但是事务最终没有提交,那么在事务中做的修改也不会保存到数据库中
- 隔离性
- 一个事务执行的过程中,不应该受到其它事务的干扰
- 持久性
- 一旦事务提交,则其所做的修改会永久保存到数据库
**事务的命令
**
- 表的引擎类型必须是 innodb类型才可以使用事务,这是mysql表的默认引擎
- 开启事务
- 开启事务后执行修改命令,变更会维护到本地缓存中,而不维护到物理表中
-
begin;
或者
start transaction;
- 提交事务
- 将缓存中的数据变更维护到物理表中
-
commit;
- 回滚事务
- 放弃缓存中变更的数据
-
rollback;
- 注意
- 默认修改数据的sql语句会自动触发事务(开启与提交),即 insert、update、delete 语句
- 一般在sql语句中手动开启事务的原因是:可以进行多次数据的修改,如果成功则一起成功,否则一起失败
**示例
**
BEGIN;


# 修改person表,id=1 的名称 (此语句执行后,由于没有提交,别的查询语句查询时,不会查到修改的数据)
update person set name='小白' where id=1;


# 提交事务,这个语句执行后,数据表中的名称变更为 小白
COMMIT;
事务隔离级别要解决的问题
- 脏读
- 脏读指的是读到了其他事务未提交的数据,未提交意味着这些数据可能会回滚,也就是可能最终不会存到数据库中,也就是不存在的数据。读到了并一定最终存在的数据,这就是脏读
- 举例: 小明的媳妇给小明打500块钱买衣服,但是不小心按成了1000块,事务还没有提交,小明这时查到卡里有1000元,小明的媳妇发现不对后就回滚了事务,这时小明卡里的钱就没了
- 不可重复读
- 不可重复读指的是在同一事务内,不同的时刻读到的同一批数据可能是不一样的,可能会受到其他事务的影响,比如其他事务改了这批数据并提交了
- 举例: 小明卡里有1000元,买了衣服准备结账(事务开启),这时他媳妇将小明卡里的钱转出来了,收费系统提示卡里面没钱了,小明郁闷了。同一事务内相同的查询语句,出现了不同的结果就是不可重复读
- 幻读
- 幻读是针对数据插入(INSERT)操作来说的。假设事务A对某些行的内容作了更改,但是还未提交,此时事务B插入了与事务A更改前的记录相同的记录行,并且在事务A提交之前先提交了,而这时,在事务A中查询,会发现好像刚刚的更改对于某些数据未起作用,但其实是事务B刚插入进来的,让用户感觉很魔幻,感觉出现了幻觉,这就叫幻读。
- 举例:小明某天花了1000元钱消费,他媳妇查看了当天的消费记录(全表扫描,事务开启),看到确实花了1000元,就在这时,小明又花了1000元买了件衣服,并提交了事务,当他媳妇打印消费清单时(事务提交),发现花了2000元,以为出现了幻觉,这就是幻读
事务的隔离级别
- SQL 标准定义了四种隔离级别,MySQL 全都支持。这四种隔离级别分别是:
- 读未提交(READ UNCOMMITTED)
- 读已提交(READ COMMITTED)
- 可重复读(REPEATABLE READ)
- 串行化(SERIALIZABLE)
- 从上往下,隔离强度逐渐增强,性能逐渐变差。采用哪种隔离级别要根据系统需求权衡决定,其中, 可重复读是 MySQL 的默认级别 。
- 事务隔离其实就是为了解决上面提到的脏读、不可重复读、幻读这几个问题,下面展示了 4 种隔离级别对这三个问题的解决程度
| 隔离级别 | 脏读 | 不可重复读 | 幻读 |
|---|---|---|---|
| 读未提交 | 可能 | 可能 | 可能 |
| 读已提交 | 不可能 | 可能 | 可能 |
| 可重复读 | 不可能 | 不可能 | 可能 |
| 串行化 | 不可能 | 不可能 | 不可能 |
索引
- 索引是一种特殊的文件 (InnoDB 数据表上的索引是表空间的一个组成部分),它们包含着对数据表里面所有记录的引用指针。通俗来讲,索引就好比一本书前面的目录,能加快数据查询的速度
- 索引的目的在于提高查询效率,可以类比字典
索引的使用
- 查看索引
show index form 表名;
- 创建索引
ALTER TABLE 表名
ADD UNIQUE INDEX 索引名 (字段) USING BTREE ;
- 删除索引
ALTER TABLE 表名
DROP INDEX 索引名;
示例
-
**创建一个数据表,并插入99万条记录,用作测试索引
**
CREATE TABLE `test_index` (
  `id` int(11) DEFAULT NULL,
  `name` varchar(255) DEFAULT NULL
) ENGINE=InnoDB DEFAULT CHARSET=utf8;
from pymysql import *


# 建立数据库连接
conn=connect(host="localhost",port=3306,user="root",password="123456",database="python01",charset="utf8")
# 获取Cursor对象
cursor=conn.cursor()


for i in range(100000):
    cursor.execute("insert into test_index(id,name) values (%d,'testindex')" %i)


# 修改数据表后,需要提交
conn.commit()


# 关闭Cursor对象,关闭数据库连接
cursor.close()
conn.close()
- 开启运行时间监测
set profiling=1
- 在整个表中查找 id=88888的记录
SELECT * from test_index where id=88888;
- 查看执行时间
show profiles;
- 为id字段添加索引
ALTER TABLE `test_index`
ADD UNIQUE INDEX `idx_id` (`id`) USING BTREE ;
- 添加索引后再次查询
SELECT * from test_index where id=88888;
- 再次查看执行时间
show PROFILES;
最终结果

注意
-
**建立太多的索引会影响更新和插入数据的速度,因为它需要同样更新每个索引文件,对于一个经常更新和插入的表格,没有必要为一个很少使用的where子句单独建立索引。 **
-
**建立索引会占用磁盘空间
**
MySQL的主从
- 定义
- 主从同步使用数据可以从一个服务器上复制到其它服务器上,在复制数据时,一个服务充当主服务器(master),其余的服务器充当从服务器(slave),因为复制是异步进行的,所以从服务器不需要一直连接主服务器,从服务器甚至可以通过拨号断断续续地连接主服务器,通过配置文件可以指定复制所有的数据库、某个数据库、甚至某个数据上的某个表
- 主从同步的好处
- 通过增加从服务器来提高数据库的性能,在主服务器上执行写入和更新,在从服务器上向外提供读功能,可以动态的调整从服务器的数量,从而调整整个数据库的性能。
- 提高数据的安全性,因为数据复制到了从数据库,如果一旦主服务器挂掉了,可以使用从服务器上的数据
- 在主服务器上生成实时数据,在从服务器上分析这些数据,从而提高服务器的性能
- 主从同步机制
- Mysql服务器之间的主从同步是基于二进制日志机制,主服务器使用二进制日志来记录数据库的变动情况,从服务器通过读取和执行该日志文件来保持和主服务器的数据一致性
- 在使用二进制日志时,主服务器的所有操作都会被记录下来,然后从服务器会接收到该日志的一个副本。从服务器可以指定执行该日志文件中的哪一类事件(比如只插入数据或只更新数据)。默认会执行日志中的所有语句

- 配置主从同步的基本步骤
- 在主服务器上,必须开启二进制日志机制和配置一个独立的ID
- 在每一个服务器上,配置一个唯一的ID,创建一个用来专门复制主服务器数据的账号
- 在开始复制进程前,在主服务器上记录二进制文件的位置信息
- 如果在开始复制之前,数据库中已经有数据,就必须先创建一个数据快照(可以使用mysqldump导出数据库,或者直接复制数据文件)
- 配置从服务器要连接的主服务器的ip地址和登陆授权,二进制日志文件名和位置
- 详细配置主从同步方法
- 主和从的身份可以自己指定,我将虚拟机centOs中的Mysql作为主服务器,将window中的mysql作为从服务器,在主从设置之前,要保证centOs与windows间的网络能互通
- 如果 在设置主从同步前,主服务器上已有大量数据,可以使用mysqldump进行数据备份并还原到从服务器上实现数据复制
- 在主服务器上执行命令进行备份
-
mysqldump -uroot -pmysql --all-databases --lock-all-tables > /tmp/master_data.sql - 说明
- -u:用户名
- -p:密码
- --all-databases:表示导出所有数据库
- --lock-all-tables:执行操作时锁住所有表,防止操作时数据被修改
- /tmp/master_data.sql:导出文件存放的位置
-
- 在从服务器上读取刚在主服务器上生存的数据文件
-
mysql -uroot -p密码 新数据库名 < master_data.sql
-
- 编写mysqld的配置文件,设置Log_bin和server-id (注:把#删除)
-
sudo vim /etc/mysql/mysql.conf.d/mysqld.cnf -
log_bin = var/log/mysql/mysql-bin.log server-id = 1 - 重启mysql服务
-
server mysql restart
-
- 登陆主服务器中的Mysql,创建用于从服务器同步数据使用的账号
-
mysql -uroot -p密码 -
GRANT REPLICATION SLAVE ON *.* TO 'slave'@'%' identified by 'slave'; -
FLUSH PRIVILEGES;
-
- 获取主服务器二进制日志信息
-
SHOW MASTER STARTS;
-
- 配置从服务器的mysqld文件,server-id与主服务器不一致即可,然后重新启动
- 在从服务器进入mysql中执行以下命令
-
change master to master_host='主服务器ip地址' ,master_user=’slave',master_password='slave',master_log_file='mysql-bin.000006',master_log_pos=590 - 注:以上配置的master_log_file 和 master_log_pos 可通过在主服务器上进入mysql输入以下命令查看
-
show master status;
-
- 开启同步,查看同步状态(进入mysql,执行以下命令)
-
start slave; -
show slave status \\G; - **在显示的信息中看到 Slave_IO_Runnig: YES 和 Slave_SQL_Running:YES 就表示同步成功 **
- 注: 如果没有显示YES,说明没配置成功,原因可能是 从命令中的 change master中的配置没配置好,要仔细检查
-
声明:本文内容及配图由入驻作者撰写或者入驻合作网站授权转载。文章观点仅代表作者本人,不代表电子发烧友网立场。文章及其配图仅供工程师学习之用,如有内容侵权或者其他违规问题,请联系本站处理。
举报投诉
-
Python存储数据详解2018-03-29 2597
-
mysql与python交互方式概述2019-09-25 1175
-
Python操作Mysql实现数据库脚本的方法概述2019-10-08 1779
-
python 数据分析基础 day12-python调用mysql2019-10-23 1534
-
python数据分析之安装mysql数据库2020-03-20 1427
-
Python的MySQL使用2020-04-07 1339
-
Python连接MySQL数据库及模块封装2020-05-01 1906
-
python如何连接MySql数据库2020-06-14 1735
-
Python+Django+Mysql实现在线电影推荐系统2022-01-03 1876
-
如何使用Python操作MySQL数据库2018-12-15 4358
-
精通Python的深入学习资料2020-07-07 1078
-
如何使用python将txt文件导入到mysql的应用实例2020-09-09 1157
-
python程序里如何链接MySQL数据库2021-08-23 4151
-
Python基于Flask+MySQL的车辆管理系统2023-06-07 1190
-
适用于MySQL和MariaDB的Python连接器:可靠的MySQL数据连接器和数据库2025-01-17 886
全部0条评论

快来发表一下你的评论吧 !

