

伺服电机控制的无线电灯开关-第二部分
电子说
描述
这篇文章来源于DevicePlus.com英语网站的翻译稿。
目录
• 第一部分
什么是伺服电机?
伺服电机的类型
所需电压和电源
• 第二部分
基于Arduino程序的伺服控制
伺服电机可以做什么?
• 第三部分
伺服控制电灯开关
电灯开关的远程控制
4. 基于Arduino程序的伺服控制
Arduino对伺服电机控制的方式大致有两种。
PWM(脉冲宽度调制)是一种通过打开和关闭脉冲信号来控制电机的方法。通过直接使用PWM来控制伺服电机可以实现步进式转动。但是对于更复杂的项目,您可以使用Arduino IDE中包含的伺服电机库。
Arduino IDE → [File] → [Examples] → [10.StarterKit BasicKit] → [p05_ServoMoodindicator]
该程序可以根据模拟引脚0(A0)的输入值来更改伺服电机的角度。在模拟引脚上使用电位计或光学传感器等可变电阻,通过电阻值的变化来实现电机的转动。
伺服电机库函数
伺服电机库基于两种类型的指令:1)指定要发送到伺服电机的控制信号的引脚编号。2)指定伺服电机转动时的角度。
代码—示例
myServo.attach(9); //Specify the servo motor's signal pin
代码—示例
myServo.write(angle); //Move the servomotor to a specific angle
以下电路是使用FEETECH FS90微伺服电机的示例。该伺服电机的工作电压是6V。由于工作时的电流是200 mA,因此伺服电机由四节AA电池串联供电(6V)。
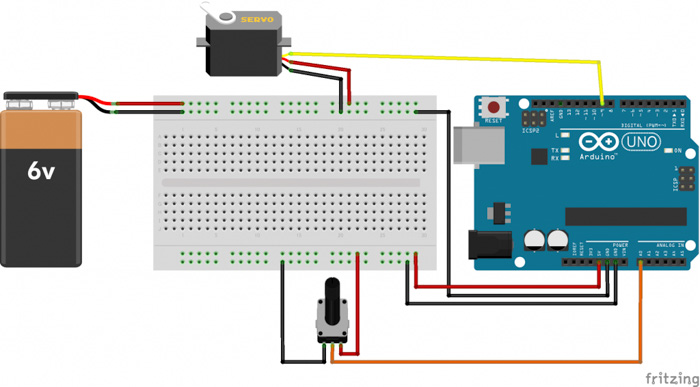
图6:示例电路图
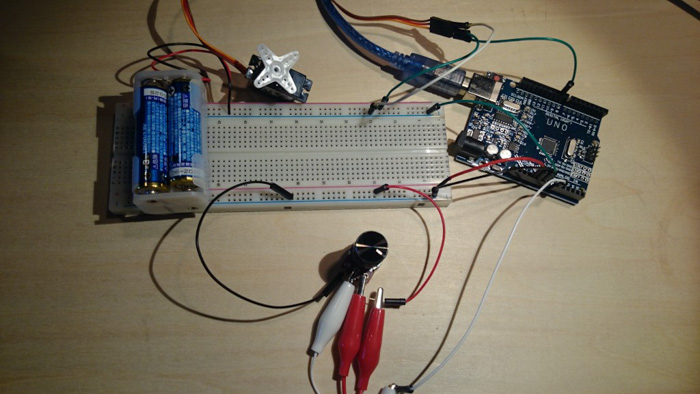
图7:伺服电机控制电路
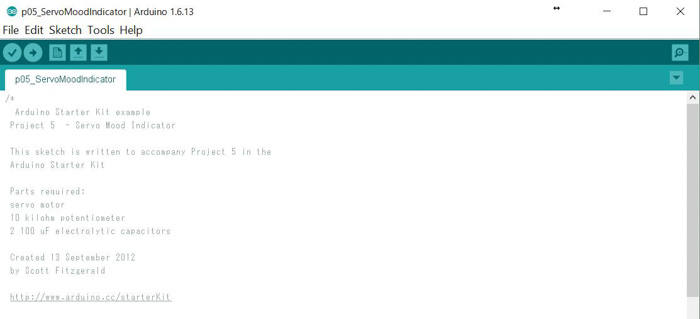
图8: p05_ServoMoodIndicator
代码—示例
/* Arduino Starter Kit example Project 5 - Servo Mood Indicator This sketch is written to accompany Project 5 in the Arduino Starter Kit Parts required: servo motor 10 kilohm potentiometer 2 100 uF electrolytic capacitors Created 13 September 2012 by Scott Fitzgerald https://www.arduino.cc/starterKit This example code is part of the public domain */ // include the servo library #includeServo myServo; // create a servo object int const potPin = A0; // analog pin used to connect the potentiometer int potVal; // variable to read the value from the analog pin int angle; // variable to hold the angle for the servo motor void setup() { myServo.attach(9); // attaches the servo on pin 9 to the servo object Serial.begin(9600); // open a serial connection to your computer } void loop() { potVal = analogRead(potPin); // read the value of the potentiometer // print out the value to the serial monitor Serial.print("potVal: "); Serial.print(potVal); // scale the numbers from the pot angle = map(potVal, 0, 1023, 0, 179); // print out the angle for the servo motor Serial.print(", angle: "); Serial.println(angle); // set the servo position myServo.write(angle); // wait for the servo to get there delay(15); }
5. 伺服电机可以做什么?
让我们简要回顾一下使用伺服电机可以完成的工作。以下是两种典型工作方式:
I. 按下按钮
伺服电机可以控制转动的角度。这就是为什么伺服电机最适于开发按钮控制的机械系统。您可以像下面的视频中那样制作一些有趣的设备,并且也可以开发出仅通过一个按钮来实现控制的多种设备,如房间里的开关等等。
II. 移动物体
在使用Arduino控制电机的第三部分——制造一辆通过伺服电机控制转向的RC车中,我们使用LEGO制造了一台RC车。我们安装了通过伺服电机进行控制的转向部件。伺服电机可以用于多种器件,但是它通常用于“移动”部件/物体,例如移动机器人汽车或机器人手臂等。

DevicePlus 编辑团队
设备升级版适用于所有热爱电子和机电一体化的人。
审核编辑 黄宇
-
救世主Ga N来啦!第二部分:测量2022-11-03 846
-
如何实现更高的系统效率——第二部分:高速栅极驱动器2022-11-02 760
-
超声波感应器会被用于何处?—— 第二部分2022-11-01 1042
-
有时你需要一点收获第二部分2021-04-19 854
-
AN-389: 使用Σ-Δ转换器—第二部分[中文版]2021-03-19 1092
-
如何使用 Nios II 处理器进行你中意的设计之第二部分教程2018-06-11 6217
-
2012年PSoC数模混合设计培训_第二部分2017-10-27 1114
-
中国NB-IOT产业联盟-第二部分问题清单-201608242017-01-11 1216
-
无线信道的信道容量:第二部分_英文版2016-08-05 994
-
常用单片机实例与仿真_第二部分2015-11-10 654
-
开关电源设计(第3版)第二部分2012-09-12 271
-
AT91SAM9260使用手册第二部分2010-03-10 1426
-
实现免调整VCO1的IC (第二部分)2006-05-07 1238
全部0条评论

快来发表一下你的评论吧 !
