

利用ESP-WROOM-02和天气API制作发光的圣诞节雪人
电子说
描述
这篇文章来源于DevicePlus.com英语网站的翻译稿。
许多应用都用过ESP-WROOM-02,并且通过Arduino程序利用了该开发板的wifi通信功能。今天,我们要实现一个更具创意性的项目,根据天气API的天气信息制作另一款炫丽的圣诞装饰品。
今天的电子设计技巧
估计完成时间:90分钟
所需部件
ESP-WROOM-02 开发板
面包板
LED – 绿色
电阻220Ω/180Ω/91Ω
高功率RGB LED
为了启用ESP-WROOM-02开发板的Arduino程序无线通信功能,我想首先尝试一个示例程序。选择File → Sketch Example → ESP 8266 WiFi → WiFi Web Server。该示例程序负责处理与Arduino的Wifi通信。
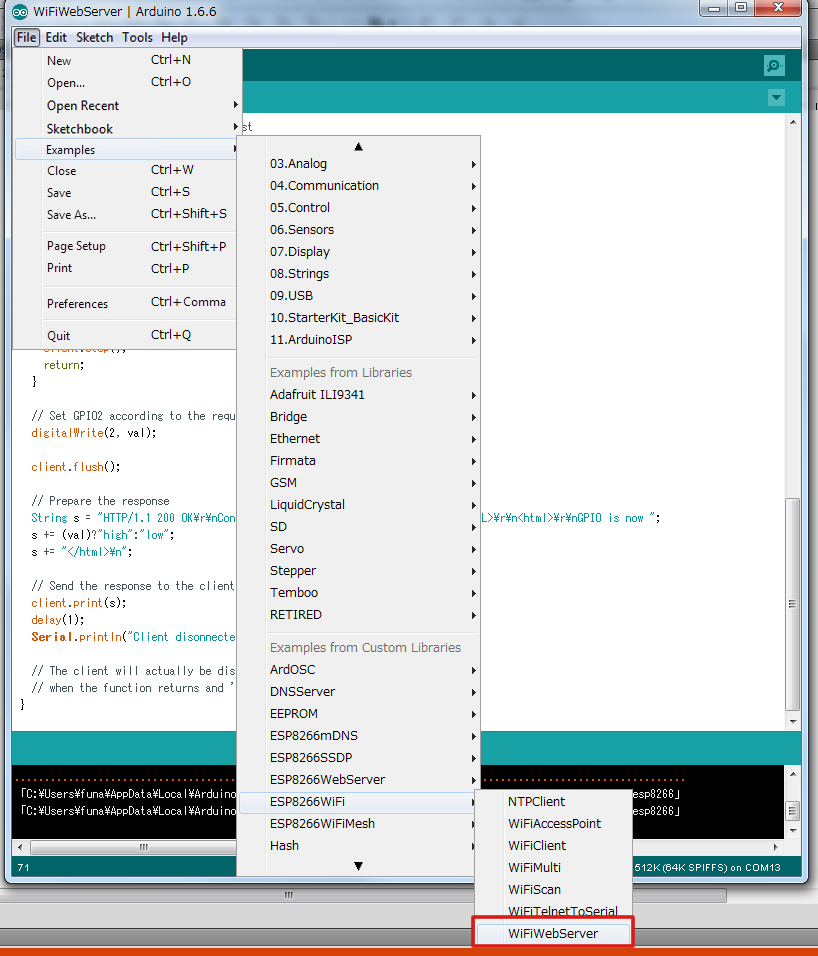
图1 加载程序示例
这个示例程序能让ESP-WROOM-02成为服务器。程序启动后,它会一直等待来自其他终端的请求,当收到带有参数的请求后,程序就会处理该参数。在我们的例子中,我们将使用这个程序来点亮LED。
我想使用上次的电路进行测试。将示例程序中的引脚“2”更改为引脚“13”。

图2 LED控制电路
/*
 * This sketch demonstrates how to set up a simple HTTP-like server.
 * The server will set a GPIO pin depending on the request
 * https://server_ip/gpio/0 will set the GPIO2 low,
 * https://server_ip/gpio/1 will set the GPIO2 high
 * server_ip is the IP address of the ESP8266 module, will be
 * printed to Serial when the module is connected.
 */

#include
#include

const char *ssid = "Provide SSID of wireless router here";
const char *password = "Provide the wireless router password here";

// Create an instance of the server
// specify the port to listen on as an argument
WiFiServer server(80);

void setup() {
 Serial.begin(115200);
 delay(10);

 // prepare GPIO2
 pinMode(2, OUTPUT);
 digitalWrite(2, 0);

 // Connect to WiFi network
 Serial.println();
 Serial.println();
 Serial.print("Connecting to ");
 Serial.println(ssid);

 WiFi.begin(ssid, password);

 while (WiFi.status() != WL_CONNECTED) {
 delay(500);
 Serial.print(".");
 }
 Serial.println("");
 Serial.println("WiFi connected");

 // Start the server
 server.begin();
 Serial.println("Server started");

 // Print the IP address
 Serial.println(WiFi.localIP());
}

void loop() {
 // Check if a client has connected
 WiFiClient client = server.available();
 if (!client) {
 return;
 }

 // Wait until the client sends some data
 Serial.println("new client");
 while(!client.available()){
 delay(1);
 }

 // Read the first line of the request
 String req = client.readStringUntil('r');
 Serial.println(req);
 client.flush();

 // Match the request
 int val;
 if (req.indexOf("/gpio/0") != -1)
 val = 0;
 else if (req.indexOf("/gpio/1") != -1)
 val = 1;
 else {
 Serial.println("invalid request");
 client.stop();
 return;
 }


 // Set GPIO2 according to the request
 digitalWrite(2, val);

 client.flush();

 // Prepare the response
 String s = "HTTP/1.1 200 OKrnContent-Type: text/htmlrnrnrnrnGPIO is now ";
 s += (val)high":"low";
 s += "n";

 // Send the response to the client
 client.print(s);
 delay(1);
 Serial.println("Client disonnected");

 // The client will actually be disconnected
 // when the function returns and 'client' object is detroyed
}
启动程序后,请尝试连至路由器。如果已经连接,那么系统会在串行监视器上显示IP地址等。所以,请尝试从浏览器访问该IP地址。连至/gpio/1时,LED亮起;连至/gpio/0时,LED熄灭。
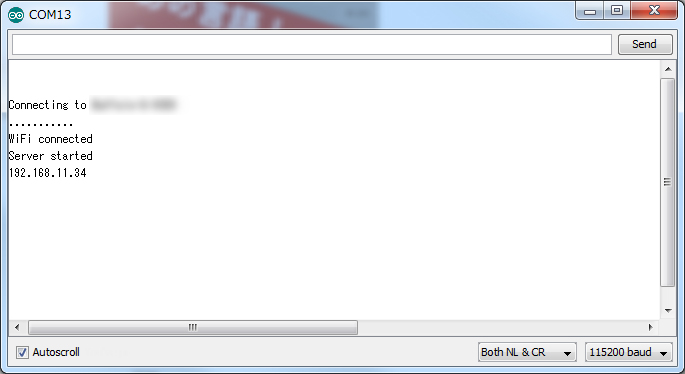
图3 Wifi访问成功
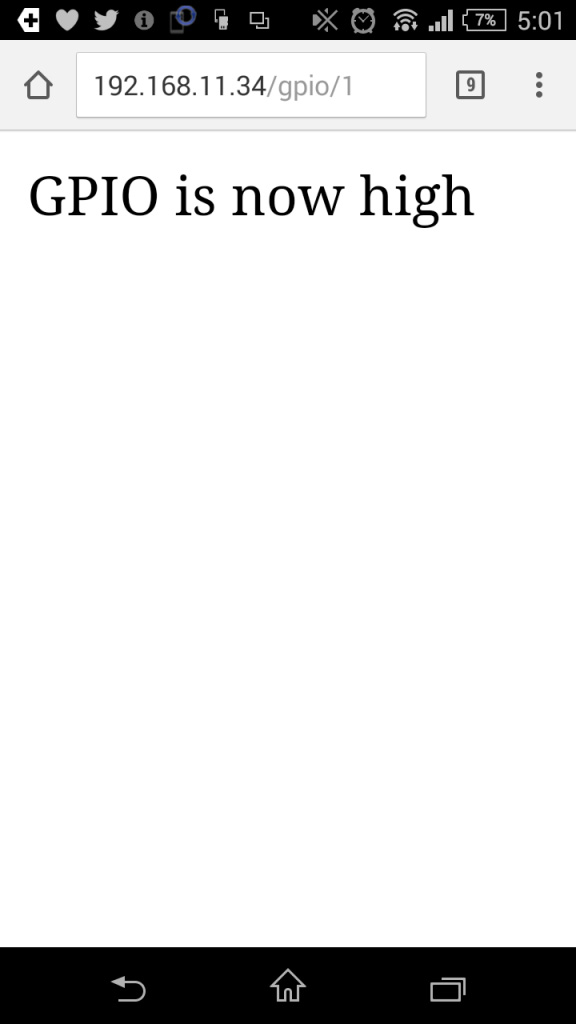
图4 智能手机连接
通过程序控制伺服电机
接下来我们通过一个实际例子试着用Wifi控制伺服电机。伺服电机的控制基本上应与LED控制相同。我将在LED程序中添加一些修改,并通过从浏览器访问时添加一些HTML。
#include
#include

const char *ssid = "Provide SSID of wireless router here";
const char *password = "Provide the wireless router password here";

Servo myservo;
WiFiServer server(80);

void setup() {
 Serial.begin(115200);
 delay(10);

 Serial.println();
 Serial.println();
 Serial.print("Connecting to ");
 Serial.println(ssid);

 WiFi.begin(ssid, password);

 while (WiFi.status() != WL_CONNECTED) {
 delay(1500);
 Serial.print(".");
 }
 Serial.println("");
 Serial.println("WiFi connected");

 server.begin();
 Serial.println("Server started");

 Serial.println(WiFi.localIP());

 myservo.attach(2);
}

void loop() {
 WiFiClient client = server.available();
 if (!client) {
 return;
 }

 Serial.println("new client");
 while(!client.available()){
 delay(1);
 }

 String req = client.readStringUntil('r');
 Serial.println(req);
 client.flush();

 // Match the request
 int val;
 if (req.indexOf("/gpio/0") != -1){ val = 0; }
 else if (req.indexOf("/gpio/30") != -1){ val = 30; }
 else if (req.indexOf("/gpio/60") != -1){ val = 60; }
 else if (req.indexOf("/gpio/90") != -1){ val = 90; }
 else if (req.indexOf("/gpio/120") != -1){ val = 120; }
 else if (req.indexOf("/gpio/150") != -1){ val = 150; }
 else {
 Serial.print("REQ:");
 Serial.println(req);
 Serial.println("invalid request");
 client.stop();
 return;
 }

 myservo.write(val);

 client.flush();

 String s = "HTTP/1.1 200 OKrnContent-Type: text/htmlrnrnrnrnGPIO is now ";
 s += (val)high":"low";
 s += "
"; s += "
0
n"; s += "
30
n"; s += "
60
n"; s += "
90
n"; s += "
120
n"; s += "
150
n"; s += "
n"; s += "n"; client.print(s); delay(1); Serial.println("Client disonnected"); }
在这个程序中,浏览器显示的角度为0到150。当点击每个数值时,伺服电机会移动到一个指定角度。
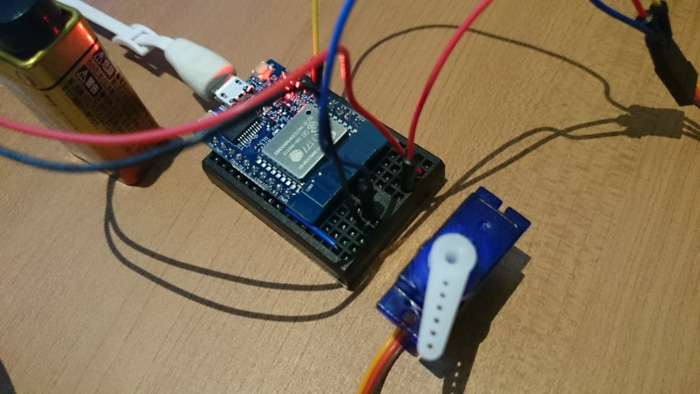
图5 通过Wifi进行伺服电机控制
让我们来制作我们的天气预报雪人吧!
圣诞节即将到来,我决定做一个圣诞节装饰品。大量的炫彩LED装饰灯固然不错,但是桌子上的可爱饰品则更具圣诞节韵味。所以,我用123d设计创建了一个雪人模型。这款工具可以在组合不同形状的同时进行建模,所以即使是初学者也可以轻松创建3D模型。
雪人模型
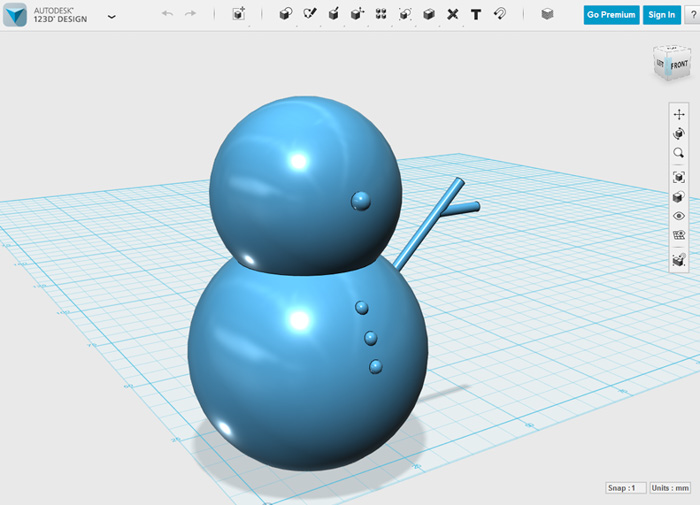
图6 雪人建模
请根据个人喜好随意更改雪人的形状或大小。建模完成后,我试着用3D打印机输出自己设计的雪人。不幸的是,手臂没有打印出来。
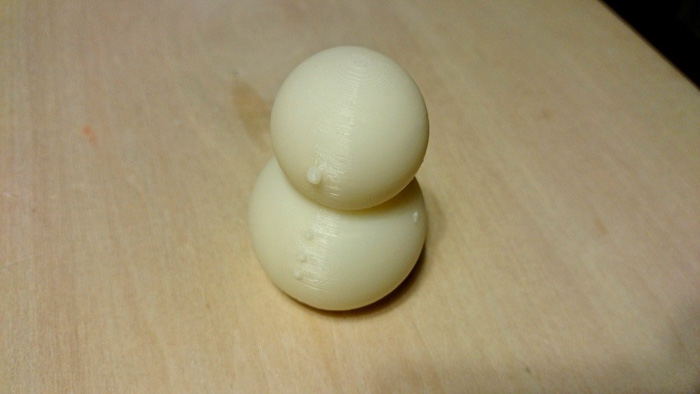
图7 3D打印的雪人
现在我们需要一个全彩LED。让我们将全彩LED和WiFi通信整合到一个桌面设备中,使得该设备能够根据特定位置的天气数据改变LED的颜色。
设备配置
像往常一样
审核编辑:汤梓红
-
乐鑫原装片式模组 ESP-WROOM-022021-12-30 1137
-
ESP-WROOM-02未按预期响应AT命令的原因?2023-02-21 736
-
ESP-WROOM-02和MCU之间不会通过UART进行任何数据交换的原因?2023-02-22 664
-
如何在ESP-WROOM-02模组上使用MESH网络?2023-04-28 596
-
ESP-WROOM-02技术规格书2023-09-18 682
-
使用串口升级ESP-WROOM-02固件时如何连线?2023-11-06 627
-
圣诞节彩灯电路2010-02-25 2141
-
ESP-WROOM-022015-12-30 2506
-
关于利用ESP-WROOM-02和天气API制作发光的圣诞节雪人教程讲解2019-08-22 6042
-
PCB制作的玻璃球圣诞节2022-07-18 739
-
PCB制作的圣诞节led灯树2022-08-03 919
-
PCB制作的圣诞节20182022-08-22 871
-
ESP-WROOM-02 Wifi设置指南—AT指令2023-02-28 4678
-
使用ESP-WROOM-02 Wifi模块作为Arduino MCU2023-02-23 3588
-
乐鑫ESP-WROOM-02 技术规格书2024-01-14 736
全部0条评论

快来发表一下你的评论吧 !
