
 小型双轮差速底盘视觉循迹功能的实现
电子说
描述
1. 任务描述
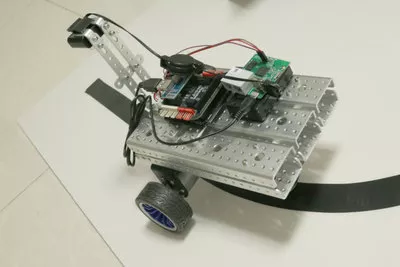
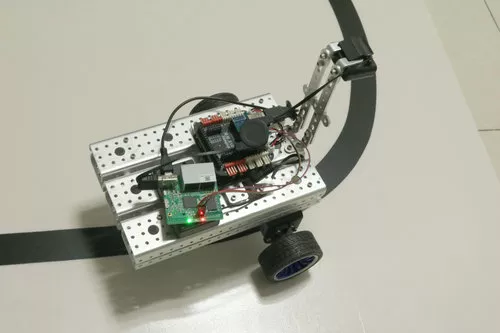
在机器人小车上搭载摄像头,摄像头采集图像信息并通过WiFi将信息传递给PC端,然后PC端使用OpenCV对摄像头读取到的视频进行灰度化、高斯滤波、腐蚀、膨胀等处理,使图像分为黑白两色。PC端进行图像信息处理并将处理结果传递为下位机,下位机接收上位机处理的图像信息结果后便会控制小车相应运动,小车运动包含前进、左转、右转、停止。

2. 电子硬件
在这个示例中,我们采用了以下硬件,请大家参考:
| 主控板 | Basra(兼容Arduino Uno) |
| 扩展板 | Bigfish2.1 |
| 电池 | 7.4V锂电池 |
| 通信 | 2510通信转接板 |
| WiFi路由器 | |
| 其它 | 摄像头x1、计算机x1 |
3. 功能实现
视觉小车巡黑线工作原理:
(1) 摄像头采集图像信息;
(2) 通过 WiFi 将图像信息传递给 PC 端(VS2015 配置的 OpenCV 环境);
(3) 在 PC 端使用 OpenCV 对摄像头读取到的视频进行灰度化、高斯滤波、腐蚀、膨胀等处理,使图像分为黑白两色,采用 RGB 颜色模型作为黑白颜色判断;
(4) 将图像对称分成左右两半,分别判断左、右计算检测在显示的摄像范围内的黑色像素区域所占比例=黑色像素范围/显示的摄像范围;
(5) 比较两侧黑色像素区域所占比例大小确定前进方向,如果左侧比例大于右侧,则小车左偏离,进行右转;
(6) PC端进行图像信息处理,将处理结果传递为下位机,下位机控制小车进行相应的运动;
3.1硬件连接
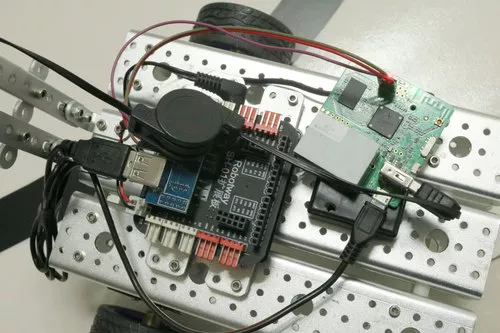
接线说明:
① 将2510通信转接板连接到扩展板的扩展坞上面;
② 用3根母对母杜邦线将2510通信转接板与WiFi路由器连接起来,GND-GND、RX-RX、TX-TX;
③ 找到1根USB线,一端连接到2510通信转接板接口上,另一端连接到WiFi路由器USB接口上;
④ 将摄像头线连接到WiFi路由器接口上。


3.2示例程序
编程环境:Arduino 1.8.19
① 下位机例程:
下位机接收上位机处理的图像信息结果控制小车相应运动,小车运动包含前进、左转、右转、停止。
参考例程代码(car.ino)如下:【详细例程源代码详见https://www.robotway.com/h-col-113.html】
/*------------------------------------------------------------------------------------

  版权说明:Copyright 2023 Robottime(Beijing) Technology Co., Ltd. All Rights Reserved.

           Distributed under MIT license.See file LICENSE for detail or copy at

           https://opensource.org/licenses/MIT

           by 机器谱 2023-02-02 https://www.robotway.com/

  -----------------------------------------------------------------------------------

/*

  wift car:

  2019/08/19:

  JN

  left: 9, 5;

  right: 10, 6;

*/


const String FORWARD = "F";

const String BACK = "B";

const String LEFT = "L";

const String RIGHT = "R";

const String STOP = "S";


int speed_left = 41;

int speed_right = 41;


void setup() {

  Serial.begin(9600);

  pinMode(5, OUTPUT);

  pinMode(6, OUTPUT);


  pinMode(9, OUTPUT);

  pinMode(10, OUTPUT);

  Stop();

  delay(1000);

}


void loop() {

  String data = SerialRead();


  //if(data != ""){

    if(data == FORWARD)

      Forward();

    else if(data == BACK)

      Back();

    else if(data == LEFT)

      Left();

    else if(data == RIGHT)

      Right();

    else if(data == STOP)

      Stop();

// }

}


String SerialRead(){

  String str;

  while(Serial.available()){

    str += char(Serial.read());

  }

  return str;

}


void Forward(){

  analogWrite(9, speed_left);

  analogWrite(5, 0);

  analogWrite(6, 0);

  analogWrite(10, speed_right);

}


void Back(){

  analogWrite(9, 0);

  analogWrite(5, speed_left);

  analogWrite(6, speed_right);

  analogWrite(10, 0);

}


void Left(){

  analogWrite(9, 0);

  analogWrite(5, speed_left);

  analogWrite(6, 0);

  analogWrite(10, speed_right);

}


void Right(){

  analogWrite(9, speed_left);

  analogWrite(5, 0);

  analogWrite(6, speed_right);

  analogWrite(10, 0);

}


void Stop(){

  analogWrite(9, speed_left);

  analogWrite(5, speed_left);

  analogWrite(6, speed_right);

  analogWrite(10,speed_right);

}
② 上位机例程:
上位机(Visual Studio 2015.net下配置OpenCV环境)进行图像信息处理。下面提供一个参考例程(MainWindow.xaml.cs),大家可尝试根据实验效果改写。
/*******************************************************************************************

版权说明:Copyright 2023 Robottime(Beijing) Technology Co., Ltd. All Rights Reserved.

           Distributed under MIT license.See file LICENSE for detail or copy at

           https://opensource.org/licenses/MIT

           by 机器谱 2023-02-02 https://www.robotway.com/

---------------------------------------------------------------------------------------

using System;

using System.IO;

using System.Collections.Generic;

using System.Linq;

using System.Text;

using System.Threading.Tasks;

using System.Windows;

using System.Windows.Controls;

using System.Windows.Data;

using System.Windows.Documents;

using System.Windows.Input;

using System.Windows.Media;

using System.Windows.Media.Imaging;

using System.Windows.Navigation;

using System.Windows.Shapes;

using System.Windows.Media.Animation;

using System.Threading;

using OpenCvSharp;

using System.Drawing;

using System.Drawing.Imaging;

using System.Net;

using System.Net.Sockets;


namespace Tracking_Car

{

    ///

    /// Tracking_Car

    ///

    public partial class MainWindow : System.Windows.Window

    {

        //定义视频,控制地址以及控制端口变量

        static string CameraIp = "http://192.168.8.1:8083/?action=stream";

        static string ControlIp = "192.168.8.1";

        static string Port = "2001";


        //定义上位机发送的控制命令变量

        //定义命令变量

        string CMD_FORWARD = "", CMD_TURN_LEFT = "", CMD_TURN_RIGHT = "", CMD_STOP = "";


        /*

         * 指针角度对应各颜色

         * 25 -> 红色

         * 90 -> 绿色

         * 150 -> 蓝色

         */

        int ANGLE_LEFT = 0;

        int ANGLE_GO = 0;

        int ANGLE_RIGHT = 0;


        //黑色像素在左右两侧所占比例

        double numOfleft = 0.0;

        double numOfright = 0.0;


        //创建视频图像实例

        VideoCapture capture = new VideoCapture(CameraIp); //图像大小:宽度 X 长度 = 160 X 120;

        Mat frame = new Mat();   //存储视频每一帧图像像素

        Mat result = new Mat(); //存储二值化图像


        static byte[] kernelValues = { 0, 1, 0, 1, 1, 1, 0, 1, 0 }; // cross (+)

        Mat kernel = new Mat(3, 3, MatType.CV_8UC1, kernelValues);


        //图像中心线坐标

        int x1, y1, x2, y2;

        //窗口面积

        float area;


        //视频显示切换变量

        Boolean isChange = false;

        //循迹开始开关变量

        Boolean isBegin = false;


        public MainWindow()

        {

            InitializeComponent();

        }


        private void Window_Loaded(object sender, RoutedEventArgs e)

        {

            Assignment();

        }


        //变量赋值函数

        private void Assignment()

        {

            ANGLE_LEFT = 25;

            ANGLE_GO = 90;

            ANGLE_RIGHT = 150;


            rateLeft.Height = 10;

            rateRight.Height = 10;


            x1 = 80;

            y1 = 0;

            x2 = x1;

            y2 = 120;

            area = 160 * 120 / 2;


            CMD_FORWARD = "F";

            CMD_TURN_LEFT = "L";

            CMD_TURN_RIGHT = "R";

            CMD_STOP = "S";

        }


        ///

        /// MatToBitmap(Mat image)

        ///

        public static Bitmap MatToBitmap(Mat image)

        {

            return OpenCvSharp.Extensions.BitmapConverter.ToBitmap(image);

        }


        ///

        /// BitmapToBitmapImage(System.Drawing.Bitmap bitmap)

        ///

        public static BitmapImage BitmapToBitmapImage(Bitmap bitmap)

        {

            using (MemoryStream stream = new MemoryStream())

            {

                bitmap.Save(stream, ImageFormat.Png); //格式选Bmp时,不带透明度


                stream.Position = 0;

                BitmapImage result = new BitmapImage();

                result.BeginInit();

                // According to MSDN, "The default OnDemand cache option retains access to the stream until the image is needed."

                // Force the bitmap to load right now so we can dispose the stream.

                result.CacheOption = BitmapCacheOption.OnLoad;

                result.StreamSource = stream;

                result.EndInit();

                result.Freeze();

                return result;

            }

        }


        //颜色指示动画函数

        int angelCurrent = 0;

        private void ColorIndicate(int where)

        {

            RotateTransform rt = new RotateTransform();

            rt.CenterX = 130;

            rt.CenterY = 200;


            this.indicatorPin.RenderTransform = rt;


            double timeAnimation = Math.Abs(angelCurrent - where) * 5;

            DoubleAnimation da = new DoubleAnimation(angelCurrent, where, new Duration(TimeSpan.FromMilliseconds(timeAnimation)));

            da.AccelerationRatio = 0.8;

            rt.BeginAnimation(RotateTransform.AngleProperty, da);


            switch (where)

            {

                case 25:

                    dirDisplay.Content = "左转";

                    break;

                case 90:

                    dirDisplay.Content = "前进";

                    break;

                case 150:

                    dirDisplay.Content = "右转";

                    break;

                default:

                    dirDisplay.Content = "方向指示";

                    break;

            }


            angelCurrent = where;

        }


        //检测函数

        private void ColorDetect() {

            //将摄像头RGB图像转化为灰度图,便于后续算法处理

            Mat gray = frame.CvtColor(ColorConversionCodes.BGR2GRAY);

            //进行高斯滤波

            Mat binary = gray.Threshold(0, 255, ThresholdTypes.Otsu | ThresholdTypes.Binary);

            //闭运算,先膨胀后腐蚀,消除小型黑洞

            Cv2.Dilate(binary, binary, null);

            Cv2.Erode(binary, binary, kernel);


            result = binary.Clone();

            result.Line(new OpenCvSharp.Point(x1, y1), new OpenCvSharp.Point(x2, y2), new Scalar(255, 255, 255), 1);


            float rateOfleft = 0, rateOfRight = 0;

            var indexer = result.GetGenericIndexer();

            for (int i = 0; i < result.Rows; i++) {

                for (int j = 0; j < result.Cols; j++) {

                    int B = indexer[i, j][0];

                    int G = indexer[i, j][1];

                    int R = indexer[i, j][2];


                    if (B == 0 && G == 0 && R == 0) {

                        if (j <= x1) {

                            numOfleft++;

                        }

                        else

                        {

                            numOfright++;

                        }

                    }

                }

            }


            rateOfleft = (float)(numOfleft) / area * 100;

            rateOfRight = (float)(numOfright) / area * 100;

            rateLeft.Height = rateOfleft;

            rateRight.Height = rateOfRight;

            numOfleft = 0;

            numOfright = 0;

        }


        //命令发送函数

        void SendData(string data)

        {

            try

            {

                IPAddress ips = IPAddress.Parse(ControlIp.ToString());//("192.168.8.1");

                IPEndPoint ipe = new IPEndPoint(ips, Convert.ToInt32(Port.ToString()));//把ip和端口转化为IPEndPoint实例

                Socket c = new Socket(AddressFamily.InterNetwork, SocketType.Stream, ProtocolType.Tcp);//创建一个Socket


                c.Connect(ipe);//连接到服务器


                byte[] bs = Encoding.ASCII.GetBytes(data);

                c.Send(bs, bs.Length, 0);//发送测试信息

                c.Close();

            }

            catch (Exception e)

            {

                MessageBox.Show(e.Message);

            }

        }


        //方向指示更新及命令发送

        private void CommandSend() {

            double l = rateLeft.Height;

            double r = rateRight.Height;


            if (isBegin) {

                if (Math.Abs(l - r) < 20)   //两侧黑色轨迹基本相同,前进

                {

                    ColorIndicate(ANGLE_GO);

                    SendData(CMD_FORWARD);

                }

                else if ((l - r) < -50)     //左侧黑色轨迹小于右侧,右转

                {

                    ColorIndicate(ANGLE_RIGHT);

                    SendData(CMD_TURN_RIGHT);


                }

                else if ((l - r) > 50)      //右侧黑色轨迹小于左侧,左转

                {

                    ColorIndicate(ANGLE_LEFT);

                    SendData(CMD_TURN_LEFT);

                }

            }

        }


        //视频显示函数

        private void ThreadCapShow()

        {


            while (true)

            {

                try

                {

                    capture.Read(frame); // same as cvQueryFrame

                    if (frame.Empty())

                        break;


                    this.Dispatcher.Invoke(

                        new Action(

                            delegate

                            {

                                if (isChange)

                                {

                                    //检测图像左右两侧黑色像素所占的比例,并显示图像

                                    ColorDetect();

                                    originImage.Source = BitmapToBitmapImage(MatToBitmap(result));

                                    CommandSend();

                                    result = null;

                                }

                                else

                                {

                                    originImage.Source = BitmapToBitmapImage(MatToBitmap(frame));

                                }

                            }

                            ));

                    //Cv2.WaitKey(100);

                    //bitimg = null;

                }

                catch { }

            }

        }


        //加载视频

        private void loadBtn_Click(object sender, RoutedEventArgs e)

        {

            if (originImage.Source != null) return;

            Thread m_thread = new Thread(ThreadCapShow);

            m_thread.IsBackground = true;

            m_thread.Start();

        }


        //切换视频显示,显示检测结果

        private void changeBtn_Click(object sender, RoutedEventArgs e)

        {

            if (!isChange)

            {

                isChange = true;

                changeBtn.Content = "返回";

            }

            else

            {

                isChange = false;

                changeBtn.Content = "切换";

                //指针角度归零

                ColorIndicate(0);

                rateLeft.Height = 10;

                rateRight.Height = 10;

                result = null;

            }

        }


        //循迹开始

        private void bgeinBtn_Click(object sender, RoutedEventArgs e)

        {

            isBegin = true;

        }

        //循迹停止

        private void stopBtn_Click(object sender, RoutedEventArgs e)

        {

            isBegin = false;

            SendData(CMD_STOP);

        }

    }

}
4. 资料内容
①视觉循迹-程序源代码
②视觉循迹-样机3D文件
审核编辑 黄宇
-
如何搭建实体机器人ros底盘2022-01-20 0
-
如何让小型双轮差速底盘实现双灰度循迹功能?2023-03-03 482
-
差分底盘的设计资料分享2022-02-14 0
-
使用以双灰度传感器实现的曲线循迹以及矩形循迹的资料说明2019-12-23 1730
-
小型双节履带底盘的制作2023-01-07 852
-
小型平行履带底盘的制作分享2023-01-12 3136
-
小型双轮差速底盘的制作2023-01-13 2891
-
小型三节履带底盘的制作2023-01-29 1200
-
如何实现双轮差速底盘躲避悬崖的功能?2023-03-03 387
-
双轮差速底盘三灰度循迹功能的实现2023-03-03 799
-
小型平行履带底盘实现双灰度循迹功能2023-03-09 437
-
DGT-01M四轮差速移动机器人底盘2022-12-23 441
-
第13章-循迹功能 STM32智能小车循迹教程 PID循迹算法分析2024-08-21 1630
-
第19.2章-星曈科技 openmv H7 plus openmv视觉循迹功能-完成视觉识别指定区域 OpenMV视觉模块循迹 STM32F103C8T6视觉巡线2024-08-20 557
全部0条评论

快来发表一下你的评论吧 !

