

i.MX6ULL学习笔记:GPIO按键输入捕获
描述
掌握GPIO的输入输出是必备技能,这篇推文继续来学习操作GPIO,这篇主要学习GPIO的输入,通过使用按键进行GPIO输入实验。
| 硬件
写驱动前先看看具体的硬件,资料来源于野火公开文件,更多资料请自行访问野火官网查询:
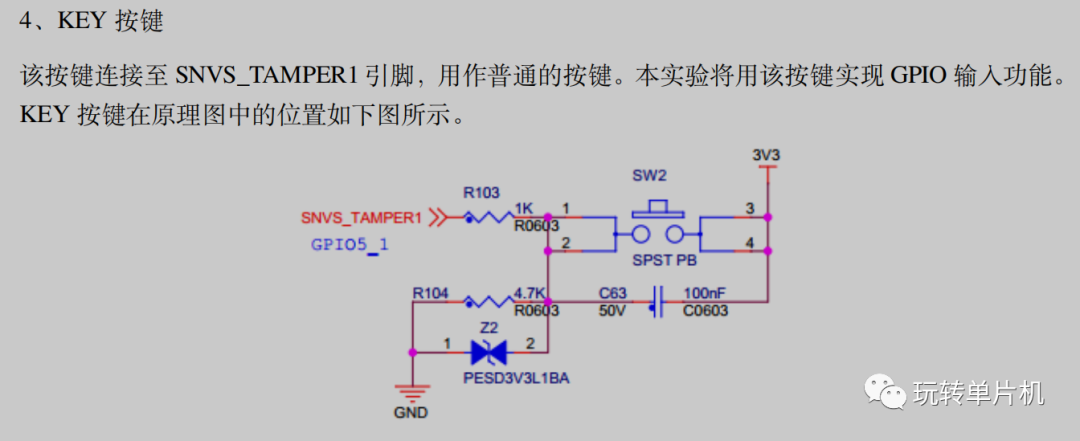
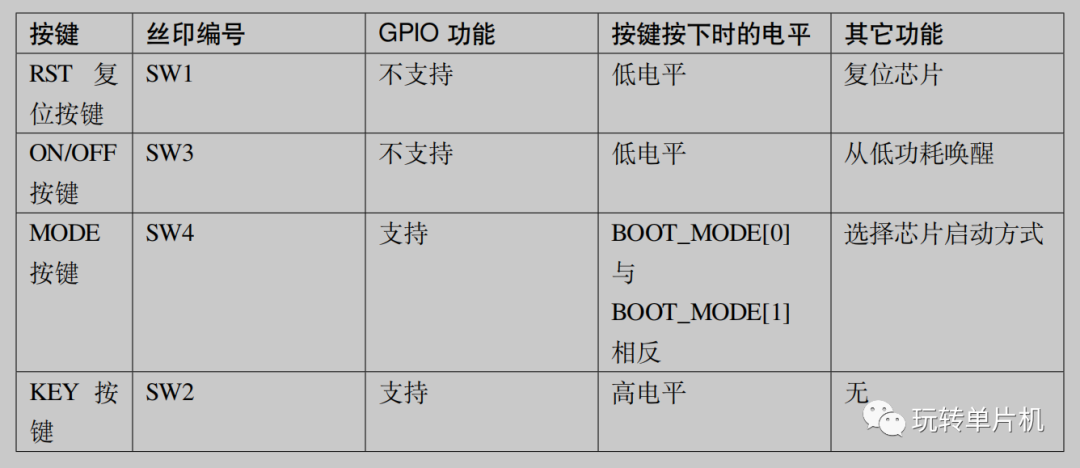
开发板上的四个按键功能如下图所示,选择KEY按键来进行按键输入实验:
| 驱动
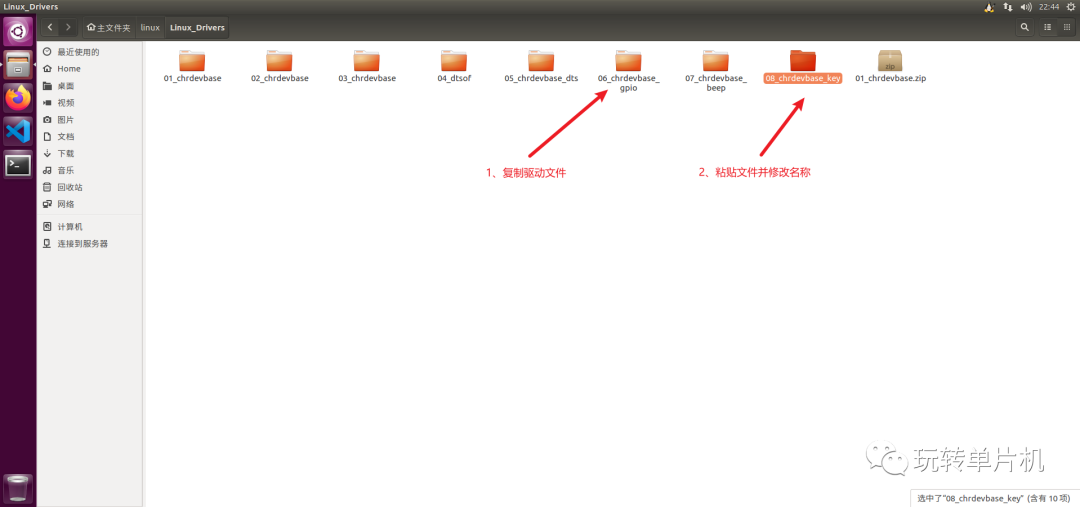
1、准备驱动文件:
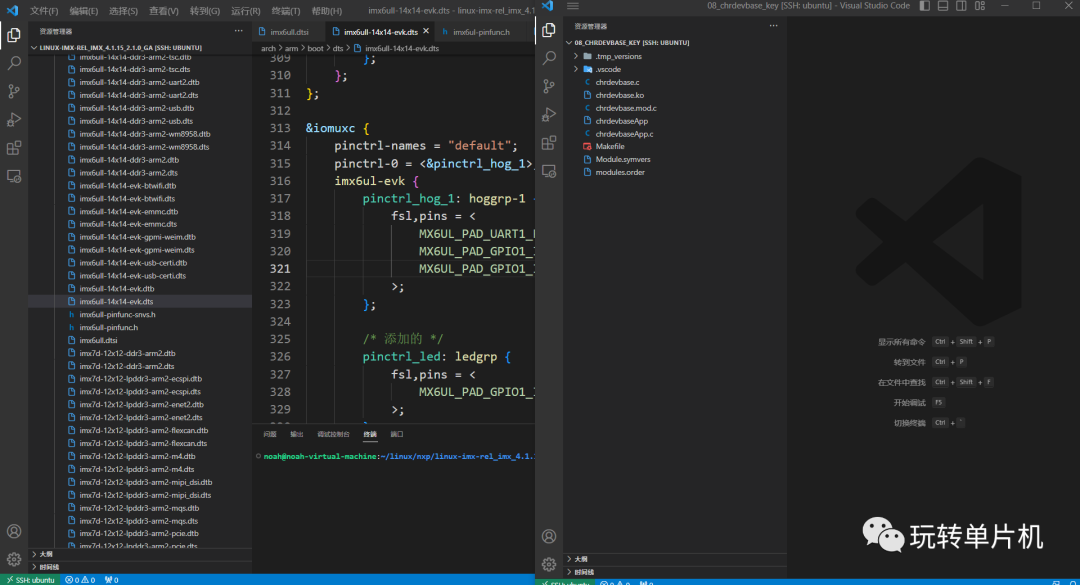
2、远程连接ubuntu并打开设备树和驱动文件夹:
3、在设备树中添加 pinctrl 节点
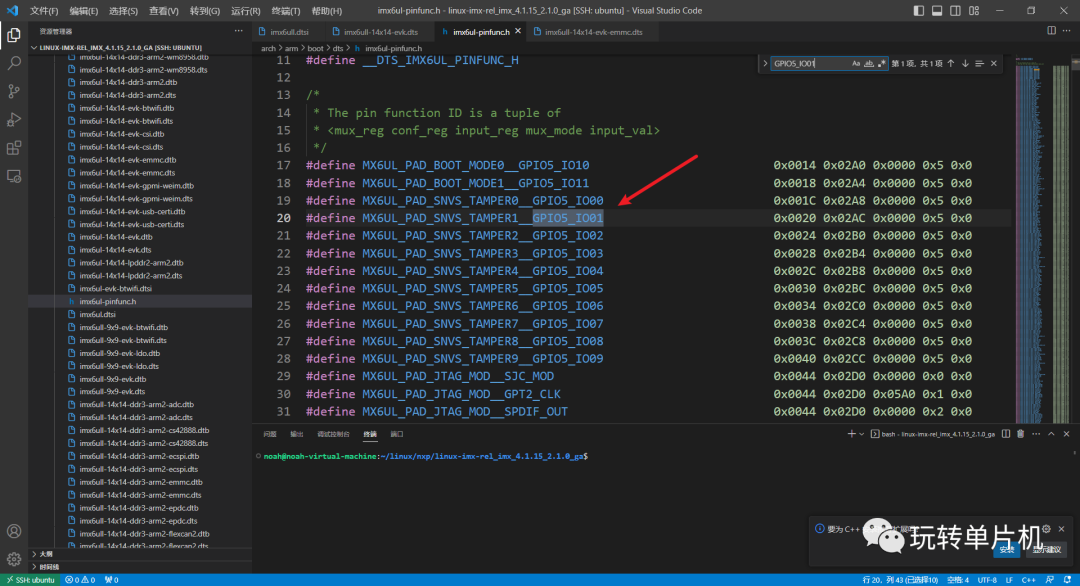
GPIO的相关配置可以在 arch/arm/boot/dts/imx6ul-pinfunc.h 文件中找到对应的宏定义:
在设备树中添加节点:
pinctrl_key: keygrp {
  fsl,pins = <
    MX6UL_PAD_SNVS_TAMPER1__GPIO5_IO01 0xF080 /* key */
  >;
};
相关解析:
/* PAD寄存器的配置说明 */
0xF080,即1000 0000 1000 0000


/*
*bit 16:0 HYS关闭
*bit [15:14]: [00]下拉 [01]47k上拉 [10]100k上拉 [11]22k上拉 <---
*bit [13]: [0]kepper功能 [1]pull功能
*bit [12]: [0]pull/keeper-disable [1]pull/keeper-enable
*bit [11]: 0 关闭开路输出
*bit [10:8]: 00 保留值
*bit [7:6]: 10 速度100Mhz
*bit [5:3]: 000 输出disable <---
*bit [2:1]: 00 保留值
*bit [0]: 0 低转换率
*/
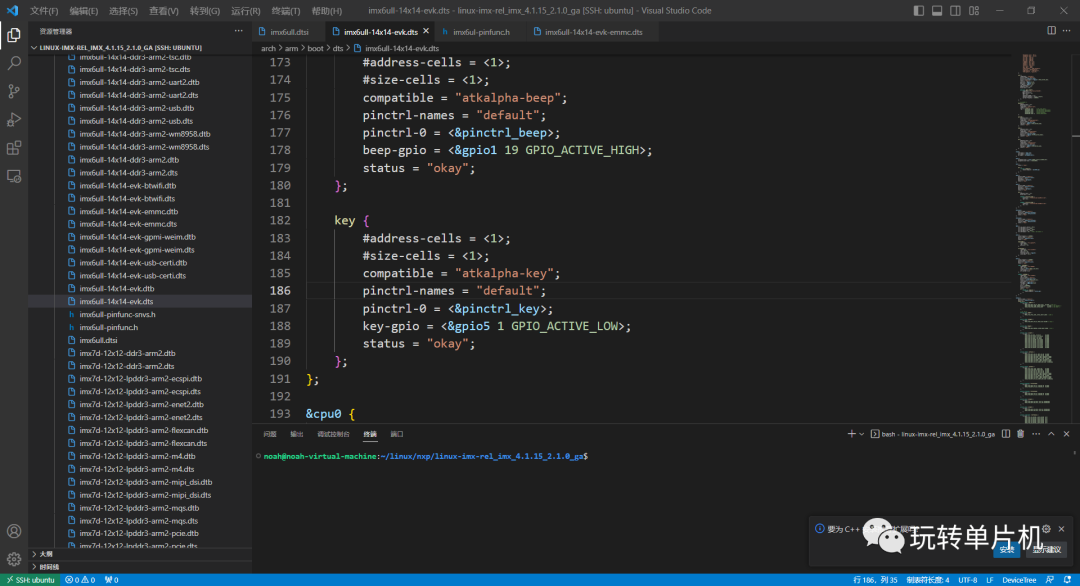
4、在设备树中添加 KEY 设备节点
key {
  #address-cells = <1>;
  #size-cells = <1>;
  compatible = "atkalpha-key";
  pinctrl-names = "default";
  pinctrl-0 = <&pinctrl_key>;
  key-gpio = <&gpio5 1 GPIO_ACTIVE_LOW>;
  status = "okay";
};
下图所示:
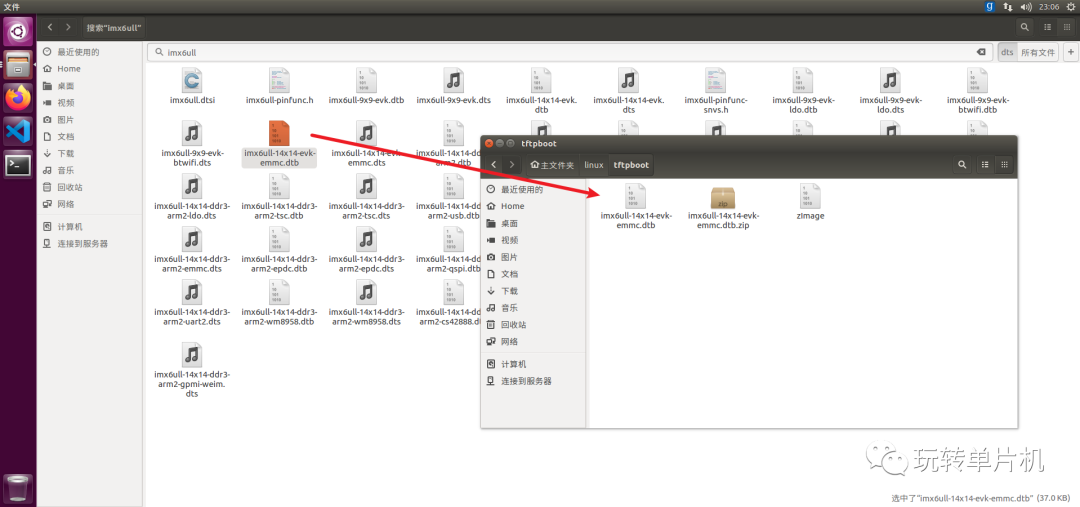
5、编译设备树并把生成的文件复制到对应位置
6、编写对应的驱动
#include#include #include #include #include #include #include #include #include #include #include #include #include /* 添加头文件 */ #include #include #include #include #define CHRDEVBASE_CNT 1 /* 设备号个数 */ #define CHRDEVBASE_NAME "chrdevbase" /* 名字 */ /* 定义按键值 */ #define KEY0VALUE 0XF0 /* 按键值 */ #define INVAKEY 0X00 /* 无效的按键值 */ /* chrdevbase 设备结构体 */ struct newchr_dev{ dev_t devid; /* 设备号 */ struct cdev cdev; /* cdev */ struct class *class; /* 类 */ struct device *device; /* 设备 */ int major; /* 主设备号 */ int minor; /* 次设备号 */ struct device_node *nd; /* 设备节点 */ int key_gpio; /* key 所使用的 GPIO 编号 */ atomic_t keyvalue; /* 按键值 */ }; struct newchr_dev chrdevbase;/* 自定义字符设备 */ /* * @description : key 硬件初始化 * @param : 无 * @return : 无 */ static int key_hal_init(void) { /* 设置 LED 所使用的 GPIO */ /* 1、获取设备节点:key */ chrdevbase.nd = of_find_node_by_path("/key"); if(chrdevbase.nd == NULL) { printk("chrdevbase node cant not found! "); return -EINVAL; } else { printk("chrdevbase node has been found! "); } /* 2、 获取设备树中的 gpio 属性,得到 KEY 所使用的 KEY 编号 */ chrdevbase.key_gpio = of_get_named_gpio(chrdevbase.nd, "key-gpio", 0); if(chrdevbase.key_gpio < 0) { printk("can't get key-gpio"); return -EINVAL; } printk("key-gpio num = %d ", chrdevbase.key_gpio); /* 3、初始化 key 所使用的 IO */ gpio_request(chrdevbase.key_gpio, "key0"); /* 请求 IO */ gpio_direction_input(chrdevbase.key_gpio); /* 设置为输入 */ return 0; } /* * @description : 打开设备 * @param - inode : 传递给驱动的inode * @param - filp : 设备文件,file结构体有个叫做private_data的成员变量 * 一般在open的时候将private_data指向设备结构体。 * @return : 0 成功;其他 失败 */ static int chrdevbase_open(struct inode *inode, struct file *filp) { printk("[BSP]chrdevbase open! "); filp->private_data = &chrdevbase; /* 设置私有数据 */ return 0; } /* * @description : 从设备读取数据 * @param - filp : 要打开的设备文件(文件描述符) * @param - buf : 返回给用户空间的数据缓冲区 * @param - cnt : 要读取的数据长度 * @param - offt : 相对于文件首地址的偏移 * @return : 读取的字节数,如果为负值,表示读取失败 */ static ssize_t chrdevbase_read(struct file *filp, char __user *buf, size_t cnt, loff_t *offt) { int ret = 0; unsigned char value; struct newchr_dev *dev = filp->private_data; if (gpio_get_value(dev->key_gpio) == 0) { /* key0 按下 */ while(!gpio_get_value(dev->key_gpio)); /* 等待按键释放 */ atomic_set(&dev->keyvalue, KEY0VALUE); } else { /* 无效的按键值 */ atomic_set(&dev->keyvalue, INVAKEY); } value = atomic_read(&dev->keyvalue); /* 保存按键值 */ ret = copy_to_user(buf, &value, sizeof(value)); return ret; // printk("chrdevbase read! "); // return 0; } /* * @description : 向设备写数据 * @param - filp : 设备文件,表示打开的文件描述符 * @param - buf : 要写给设备写入的数据 * @param - cnt : 要写入的数据长度 * @param - offt : 相对于文件首地址的偏移 * @return : 写入的字节数,如果为负值,表示写入失败 */ static ssize_t chrdevbase_write(struct file *filp, const char __user *buf, size_t cnt, loff_t *offt) { int retvalue = 0; char writebuf[1]; /* 接收用户空间传递给内核的数据并且打印出来 */ retvalue = copy_from_user(writebuf, buf, cnt); printk("[BSP]kernel recevdata data:%d! ",writebuf[0]); // printk("chrdevbase write! "); return 0; } /* * @description : 关闭/释放设备 * @param - filp : 要关闭的设备文件(文件描述符) * @return : 0 成功;其他 失败 */ static int chrdevbase_release(struct inode *inode, struct file *filp) { printk("[BSP]release! "); return 0; } /* * 设备操作函数结构体 */ static struct file_operations chrdevbase_fops = { .owner = THIS_MODULE, .open = chrdevbase_open, .read = chrdevbase_read, .write = chrdevbase_write, .release = chrdevbase_release, }; /* * @description : 驱动入口函数 * @param : 无 * @return : 0 成功;其他 失败 */ static int __init chrdevbase_init(void) { /* 初始化硬件 */ key_hal_init(); /* 注册字符设备驱动 */ /* 1、创建设备号 */ if (chrdevbase.major) { /* 定义了设备号 */ chrdevbase.devid = MKDEV(chrdevbase.major, 0); register_chrdev_region(chrdevbase.devid, CHRDEVBASE_CNT, CHRDEVBASE_NAME); } else { /* 没有定义设备号 */ alloc_chrdev_region(&chrdevbase.devid, 0, CHRDEVBASE_CNT,CHRDEVBASE_NAME); /* 申请设备号 */ chrdevbase.major = MAJOR(chrdevbase.devid); /* 获取主设备号 */ chrdevbase.minor = MINOR(chrdevbase.devid); /* 获取次设备号 */ } printk("newcheled major=%d,minor=%d ",chrdevbase.major,chrdevbase.minor); /* 2、初始化 cdev */ chrdevbase.cdev.owner = THIS_MODULE; cdev_init(&chrdevbase.cdev, &chrdevbase_fops); /* 3、添加一个 cdev */ cdev_add(&chrdevbase.cdev, chrdevbase.devid, CHRDEVBASE_CNT); /* 4、创建类 */ chrdevbase.class = class_create(THIS_MODULE, CHRDEVBASE_NAME); if (IS_ERR(chrdevbase.class)) { return PTR_ERR(chrdevbase.class); } /* 5、创建设备 */ chrdevbase.device = device_create(chrdevbase.class, NULL,chrdevbase.devid, NULL, CHRDEVBASE_NAME); if (IS_ERR(chrdevbase.device)) { return PTR_ERR(chrdevbase.device); } return 0; } /* * @description : 驱动出口函数 * @param : 无 * @return : 无 */ static void __exit chrdevbase_exit(void) { /* 注销字符设备 */ cdev_del(&chrdevbase.cdev);/* 删除 cdev */ unregister_chrdev_region(chrdevbase.devid, CHRDEVBASE_CNT);/* 注销设备号 */ device_destroy(chrdevbase.class, chrdevbase.devid);/* 销毁设备 */ class_destroy(chrdevbase.class);/* 销毁类 */ printk("[BSP]chrdevbase exit! "); } /* * 将上面两个函数指定为驱动的入口和出口函数 */ module_init(chrdevbase_init); module_exit(chrdevbase_exit); /* * LICENSE和作者信息 */ MODULE_LICENSE("GPL"); MODULE_AUTHOR("zuozhongkai");
7、编写应用层
#include "stdio.h"
#include "unistd.h"
#include "sys/types.h"
#include "sys/stat.h"
#include "fcntl.h"
#include "stdlib.h"
#include "string.h"


/* 定义按键值 */
#define KEY0VALUE 0XF0
#define INVAKEY 0X00


/*
 * @description    : main主程序
 * @param - argc   : argv数组元素个数
 * @param - argv   : 具体参数
 * @return       : 0 成功;其他 失败
 */
int main(int argc, char *argv[])
{
  int fd, retvalue;
  char *filename;
  unsigned char keyvalue;


  if(argc != 2){
    printf("[APP]Error Usage!
");
    return -1;
  }


  filename = argv[1];


  /* 打开驱动文件 */
  fd  = open(filename, O_RDWR);
  if(fd < 0){
    printf("[APP]Can't open file %s
", filename);
    return -1;
  }


  /* 循环读取按键值数据!*/
  while(1) {
    read(fd, &keyvalue, sizeof(keyvalue));
    if (keyvalue == KEY0VALUE) { /* KEY0 */
      printf("KEY0 Press, value = %#X
", keyvalue);/* 按下 */
    }
  }


  /* 关闭设备 */
  retvalue = close(fd);
  if(retvalue < 0){
    printf("[APP]Can't close file %s
", filename);
    return -1;
  }


  return 0;
}
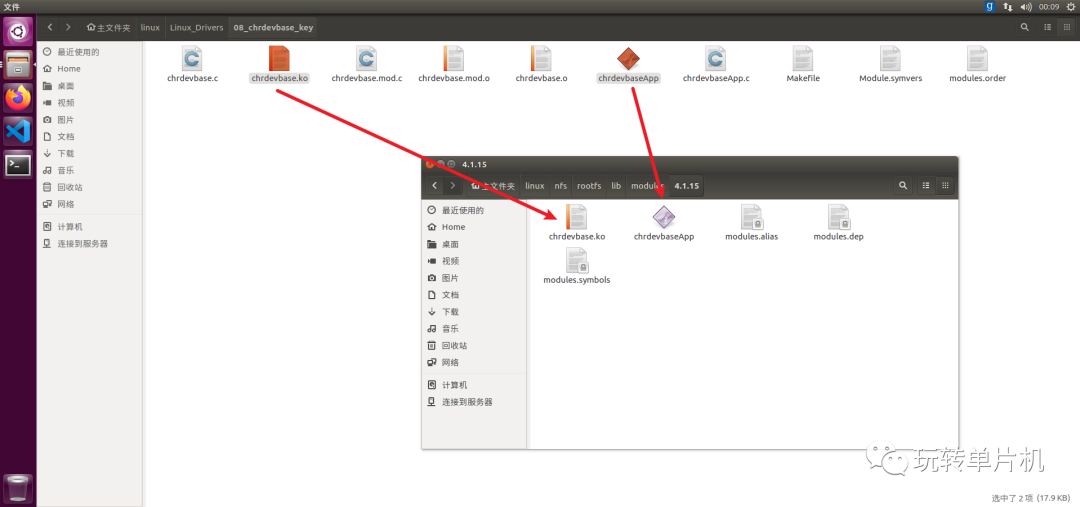
8、编译并把生成的文件复制到对应位置
9、测试应用
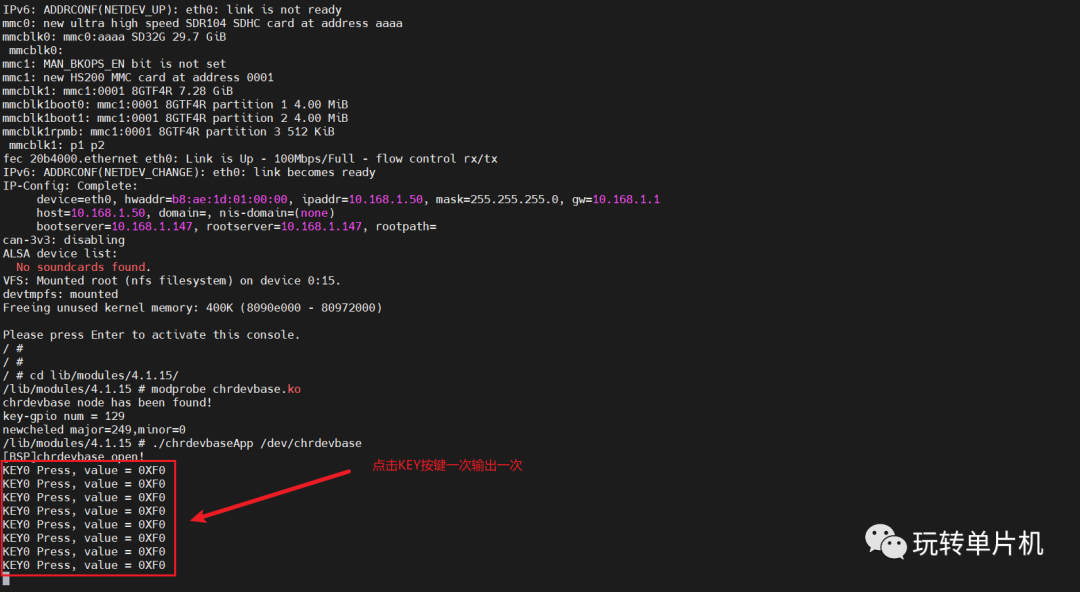
测试结果显示没有问题,能正常读取到按键按下时的键值,通过在应用层中轮询读取按键按下,当按键按下时立马打印出按键的键值。
审核编辑:汤梓红
声明:本文内容及配图由入驻作者撰写或者入驻合作网站授权转载。文章观点仅代表作者本人,不代表电子发烧友网立场。文章及其配图仅供工程师学习之用,如有内容侵权或者其他违规问题,请联系本站处理。
举报投诉
-
i.MX6ULL 驱动开发7—按键输入捕获与GPIO输入配置与高低电平读取2022-05-24 8387
-
移植NXP官方linux 5.4内核到i.MX6ULL开发板2022-12-19 2878
-
如何在i.MX6ULL睡眠时停止刷新LCD?2025-04-03 1012
-
i.MX6ULL能否接受来自外部振荡器的直接50 MHz输入?2026-04-17 118
-
迅为i.MX6ULL开发板资料下载,让Linux学习更轻松2020-09-23 3284
-
i.MX6ULL开发板硬件资源2020-12-29 2402
-
i.MX6ULL核心板资源2021-07-12 3387
-
初识 i.MX6ULL 寄存器2021-12-20 1630
-
关于i.MX6ULL配置GPIO2022-08-05 3985
-
I.MX6ULL UART传输问题求解2023-04-21 1034
-
基于NXP i.MX6ULL处理器的FETMX6ULL-C核心板2022-04-11 1699
-
基于i.MX6ULL点亮LED2023-03-06 1751
-
【北京迅为】i.MX6ULL开发板移植 Debian 文件系统2022-02-10 2608
-
基于i.MX6ULL的掉电检测设计与软件测试2023-11-09 1945
-
【迅为电子】i.MX6UL和i.MX6ULL芯片区别与开发板对比2024-11-28 2646
全部0条评论

快来发表一下你的评论吧 !
