

【试用报告】RP2040上的MicroPython环境中多线程编程
描述
双核介绍
BPI-Pico-RP2040官方介绍如下:
其核心是RP2040,采用的是ARM Cortex M0+ CPU内核,运行频率高达 133 MHz。
比一般使用Cortex M0+的MCU更强大的是,RP2040使用了双核ARM Cortex M0+,既然是双核的,那么我们就可以在BPI-Pico-RP2040运行多线程程序了,更好的挖掘出其潜力来。
多线程了解
关于什么是多线程,本文不讲,大家可以自行查找资料详细了解。
为了更方便的进行测试,本次所有的实例,都是在python环境中进行的。
经过了解,circuitpython还不支持多线程,而micropython则已经提供支持。
不过micropython中的多线程还是实验性质的支持,这从官方文档中可以了解:MicroPython libraries » _thread – multithreading support
micropython官方为RP2040提供的最新固件为v1.19.1,其已提供对多线程的支持。
因为micropython的多线程基于CPython中的_thread模块,所以可以从Python官方文档了解其具体用法:_thread --- 底层多线程 API
如果是开始使用多线程,那么先关注如下的调用,等熟悉了以后,再深入学习其他的:
_thread.start_new_thread(function, args[, kwargs]):开启一个新线程
_thread.allocate_lock():返回一个新的锁对象
lock.acquire(blocking=True, timeout=- 1):申请获得锁
lock.release():释放锁
本文中所有的实例代码,都可以从以下地址获取:
Pico(RP2040)上的MicroPython环境中多线程编程https://gitee.com/honestqiao/multithread_in_micropython_on_pico
基础多线程
首先,用一个简单的micropython程序,来控制板载的LED不同时间点亮和熄灭
import machine
import _thread
import utime
led = machine.Pin(25, machine.Pin.OUT)
led.off()
key = 0
start_time = 0
def run_on_core1():
global start_time
while start_time == 0:
pass
while True:
utime.sleep_ms(300)
print((utime.ticks_us()-start_time)//100000, "led on")
led.on()
utime.sleep_ms(700)
def run_on_core0():
global start_time
start_time = utime.ticks_us()
while True:
utime.sleep_ms(700)
print((utime.ticks_us()-start_time)//100000, "led off")
led.off()
utime.sleep_ms(300)
_thread.start_new_thread(run_on_core1, ( ))
run_on_core0()(左右移动查看全部内容)
在RP2040的micropython环境中,程序默认在core0上运行,使用_thread.start_new_thread()启动新的线程后,将会在core1上运行。
上面的程序运行后,具体输出结果如下:
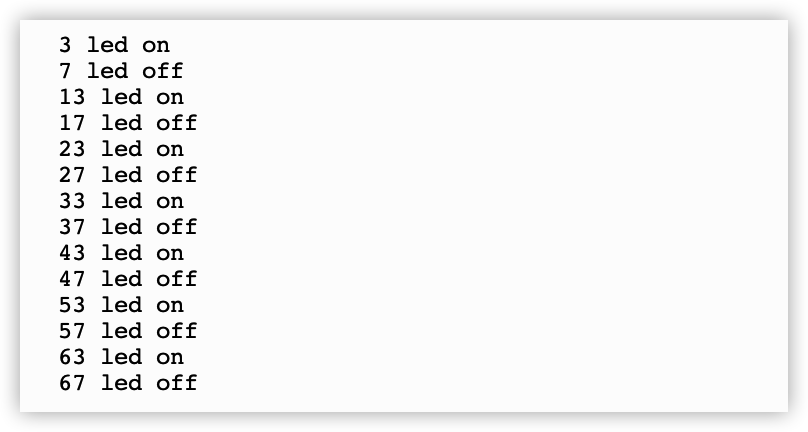
在run_on_core1中,先延时300ms,然后点亮led,再延时700ms,然后继续循环
在run_on_core0中,先延时700ms,然后熄灭led,再延时300ms,然后继续循环
从以上的输出可以看到,点亮和熄灭led,都对应到了对应的时间点。
也许有人会说,这有啥用,我不用多线程,也完全可以在对应的时间点点亮和熄灭LED,用多线程岂不是多此一举。
上面的例子,是一个基础的多线程演示,其只是在两个线程中,控制同一个LED,所以会觉得意义不大。如果我们的程序要同时做两件不同的事情,那么每件事情在一个core上运行,互不干扰,就很重要的,在后面会有这样的实例展示。
确认双线程
在不同的开发板上,对多线程的支持,也是有差异的。
RP2040上的micropython,只能跑两个线程,每个线程占用1个core,多了就会出错。
我们可以用下面的程序进行验证:
import machine
import _thread
import utime
def thread_1():
while True:
print("thread_1")
utime.sleep_ms(1000)
def thread_2():
while True:
print("thread_2")
utime.sleep_ms(1000)
_thread.start_new_thread(thread_1, ( ))
_thread.start_new_thread(thread_2, ( ))
while True:
print("main")
utime.sleep_ms(1000)(左右移动查看全部内容)
运行上面的程序后,将会出现如下的错误信息:
其原因在于,主程序本身,使用了core0,而使用_thread.start_new_thread()创建一个线程时,会自动的使用core1,第二次调用_thread.start_new_thread()再次创建一个线程时,无法再使用core1,所以就会出错。
在core1上运行的子线程,需要使用_thread.start_new_thread()创建,所以其运行的需要使用一个函数进行调用作为入口。
而程序的主线程,运行在core0上,可以直接在程序主流程中写运行逻辑,也可以写一个函数调用,效果是一样的。
后续的实例中,我们将使用run_on_core0()和run_on_core1()来区分在core0、core1的所运行的线程。
线程间交互
全局变量
通常时候,让两个线程,分别做各自独立的事情,可以运行的很好。
但有的时候,我们可能还需要两个之间,能够有一些交流。
最简单的方法,就是使用一个全局变量,然后两个线程之间,都调用这个全局变量即可。
下面用一个简单的程序进行演示:
import machine
import _thread
import utime
led = machine.Pin(25, machine.Pin.OUT)
led.off()
status = 0
def run_on_core1():
global status
while True:
if status:
led.on()
else:
led.off()
utime.sleep_ms(100)
def run_on_core0():
global status
while True:
status = 1 if not status else 0
utime.sleep_ms(1000)
_thread.start_new_thread(run_on_core1, ( ))
run_on_core0()(左右移动查看全部内容)
在上面的程序中,core0上的程序,每隔1秒,将status取反一次。core1上的程序,则根据status的值,来点亮或者熄灭LED。
线程锁
上面这个程序比较简单,处理起来的速度很快,所以这么实用,不会有什么问题。
如果我们有一个程序需要两个线程进行配合,例如主线程进行数据采集分析,而子线程进行数据的呈现,就有可能会出现问题了。
我们看一看下面的程序:
import machine
import _thread
import utime
led = machine.Pin(25, machine.Pin.OUT)
led.off()
status = 0
data = []
def run_on_core1():
global status, data
while True:
if status:
led.on()
else:
led.off()
str_data = ''.join(data)
print("str_data: len=%d content=%s" % (len(str_data), str_data))
utime.sleep_ms(1000)
def run_on_core0():
global status, data
while True:
status = 1 if not status else 0
data = []
for i in range(100):
data.append(str(status))
utime.sleep_ms(10)
utime.sleep_ms(1000)
_thread.start_new_thread(run_on_core1, ( ))
run_on_core0()(左右移动查看全部内容)
在core0的主线程中,根据status的值,将data设置为100个0或者1;而在core1的子线程中,则将其值合并为字符串输出出来,输出的同时,显示字符串的长度。
运行上面的程序后,实际输出结果如下:

按说,其长度,要么是空,要么是100,可是实际结果却会出现不为100的情况呢?
这是因为,core0上的主线程在操作data,core1的子线程也在操作data,两者都是在同时进行的,而多个控制线程之间是共享全局数据空间,那么就会出现,core0上的主线程处理数据处理到到一半了,core1的子线程已经开始操作了,这样就会出现问题,数据不完整了。
显然,这种情况,是我们所不期望的。那要解决这种情况,可以用一个全局变量作为标志,主线程告诉子线程是否处理完成了,一旦处理完成了,子线程就可以开始处理了。
但线程调用库本身,有更好的办法,那就是锁。
我们先看下面的程序:
import machine
import _thread
import utime
led = machine.Pin(25, machine.Pin.OUT)
led.off()
status = 0
data = []
def run_on_core1():
global status, data
while True:
if status:
led.on()
else:
led.off()
lock.acquire()
str_data = ''.join(data)
print("str_data: len=%d content=%s" % (len(str_data), str_data))
lock.release()
utime.sleep_ms(1000)
def run_on_core0():
global status, data
while True:
status = 1 if not status else 0
lock.acquire()
data = []
for i in range(100):
data.append(str(status))
utime.sleep_ms(10)
lock.release()
utime.sleep_ms(1000)
lock = _thread.allocate_lock()
_thread.start_new_thread(run_on_core1, ( ))
run_on_core0()(左右移动查看全部内容)
在上面的程序中,启动线程之前,使用 _thread.allocate_lock() 来获取一个新的锁,然后在core0的主线程中,处理数据前,使用 lock.acquire() 获得锁,处理完成后,再使用lock.release()释放锁。
一但一个线程获得锁,那么其他线程想要获得该锁时,只能等待直到这个锁被释放,也就是不能同时获得,这在python中叫做互斥锁。
因而,在core1的子线程,要输出数据的时候,也使用同样的机制来获得和释放锁。
最终,data改变时,其他地方需要等待改变完成。data输出时,其他地方也需要等待输出完成。从而确保了任何时刻,对只有一个地方操作改数据。
运行上面的程序,就能得到理想的输出了:

运行中启动线程
前面演示的程序,都是在主线程中,启动了子线程,然后并行运行。
在实际使用中,还可以在主线程中,按需启动子线程。
我们先看下面的程序:
import machine
import _thread
import utime
def run_on_core1():
print("[core1] run thread")
utime.sleep_ms(100)
def run_on_core0():
while True:
print("[core0] start thread:")
_thread.start_new_thread(run_on_core1, ( ))
utime.sleep_ms(1000)
run_on_core0()(左右移动查看全部内容)
在上面的程序中,core0上运行的主线程,会每过1秒启动一个子线程。子线程在core1上运行完以后,会自动退出。
运行后,输出如下:
需要特别注意的是,如果子线程还没有退出,那么再次启动,将会出现错误。
例如我们修改上面的程序的延时如下:
import machine
import _thread
import utime
def run_on_core1():
print("[core1] run thread")
utime.sleep_ms(1000)
def run_on_core0():
while True:
print("[core0] start thread:")
_thread.start_new_thread(run_on_core1, ( ))
utime.sleep_ms(100)
run_on_core0()(左右移动查看全部内容)
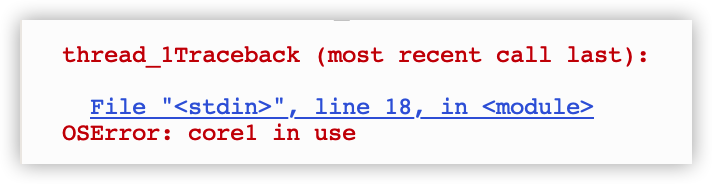
运行后,就会出错:
[core0] start thread:
[core1] run thread
[core0] start thread:
Traceback (most recent call last):
File "", line 17, in
File "", line 14, in run_on_core0
OSError: core1 in use
其原因就在于,子线程还没有结束,主线程又再次启动主线程了。
这在多线程编程中,是需要特别注意的问题。
要解决这个问题,可以使用前面主线程和子线程交互中的方法,例如使用一个全局变量表示子线程是否运行完成,或者使用锁。
下面是一个使用锁的程序:
import machine
import _thread
import utime
def run_on_core1():
lock.acquire()
print("[core1] run thread")
utime.sleep_ms(1000)
lock.release()
def run_on_core0():
while True:
print("[core0] start thread:")
lock.acquire()
_thread.start_new_thread(run_on_core1, ( ))
lock.release()
utime.sleep_ms(100)
lock = _thread.allocate_lock()
run_on_core0()(左右移动查看全部内容)
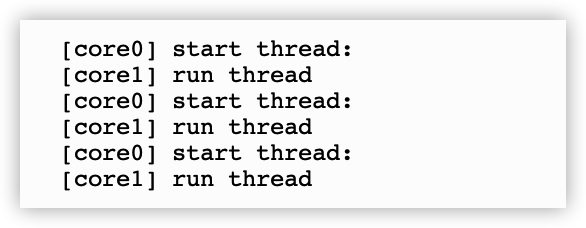
运行后,输出如下:
[core0] start thread:
[core1] run thread
[core0] start thread:
[core1] run thread
[core0] start thread:
[core1] run thread
[core0] start thread:
[core1] run thread
多线程的实例
双线程做pwm和ws2812b
下面,再用一段稍微复杂一点点的程序,演示多线程的使用。
import machine
import _thread
import utime
from ws2812 import WS2812
led = machine.Pin(25, machine.Pin.OUT)
led.off()
BLACK = (0, 0, 0)
RED = (255, 0, 0)
YELLOW = (255, 150, 0)
GREEN = (0, 255, 0)
CYAN = (0, 255, 255)
BLUE = (0, 0, 255)
PURPLE = (180, 0, 255)
WHITE = (255, 255, 255)
COLORS = (BLACK, RED, YELLOW, GREEN, CYAN, BLUE, PURPLE, WHITE)
ws = WS2812(3, 1) #WS2812(pin_num,led_count)
ws.pixels_fill(BLACK)
ws.pixels_show()
def run_on_core1():
while True:
for color in COLORS:
ws.pixels_fill(color)
ws.pixels_show()
utime.sleep_ms(200)
def run_on_core0():
duty = 0
step = 1
count = 0
while True:
led.on()
utime.sleep_ms(duty)
led.off()
utime.sleep_ms(10-duty)
count = count + 1
if count>10:
count = 0
duty = duty + step
if duty >= 10:
step = -1
if duty <= 0 :
step = 1
_thread.start_new_thread(run_on_core1, ( ))
run_on_core0()(左右移动查看全部内容)
在上面的这段程序中,我们会在core0上运行的主线程中,控制GPIO25的输出占空比,从而让板载LED产生类似呼吸灯的效果。同时,还会在core1上运行的子线程中,控制板载WS2812B灯珠变色。
双线程播放Bad Apple
最后,我们再用经典的Bad Apple,作为这篇文章的结尾。
from machine import SPI,Pin
from ssd1306 import SSD1306_SPI
import framebuf
import _thread
import utime
spi = SPI(1, 100000, mosi=Pin(11), sck=Pin(10))
display = SSD1306_SPI(128, 64, spi, Pin(9),Pin(8), Pin(1))
def run_on_core1():
global fbuf
while True:
if not fbuf == None:
display.fill(0)
lock.acquire()
display.blit(fbuf,19,0)
fbuf = None
lock.release()
display.show()
utime.sleep_ms(100)
def run_on_core0():
global fbuf
while True:
for i in range(1,139):
dirt = 'BAD_APPLE/' + str(i) + '.pbm'
print(i, dirt)
with open(dirt,'rb') as f :
f.readline()
f.readline()
data = bytearray(f.read())
lock.acquire()
fbuf = framebuf.FrameBuffer(data,88,64,framebuf.MONO_HLSB)
lock.release()
utime.sleep_ms(100)
fbuf = None
lock = _thread.allocate_lock()
_thread.start_new_thread(run_on_core1, ( ))
run_on_core0()(左右移动查看全部内容)
上面的代码,使用core0上运行的主线程,来从pbm文件中读取需要呈现的图片数据,而在core1上运行的子线程中,则使用读取到的数据输出到OLED进行显示。
因为受限于Pico内置存储的限制,并没有存储完整的Bad Apple数据,所以只播放了部分。如果感兴趣,可以将数据放置到SD卡上,主线程读取数据,子线程显示数据,一样丝滑流畅。
后记
多线程是个让人有爱又恨的东西,用好了能有大作用,但是用不好可能会出现莫名其妙的问题,需要好好钻研。本文只是一些较为基础的研究,还比较浅显,对于gc等方面,都尚未涉及,感兴趣的读者可以进一步深入了解。
在钻研的过程中,参考了不少资料,对所有资料的贡献者表示感谢。以下为参考到的部分资料列表:
树莓派Pico迷你开发板MicroPython多线程编程实践
Multithreaded on Raspberry Pi Pico (MicroPython)
Raspberry Pi Pico Dual Core Programming
Multi Thread Coding on the Raspberry Pi Pico in Micropython
pico-micropython-examples
Raspberrypi Pico MicroPython Cookbook
MicroPython类库 » _thread --- 线程
ESP32上驱动OLED屏幕播放你想要的视频


更多热点文章阅读
龙芯架构首款面向嵌入式应用的开发板,2K500开发应用实例
基于32位RISC-V设计的互联型微控制器,沁恒微CH32V307开发样例
RK3568!四核64位ARMv8.2A架构,汇聚编译源码及实战样例
尺寸仅有21mm*51mm,板边采用邮票孔设计,合宙 Air105 核心板开发总结
基于32位RISC-V高集成SoC,ADP-Corvette-T1开发板样例及源码!
原文标题:【试用报告】RP2040上的MicroPython环境中多线程编程
文章出处:【微信公众号:电子发烧友论坛】欢迎添加关注!文章转载请注明出处。
-
使用RP2040设计一个迷你板2022-09-02 3386
-
ubuntu上交叉编译rp20402024-08-27 1699
-
【干货分享】RP2040 + Cyclone 10 FPGA PCB 设计2025-06-12 4021
-
ProMicro-RP2040印刷电路板资料分享2022-06-22 1733
-
【免费试用19期】BPI-Pico-RP2040 开发板2023-02-21 40171
-
【BPI-Pico-RP2040 开发板】RP2040上的MicroPython环境中多线程编程2023-04-12 7631
-
RP20402023-09-15 22165
-
使用MicroPython在Raspberry Pi上通过双核编程的多线程控制LED2022-07-25 9397
-
RP2040迷你板开源分享2022-08-15 3139
-
RP2040模块MCU开源分享2022-10-28 1070
-
使用Seeed Wio RP2040模块进行环境监测2022-11-08 965
-
使用RP2040和KMK固件的40%正交线性键盘2023-06-08 1808
-
将MicroPython从Raspberry pi(RP2040)移植到Wiznet5K2023-06-14 1097
-
RP2040 Raspberry Pi Pico遇见LoRa2023-06-15 1421
-
RP2040的工业级封装系统!2025-07-06 1592
全部0条评论

快来发表一下你的评论吧 !
