
Banana Pi BPI-Centi-S3 使用MicroPython编程显示JPG图片
描述
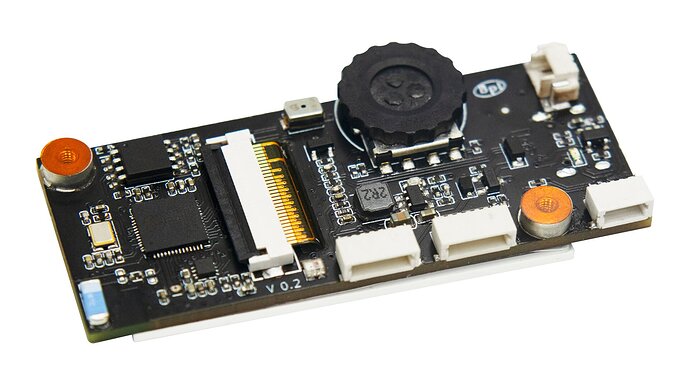
BPI-Centi-S3是我们新推出的一款板载1.9英寸彩屏的小尺寸ESP32-S3开发板!
BPI-Centi-S3 physical photo front 1920x1080 white background1920×1080 136 KB

BPI-Centi-S3 physical photo back 3 1920x1080 white background1920×1080 233 KB
关键特性
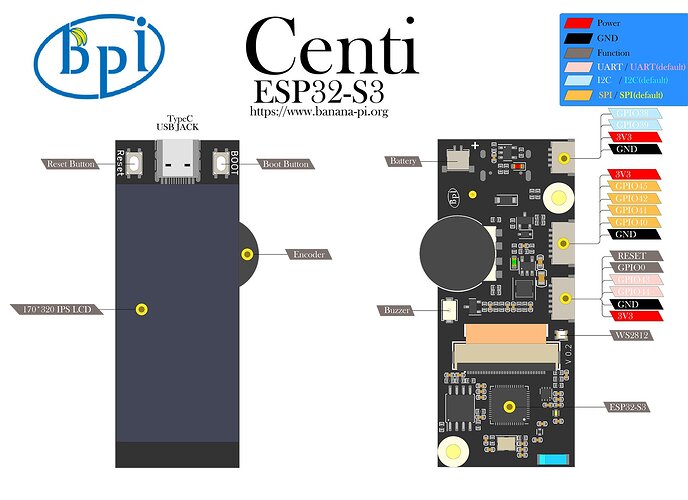
- ESP32-S3,Xtensa® 32 bit LX7
- 2M PSRAM , 8M FLASH
- 2.4G WIFI ,Bluetooth 5 ,Bluetooth mesh
- GPIO , PWM , I2C , SPI , RMT , I2S , UART ,USB , JTAG
- 1 * ST7789 屏幕,1.9英寸,170*320分辨率,8bit 8080并口
- 1 * 旋转编码器
- 1 * 蜂鸣器
- 1 * 全彩色LED
- 1 * JST SH 1mm 4-Pin I2C连接座
- 2 * JST SH 1mm 6-Pin
- 1 * USB Type-C
- 1 * MX 1.25mm 2-Pin 电池连接座,支持充电
- 2 * M3螺丝孔

BPI-Centi-S3-V0.2-IO-1920-white1920×1394 208 KB
屏幕
BPI-Centi-S3 正面有一块1.9英寸TFT LCD彩屏,分辨率是170*320,驱动芯片为ST7789V3, 采用8bit 并行接口与ESP32S3芯片连接。
出厂固件中已集成ST7789 C模块 驱动,来自于:
russhughes/st7789s3_esp_lcd , The MIT License
感谢 russhughes 的开源,在他的GitHub README中可以查阅编译方法和所有API接口。
前置准备
显示jpg图片
sst7789驱动库内有一个显示jpg格式图片的方法,这对于初次上手学习的我们非常友好。
jpg 方法
jpg(jpg_filename, x, y)
在给定的 x 和 y 坐标处绘制一个 JPG 文件,坐标为图片的左上角。
此方法需要额外的 3100 字节内存用于其工作缓冲区。
准备合适大小的jpg文件
任选自己喜欢的图片,裁切为长320像素,宽170像素,或小于此尺寸的图片。
图片编辑工具在各种智能终端设备中和各种操作系统中都有大量可选的,可任意使用自己喜欢的工具来编辑。
这里随意推荐一个能免费使用的 Web 在线图片编辑工具,Pixlr X 。
将裁切好的图片放入我们本地的MicroPython工作文件夹中,重命名为 pic_1.jpg ,上传图片到MicroPython设备中的方法参考 在终端中使用mpbridge 。
这里已准备一张已裁切好尺寸的图片。
jpg 方法用例
在 main.py 脚本中使用 jpg 方法。
""" BPI-Centi-S3 170x320 ST7789 display """ import st7789 import tft_config import gc def main(): try: tft = tft_config.config(rotation=1) tft.init() tft.jpg("pic_1.jpg", 0, 0) tft.show() gc.collect() except BaseException as err: err_type = err.__class__.__name__ print('Err type:', err_type) from sys import print_exception print_exception(err) finally: tft.deinit() print("tft deinit") main()
上传 main.py 后,将设备复位,即可在屏幕上看到图片。
我们再多准备几个合适大小的jpg文件,即可设计一个循环,像播放幻灯片一样在BPI-Centi-S3的屏幕上轮播图片了。
""" BPI-Centi-S3 170x320 ST7789 display """ import st7789 import tft_config import gc import time pic_list = ["pic_1.jpg", "pic_2.jpg", "pic_3.jpg", "pic_4.jpg", "pic_5.jpg"] def main():    try:        tft = tft_config.config(rotation=1)        tft.init()        while True:            for pic in pic_list:                tft.jpg(pic, 0, 0)                tft.show()                gc.collect()                time.sleep(1)    except BaseException as err:        err_type = err.__class__.__name__        print('Err type:', err_type)        from sys import print_exception        print_exception(err)    finally:        tft.deinit()        print("tft deinit") main()


	审核编辑 黄宇
- 相关推荐
- 热点推荐
- lcd
- 开发板
- banana pi
- Micropython
-
Banana Pi BPI-R3路由器开发板运行 OrayOS物联网系统2024-10-23 1805
-
Banana Pi BPI-M6(Raspberry Pi 5 替代品)初始设置及固件烧录2023-11-09 2978
-
Banana Pi 开源硬件基于ESP32-S3开发的物联网开发板系列2023-09-27 711
-
使用 OpenWRT 设置 Banana Pi BPI-R3开源硬件路由器2023-09-14 1693
-
Banana Pi BPI-PicoW 和 BPI-Leaf-S3 创客教育与物联网开发板介绍2023-09-07 10880
-
Banana Pi BPI-R3开源路由器DXF结构文档2023-09-04 541
-
Banana Pi BPI-Centi-S3 使用MicroPython编程显示JPG图片2023-04-21 1151
-
Banana Pi BPI-Centi-S3 使用MicroPython编程显示JPG图片 #嵌入式开发Banana Pi开源硬件 2023-04-20
-
【Banana PI Leaf S3开发板试用体验】——使用MicroPython学习BPI-Leaf-S3开发板2022-11-14 1748
-
Banana PI BPI PicoW-S3低功耗微控制器开发板概述2022-10-18 2410
-
Banana Pi BPI-F2S IC设计与FPGA教育学习开发套装2020-06-01 1951
-
【Banana Pi M1+试用体验】2.banana pi 硬件介绍+debian系统烧写2016-06-12 5128
全部0条评论

快来发表一下你的评论吧 !

