
Spring Batch 批处理框架编程设计
编程语言及工具
描述
一、SpringBatch 介绍
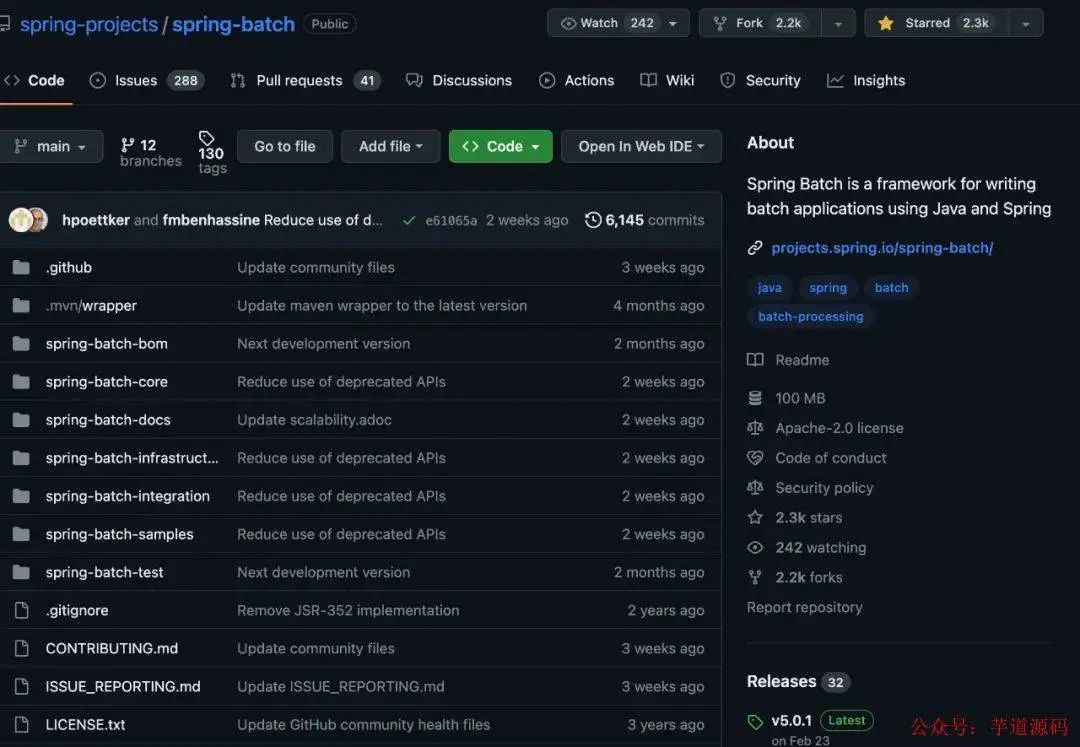
Spring Batch 是一个轻量级、全面的批处理框架,旨在支持开发对企业系统的日常操作至关重要的健壮的批处理应用程序。Spring Batch 建立在人们期望的 Spring Framework 特性(生产力、基于 POJO 的开发方法和一般易用性)的基础上,同时使开发人员可以在必要时轻松访问和使用更高级的企业服务。
Spring Batch 不是一个调度框架。在商业和开源领域都有许多优秀的企业调度程序(例如 Quartz、Tivoli、Control-M 等)。Spring Batch 旨在与调度程序结合使用,而不是替代调度程序。

二、业务场景
我们在业务开发中经常遇到这种情况:

Spring Batch 支持以下业务场景:
定期提交批处理。
并发批处理:并行处理作业。
分阶段的企业消息驱动处理。
大规模并行批处理。
失败后手动或计划重启。
相关步骤的顺序处理(扩展到工作流驱动的批次)。
部分处理:跳过记录(例如,在回滚时)。
整批交易,适用于批量较小或已有存储过程或脚本的情况。
三、基础知识
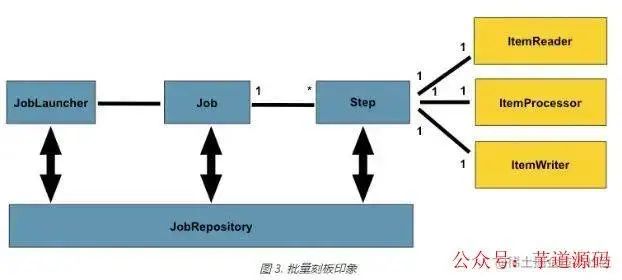
3.1、整体架构

| 名称 | 作用 |
|---|---|
| JobRepository | 为所有的原型(Job、JobInstance、Step)提供持久化的机制 |
| JobLauncher | JobLauncher表示一个简单的接口,用于启动一个Job给定的集合 JobParameters |
| Job | Job是封装了整个批处理过程的实体 |
| Step | Step是一个域对象,它封装了批处理作业的一个独立的顺序阶段 |
3.2、核心接口
ItemReader: is an abstraction that represents the output of a Step, one batch or chunk of items at a time
ItemProcessor:an abstraction that represents the business processing of an item.
ItemWriter: is an abstraction that represents the output of a Step, one batch or chunk of items at a time.

大体即为 输入→数据加工→输出 ,一个Job定义多个Step及处理流程,一个Step通常涵盖ItemReader、ItemProcessor、ItemWriter
四、基础实操
4.0、引入 SpringBatch
pom 文件引入 springboot
  org.springframework.boot
  spring-boot-starter-parent
  2.2.5.RELEASE
pom 文件引入 spring-batch 及相关依赖
      org.springframework.boot
      spring-boot-starter-batch


      org.springframework.boot
      spring-boot-starter-validation


      mysql
      mysql-connector-java


      org.springframework.boot
      spring-boot-starter-jdbc
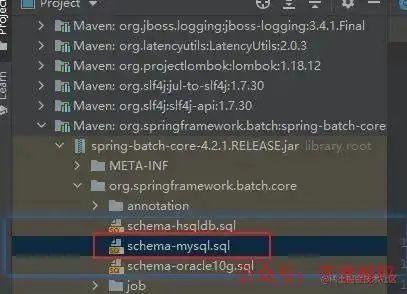
mysql 创建依赖的库表

sql 脚本的 jar 包路径:.....maven epositoryorgspringframeworkatchspring-batch-core4.2.1.RELEASEspring-batch-core-4.2.1.RELEASE.jar!orgspringframeworkatchcoreschema-mysql.sql
启动类标志@EnableBatchProcessing
@SpringBootApplication
@EnableBatchProcessing
public class SpringBatchStartApplication
{
    public static void main(String[] args) {
        SpringApplication.run(SpringBatchStartApplication.class, args);
    }
}
FirstJobDemo
@Component
public class FirstJobDemo {

    @Autowired
    private JobBuilderFactory jobBuilderFactory;
    @Autowired
    private StepBuilderFactory stepBuilderFactory;

    @Bean
    public Job firstJob() {
        return jobBuilderFactory.get("firstJob")
                .start(step())
                .build();
    }

    private Step step() {
        return stepBuilderFactory.get("step")
                .tasklet((contribution, chunkContext) -> {
                    System.out.println("执行步骤....");
                    return RepeatStatus.FINISHED;
                }).build();
    }
}
4.1、流程控制
A、多步骤任务
@Bean
public Job multiStepJob() {
    return jobBuilderFactory.get("multiStepJob2")
            .start(step1())
            .on(ExitStatus.COMPLETED.getExitCode()).to(step2())
            .from(step2())
            .on(ExitStatus.COMPLETED.getExitCode()).to(step3())
            .from(step3()).end()
            .build();
}


private Step step1() {
    return stepBuilderFactory.get("step1")
            .tasklet((stepContribution, chunkContext) -> {
                System.out.println("执行步骤一操作。。。");
                return RepeatStatus.FINISHED;
            }).build();
}

private Step step2() {
    return stepBuilderFactory.get("step2")
            .tasklet((stepContribution, chunkContext) -> {
                System.out.println("执行步骤二操作。。。");
                return RepeatStatus.FINISHED;
            }).build();
}

private Step step3() {
    return stepBuilderFactory.get("step3")
            .tasklet((stepContribution, chunkContext) -> {
                System.out.println("执行步骤三操作。。。");
                return RepeatStatus.FINISHED;
            }).build();
}
B、并行执行
创建了两个 Flow:flow1(包含 step1 和 step2)和 flow2(包含 step3)。然后通过JobBuilderFactory的split方法,指定一个异步执行器,将 flow1 和 flow2 异步执行(也就是并行)
@Component
public class SplitJobDemo {

    @Autowired
    private JobBuilderFactory jobBuilderFactory;
    @Autowired
    private StepBuilderFactory stepBuilderFactory;

    @Bean
    public Job splitJob() {
        return jobBuilderFactory.get("splitJob")
                .start(flow1())
                .split(new SimpleAsyncTaskExecutor()).add(flow2())
                .end()
                .build();

    }

    private Step step1() {
        return stepBuilderFactory.get("step1")
                .tasklet((stepContribution, chunkContext) -> {
                    System.out.println("执行步骤一操作。。。");
                    return RepeatStatus.FINISHED;
                }).build();
    }

    private Step step2() {
        return stepBuilderFactory.get("step2")
                .tasklet((stepContribution, chunkContext) -> {
                    System.out.println("执行步骤二操作。。。");
                    return RepeatStatus.FINISHED;
                }).build();
    }

    private Step step3() {
        return stepBuilderFactory.get("step3")
                .tasklet((stepContribution, chunkContext) -> {
                    System.out.println("执行步骤三操作。。。");
                    return RepeatStatus.FINISHED;
                }).build();
    }

    private Flow flow1() {
        return new FlowBuilder("flow1")
                .start(step1())
                .next(step2())
                .build();
    }

    private Flow flow2() {
        return new FlowBuilder("flow2")
                .start(step3())
                .build();
    }
}
C、任务决策
决策器的作用就是可以指定程序在不同的情况下运行不同的任务流程,比如今天是周末,则让任务执行 step1 和 step2,如果是工作日,则之心 step1 和 step3。
@Component
public class MyDecider implements JobExecutionDecider {
    @Override
    public FlowExecutionStatus decide(JobExecution jobExecution, StepExecution stepExecution) {
        LocalDate now = LocalDate.now();
        DayOfWeek dayOfWeek = now.getDayOfWeek();

        if (dayOfWeek == DayOfWeek.SATURDAY || dayOfWeek == DayOfWeek.SUNDAY) {
            return new FlowExecutionStatus("weekend");
        } else {
            return new FlowExecutionStatus("workingDay");
        }
    }
}
@Bean
public Job deciderJob() {
 return jobBuilderFactory.get("deciderJob")
   .start(step1())
   .next(myDecider)
   .from(myDecider).on("weekend").to(step2())
   .from(myDecider).on("workingDay").to(step3())
   .from(step3()).on("*").to(step4())
   .end()
   .build();
}
private Step step1() {
 return stepBuilderFactory.get("step1")
   .tasklet((stepContribution, chunkContext) -> {
    System.out.println("执行步骤一操作。。。");
    return RepeatStatus.FINISHED;
   }).build();
}

private Step step2() {
 return stepBuilderFactory.get("step2")
   .tasklet((stepContribution, chunkContext) -> {
    System.out.println("执行步骤二操作。。。");
    return RepeatStatus.FINISHED;
   }).build();
}

private Step step3() {
 return stepBuilderFactory.get("step3")
   .tasklet((stepContribution, chunkContext) -> {
    System.out.println("执行步骤三操作。。。");
    return RepeatStatus.FINISHED;
   }).build();
}


private Step step4() {
 return stepBuilderFactory.get("step4")
   .tasklet((stepContribution, chunkContext) -> {
    System.out.println("执行步骤四操作。。。");
    return RepeatStatus.FINISHED;
   }).build();
}
D、任务嵌套
任务 Job 除了可以由 Step 或者 Flow 构成外,我们还可以将多个任务 Job 转换为特殊的 Step,然后再赋给另一个任务 Job,这就是任务的嵌套。
@Component
public class NestedJobDemo {

    @Autowired
    private JobBuilderFactory jobBuilderFactory;
    @Autowired
    private StepBuilderFactory stepBuilderFactory;
    @Autowired
    private JobLauncher jobLauncher;
    @Autowired
    private JobRepository jobRepository;
    @Autowired
    private PlatformTransactionManager platformTransactionManager;

    // 父任务
    @Bean
    public Job parentJob() {
        return jobBuilderFactory.get("parentJob")
                .start(childJobOneStep())
                .next(childJobTwoStep())
                .build();
    }


    // 将任务转换为特殊的步骤
    private Step childJobOneStep() {
        return new JobStepBuilder(new StepBuilder("childJobOneStep"))
                .job(childJobOne())
                .launcher(jobLauncher)
                .repository(jobRepository)
                .transactionManager(platformTransactionManager)
                .build();
    }

    // 将任务转换为特殊的步骤
    private Step childJobTwoStep() {
        return new JobStepBuilder(new StepBuilder("childJobTwoStep"))
                .job(childJobTwo())
                .launcher(jobLauncher)
                .repository(jobRepository)
                .transactionManager(platformTransactionManager)
                .build();
    }

    // 子任务一
    private Job childJobOne() {
        return jobBuilderFactory.get("childJobOne")
                .start(
                    stepBuilderFactory.get("childJobOneStep")
                            .tasklet((stepContribution, chunkContext) -> {
                                System.out.println("子任务一执行步骤。。。");
                                return RepeatStatus.FINISHED;
                            }).build()
                ).build();
    }

    // 子任务二
    private Job childJobTwo() {
        return jobBuilderFactory.get("childJobTwo")
                .start(
                    stepBuilderFactory.get("childJobTwoStep")
                            .tasklet((stepContribution, chunkContext) -> {
                                System.out.println("子任务二执行步骤。。。");
                                return RepeatStatus.FINISHED;
                            }).build()
                ).build();
    }
}
4.2、读取数据
定义 Model TestData,下面同一
@Data
public class TestData {
    private int id;
    private String field1;
    private String field2;
    private String field3;
}
读取数据包含:文本数据读取、数据库数据读取、XML 数据读取、JSON 数据读取等,具体自己查资料。
文本数据读取 Demo
@Component
public class FileItemReaderDemo {

    // 任务创建工厂
    @Autowired
    private JobBuilderFactory jobBuilderFactory;
    // 步骤创建工厂
    @Autowired
    private StepBuilderFactory stepBuilderFactory;

    @Bean
    public Job fileItemReaderJob() {
        return jobBuilderFactory.get("fileItemReaderJob2")
                .start(step())
                .build();
    }

    private Step step() {
        return stepBuilderFactory.get("step")
                .chunk(2)
                .reader(fileItemReader())
                .writer(list -> list.forEach(System.out::println))
                .build();
    }

    private ItemReader fileItemReader() {
        FlatFileItemReader reader = new FlatFileItemReader<>();
        reader.setResource(new ClassPathResource("reader/file")); // 设置文件资源地址
        reader.setLinesToSkip(1); // 忽略第一行

        // AbstractLineTokenizer的三个实现类之一,以固定分隔符处理行数据读取,
        // 使用默认构造器的时候,使用逗号作为分隔符,也可以通过有参构造器来指定分隔符
        DelimitedLineTokenizer tokenizer = new DelimitedLineTokenizer();

        // 设置属性名,类似于表头
        tokenizer.setNames("id", "field1", "field2", "field3");

        // 将每行数据转换为TestData对象
        DefaultLineMapper mapper = new DefaultLineMapper<>();
        // 设置LineTokenizer
        mapper.setLineTokenizer(tokenizer);

        // 设置映射方式,即读取到的文本怎么转换为对应的POJO
        mapper.setFieldSetMapper(fieldSet -> {
            TestData data = new TestData();
            data.setId(fieldSet.readInt("id"));
            data.setField1(fieldSet.readString("field1"));
            data.setField2(fieldSet.readString("field2"));
            data.setField3(fieldSet.readString("field3"));
            return data;
        });
        reader.setLineMapper(mapper);
        return reader;
    }

}
4.3、输出数据
输出数据也包含:文本数据读取、数据库数据读取、XML 数据读取、JSON 数据读取等
Component
public class FileItemWriterDemo {

    @Autowired
    private JobBuilderFactory jobBuilderFactory;
    @Autowired
    private StepBuilderFactory stepBuilderFactory;
    @Resource(name = "writerSimpleReader")
    private ListItemReader writerSimpleReader;

    @Bean
    public Job fileItemWriterJob() throws Exception {
        return jobBuilderFactory.get("fileItemWriterJob")
                .start(step())
                .build();
    }

    private Step step() throws Exception {
        return stepBuilderFactory.get("step")
                .chunk(2)
                .reader(writerSimpleReader)
                .writer(fileItemWriter())
                .build();
    }

    private FlatFileItemWriter fileItemWriter() throws Exception {
        FlatFileItemWriter writer = new FlatFileItemWriter<>();

        FileSystemResource file = new FileSystemResource("D:/code/spring-batch-demo/src/main/resources/writer/writer-file");
        Path path = Paths.get(file.getPath());
        if (!Files.exists(path)) {
            Files.createFile(path);
        }
        // 设置输出文件路径
        writer.setResource(file);

        // 把读到的每个TestData对象转换为JSON字符串
        LineAggregator aggregator = item -> {
            try {
                ObjectMapper mapper = new ObjectMapper();
                return mapper.writeValueAsString(item);
            } catch (JsonProcessingException e) {
                e.printStackTrace();
            }
            return "";
        };

        writer.setLineAggregator(aggregator);
        writer.afterPropertiesSet();
        return writer;
    }

}
4.5、处理数据
@Component
public class ValidatingItemProcessorDemo {

    @Autowired
    private JobBuilderFactory jobBuilderFactory;
    @Autowired
    private StepBuilderFactory stepBuilderFactory;
    @Resource(name = "processorSimpleReader")
    private ListItemReader processorSimpleReader;

    @Bean
    public Job validatingItemProcessorJob() throws Exception {
        return jobBuilderFactory.get("validatingItemProcessorJob3")
                .start(step())
                .build();
    }

    private Step step() throws Exception {
        return stepBuilderFactory.get("step")
                .chunk(2)
                .reader(processorSimpleReader)
                .processor(beanValidatingItemProcessor())
                .writer(list -> list.forEach(System.out::println))
                .build();
    }

//    private ValidatingItemProcessor validatingItemProcessor() {
//        ValidatingItemProcessor processor = new ValidatingItemProcessor<>();
//        processor.setValidator(value -> {
//            // 对每一条数据进行校验
//            if ("".equals(value.getField3())) {
//                // 如果field3的值为空串,则抛异常
//                throw new ValidationException("field3的值不合法");
//            }
//        });
//        return processor;
//    }

    private BeanValidatingItemProcessor beanValidatingItemProcessor() throws Exception {
        BeanValidatingItemProcessor beanValidatingItemProcessor = new BeanValidatingItemProcessor<>();
        // 开启过滤,不符合规则的数据被过滤掉;
//        beanValidatingItemProcessor.setFilter(true);
        beanValidatingItemProcessor.afterPropertiesSet();
        return beanValidatingItemProcessor;
    }

}
4.6、任务调度
可以配合 quartz 或者 xxljob 实现定时任务执行
@RestController
@RequestMapping("job")
public class JobController {

    @Autowired
    private Job job;
    @Autowired
    private JobLauncher jobLauncher;

    @GetMapping("launcher/{message}")
    public String launcher(@PathVariable String message) throws Exception {
        JobParameters parameters = new JobParametersBuilder()
                .addString("message", message)
                .toJobParameters();
        // 将参数传递给任务
        jobLauncher.run(job, parameters);
        return "success";
    }
}
编辑:黄飞
-
Spring Batch Admin监控管理工具2022-04-27 604
-
什么是java spring2008-09-11 5088
-
基于python的批处理方法2017-12-21 3525
-
iMPACT无法转到批处理模式2019-02-15 1631
-
Spring框架的设计理念2019-07-15 1558
-
轻量级批处理框架SpringBatch2019-09-27 924
-
一文解析Spring框架2020-06-17 1685
-
手把手教你写批处理-批处理的介绍2009-10-25 1309
-
Spring框架在数据处理方面的进步2017-10-12 772
-
spring mvc框架介绍2017-11-17 2693
-
「Spring认证」Spring 框架概述2021-08-12 1096
-
AUTO插件和自动批处理的最佳实践2022-06-24 1907
-
基于spring的批处理框架分析2023-01-05 597
-
Spring赌上未来的一击,响应式的WebFlux框架更优雅2023-06-21 1453
-
Spring Cloud Gateway网关框架2024-08-22 970
全部0条评论

快来发表一下你的评论吧 !

