

AVM环视系统:鱼眼相机去畸变算法及实战
描述
前言
在近一年的AVM算法开发工作中,鱼眼相机去畸变的玩法前前后后基本过了个遍。从最开始的调用Opencv API,到后来由于算法需要自己实现、正向的undis2fish、反向的fish2undis、鱼眼上检测、undis上标定,总之遇到很多坑,还好都解决了。正好最近有同学在AVM的帖子下面问这个东西的实现,今天在这里讨论一下。本帖从鱼眼相机模型开始讲起,包含Opencv API调参、基于畸变表的参数拟合、鱼眼相机去畸变算法原理和C++实现。1. 鱼眼相机基础
1.1 鱼眼相机模型
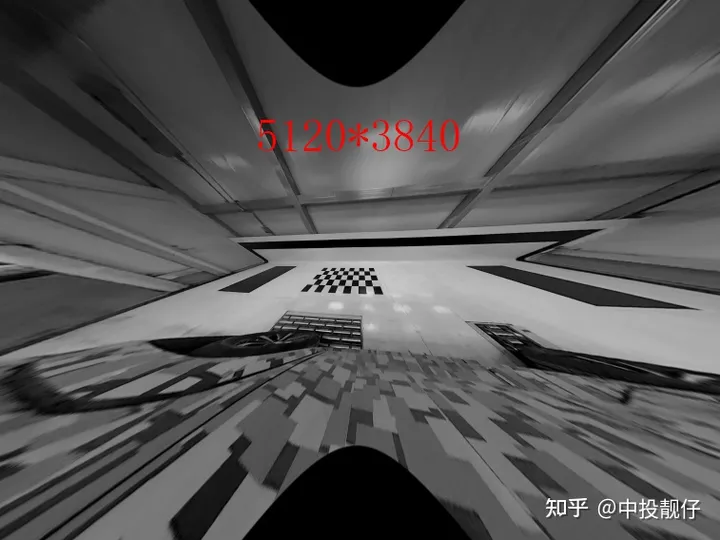
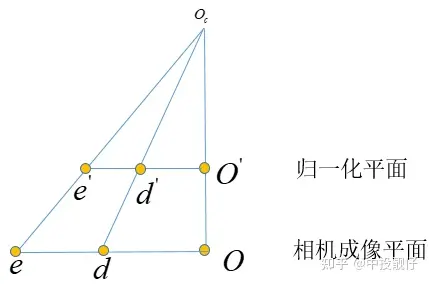
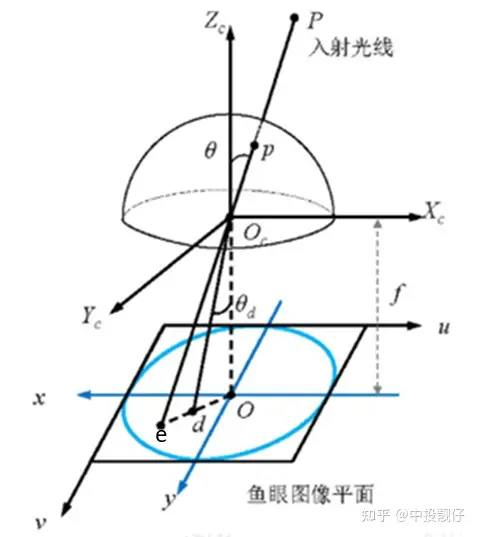 鱼眼相机模型经过P点的入射光线没有透镜的话,本应交于相机成像平面的e点。然而,经过鱼眼相机的折射,光线会交于相机成像平面的d点,就产生了畸变,因此畸变图像整体上呈现出像素朝图像中心点聚集的态势。而去畸变,就是将折射到d点的点,重新映射回到e点,因此去畸变之后的图像与原始的鱼眼图像相比,仿佛是把向心聚集的像素又重新向四周铺展开来。下表中的两幅图分别为鱼眼图和去畸变之后的展开图:
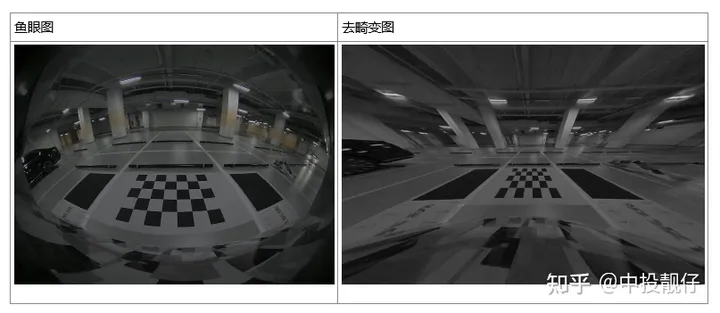 鱼眼相机的投影方式有很多种假设,例如等距投影、等立体角投影、正交投影、体视投影、线性投影。但是真实的鱼眼相机镜头并不完全遵循上述的这些模型假设。因此Kannala-Brandt提出了一种一般形式的估计,适用于不同类型的鱼眼相机:
 ,这个也是纳入opencv中的鱼眼相机畸变模型。现在基本上默认鱼眼相机模型遵循上述公式。公式中的 为光线入射角,r()为上图中 od 的长度。
1.2 基于畸变表的拟合方法
每个相机都有它固定的相机参数,包含内参、畸变系数。可以使用特定的相机标定方法,得到这些相机参数。通常,我们可以使用相机在不同位置、不同角度对着标定板拍摄几十张照片,然后用某种优化方法,计算出相机参数的最优解,例如张正友棋盘格标定法。然而,基于标定板的方法标定出的结果取决于光照是否充足、图像序列是否充足、全部的标定板序列是否能够充满整个图像幅面等因素。也就是说汽车标定的过程中需要人工摆放标定板的位置,指望算法工程师将产线上的工人培训得和他们一样专业显然不现实。大部分标定车间都是车开到标定场中间,十几秒标定出AVM系统所需要的参数,主要是4个鱼眼相机的外参,而非相机本身的参数(内参、畸变系数)。大概几十秒搞定一辆车,不可能有人工标定相机内参的过程。好在相机在出厂时厂家一般都会提供相机的必要参数- 内参
 中间矩阵为内参计算公式
- 畸变表:
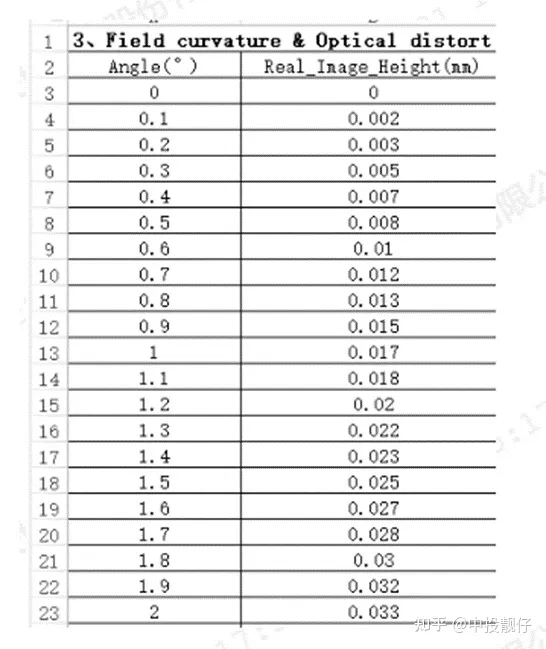 畸变表通过畸变表可以得到畸变前后像素坐标的映射关系:其中angle表示光线的入射角 ,Real_Image_Height表示入射光线经过鱼眼相机透镜折射(出射角为 )与成像平面的交点(畸变点)。opencv Kannala-Brandt模型与畸变表之间的差异为:
- opencv Kannala-Brandt相机畸变模型描述的是光线的入射角与其经过折射后在相机归一化平面上的投影点距离归一化平面中心的距离r
- 畸变表描述的是光线的入射角与其经过折射后在相机的真实的成像平面上的投影点距离成像中心的距离r
 具体的实现方法可以使用python的curve_fit函数,即可拟合出合适的k0,k1,k2,k3,k4系数。上面提到opencv Kannala-Brandt与厂家给的畸变表之间相差一个系数:focal_length,因此,在做曲线拟合的时候,要把这部分考虑进去:
theta_input = data[:,0]*3.14/180 theta_fit = np.arctan(self.data[:,1]/0.95) #focal_lenth=0.95 distort_data, _ = curve_fit(func1, theta_input, theta_fit) 综上,我们通过曲线拟合的方法得到了畸变参数。
2 Opencv API 鱼眼图像去畸变方法
Opencv提供了基于Kannala-Brandt数学模型的鱼眼去畸变方法: cv::initUndistortRectifyMap,该函数使用相机的内参和畸变参数计算出映射图mapx和mapy。2.1 基础鱼眼图像去畸变
其中入参K为鱼眼相机内参,D为,,, 畸变参数,R我们一般设置为单位阵,P为去畸变图像的相机内参,size为输出图像的大小;map1,map2为输出的映射图。@param K Camera intrinsic matrix f$cameramatrix{K}f$. @param D Input vector of distortion coefficients f$distcoeffsfisheyef$. @param R Rectification transformation in the object space: 3x3 1-channel, or vector: 3x1/1x3 1-channel or 1x1 3-channel @param P New camera intrinsic matrix (3x3) or new projection matrix (3x4) @param size Undistorted image size. @param m1type Type of the first output map that can be CV_32FC1 or CV_16SC2 . See convertMaps() for details. @param map1 The first output map. @param map2 The second output map. */ CV_EXPORTS_W void initUndistortRectifyMap(InputArray K, InputArray D, InputArray R, InputArray P, const cv::Size& size, int m1type, OutputArray map1, OutputArray map2); 相机内参矩阵表示如下,其中 表示相机焦距 f 与相机cmos参数 的比值,这个 的物理意义为每个像素的实际长度,单位可以是mm/像素。 表示相机主点,即光心与图像平面相交的坐标,单位为像素。
 那么问题来了,为什么既需要鱼眼相机的内参,又需要输出图像的相机内参呢,它们之间是什么关系呢?最开始的时候,很多同学肯定是把这两个相机内参设置成一样的,即都设置成鱼眼相机的大小,如下图所示。代码中去畸变之后图像的内参是从鱼眼相机内参深拷贝过来的。
cv::Mat R = cv::eye(3, 3, CV_32F); cv::Mat mapx_open, mapy_open; cv::Mat intrinsic_undis; fish_intrinsic.copyTo(intrinsic_undis); //intrinsic_undis.at<float>(0,2) *= 2; //intrinsic_undis.at<float>(1,2) *= 2; cv::initUndistortRectifyMap( fish_intrinsic, m_undis2fish_params, R, intrinsic_undis, cv::Size(intrinsic_undis.at<float>(0, 2) * 2, intrinsic_undis.at<float>(1, 2) * 2), CV_32FC1, mapx_open, mapy_open); cv::Mat test; cv::remap(disImg[3], test, mapx_open, mapy_open, cv::INTER_LINEAR);
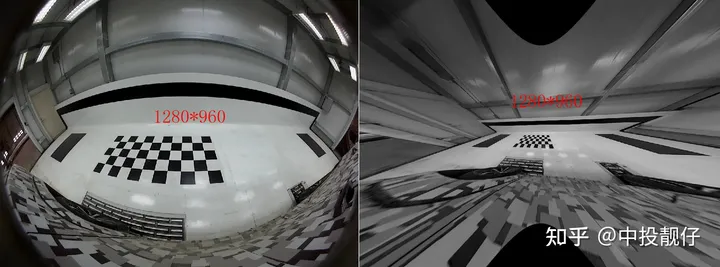
 左侧为鱼眼图,右侧为去畸变图
2.2 相机主点参数调节
我们发现,上图中右侧去畸变之后虽然图像幅面大小与鱼眼图相同都是1280*960,但是可视范围变得很小。标定所需要的大方格没有包含进来。因此,需要进一步调参,下面代码中将去畸变之后图像相机参数中的主点 , 扩大为原来的两倍,且initUndistortRectifyMap函数输出的去畸变图像大小size是与去畸变之后图像相机参数主点相关的,也就是图像大小同样跟着放大了两倍。记住一点:initUndistortRectifyMap函数中的size参数一般都是与去畸变之后图像的相机参数中主点大小强相关的。这一点在后面C++代码手撕算法流程时候会提到。cv::Mat R = cv::eye(3, 3, CV_32F); cv::Mat mapx_open, mapy_open; cv::Mat intrinsic_undis; fish_intrinsic.copyTo(intrinsic_undis); intrinsic_undis.at<float>(0,2) *= 2; intrinsic_undis.at<float>(1,2) *= 2; cv::initUndistortRectifyMap( fish_intrinsic, m_undis2fish_params, R, intrinsic_undis, cv::Size(intrinsic_undis.at<float>(0, 2) * 2, intrinsic_undis.at<float>(1, 2) * 2), CV_32FC1, mapx_open, mapy_open); cv::Mat test; cv::remap(disImg[3], test, mapx_open, mapy_open, cv::INTER_LINEAR);
 去畸变图像相机参数的主点扩大了两倍,同时生成图像大小扩到两倍从上图中我们依然不能获得到右侧完整的黑色大方格,因此需要进一步扩大去畸变后图像相机主点位置以及生成图像的分辨率:
cv::Mat R = cv::eye(3, 3, CV_32F); cv::Mat mapx_open, mapy_open; cv::Mat intrinsic_undis; fish_intrinsic.copyTo(intrinsic_undis); intrinsic_undis.at<float>(0,2) *= 4; intrinsic_undis.at<float>(1,2) *= 4; cv::initUndistortRectifyMap( fish_intrinsic, m_undis2fish_params, R, intrinsic_undis, cv::Size(intrinsic_undis.at<float>(0, 2) * 2, intrinsic_undis.at<float>(1, 2) * 2), CV_32FC1, mapx_open, mapy_open); cv::Mat test; cv::remap(disImg[3], test, mapx_open, mapy_open, cv::INTER_LINEAR);
 现在我已经把去畸变图像相机内参的主点扩大为fish相机内参的4倍了,生成图像的长宽也放大了4倍,像素数量总体放大16倍,这样才勉强把大方格完全显示出来。我们知道提取角点需要用到图像处理算法,显然对这么大的图像做处理的效率非常低。
2.3 相机f参数调节
到目前位置,我们只讨论了相机参数中主点的调参,想要解决上述问题还需要调整相机的 ,先不说理论,直接看调参结果,这里我们代码中只调整了去畸变图像相机参数中的,使它们缩小为原来的1/4。cv::Mat R = cv::eye(3, 3, CV_32F); cv::Mat mapx_open, mapy_open; cv::Mat intrinsic_undis; fish_intrinsic.copyTo(intrinsic_undis); intrinsic_undis.at<float>(0, 0) /= 4; intrinsic_undis.at<float>(1, 1) /= 4; /*intrinsic_undis.at<float>(0,2) *= 4; intrinsic_undis.at<float>(1,2) *= 4;*/ cv::initUndistortRectifyMap( fish_intrinsic, m_undis2fish_params, R, intrinsic_undis, cv::Size(intrinsic_undis.at<float>(0, 2) * 2, intrinsic_undis.at<float>(1, 2) * 2), CV_32FC1, mapx_open, mapy_open); cv::Mat test; cv::remap(disImg[3], test, mapx_open, mapy_open, cv::INTER_LINEAR);
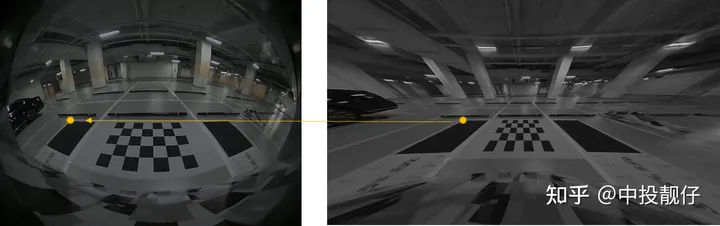
 左侧为鱼眼图,右侧为去畸变图,分辨率均为1280*960从图中可以看出,当我们仅将相机焦距缩小时,可以看到更多的东西。虽然去畸变之后的图像很小只有1280*960,但是却可以看到完整的方格。本节我们讨论了opencv API initUndistortRectifyMap函数的主点和f参数调节对于去畸变图像的影响,接下来的第3节,我们将会从去畸变算法原理入手,C++实现一波该算法。做这件事的原因很简单:opencv只提供了整张图像从undis2fish的映射,在avm的视角转换中,我们需要进行单个像素点的undis2fish,因此,我们需要自己实现一波这个去畸变过程。结论:缩小相机焦距可以使FOV增大,在更小分辨率的图像上呈现出更多的内容,看上去也是更加清晰。
3 鱼眼去畸变算法及其实现
 畸变映射关系鱼眼去畸变的算法实现就是遍历去畸变图像上的每一个点,寻找它们在鱼眼图像上的像素点坐标,计算它们之间的映射关系C++实现:
/* func: warp from distort to undistort @param f_dx:f/dx @param f_dy:f/dy @param large_center_h: undis image center y @param large_center_w: undis image center x @param fish_center_h: fish image center y @param fish_center_w: fish image center x @param undis_param: factory param @param x: input coordinate x on the undis image @param y: input coordinate y on the undis image */ cv::Vec2f warpUndist2Fisheye(float fish_scale, float f_dx, float f_dy, float large_center_h, float large_center_w, float fish_center_h, float fish_center_w, cv::Vec4d undis_param, float x, float y) { f_dx *= fish_scale; f_dy *= fish_scale; float y_ = (y - large_center_h) / f_dy; // normalized plane float x_ = (x - large_center_w) / f_dx; float r_ = static_cast<float>(sqrt(pow(x_, 2) + pow(y_, 2))); // Look up table /*int num = atan(r_) / atan(m_d) * 1024; float angle_distorted = m_Lut[num];*/ float angle_undistorted = atan(r_); // theta float angle_undistorted_p2 = angle_undistorted * angle_undistorted; float angle_undistorted_p3 = angle_undistorted_p2 * angle_undistorted; float angle_undistorted_p5 = angle_undistorted_p2 * angle_undistorted_p3; float angle_undistorted_p7 = angle_undistorted_p2 * angle_undistorted_p5; float angle_undistorted_p9 = angle_undistorted_p2 * angle_undistorted_p7; float angle_distorted = static_cast<float>(angle_undistorted + undis_param[0] * angle_undistorted_p3 + undis_param[1] * angle_undistorted_p5 + undis_param[2] * angle_undistorted_p7 + undis_param[3] * angle_undistorted_p9); // scale float scale = angle_distorted / (r_ + 0.00001f); // scale = r_dis on the camera img plane // divide r_undis on the normalized plane cv::Vec2f warp_xy; float xx = (x - large_center_w) / fish_scale; float yy = (y - large_center_h) / fish_scale; warpPointOpencv(warp_xy, fish_center_h, fish_center_w, xx, yy, scale); return warp_xy; } void warpPointOpencv(cv::Vec2f &warp_xy, float map_center_h, float map_center_w, float x_, float y_, float scale) { warp_xy[0] = x_ * scale + map_center_w; warp_xy[1] = y_ * scale + map_center_h; } 针对上述代码,我们由浅入深地讲述算法流程
3.1 基础的鱼眼去畸变(主点相关)
鱼眼相机成像模型上述代码中令fish_scale为1,先讨论最简单的,即让去畸变图像相机参数中的, 大小与鱼眼图相同,对照鱼眼相机模型这张图和代码,我们来梳理一下算法流程:算法流程- 首先,对于图像平面上的像素点,要用相机的内参f、dx、dy,将其转化到归一化平面,对应上图中的e点。并计算其距离归一化平面中心的距离r_。并计算对应的入射角,即上图中的 theta角
- 根据Kannala-Brandt的鱼眼模型公式,使用事先拟合的k1,k2,k3,k4参数计算归一化平面上去畸变之后点的位置r_distorted
- 在归一化平面上计算去畸变前后点位置的比值:r_distorted/r_
- 3中计算的比值为归一化平面上,同样可以应用到相机成像平面以及图像平面上。因此,可以对图像平面上的像素点,乘上这个系数,就得到了鱼眼图上像素点的位置。
 总体来讲这个基础的鱼眼去畸变算法的实现思路就是:在归一化平面上计算去畸变前后的像素坐标scale,然后运用到图像平面上。
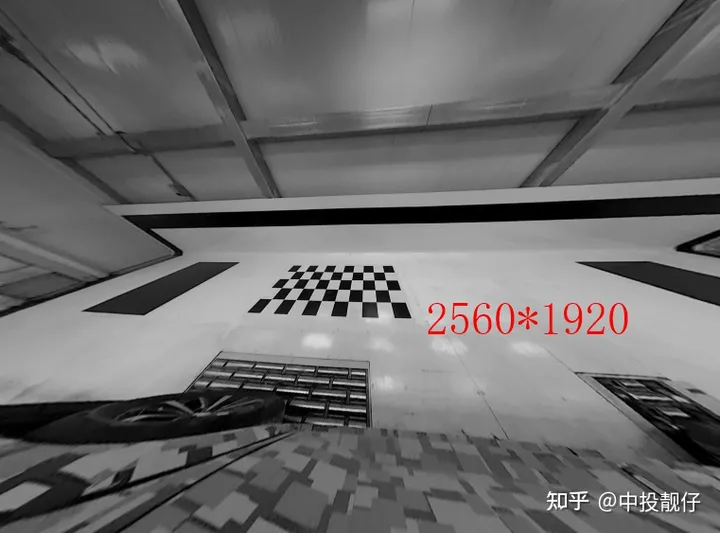
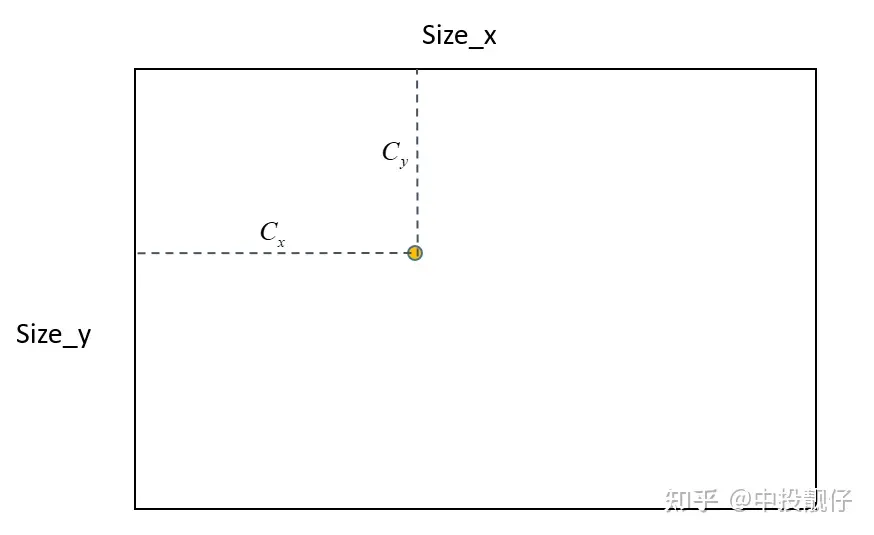 主点位置示意图如上图所示,输出的去畸变图大小为Size,去畸变图相机内参中的主点位置为 ,在算法的实现中,首先会创建Size大小的mesh_grid,即map,确定主点的位置,然后根据mesh_grid上每个点的坐标,计算其与主点的相对位置,然后进行后续的计算(转换到归一化平面、计算scale等),因此根据这个逻辑如果上面的主点不在Size的中心,就会导致相机实际拍摄到内容的中心在主点区域,但是右下角会有很多的延申。例如下图这种:
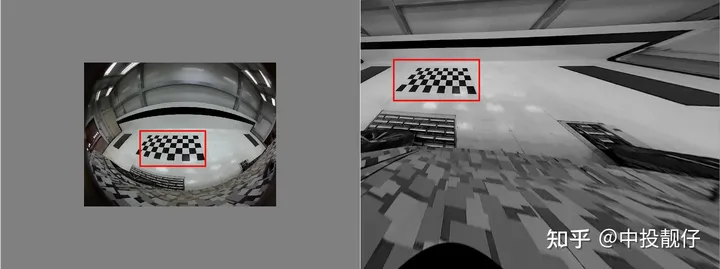 从上图原始的鱼眼图中可以看出相机拍摄的内容中心大概在棋盘格附近,然而去畸变了之后棋盘格却跑到了左上角。这就是因为我们设置的主点偏左上,没有位于生成的去畸变图的中心。这就是2.2节中提到的:initUndistortRectifyMap函数中的size参数一般都是与去畸变之后图像的相机参数中主点大小强相关的。
3.2 进阶的 鱼眼去畸变(如何调整f)
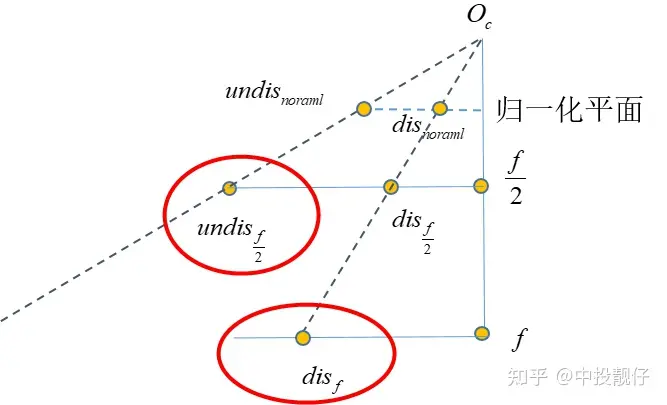
正如第2节所说,我们需要在很小的图像上呈现出大方格。这就需要调整f,这个过程不太容易理解,我们画个图来理解一下: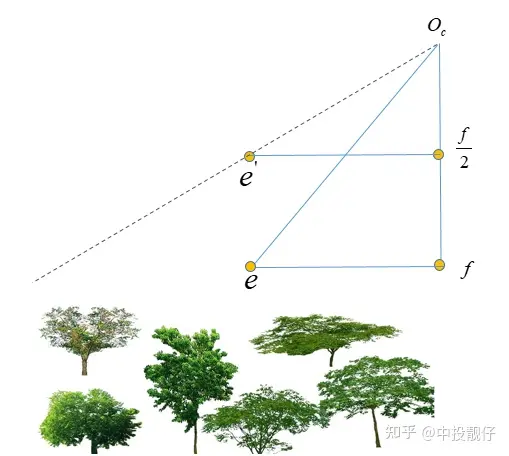 相机焦距调整示意图上图中相机的真实焦距为f,假设cmos长度不变,我们只是把成像平面放在了 f/2 的位置上,显然调整焦距后的相机FOV更大,能够看到的东西越多。同理,对于标定车间中的大方格,假设我们调参使得 , 缩小一定的倍数,理论上就可以看到更多的内容。
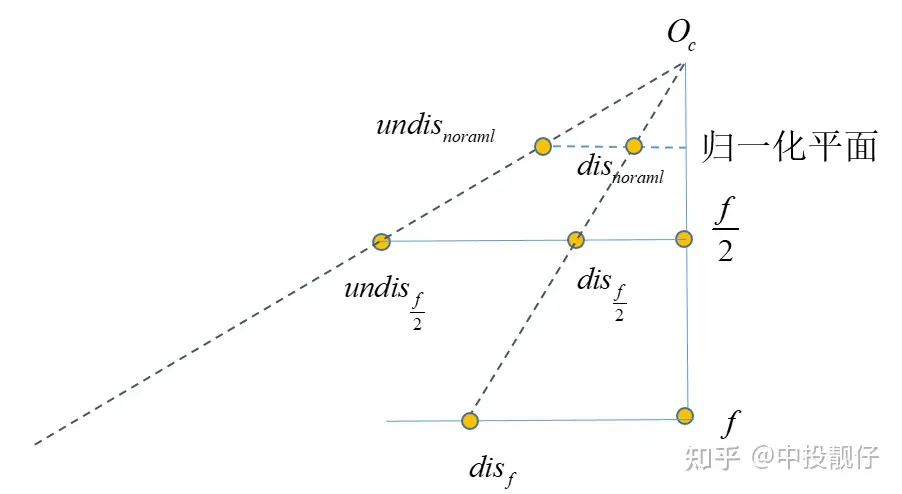 将相机内参 f 缩小为 f/2 意味着我们将相机的cmos推导距离相机光心 f/2 处,在这个平面上做映射。算法流程如下:
- 将相机焦距调整为 f/2 后,使用新的焦距将 点转换到归一化平面上去,得到
- 使用去畸变参数 ,,, 计算其畸变状态下在归一化平面上的位置
- 使用前两步的结果,计算去畸变前后线段的长度比例scale
- 根据已知的 与 前面计算的scale计算出
- *2将点映射到 f 平面上,就得到了在 f/2 成像平面上的去畸变映射关系。
- 当我们调整 f 使其更小时,相同的内容集中于更小的分辨率上,对于后续的图像处理算法会更友好。很多锯齿和模糊的问题都能得到改善
- 在鱼眼上检测棋盘格角点要比在去畸变图上检测棋盘格角点更加准确,因为去畸变后大方格被拉伸的很严重。这个结论的依据是重投影误差以及将鱼眼检测到的角点坐标映射到去畸变图上后与直接在畸变图上的位置做视觉上的比较。
3.3 Opencv API undistortPoints的实现
前面所有讨论的都是undis2fish的过程。在实际的AVM标定中,通常是对鱼眼相机检测角点,因为去畸变之后图像拉伸效果严重,提取的角点不准确。参考张正友标定法标定相机参数时,也是在获取到的图像上直接提取角点,解一个全局优化问题。因此,除了前面讲到的undis2fish映射过程以外,我们还需要实现fish2undis的过程。这个过程Opencv提供了函数undistortPoints,即输入为鱼眼相机上点的坐标,输出为去畸变图像上点的坐标。这个过程是一个解 方程的问题,用到非线性优化,速度很慢。因此我们通过畸变表,构建了一个多项式,通过反向拟合的方法,提前拟合出fish2undis的方程系数:
#forward self.distor_para, _ = curve_fit(self.func, self.data[:, 0],self.data[:, 1]) #inverse f_inverse_para, _ = curve_fit(self.func_inverse, self.data[:, 1], self.data[:, 0]) 计算fish2undis的过程与undis2fish(3.1,3.2)的过程略有不同,但都是寻找 与 之间的映射关系,因为 f 平面才是我们真实拿到的fish图,我们最终还是要在这个原始的fish图上找点。
 实现代码:
实现代码:cv::Vec2f CalibrateInit::warpFisheye2Undist(float fish_scale, float f_dx, float f_dy, float undis_center_h, float undis_center_w, float fish_center_h, float fish_center_w, cv::Vec4d undis_param, float x, float y) { // f_dx *= fish_scale; // f_dy *= fish_scale; float y_ = (y - fish_center_h) / f_dy; // normalized plane float x_ = (x - fish_center_w) / f_dx; float r_distorted = static_cast<float>(sqrt(pow(x_, 2) + pow(y_, 2))); float r_distorted_p2 = r_distorted * r_distorted; float r_distorted_p3 = r_distorted_p2 * r_distorted; float r_distorted_p4 = r_distorted_p2 * r_distorted_p2; float r_distorted_p5 = r_distorted_p2 * r_distorted_p3; float angle_undistorted = static_cast<float>(r_distorted + undis_param[0] * r_distorted_p2 + undis_param[1] * r_distorted_p3 + undis_param[2] * r_distorted_p4 + undis_param[3] * r_distorted_p5); // scale float r_undistorted = tanf(angle_undistorted); float scale = r_undistorted / (r_distorted + 0.00001f); // scale = r_dis on the camera img plane // divide r_undis on the normalized plane cv::Vec2f warp_xy; float xx = (x - fish_center_w) * fish_scale; float yy = (y - fish_center_h) * fish_scale; warpPointInverse(warp_xy, undis_center_h, undis_center_w, xx, yy, scale); return warp_xy; } void CalibrateInit::Vec2f& warp_xy, float map_center_h, float map_center_w, float x_, float y_, float scale) { warp_xy[0] = x_ * scale + map_center_w; warp_xy[1] = y_ * scale + map_center_h; }
总结
本贴讨论的内容为鱼眼相机图像基于畸变表的处理方法,AVM中畸变的运用非常灵活,所以笔者必须对它进行实现才可以灵活运用。据笔者所知有些AVM供应商的鱼眼畸变参数并不一定是依赖畸变表,有的也会拿来一批摄像头自行标定。具体那种方法更优,可能需要更多同行同学的实验和讨论得到结论。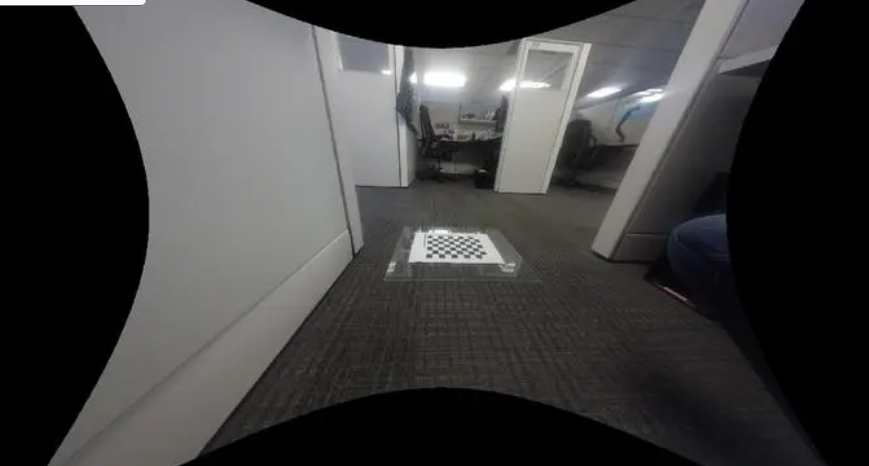
审核编辑 :李倩
声明:本文内容及配图由入驻作者撰写或者入驻合作网站授权转载。文章观点仅代表作者本人,不代表电子发烧友网立场。文章及其配图仅供工程师学习之用,如有内容侵权或者其他违规问题,请联系本站处理。
举报投诉
-
基于米尔RK3576的环视实时性方案解析2025-11-28 1076
-
环视全景摄像头应用在那些场合和起到作用有哪些2016-05-23 3884
-
汽车环视系统设计完整硬件平台设计方案2017-11-20 2086
-
鱼眼相机与PTZ相机相结合的主从目标监控系统2017-11-22 1171
-
KUS集团目前已研发出3D AVM全景环视系统2020-08-22 5454
-
基于除法畸变模型的镜头线性标定方法2021-05-19 1479
-
鱼眼相机的成像原理与成像模型解析2022-09-26 7319
-
鱼眼自动分析仪——薄膜鱼眼检测系统2022-12-26 2147
-
AVM系统算法框架搭建的方法2023-05-15 2267
-
360全景环视原理说明2022-01-17 3067
-
缓解盲区焦虑,打造更直观的AVM全景系统2026-01-26 2104
全部0条评论

快来发表一下你的评论吧 !
