

在树莓派64位上安装TensorFlow
电子说
描述
介绍
本页将指导您在Raspberry Pi 4 64位操作系统Bullseye 上安装 TensorFlow 2.10.0 或更早版本。
TensorFlow是一个专门为深度学习开发的大型软件库。它消耗大量资源。你可以在Raspberry Pi 4上执行TensorFlow,但不要指望奇迹。它可以运行您的模型,如果不是太复杂,但它将无法训练新模型。它也不能执行所谓的迁移学习。除了运行预先构建的深度学习模型外,您还可以使用该库将所谓的冻结 TensorFlow 模型转换为 TensorFlow Lite 平面缓冲区模型。
如果你只是想对深度学习有一些印象,请考虑安装TensorFlow Lite。它的速度要快得多,使用的资源要少得多,因为它是为Raspberry Pi等小型计算机设计的。您可以使用许多现成的生成模型。在此处查看我们的 64 位 Raspberry 安装指南。
路线图
TensorFlow继续增长。每个新版本都需要更多的资源、支持软件和库。它越来越多地给你的树莓派带来了沉重的负担。它解释了为什么最新版本在具有“过时”操作系统的“旧”Raspberry Pis上不能很好地运行。
另一方面,不建议在最新的Bullseye上安装非常旧的TensorFlow版本。您将被迫降级某些系统库,这将阻止其他软件运行。这里最好遵循:“顺其自然”。
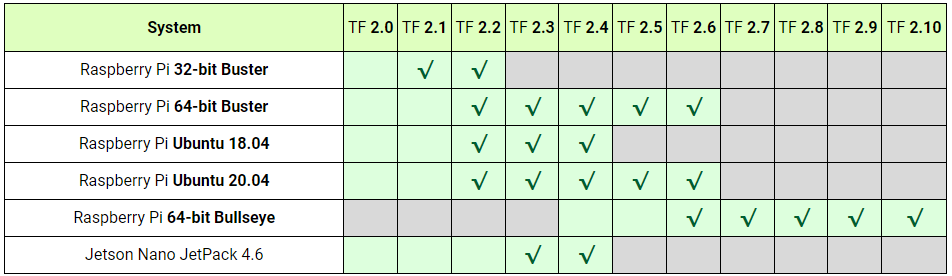
以下是概述。绿色复选标记表示有版本可用。空的绿色盒子意味着没有版本,但仍然可以安装。灰色框指定不允许“正常”安装的硬件或软件限制。
提示

通常,我们会收到一个问题,如果我们有一个带有预装框架和深度学习示例的 Raspberry Pi 4 的 SD 图像。
我们很乐意遵守这一要求。请在我们的GitHub页面上找到一个完整的Raspberry Pi 4,专门用于深度学习。 从我们的GDrive网站下载zip文件,解压缩并在16 GB SD卡上刷新图像,然后开始吧!
我们讨论了两个安装,一个用于 Python 3,一个用于 API 库C++。 不幸的是,没有官方的 aarch64 pip3 轮可用于 2.7、2.6 或 2.5 版本。但是,为了您的方便,我们使用 Bazel 创建了我们的轮子并将它们放在 GitHub 上。
本指南的最后一部分讨论了Keras的安装。
准备
Numpy
Tensorflow在最新版本的numpy中遇到了问题。将 TensorFlow 移植到 numpy 1.20 变得非常困难。现在,随着TensorFlow版本2.8.0的出现,它终于成功了。最后,安装TensorFlow时不再有numpy版本冲突。
但是,TensorFlow 2.7.0仍然报告了一些问题。为了安全起见,请使用 numpy 版本 1.19.5为了TF 2.7.0 以确保一切正常。
libclang 9.0.1
TensorFlow 2.7.0 依赖于 libclang 9.0.1。没有适用于 Debian 10 的发行版。这就是为什么只有TensorFlow 2.7安装在Debian11Bullseye上,。你可以从头开始在Buster RPi上安装libclang 9.0.1,这样你就可以安装TensorFlow了。请注意,clang构建需要大量资源,超过5 GB。最好切换到Bullseye,并在半小时内启动并运行TensorFlow
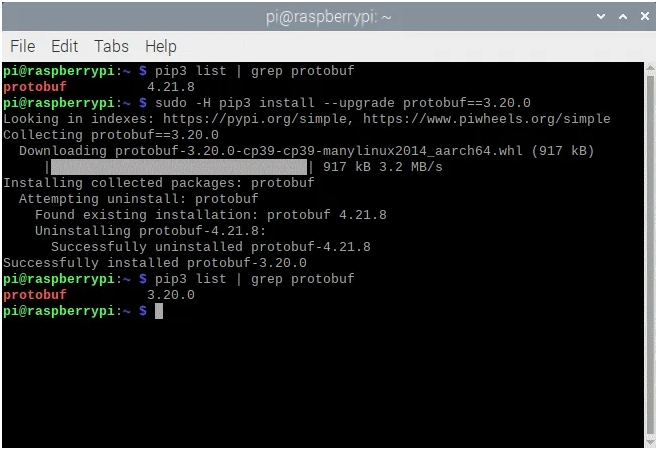
Protobuffer 4.21
最新版本的Protobuffer 4.21.0与以前的版本3.20.1相比有一些重大改进。但是,TensorFlow尚不支持这些更改。为了使 TensorFlow 正常工作,如果您安装了4.21 ,则需要将 Protobuf 降级到 3.20版本。
Tensorflow-io-gcs-filesystem
所有依赖项都可以只用一个命令安装,除了 tensorflow-io-gcs 文件系统。由于没有 aarch64 机器的发行版,我们必须从头开始构建 tensorflow-io-gcs 文件系统。整个过程可以在下面找到,应该在安装TensorFlow本身之前完成。如果让TensorFlow安装io-gcs,它将选择错误的版本并且不起作用。
# get a fresh start
$ sudo apt-get update
$ sudo apt-get upgrade
# install pip3
$ sudo apt-get install git python3-pip
# install correct version protobuf
$ sudo -H pip3 install --upgrade protobuf==3.20.0
Method 1
# download tensorflow io
$ git clone -b v0.23.1 --depth=1 --recursive https://github.com/tensorflow/io.git
$ cd io
$ python3 setup.py -q bdist_wheel --project tensorflow_io_gcs_filesystem
$ cd dist
$ sudo -H pip3 install tensorflow_io_gcs_filesystem-0.23.1-cp39-cp39-linux_aarch64.whl
$ cd ~
Method 2
# or download wheel
$ git clone https://github.com/Qengineering/Tensorflow-io.git
$ cd Tensorflow-io
$ sudo -H pip3 install tensorflow_io_gcs_filesystem-0.23.1-cp39-cp39-linux_aarch64.whl
$ cd ~
Python 3.9 的 TensorFlow wheels
TensorFlow由一个名为Bazel的Google软件安装程序安装。最后,Bazel生成一个轮子来安装TensorFlow Python版本,或者在安装C++版本时生成一个压缩包。这两种方法都是树莓派用户所熟知的。我们已经在GitHub页面上发布了Bazel的结果。随意使用这些轮子。整个 TensorFlow 安装过程从头到尾需要很多小时(Python ±64,C++库±1)。完成所有繁琐的工作后,只需几分钟即可在Raspberry 64位Bullseye上安装TensorFlow。对于很难完成的部分,本手册稍后将介绍完整的程序。
整个快捷方式过程如下。wheels太大,无法存储在GitHub上,因此使用Google驱动器代替。
TensorFlow 2.10.0
# install gdown to download from Google drive
$ sudo -H pip3 install gdown
# download the wheel
$ gdown https://drive.google.com/uc?id=1G2P-FaHAXJ-UuQAQn_0SYjNwBu0aShpd
# install TensorFlow 2.10.0
$ sudo -H pip3 install tensorflow-2.10.0-cp39-cp39-linux_aarch64.whl
TensorFlow 2.9.1
# install gdown to download from Google drive
$ sudo -H pip3 install gdown
# download the wheel
$ gdown https://drive.google.com/uc?id=1xP6ErBK85SMFnQamUh4ro3jRmdCV_qDU
# install TensorFlow 2.9.1
$ sudo -H pip3 install tensorflow-2.9.1-cp39-cp39-linux_aarch64.whl
TensorFlow 2.8.0
# install gdown to download from Google drive
$ sudo -H pip3 install gdown
# download the wheel
$ gdown https://drive.google.com/uc?id=1YpxNubmEL_4EgTrVMu-kYyzAbtyLis29
# install TensorFlow 2.8.0
$ sudo -H pip3 install tensorflow-2.8.0-cp39-cp39-linux_aarch64.whl
TensorFlow 2.7.0
# utmost important: use only numpy version 1.19.5
# check the version first
$ pip3 list | grep numpy
# if not version 1.19.5, update!
$ sudo -H pip3 install numpy==1.19.5
# (re)install termcolor at the correct location
$ python3 -m pip install termcolor
# install gdown to download from Google drive
$ sudo -H pip3 install gdown
# download the wheel
$ gdown https://drive.google.com/uc?id=1FdVZ1kX5QZgWk2SSgq31C2-CF95QhT58
# install TensorFlow 2.7.0
$ sudo -H pip3 install tensorflow-2.7.0-cp39-cp39-linux_aarch64.whl
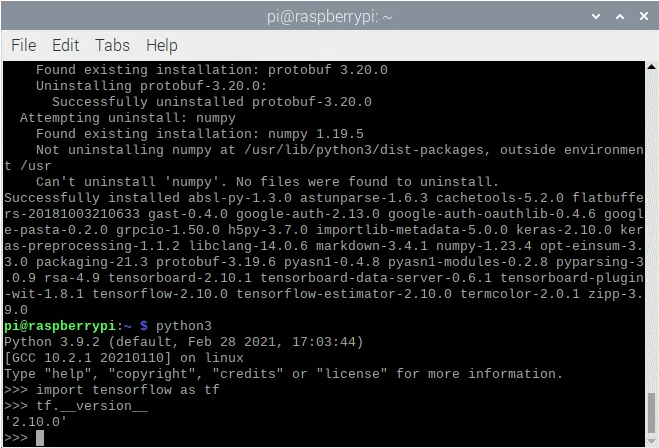
安装成功后,应获得以下屏幕输出。
TensorFlow 2.8.0 C++ API
如果你打算用C++编程,你将需要TensorFlow的C++API版本,而不是Python版本。使用我们 GitHub 页面中的预构建压缩包安装 C++ 库可以为您节省大量时间。 请按照以下步骤操作。
TensorFlow 2.10.0
# get a fresh start
$ sudo apt-get update
$ sudo apt-get upgrade
# remove old versions (if found)
$ sudo rm -r /usr/local/lib/libtensorflow*
$ sudo rm -r /usr/local/include/tensorflow
# the dependencies
$ sudo apt-get install wget curl libhdf5-dev libc-ares-dev libeigen3-dev
$ sudo apt-get install libatomic1 libatlas-base-dev zip unzip
# install gdown to download from Google drive (if not already done)
$ sudo -H pip3 install gdown
# download the tarball
$ gdown https://drive.google.com/uc?id=1GOC5CiT5Ws2NpiBem4K3g3FRqmGDRcL7
# unpack the ball
$ sudo tar -C /usr/local -xzf libtensorflow_cp39_64OS_2_10_0.tar.gz
TensorFlow 2.9.1
# get a fresh start
$ sudo apt-get update
$ sudo apt-get upgrade
# remove old versions (if found)
$ sudo rm -r /usr/local/lib/libtensorflow*
$ sudo rm -r /usr/local/include/tensorflow
# the dependencies
$ sudo apt-get install wget curl libhdf5-dev libc-ares-dev libeigen3-dev
$ sudo apt-get install libatomic1 libatlas-base-dev zip unzip
# install gdown to download from Google drive (if not already done)
$ sudo -H pip3 install gdown
# download the tarball
$ gdown https://drive.google.com/uc?id=1Z83_RQTvCb2jL2BO1Zdez3x4Qx-XheRk
# unpack the ball
$ sudo tar -C /usr/local -xzf libtensorflow_cp39_64OS_2_9_1.tar.gz
TensorFlow 2.8.0
# get a fresh start
$ sudo apt-get update
$ sudo apt-get upgrade
# remove old versions (if found)
$ sudo rm -r /usr/local/lib/libtensorflow*
$ sudo rm -r /usr/local/include/tensorflow
# the dependencies
$ sudo apt-get install wget curl libhdf5-dev libc-ares-dev libeigen3-dev
$ sudo apt-get install libatomic1 libatlas-base-dev zip unzip
# install gdown to download from Google drive (if not already done)
$ sudo -H pip3 install gdown
# download the tarball
$ gdown https://drive.google.com/uc?id=1dmJKIk8lUi_XCzlVnRgL-UvfVFriRmCG
# unpack the ball
$ sudo tar -C /usr/local -xzf libtensorflow_cp39_64OS_2_8_0.tar.gz
TensorFlow 2.7.0
# get a fresh start
$ sudo apt-get update
$ sudo apt-get upgrade
# remove old versions (if found)
$ sudo rm -r /usr/local/lib/libtensorflow*
$ sudo rm -r /usr/local/include/tensorflow
# the dependencies
$ sudo apt-get install wget curl libhdf5-dev libc-ares-dev libeigen3-dev
$ sudo apt-get install libatomic1 libatlas-base-dev zip unzip
# install gdown to download from Google drive (if not already done)
$ sudo -H pip3 install gdown
# download the tarball
$ gdown https://drive.google.com/uc?id=1kScCKyj0pr265XbCgYmXqXs77xJFe6p1
# unpack the ball
$ sudo tar -C /usr/local -xzf libtensorflow_cp39_64OS_2_7_0.tar.gz
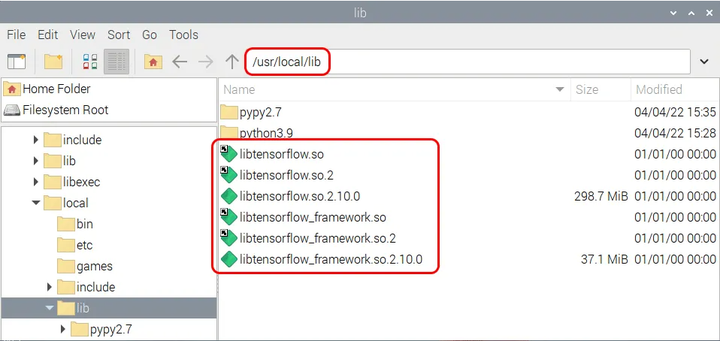
你最终应该将 TensorFlow 库安装在 /usr/local/lib 位置,并将头文件安装在文件夹 usr/local/include/tensorflow/c 中。

从头开始安装
内存交换大小
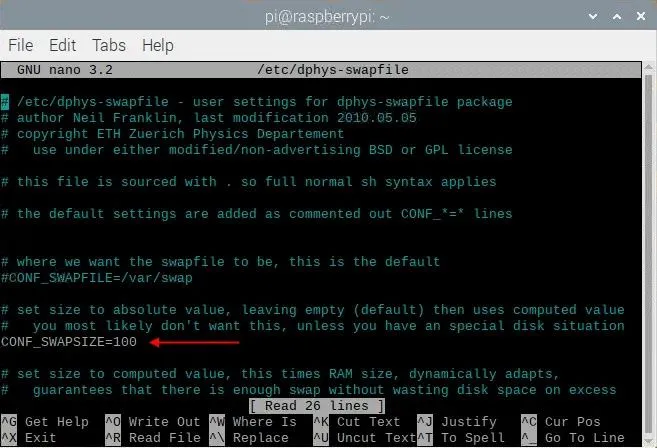
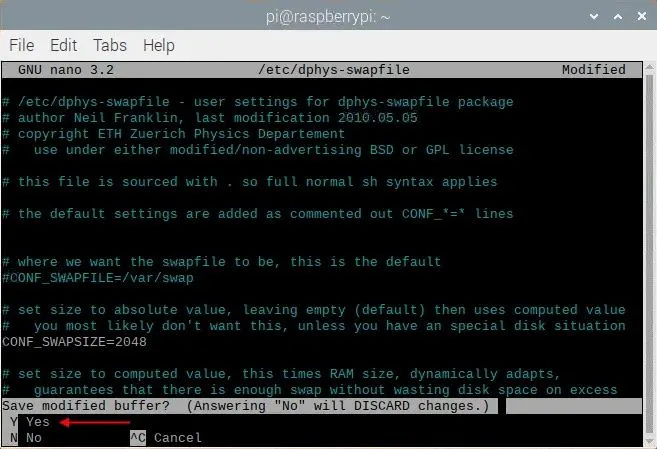
构建完整的 TensorFlow 2.8 包需要超过 6 GB 的 RAM。如果您有具有8 GB RAM的Raspberry Pi 4,那么您就很清楚了。否则,请确保增加交换大小以满足此需求。板载 4 GB RAM,zram 可以提供额外的 2 GB。有了 2 GB 的 RAM,您就不能再依靠 zram 来压缩超过 2 倍。在这种情况下,他们必须重新安装dphys-swapfile才能从SD卡中获取额外的空间。如果您必须安装 dphys-swapfile,请按照以下命令操作。在 Bullseye 操作系统上设置交换空间时,完成重启需要相当长的时间。
# install dphys-swapfile
$ sudo apt-get install dphys-swapfile
# give the required memory size
$ sudo nano /etc/dphys-swapfile
# reboot afterwards
$ sudo reboot

如果一切顺利,你应该有这样的东西。
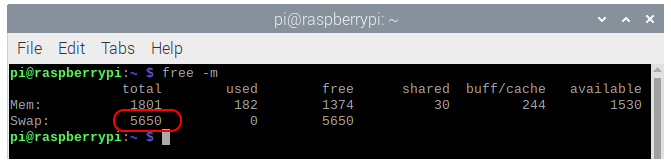
作为记录,显示的数字是dphys-swapfile和zram分配的交换空间总量。请不要忘记在完成后删除dphys-swapfile。
注意:如果在同时启用 zram 和 dphys-swapfile 的情况下重新启动 Raspberry Pi,zram 将在启动期间禁用 dphys-swapfile。您必须手动重新激活此服务。
# reactivate dphys-swapfile after a reboot
# (when zram and dphys-swapfile are both enabled)
$ sudo /etc/init.d/dphys-swapfile stop
$ sudo /etc/init.d/dphys-swapfile start
Bazel
Bazel是Google的免费软件工具,用于自动构建和测试软件包。你可以将它与OpenCV使用的CMake进行比较,但后者只构建软件,没有测试工具。Bazel是用Java编写的,Java是一种独立于平台的语言,在语法方面主要基于C++。要编译 Bazel,我们必须首先使用以下命令安装 Java 和其他一些依赖项。
# get a fresh start
$ sudo apt-get update
$ sudo apt-get upgrade
# install pip and pip3
$ sudo apt-get install python3-pip
# install some tools
$ sudo apt-get install zip unzip curl
# install Java
$ sudo apt-get install openjdk-11-jdk
接下来,我们可以下载并解压缩 Bazel 软件。我们需要 TensorFlow 2.1.0 的 Bazel 版本 5.1.1,因此请确保安装正确的版本。
$ wget https://github.com/bazelbuild/bazel/releases/download/5.1.1/bazel-5.1.1-dist.zip
$ unzip -d bazel bazel-5.1.1-dist.zip
$ cd bazel
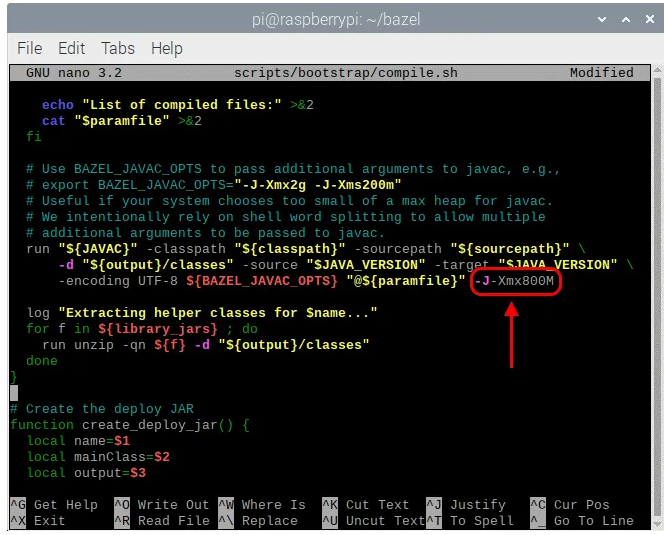
在安装过程中,Bazel 使用预定义的可用工作内存比率。由于树莓派的 RAM 大小有限,这个比例太小了。为防止崩溃,我们必须将此内存的大小定义为最大板载 RAM 的 40%。例如,800 MB用于2 GByte RAM Raspberry Pi。这是通过在脚本文件 compile.sh 中添加一些额外信息来完成的。您可以将文本 -J-Xmx800M 添加到以 run 开头的行中。 (第 144 行左右)。请参阅下面的屏幕。使用众所周知的、、保存更改(请参阅上面的幻灯片放映)。
$ nano scripts/bootstrap/compile.sh -c
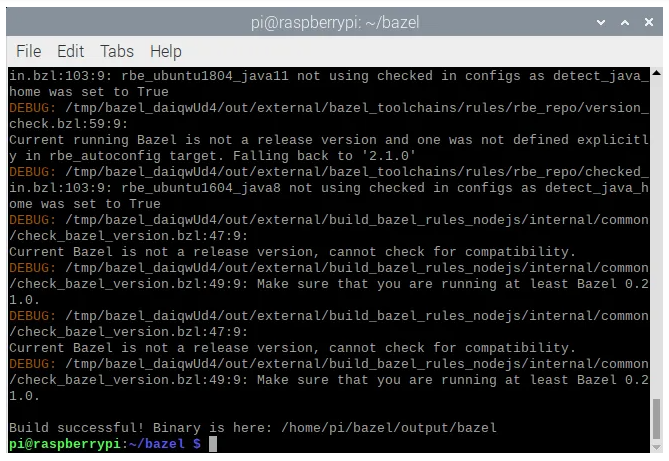
一旦 Bazel 的 Java 环境最大化,您就可以使用下一个命令开始构建 Bazel 软件。完成后,将二进制文件复制到 /usr/local/bin 位置,以便 bash 可以在任何地方找到可执行文件。最后一个操作是删除 zip 文件。整个构建大约需要 33 分钟。
# start the build
$ env EXTRA_BAZEL_ARGS="--host_javabase=@local_jdk//:jdk" bash ./compile.sh
# copy the binary
$ sudo cp output/bazel /usr/local/bin/bazel
# clean up
$ cd ~
$ rm bazel-5.1.1-dist.zip
# if you have a copied bazel to /usr/local/bin you may also
# delete the whole bazel directory, freeing another 500 MByte
$ sudo rm -rf bazel
安装 TensorFlow for Python 3
随着Bazel的启动和运行,我们可以开始在64位Raspberry Pi for Python 3上构建TensorFlow 2.10.0。这几乎正在成为标准做法。首先,安装一些依赖项,然后从 GitHub 下载 zip,最后解压缩软件。您还必须安装 tensorflow_io_gcs 文件系统。它是通过使用我们的 GitHub 存储库中的预编译轮来完成的。
TensorFlow 2.10.0
# get a fresh start
$ sudo apt-get update
$ sudo apt-get upgrade
# the dependencies
$ sudo apt-get install zip unzip
$ sudo -H pip3 install keras_applications --no-deps
$ sudo -H pip3 install keras_preprocessing --no-deps
# install correct version protobuf
$ sudo -H pip3 install --upgrade protobuf==3.20.0
# download tensorflow io
$ git clone https://github.com/Qengineering/Tensorflow-io.git
$ cd Tensorflow-io
$ sudo -H pip3 install tensorflow_io_gcs_filesystem-0.23.1-cp39-cp39-linux_aarch64.whl
$ cd ~
# download TensorFlow 2.10.0
$ wget -O tensorflow.zip https://github.com/tensorflow/tensorflow/archive/v2.10.0.zip
$ unzip tensorflow.zip
$ cd tensorflow-2.10.0
$ ./configure
TensorFlow 2.9.1
# get a fresh start
$ sudo apt-get update
$ sudo apt-get upgrade
# the dependencies
$ sudo apt-get install zip unzip
$ sudo -H pip3 install keras_applications --no-deps
$ sudo -H pip3 install keras_preprocessing --no-deps
# install correct version protobuf
$ sudo -H pip3 install --upgrade protobuf==3.20.0
# download tensorflow io
$ git clone https://github.com/Qengineering/Tensorflow-io.git
$ cd Tensorflow-io
$ sudo -H pip3 install tensorflow_io_gcs_filesystem-0.23.1-cp39-cp39-linux_aarch64.whl
$ cd ~
# download TensorFlow 2.9.1
$ wget -O tensorflow.zip https://github.com/tensorflow/tensorflow/archive/v2.9.1.zip
$ unzip tensorflow.zip
$ cd tensorflow-2.9.1
$ ./configure
TensorFlow 2.8.0
# get a fresh start
$ sudo apt-get update
$ sudo apt-get upgrade
# the dependencies
$ sudo apt-get install zip unzip
$ sudo -H pip3 install keras_applications --no-deps
$ sudo -H pip3 install keras_preprocessing --no-deps
# install correct version protobuf
$ sudo -H pip3 install --upgrade protobuf==3.20.0
$ cd ~
# download TensorFlow 2.8.0
$ wget -O tensorflow.zip https://github.com/tensorflow/tensorflow/archive/v2.8.0.zip
$ unzip tensorflow.zip
$ cd tensorflow-2.8.0
$ ./configure
TensorFlow 2.7.0
# get a fresh start
$ sudo apt-get update
$ sudo apt-get upgrade
# the dependencies
$ sudo apt-get install zip unzip
$ sudo -H pip3 install keras_applications --no-deps
$ sudo -H pip3 install keras_preprocessing --no-deps
# download TensorFlow 2.7.0
$ wget -O tensorflow.zip https://github.com/tensorflow/tensorflow/archive/v2.7.0.zip
$ unzip tensorflow.zip
$ cd tensorflow-2.7.0
$ ./configure
构建 Python 3 安装轮之前的最后一步是使用一些环境变量配置构建。这是由 ./configure 脚本文件完成的。将 Python 3 定义为默认的 Python 版本,对所有其他问题定义为“否”。
pi@raspberrypi:~/tensorflow-2.10.0 $ ./configure
You have bazel 5.1.1- (@non-git) installed.
Please specify the location of python. [Default is /usr/bin/python3]:

Found possible Python library paths:
 /usr/lib/python3/dist-packages
 /usr/local/lib/python3.9/dist-packages
Please input the desired Python library path to use.  Default is [/usr/lib/python3/dist-packages]

Do you wish to build TensorFlow with ROCm support? [y/N]: n
No ROCm support will be enabled for TensorFlow.

Do you wish to build TensorFlow with CUDA support? [y/N]: n
No CUDA support will be enabled for TensorFlow.

Do you wish to download a fresh release of clang? (Experimental) [y/N]: n
Clang will not be downloaded.

Please specify optimization flags to use during compilation when bazel option "--config=opt" is specified [Default is -Wno-sign-compare]:

Would you like to interactively configure ./WORKSPACE for Android builds? [y/N]: n
Not configuring the WORKSPACE for Android builds.

Preconfigured Bazel build configs. You can use any of the below by adding "--config=<>" to your build command. See .bazelrc for more details.
--config=mkl          # Build with MKL support.
--config=mkl_aarch64 # Build with oneDNN and Compute Library for the Arm Architecture (ACL).
--config=monolithic   # Config for mostly static monolithic build.
--config=numa         # Build with NUMA support.
--config=dynamic_kernels # (Experimental) Build kernels into separate shared objects.
--config=v2           # Build TensorFlow 2.x instead of 1.x.
Preconfigured Bazel build configs to DISABLE default on features:
--config=noaws        # Disable AWS S3 filesystem support.
--config=nogcp        # Disable GCP support.
--config=nohdfs       # Disable HDFS support.
--config=nonccl       # Disable NVIDIA NCCL support.
Configuration finished
脚本文件现已全部设置完毕,可以使用以下命令开始大规模构建。-Xmx1624m 设置运行 Bazel 的 Java 环境的内存大小。给它尽可能多的空间。我们建议 80% 的树莓派内存大小。在我们的例子中,我们有 2 GB 板载,所以 1624 MB 为除 Bazel 之外的其他线程留下了足够的空间。
另一点是Basel 使用的内核数量。最好使用一个内核。运行慢一点比崩溃好一点(总是在最后)并重新开始。
在生成过程中关闭所有其他应用程序。运行的其他进程越少,编译速度就越快。
$ sudo bazel clean
$ sudo bazel --host_jvm_args=-Xmx1624m build
             --config=opt
             --config=noaws
             --config=nogcp
             --config=nohdfs
             --config=nonccl
             --config=monolithic
             --config=v2
             --local_cpu_resources=1
             --define=tflite_pip_with_flex=true
             --copt=-ftree-vectorize
             --copt=-funsafe-math-optimizations
             --copt=-ftree-loop-vectorize
             --copt=-fomit-frame-pointer
             //tensorflow/tools/pip_package:build_pip_package
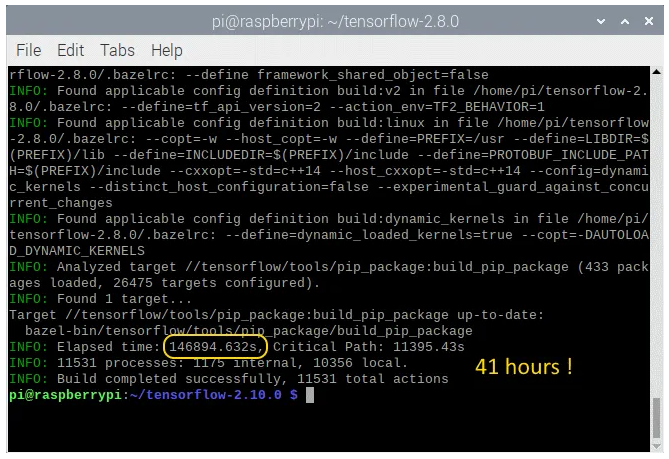
经过 41 小时(或更长时间!)编译后,您将看到以下屏幕。
现在我们必须生成wheel并安装它。这是通过以下命令完成的。安装大约只需几分钟。
TensorFlow 2.10.0
# synthesize the wheel
$ sudo bazel-bin/tensorflow/tools/pip_package/build_pip_package /tmp/tensorflow_pkg
$ cd ~
# go to the folder where the wheel is located and install tensorflow
$ cd /tmp/tensorflow_pkg
$ sudo -H pip3 install tensorflow-2.10.0-cp39-cp39-linux_aarch64.whl
TensorFlow 2.9.1
# synthesize the wheel
$ sudo bazel-bin/tensorflow/tools/pip_package/build_pip_package /tmp/tensorflow_pkg
$ cd ~
# go to the folder where the wheel is located and install tensorflow
$ cd /tmp/tensorflow_pkg
$ sudo -H pip3 install tensorflow-2.9.1-cp39-cp39-linux_aarch64.whl
TensorFlow 2.8.0
# synthesize the wheel
$ sudo bazel-bin/tensorflow/tools/pip_package/build_pip_package /tmp/tensorflow_pkg
$ cd ~
# go to the folder where the wheel is located and install tensorflow
$ cd /tmp/tensorflow_pkg
$ sudo -H pip3 install tensorflow-2.8.0-cp39-cp39-linux_aarch64.whl
TensorFlow 2.7.0
# synthesize the wheel
$ sudo bazel-bin/tensorflow/tools/pip_package/build_pip_package /tmp/tensorflow_pkg
$ cd ~
# go to the folder where the wheel is located and install tensorflow
$ cd /tmp/tensorflow_pkg
$ sudo -H pip3 install tensorflow-2.7.0-cp39-cp39-linux_aarch64.whl
安装 TensorFlow C++ API
如前所述,您可以使用 GitHub 页面上的压缩包非常快速地安装 TensorFlow C++ API;不需要经过漫长的安装过程。 对于那些想要自己构建 API 的人,现在遵循安装指南。
首先,如果尚未安装 Bazel。该过程也在上面描述。一旦 Bazel 开始工作,你可以安装依赖项并下载 TensorFlow,如果之前还没有为 Python 3 安装完成的话。
TensorFlow 2.10.0
# the dependencies
$ sudo apt-get install build-essential make cmake wget zip unzip
$ sudo apt-get install libhdf5-dev libc-ares-dev libeigen3-dev
$ sudo apt-get install libatlas-base-dev
# download TensorFlow 2.10.0
$ wget -O tensorflow.zip https://github.com/tensorflow/tensorflow/archive/v2.10.0.zip
# unpack the folder
$ unzip tensorflow.zip
$ cd tensorflow-2.10.0
$ ./configure
TensorFlow 2.9.1
# the dependencies
$ sudo apt-get install build-essential make cmake wget zip unzip
$ sudo apt-get install libhdf5-dev libc-ares-dev libeigen3-dev
$ sudo apt-get install libatlas-base-dev
# download TensorFlow 2.10.0
$ wget -O tensorflow.zip https://github.com/tensorflow/tensorflow/archive/v2.10.0.zip
# unpack the folder
$ unzip tensorflow.zip
$ cd tensorflow-2.10.0
$ ./configure
TensorFlow 2.8.0
# the dependencies
$ sudo apt-get install build-essential make cmake wget zip unzip
$ sudo apt-get install libhdf5-dev libc-ares-dev libeigen3-dev
$ sudo apt-get install libatlas-base-dev
# download TensorFlow 2.8.0
$ wget -O tensorflow.zip https://github.com/tensorflow/tensorflow/archive/v2.8.0.zip
# unpack the folder
$ unzip tensorflow.zip
$ cd tensorflow-2.8.0
$ ./configure
TensorFlow 2.7.0
# the dependencies
$ sudo apt-get install build-essential make cmake wget zip unzip
$ sudo apt-get install libhdf5-dev libc-ares-dev libeigen3-dev
$ sudo apt-get install libatlas-base-dev
# download TensorFlow 2.7.0
$ wget -O tensorflow.zip https://github.com/tensorflow/tensorflow/archive/v2.7.0.zip
# unpack the folder
$ unzip tensorflow.zip
$ cd tensorflow-2.7.0
$ ./configure
同样,我们需要在实际构建开始之前配置 Bazel。尽管我们要构建一个C++ API,但Bazel脚本文件需要设置为Python 3作为默认Python版本,而所有其他问题则需要设置为“否”。 回答脚本文件的所有问题后,您最终会得到与上所示相同的输出屏幕。
最后一步是命令行及其选项。同样,与之前使用的几乎相同。这里最重要的是 --config=monolithic 标志。没有这个方向,TensorFlow将无法与OpenCV一起使用,反之亦然。就像pip编译一样,Java环境(-Xmx1624m)的内存必须最大化到Raspberry Pi板载内存的80%。 最后一行表示压缩包库构建,而不是pip wheel。
$ sudo bazel --host_jvm_args=-Xmx1624m build
             --config=opt
             --config=noaws
             --config=nogcp
             --config=nohdfs
             --config=nonccl
             --config=monolithic
             --config=v2
             --local_cpu_resources=1
             --copt=-ftree-vectorize
             --copt=-funsafe-math-optimizations
             --copt=-ftree-loop-vectorize
             --copt=-fomit-frame-pointer
             //tensorflow/tools/lib_package:libtensorflow
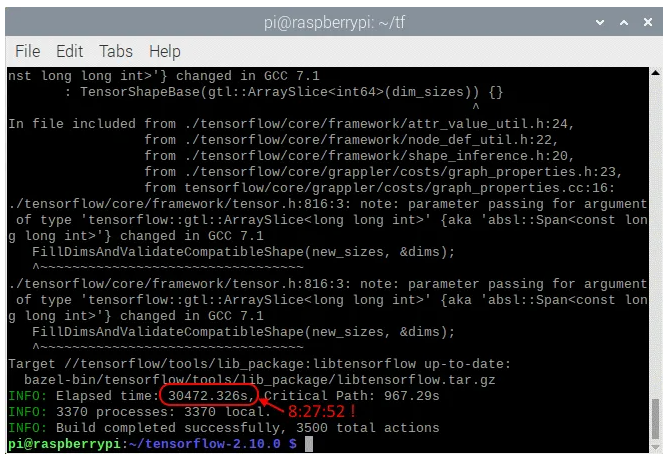
经过漫长的 12 个小时等待,您将看到以下屏幕。
最后一步是安装压缩包。这是通过以下命令完成的。
$ sudo tar -C /usr/local -xzf bazel-bin/tensorflow/tools/lib_package/libtensorflow.tar.gz
安装后,您必须具有相同的文件夹(/usr/local/lib 和 usr/local/include/tensorflow/c),如本页开头所示。
清除
成功安装后,不再需要许多文件。bazel 生成的中间对象文件占用大约 6 GB 的磁盘。删除不会造成任何伤害。
# clean up the whole bazel cache
$ sudo rm -rf ~/.cache/bazel
如果您必须重新安装 dphys-swapfile,是时候再次卸载它了。这样,您将延长SD卡的使用寿命。
# remove the dphys-swapfile (if installed)
$ sudo /etc/init.d/dphys-swapfile stop
$ sudo apt-get remove --purge dphys-swapfile
审核编辑:汤梓红
- 相关推荐
- 热点推荐
- 工控机
- 树莓派
- tensorflow
-
「EDATEC」如何在树莓派4上安装64位操作系统2023-03-31 4284
-
树莓派如何安装和启动2014-06-30 9522
-
树莓派基础功能设置2017-03-02 8588
-
RK3399开发板香橙派4在Ubuntu系统下如何安装TensorFlow2020-10-19 1821
-
在arm的云服务器外树莓派4上安装kata-container2022-07-12 3079
-
树莓派设置基本流程(上)2015-11-30 829
-
树莓派_库函数安装教程2016-01-14 888
-
树莓派的种类_树莓派安装教程2017-11-27 6055
-
树莓派3硬件配置_树莓派3都能装什么系统_树莓派3系统安装教程2017-12-08 27554
-
使用树莓派设计智能小车教程之如何进行树莓派模块安装资料免费下载2019-06-24 1694
-
在树莓派3B上运行64位系统的测评详细说明2019-11-21 3889
-
【树莓派】树莓派4B新手篇:安装官网Raspbian Buster系统及基础配置2021-11-06 1768
-
树莓派32 位和 64 位在实际测试中表现如何2022-03-17 4130
-
TensorFlow手势识别树莓派开源2022-11-09 981
-
用树莓派搞深度学习?TensorFlow启动!2025-03-25 1502
全部0条评论

快来发表一下你的评论吧 !
