

SD技术原理以及部分实现细节
电子说
描述
2022年可谓是AIGC(AI Generated Content)元年 ,上半年有文生图大模型DALL-E2 和Stable Diffusion ,下半年有OpenAI的文本对话大模型ChatGPT 问世,这让冷却的AI又沸腾起来了,因为AIGC能让更多的人真真切切感受到AI的力量。这篇文章将介绍比较火的文生图模型Stable Diffusion(简称SD) ,Stable Diffusion不仅是一个完全开源的模型(代码,数据,模型全部开源),而且是它的参数量只有1B左右,大部分人可以在普通的显卡上进行推理甚至精调模型。毫不夸张的说,Stable Diffusion的出现和开源对AIGC的火热和发展是有巨大推动作用的,因为它让更多的人能快地上手AI作画。这里将基于Hugging Face的diffusers 库深入讲解SD的技术原理以及部分的实现细节,然后也会介绍SD的常用功能,注意本文主要以SD V1.5版本为例,在最后也会简单介绍 SD 2.0版本以及基于SD的扩展应用。
SD模型原理
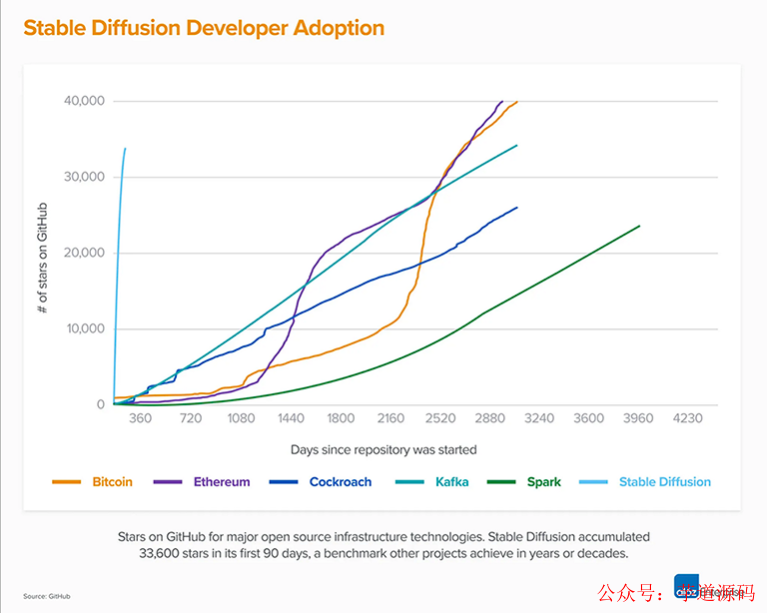
SD是CompVis、Stability AI和LAION等公司研发的一个文生图模型,它的模型和代码是开源的,而且训练数据LAION-5B也是开源的。SD在开源90天github仓库就收获了33K的stars ,可见这个模型是多受欢迎。
SD是一个基于latent的扩散模型 ,它在UNet中引入text condition来实现基于文本生成图像。SD的核心来源于Latent Diffusion 这个工作,常规的扩散模型是基于pixel的生成模型,而Latent Diffusion是基于latent的生成模型,它先采用一个autoencoder将图像压缩到latent空间,然后用扩散模型来生成图像的latents,最后送入autoencoder的decoder模块就可以得到生成的图像。
基于latent的扩散模型的优势在于计算效率更高效,因为图像的latent空间要比图像pixel空间要小,这也是SD的核心优势 。文生图模型往往参数量比较大,基于pixel的方法往往限于算力只生成64x64大小的图像,比如OpenAI的DALL-E2和谷歌的Imagen,然后再通过超分辨模型将图像分辨率提升至256x256和1024x1024;而基于latent的SD是在latent空间操作的,它可以直接生成256x256和512x512甚至更高分辨率的图像。
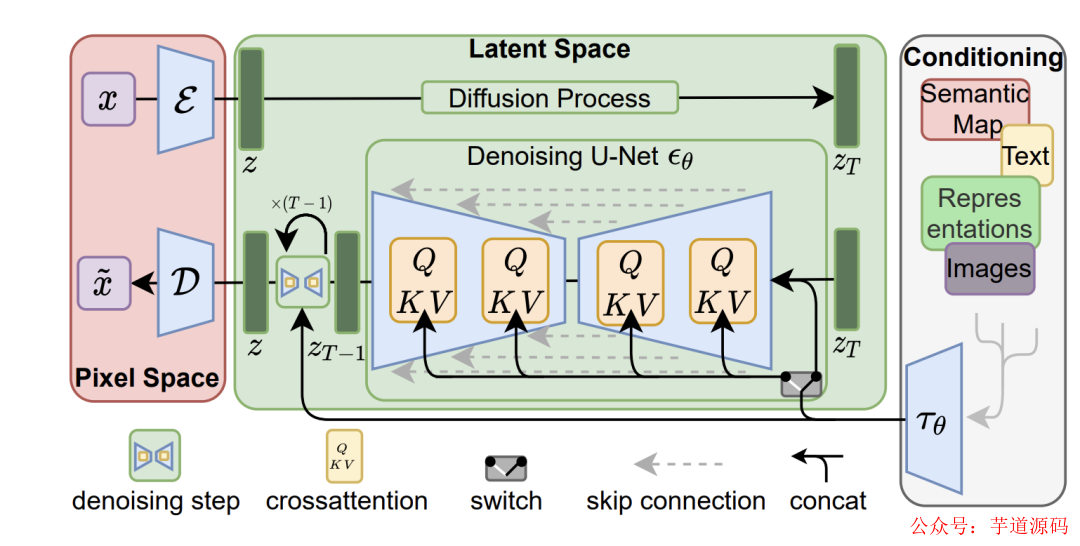
SD模型的主体结构如下图所示,主要包括三个模型:
autoencoder :encoder将图像压缩到latent空间,而decoder将latent解码为图像;
CLIP text encoder :提取输入text的text embeddings,通过cross attention方式送入扩散模型的UNet中作为condition;
UNet :扩散模型的主体,用来实现文本引导下的latent生成。

对于SD模型,其autoencoder模型参数大小为84M,CLIP text encoder模型大小为123M,而UNet参数大小为860M,所以SD模型的总参数量约为1B 。
autoencoder
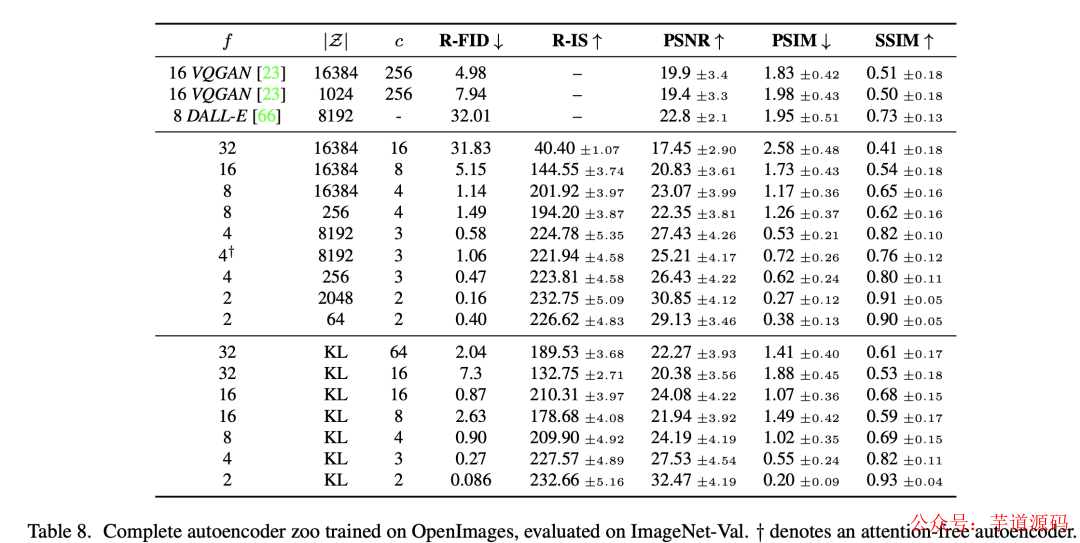
autoencoder是一个基于encoder-decoder架构的图像压缩模型,对于一个大小为的输入图像,encoder模块将其编码为一个大小为的latent,其中为下采样率(downsampling factor)。在训练autoencoder过程中,除了采用L1重建损失 外,还增加了感知损失 (perceptual loss,即LPIPS,具体见论文The Unreasonable Effectiveness of Deep Features as a Perceptual Metric)以及基于patch的对抗训练 。辅助loss主要是为了确保重建的图像局部真实性以及避免模糊,具体损失函数见latent diffusion的loss部分。同时为了防止得到的latent的标准差过大,采用了两种正则化方法:第一种是KL-reg ,类似VAE增加一个latent和标准正态分布的KL loss,不过这里为了保证重建效果,采用比较小的权重(~10e-6);第二种是VQ-reg ,引入一个VQ (vector quantization)layer,此时的模型可以看成是一个VQ-GAN,不过VQ层是在decoder模块中,这里VQ的codebook采样较高的维度(8192)来降低正则化对重建效果的影响。latent diffusion论文中实验了不同参数下的autoencoder模型,如下表所示,可以看到当较小和较大时,重建效果越好(PSNR越大),这也比较符合预期,毕竟此时压缩率小。
论文进一步将不同的autoencoder在扩散模型上进行实验,在ImageNet数据集上训练同样的步数(2M steps),其训练过程的生成质量如下所示,可以看到过小的(比如1和2)下收敛速度慢,此时图像的感知压缩率较小,扩散模型需要较长的学习;而过大的其生成质量较差,此时压缩损失过大。
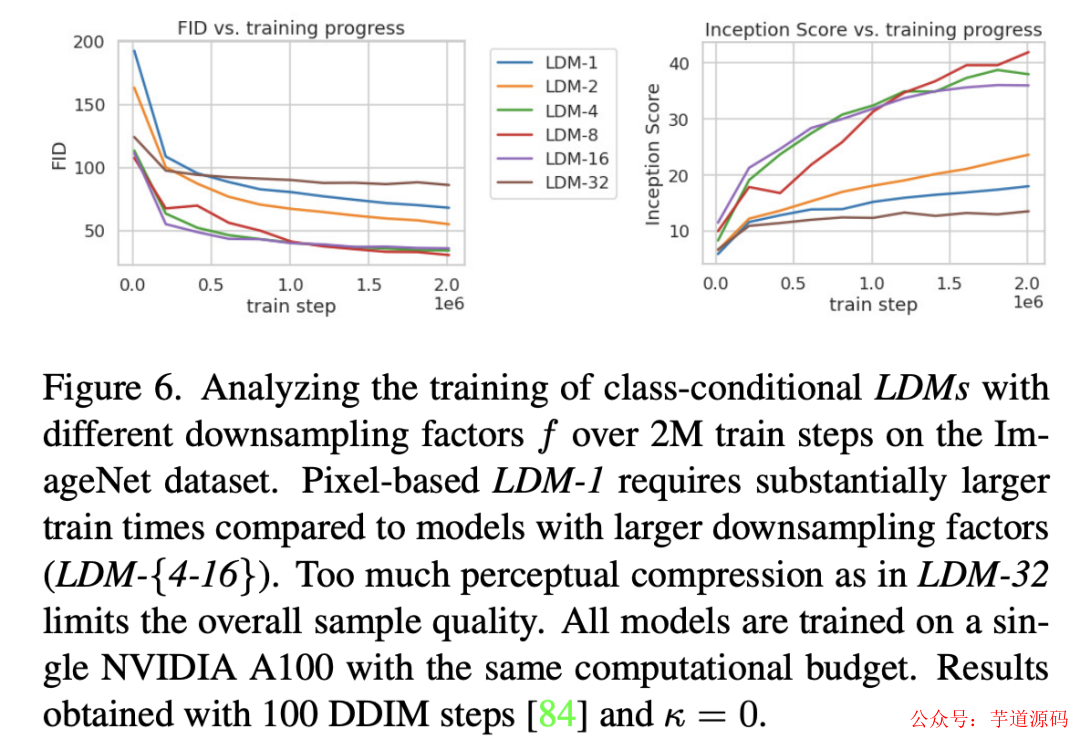
当在4~16时,可以取得相对好的效果。SD采用基于KL-reg的autoencoder,其中下采样率,特征维度为,当输入图像为512x512大小时将得到64x64x4大小的latent。autoencoder模型时在OpenImages数据集上基于256x256大小训练的,但是由于autoencoder的模型是全卷积结构的(基于ResnetBlock),所以它可以扩展应用在尺寸>256的图像上。下面我们给出使用diffusers库来加载autoencoder模型,并使用autoencoder来实现图像的压缩和重建,代码如下所示:
import torch
from diffusers import AutoencoderKL
import numpy as np
from PIL import Image
#加载模型: autoencoder可以通过SD权重指定subfolder来单独加载
autoencoder = AutoencoderKL.from_pretrained("runwayml/stable-diffusion-v1-5", subfolder="vae")
autoencoder.to("cuda", dtype=torch.float16)
> 基于 Spring Boot + MyBatis Plus + Vue & Element 实现的后台管理系统 + 用户小程序,支持 RBAC 动态权限、多租户、数据权限、工作流、三方登录、支付、短信、商城等功能
>
> * 项目地址:
> * 视频教程:
> * 视频教程:
这里我们给出了两张图片在256x256和512x512下的重建效果对比,如下所示,第一列为原始图片,第二列为512x512尺寸下的重建图,第三列为256x256尺寸下的重建图。对比可以看出,autoencoder将图片压缩到latent后再重建其实是有损的,比如会出现文字和人脸的畸变,在256x256分辨率下是比较明显的,512x512下效果会好很多。
这种有损压缩肯定是对SD的生成图像质量是有一定影响的,不过好在SD模型基本上是在512x512以上分辨率下使用的。为了改善这种畸变,stabilityai在发布SD 2.0时同时发布了两个在LAION子数据集上精调的autoencoder,注意这里只精调autoencoder的decoder部分,SD的UNet在训练过程只需要encoder部分,所以这样精调后的autoencoder可以直接用在先前训练好的UNet上(这种技巧还是比较通用的,比如谷歌的Parti也是在训练好后自回归生成模型后,扩大并精调ViT-VQGAN的decoder模块来提升生成质量)。我们也可以直接在diffusers中使用这些autoencoder,比如mse版本(采用mse损失来finetune的模型):
autoencoder = AutoencoderKL.from_pretrained("stabilityai/sd-vae-ft-mse/")
对于同样的两张图,这个mse版本的重建效果如下所示,可以看到相比原始版本的autoencoder,畸变是有一定改善的。
由于SD采用的autoencoder是基于KL-reg的,所以这个autoencoder在编码图像时其实得到的是一个高斯分布DiagonalGaussianDistribution(分布的均值和标准差),然后通过调用sample方法来采样一个具体的latent(调用mode方法可以得到均值)。由于KL-reg的权重系数非常小,实际得到latent的标准差还是比较大的,latent diffusion论文中提出了一种rescaling方法:首先计算出第一个batch数据中的latent的标准差,然后采用的系数来rescale latent,这样就尽量保证latent的标准差接近1(防止扩散过程的SNR较高,影响生成效果,具体见latent diffusion论文的D1部分讨论),然后扩散模型也是应用在rescaling的latent上,在解码时只需要将生成的latent除以,然后再送入autoencoder的decoder即可。对于SD所使用的autoencoder,这个rescaling系数为0.18215。
CLIP text encoder
SD采用CLIP text encoder来对输入text提取text embeddings ,具体的是采用目前OpenAI所开源的最大CLIP模型:clip-vit-large-patch14 ,这个CLIP的text encoder是一个transformer模型(只有encoder模块):层数为12,特征维度为768,模型参数大小是123M。对于输入text,送入CLIP text encoder后得到最后的hidden states(即最后一个transformer block得到的特征),其特征维度大小为77x768(77是token的数量),这个细粒度的text embeddings将以cross attention的方式送入UNet中 。在transofmers库中,可以如下使用CLIP text encoder:
from transformers import CLIPTextModel, CLIPTokenizer

text_encoder = CLIPTextModel.from_pretrained("runwayml/stable-diffusion-v1-5", subfolder="text_encoder").to("cuda")
# text_encoder = CLIPTextModel.from_pretrained("openai/clip-vit-large-patch14").to("cuda")
tokenizer = CLIPTokenizer.from_pretrained("runwayml/stable-diffusion-v1-5", subfolder="tokenizer")
# tokenizer = CLIPTokenizer.from_pretrained("openai/clip-vit-large-patch14")

# 对输入的text进行tokenize,得到对应的token ids
prompt = "a photograph of an astronaut riding a horse"
text_input_ids = text_tokenizer(
    prompt,
    padding="max_length",
    max_length=tokenizer.model_max_length,
    truncation=True,
    return_tensors="pt"
).input_ids

# 将token ids送入text model得到77x768的特征
text_embeddings = text_encoder(text_input_ids.to("cuda"))[0]
值得注意的是,这里的tokenizer最大长度为77(CLIP训练时所采用的设置),当输入text的tokens数量超过77后,将进行截断,如果不足则进行paddings,这样将保证无论输入任何长度的文本(甚至是空文本)都得到77x768大小的特征。在训练SD的过程中,CLIP text encoder模型是冻结的 。在早期的工作中,比如OpenAI的GLIDE和latent diffusion中的LDM均采用一个随机初始化的tranformer模型来提取text的特征,但是最新的工作都是采用预训练好的text model。比如谷歌的Imagen采用纯文本模型T5 encoder来提出文本特征,而SD则采用CLIP text encoder,预训练好的模型往往已经在大规模数据集上进行了训练,它们要比直接采用一个从零训练好的模型要好。
UNet
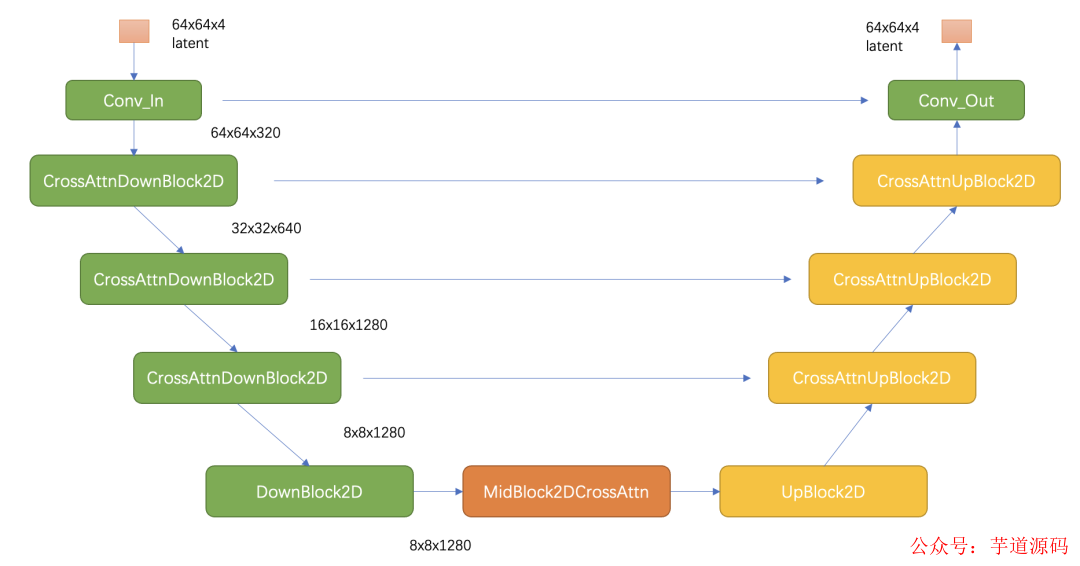
SD的扩散模型是一个860M的UNet,其主要结构如下图所示(这里以输入的latent为64x64x4维度为例),其中encoder部分包括3个CrossAttnDownBlock2D模块和1个DownBlock2D模块,而decoder部分包括1个UpBlock2D模块和3个CrossAttnUpBlock2D模块,中间还有一个UNetMidBlock2DCrossAttn模块。encoder和decoder两个部分是完全对应的,中间存在skip connection。注意3个CrossAttnDownBlock2D模块最后均有一个2x的downsample操作,而DownBlock2D模块是不包含下采样的。
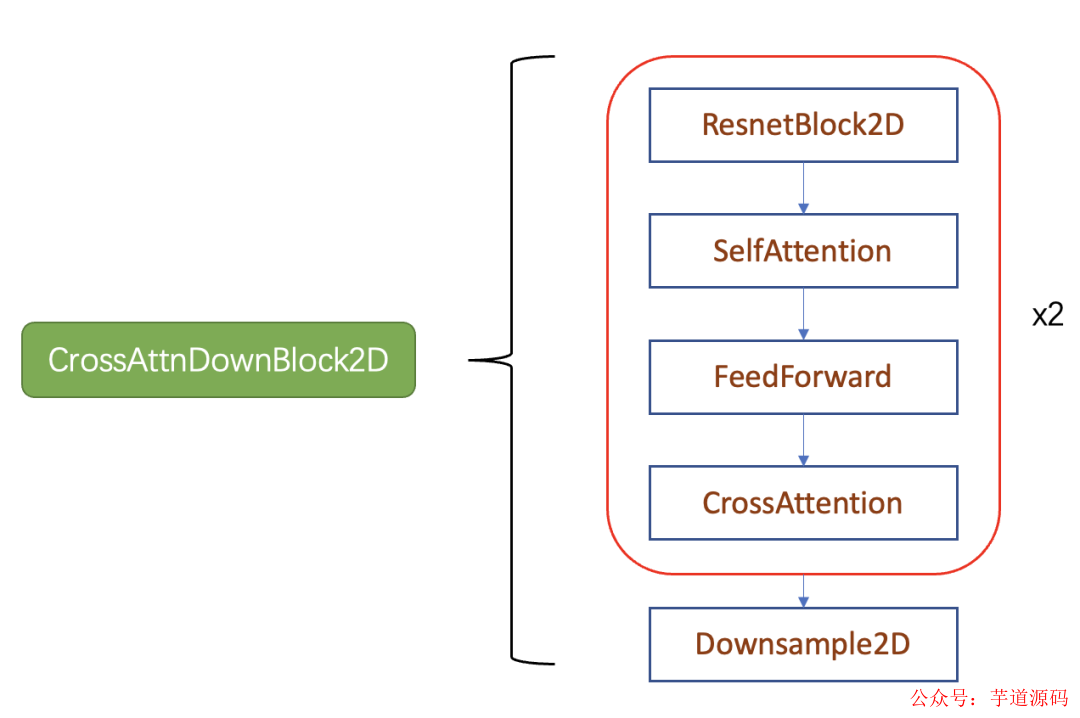
其中CrossAttnDownBlock2D模块的主要结构如下图所示,text condition将通过CrossAttention模块嵌入进来,此时Attention的query是UNet的中间特征,而key和value则是text embeddings。
SD和DDPM一样采用预测noise的方法来训练UNet,其训练损失也和DDPM一样:这里的为text embeddings,此时的模型是一个条件扩散模型。基于diffusers库,我们可以很快实现SD的训练,其核心代码如下所示(这里参考diffusers库下examples中的finetune代码):
import torch
from diffusers import AutoencoderKL, UNet2DConditionModel, DDPMScheduler
from transformers import CLIPTextModel, CLIPTokenizer
import torch.nn.functional as F

# 加载autoencoder
vae = AutoencoderKL.from_pretrained("runwayml/stable-diffusion-v1-5", subfolder="vae")
# 加载text encoder
text_encoder = CLIPTextModel.from_pretrained("runwayml/stable-diffusion-v1-5", subfolder="text_encoder")
tokenizer = CLIPTokenizer.from_pretrained("runwayml/stable-diffusion-v1-5", subfolder="tokenizer")
# 初始化UNet
unet = UNet2DConditionModel(**model_config) # model_config为模型参数配置
# 定义scheduler
noise_scheduler = DDPMScheduler(
    beta_start=0.00085, beta_end=0.012, beta_schedule="scaled_linear", num_train_timesteps=1000
)

# 冻结vae和text_encoder
vae.requires_grad_(False)
text_encoder.requires_grad_(False)

opt = torch.optim.AdamW(unet.parameters(), lr=1e-4)

for step, batch in enumerate(train_dataloader):
    with torch.no_grad():
        # 将image转到latent空间
        latents = vae.encode(batch["image"]).latent_dist.sample()
        latents = latents * vae.config.scaling_factor # rescaling latents
        # 提取text embeddings
        text_input_ids = text_tokenizer(
            batch["text"],
            padding="max_length",
            max_length=tokenizer.model_max_length,
            truncation=True,
            return_tensors="pt"
  ).input_ids
  text_embeddings = text_encoder(text_input_ids)[0]

    # 随机采样噪音
    noise = torch.randn_like(latents)
    bsz = latents.shape[0]
    # 随机采样timestep
    timesteps = torch.randint(0, noise_scheduler.num_train_timesteps, (bsz,), device=latents.device)
    timesteps = timesteps.long()

    # 将noise添加到latent上,即扩散过程
    noisy_latents = noise_scheduler.add_noise(latents, noise, timesteps)

    # 预测noise并计算loss
    model_pred = unet(noisy_latents, timesteps, encoder_hidden_states=text_embeddings).sample
    loss = F.mse_loss(model_pred.float(), noise.float(), reduction="mean")

 opt.step()
    opt.zero_grad()
注意的是SD的noise scheduler虽然也是采用一个1000步长的scheduler,但是不是linear的,而是scaled linear,具体的计算如下所示:
betas = torch.linspace(beta_start**0.5, beta_end**0.5, num_train_timesteps, dtype=torch.float32) ** 2
在训练条件扩散模型时,往往会采用Classifier-Free Guidance (这里简称为CFG),所谓的CFG简单来说就是在训练条件扩散模型的同时也训练一个无条件的扩散模型,同时在采样阶段将条件控制下预测的噪音和无条件下的预测噪音组合在一起来确定最终的噪音,具体的计算公式如下所示:

这里的为guidance scale ,当越大时,condition起的作用越大,即生成的图像其更和输入文本一致。CFG的具体实现非常简单,在训练过程中,我们只需要以一定的概率(比如10%)随机drop掉text 即可,这里我们可以将text置为空字符串(前面说过此时依然能够提取text embeddings)。这里并没有介绍CLF背后的技术原理,感兴趣的可以阅读CFG的论文Classifier-Free Diffusion Guidance以及guided diffusion的论文Diffusion Models Beat GANs on Image Synthesis。CFG对于提升条件扩散模型的图像生成效果是至关重要的 。
训练细节
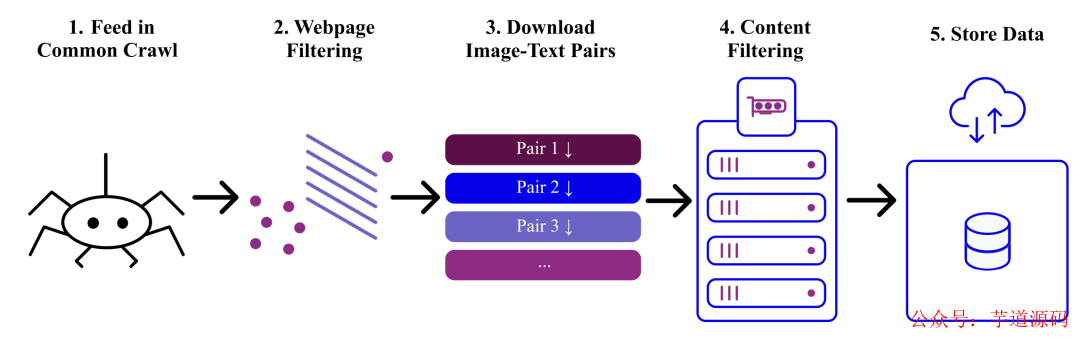
前面我们介绍了SD的模型结构,这里我们也简单介绍一下SD的训练细节,主要包括训练数据和训练资源,这方面也是在SD的Model Card上有说明。首先是训练数据,SD在laion2B-en 数据集 上训练的,它是laion-5b 数据集 的一个子集,更具体的说它是laion-5b中的英文(文本为英文)数据集。laion-5b数据集是从网页数据Common Crawl中筛选出来的图像-文本对数据集,它包含5.85B的图像-文本对,其中文本为英文的数据量为2.32B,这就是laion2B-en数据集。
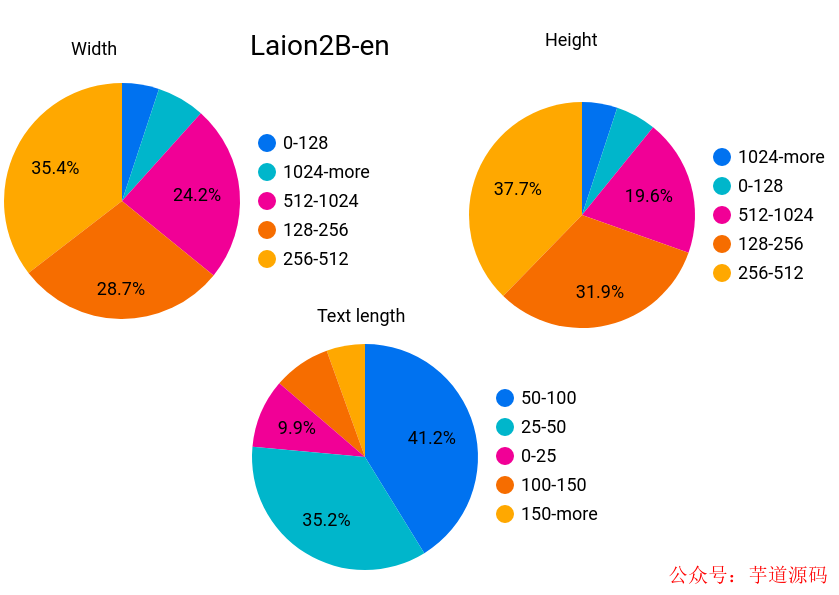
下面是laion2B-en数据集的元信息(图片width和height,以及文本长度)统计分析:其中图片的width和height均在256以上的样本量为1324M,在512以上的样本量为488M,而在1024以上的样本为76M;文本的平均长度为67。
laion数据集中除了图片(下载URL,图像width和height)和文本(描述文本)的元信息外,还包含以下信息:
similarity:使用CLIP ViT-B/32计算出来的图像和文本余弦相似度;
pwatermark:使用一个图片水印检测器检测的概率值,表示图片含有水印的概率;
punsafe:图片是否安全,或者图片是不是NSFW,使用基于CLIP的检测器来估计;
AESTHETIC_SCORE:图片的美学评分(1-10),这个是后来追加的,首先选择一小部分图片数据集让人对图片的美学打分,然后基于这个标注数据集来训练一个打分模型,并对所有样本计算估计的美学评分。
上面是laion数据集的情况,下面我们来介绍SD训练数据集的具体情况,SD的训练是多阶段的 (先在256x256尺寸上预训练,然后在512x512尺寸上精调),不同的阶段产生了不同的版本:
SD v1.1:在laion2B-en数据集上以256x256大小训练237,000步,上面我们已经说了,laion2B-en数据集中256以上的样本量共1324M;然后在laion5B的高分辨率数据集以512x512尺寸训练194,000步,这里的高分辨率数据集是图像尺寸在1024x1024以上,共170M样本。
SD v1.2:以SD v1.1为初始权重,在improved_aesthetics_5plus数据集上以512x512尺寸训练515,000步数,这个improved_aesthetics_5plus数据集上laion2B-en数据集中美学评分在5分以上的子集(共约600M样本),注意这里过滤了含有水印的图片(pwatermark>0.5)以及图片尺寸在512x512以下的样本。
SD v1.3:以SD v1.2为初始权重,在improved_aesthetics_5plus数据集上继续以512x512尺寸训练195,000步数,不过这里采用了CFG(以10%的概率随机drop掉text)。
SD v1.4:以SD v1.2为初始权重,在improved_aesthetics_5plus数据集上采用CFG以512x512尺寸训练225,000步数。
SD v1.5:以SD v1.2为初始权重,在improved_aesthetics_5plus数据集上采用CFG以512x512尺寸训练595,000步数。
其实可以看到SD v1.3、SD v1.4和SD v1.5其实是以SD v1.2为起点在improved_aesthetics_5plus数据集上采用CFG训练过程中的不同checkpoints,目前最常用的版本是SD v1.4和SD v1.5 。SD的训练是采用了32台8卡的A100机器 (32 x 8 x A100_40GB GPUs),所需要的训练硬件还是比较多的,但是相比语言大模型还好。单卡的训练batch size为2,并采用gradient accumulation,其中gradient accumulation steps=2,那么训练的总batch size就是32x8x2x2=2048 。训练优化器采用AdamW ,训练采用warmup,在初始10,000步后学习速率升到0.0001 ,后面保持不变。至于训练时间,文档上只说了用了150,000小时,这个应该是A100卡时,如果按照256卡A100来算的话,那么大约需要训练25天左右 。
模型评测
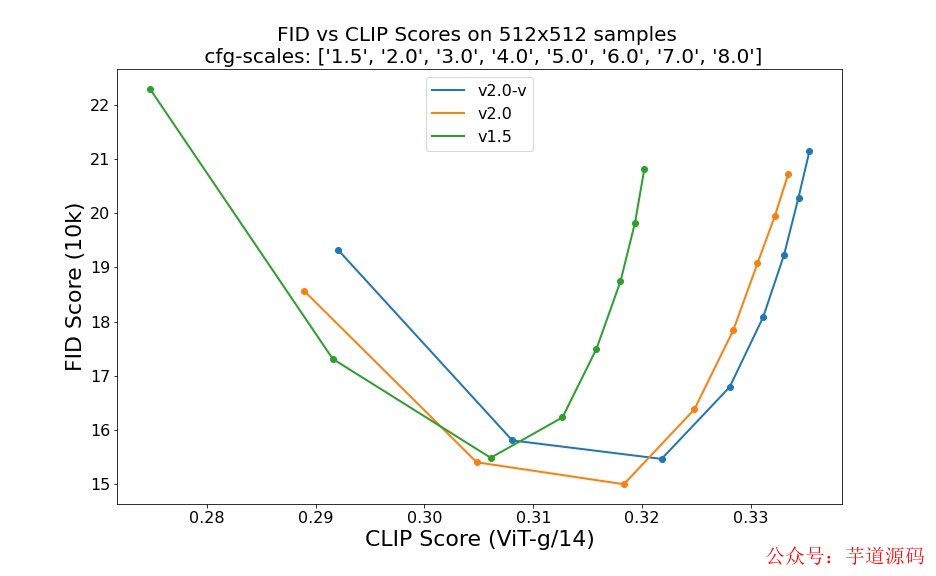
上面介绍了模型训练细节,那么最后的问题就是模型评测了。对于文生图模型,目前常采用的定量指标是FID (Fréchet inception distance)和CLIP score,其中FID可以衡量生成图像的逼真度(image fidelity),而CLIP score评测的是生成的图像与输入文本的一致性,其中FID越低越好,而CLIP score是越大越好。当CFG的gudiance scale参数设置不同时,FID和CLIP score会发生变化,下图为不同的gudiance scale参数下,SD模型在COCO2017验证集上的评测结果,注意这里是zero-shot评测,即SD模型并没有在COCO训练数据集上精调。
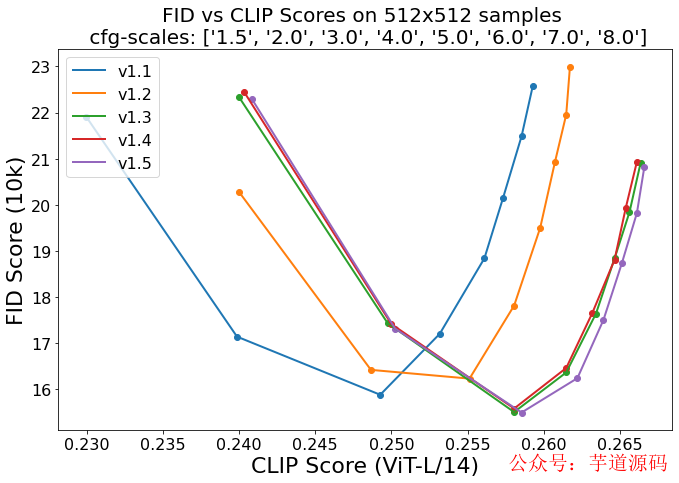
可以看到当gudiance scale=3时,FID最低;而当gudiance scale越大时,CLIP score越大,但是FID同时也变大。在实际应用时,往往会采用较大的gudiance scale,比如SD模型默认采用7.5,此时生成的图像和文本有较好的一致性。从不同版本的对比曲线上看,SD的采用CFG训练后三个版本其实差别并没有那么大,其中SD v1.5相对好一点,但是明显要未采用CFG训练的版本要好的多,这说明CFG训练是比较关键的。目前在模型对比上,大家往往是比较不同模型在COCO验证集上的zero-shot FID-30K(选择30K的样本),大家往往就选择模型所能得到的最小FID来比较,下面为eDiff和GigaGAN两篇论文所报道的不同文生图模型的FID对比(由于SD并没有给出FID-30K,所以大家应该都是自己用开源SD的模型计算的,由于选择样本不同,可能结果存在差异):
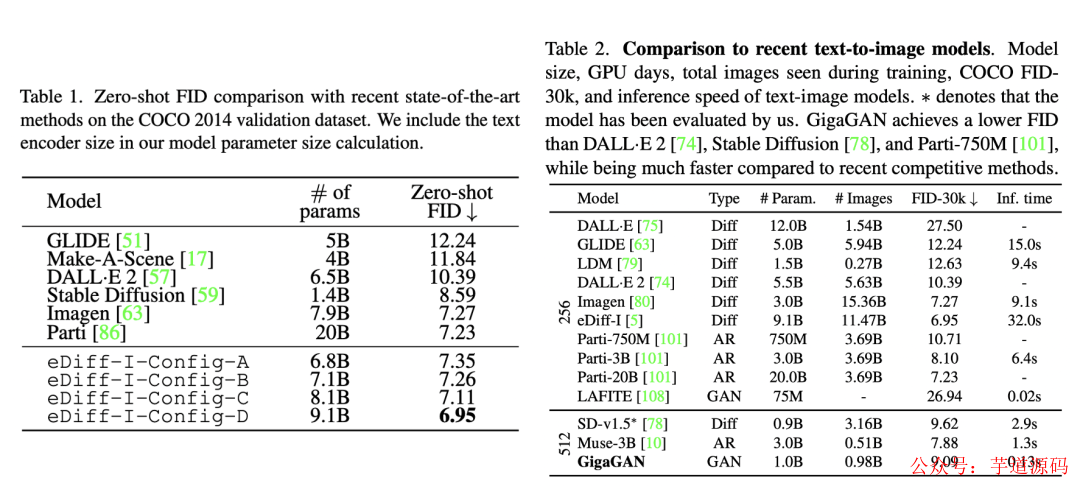
可以看到SD虽然FID不是最好的,但是也能达到比较低的FID(大约在8~9之间)。不过虽然学术界常采用FID来定量比较模型,但是FID有很大的局限性,它并不能很好地衡量生成图像的质量,也是因为这个原因,谷歌的Imagen引入了人工评价,先建立一个评测数据集DrawBench(包含200个不同类型的text),然后用不同的模型来生成图像,让人去评价同一个text下不同模型生成的图像,这种评测方式比较直接,但是可能也受一些主观因素的影响。总而言之,目前的评价方式都有一定的局限性,最好还是直接上手使用来比较不同的模型。
SD的主要应用
下面来介绍SD的主要应用,这包括文生图 ,图生图 以及图像inpainting 。其中文生图是SD的基础功能:根据输入文本生成相应的图像,而图生图和图像inpainting是在文生图的基础上延伸出来的两个功能。
文生图
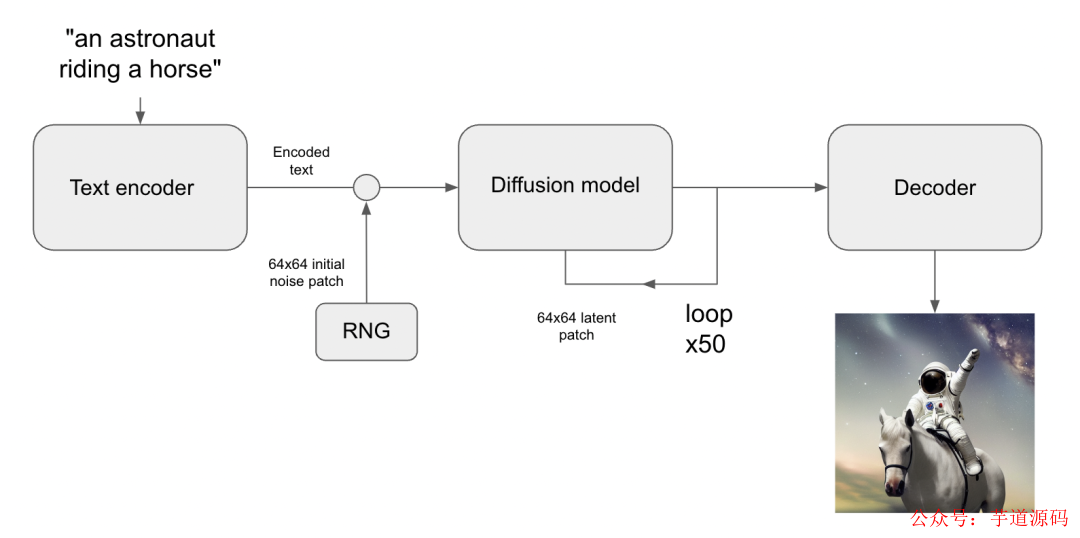
根据文本生成图像这是文生图的最核心的功能,下图为SD的文生图的推理流程图:首先根据输入text用text encoder提取text embeddings,同时初始化一个随机噪音noise(latent上的,512x512图像对应的noise维度为64x64x4),然后将text embeddings和noise送入扩散模型UNet中生成去噪后的latent,最后送入autoencoder的decoder模块得到生成的图像。
使用diffusers库,我们可以直接调用StableDiffusionPipeline来实现文生图,具体代码如下所示:
import torch
from diffusers import StableDiffusionPipeline
from PIL import Image

# 组合图像,生成grid
def image_grid(imgs, rows, cols):
    assert len(imgs) == rows*cols

    w, h = imgs[0].size
    grid = Image.new('RGB', size=(cols*w, rows*h))
    grid_w, grid_h = grid.size

    for i, img in enumerate(imgs):
        grid.paste(img, box=(i%cols*w, i//cols*h))
    return grid

# 加载文生图pipeline
pipe = StableDiffusionPipeline.from_pretrained(
    "runwayml/stable-diffusion-v1-5", # 或者使用 SD v1.4: "CompVis/stable-diffusion-v1-4"
    torch_dtype=torch.float16
).to("cuda")

# 输入text,这里text又称为prompt
prompts = [
    "a photograph of an astronaut riding a horse",
    "A cute otter in a rainbow whirlpool holding shells, watercolor",
    "An avocado armchair",
    "A white dog wearing sunglasses"
]

generator = torch.Generator("cuda").manual_seed(42) # 定义随机seed,保证可重复性

# 执行推理
images = pipe(
    prompts,
    height=512,
    width=512,
    num_inference_steps=50,
    guidance_scale=7.5,
    negative_prompt=None,
    num_images_per_prompt=1,
    generator=generator
).images

grid = image_grid(images, rows=1, cols=4)
grid
生成的图像效果如下所示:
这里可以通过指定width和height来决定生成图像的大小,前面说过SD最后是在512x512尺度上训练的,所以生成512x512尺寸效果是最好的,但是实际上SD可以生成任意尺寸的图片:一方面autoencoder支持任意尺寸的图片的编码和解码,另外一方面扩散模型UNet也是支持任意尺寸的latents生成的(UNet是卷积+attention的混合结构)。然而,生成512x512以外的图片会存在一些问题,比如生成低分辨率图像时,图像的质量大幅度下降,下图为同样的文本在256x256尺寸下的生成效果:
如果是生成512x512以上分辨率的图像,图像质量虽然没问题,但是可能会出现重复物体以及物体被拉长的情况,下图为分别为768x512和512x768尺寸下的生成效果,可以看到部分图像存在一定的问题:
所以虽然SD的架构上支持任意尺寸的图像生成,但训练是在固定尺寸上(512x512),生成其它尺寸图像还是会存在一定的问题。解决这个问题的办法就相对比较简单,就是采用多尺度策略训练,比如NovelAI提出采用Aspect Ratio Bucketing策略来在二次元数据集上精调模型,这样得到的模型就很大程度上避免SD的这个问题,目前大部分开源的基于SD的精调模型往往都采用类似的多尺度策略来精调。比如我们采用开源的dreamlike-diffusion-1.0模型(基于SD v1.5精调的),其生成的图像效果在变尺寸上就好很多:
另外一个参数是num_inference_steps,它是指推理过程中的去噪步数或者采样步数 。SD在训练过程采用的是步数为1000的noise scheduler,但是在推理时往往采用速度更快的scheduler:只需要少量的采样步数就能生成不错的图像,比如SD默认采用PNDM scheduler ,它只需要采样50步就可以出图。当然我们也可以换用其它类型的scheduler,比如DDIM scheduler和DPM-Solver scheduler。我们可以在diffusers中直接替换scheduler,比如我们想使用DDIM:
from diffusers import DDIMScheduler

# 注意这里的clip_sample要关闭,否则生成图像存在问题,因为不能对latent进行clip
pipe.scheduler = DDIMScheduler.from_config(pipe.scheduler.config, clip_sample=False)
换成DDIM后,同样的采样步数生成的图像如下所示,在部分细节上和PNDM有差异:
当然采样步数越大,生成的图像质量越好,但是相应的推理时间也更久 。这里我们可以试验一下不同采样步数下的生成效果,以宇航员骑马为例,下图展示了采样步数为10,20,30,50,70和100时的生成图像,可以看到采样步数增加后,图像生成质量是有一定的提升的,当采样步数为30时就能生成相对稳定的图像。
我们要讨论的第三个参数是guidance_scale,前面说过当CFG的guidance_scale越大时,生成的图像应该会和输入文本更一致,这里我们同样以宇航员骑马为例来测试不同guidance_scale下的图像生成效果。下图为guidance_scale为1,3,5,7,9和11下生成的图像对比,可以看到当guidance_scale较低时生成的图像效果是比较差的,当guidance_scale在7~9时,生成的图像效果是可以的 ,当采用更大的guidance_scale比如11,图像的色彩过饱和而看起来不自然,所以SD默认采用的guidance_scale为7.5 。
过大的guidance_scale之所以出现问题,主要是由于训练和测试的不一致,过大的guidance_scale会导致生成的样本超出范围。谷歌的Imagen论文提出一种dynamic thresholding策略来解决这个问题,所谓的dynamic thresholding是相对于原来的static thresholding,static thresholding策略是直接将生成的样本clip到[-1, 1]范围内(Imagen是基于pixel的扩散模型,这里是将图像像素值归一化到-1到1之间),但是会在过大的guidance_scale时产生很多的饱含像素点。而dynamic thresholding策略是先计算样本在某个百分位下(比如99%)的像素绝对值,然后如果它超过1时就采用来进行clip,这样就可以大大减少过饱和的像素。两种策略的具体实现代码如下所示:
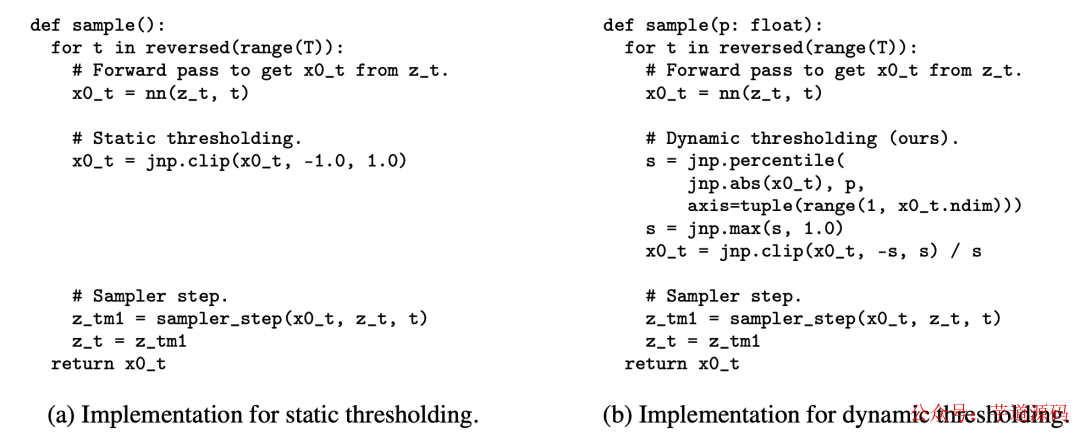
dynamic thresholding策略对于Imagen是比较关键的,它使得Imagen可以采用较大的guidance_scale来生成更自然的图像。下图为两种thresholding策略下生成图像的对比:
虽然SD是基于latent的扩散模型,但依然可以采用类似的dynamic thresholding策略,感兴趣的可以参考目前的一个开源实现:sd-dynamic-thresholding,使用dynamic thresholding策略后,SD可以在较大的guidance_scale下生成相对自然的图像。
另外一个比较容易忽略的参数是negative_prompt,这个参数和CFG有关,前面说过,SD采用了CFG来提升生成图像的质量。使用CFG,去噪过程的噪音预测不仅仅依赖条件扩散模型,也依赖无条件扩散模型:这里的negative_prompt便是无条件扩散模型的text输入,前面说过训练过程中我们将text置为空字符串来实现无条件扩散模型,所以这里:negative_prompt = None = ""。但是有时候我们可以使用不为空的negative_prompt来避免模型生成的图像包含不想要的东西 ,因为从上述公式可以看到这里的无条件扩散模型是我们想远离的部分。下面我们来举几个具体的例子,首先来看生成人物图像的一个例子,这里的输入文本为"a portrait of a beautiful blonde woman",其生成的图像如下所示:
可以看到生成的图像效果并不好,比如出现一些脸部的畸变,但是我们可以设置negative_prompt来提升生成效果,这里我们将negative_prompt设置为"cropped, lowres, poorly drawn face, out of frame, poorly drawn hands, blurry",这些描述都是负面的。改变negative_prompt后,生成的图像效果有一个明显的提升:
第二个例子是一个建筑物,这里的输入文本为"A Hyperrealistic photograph of German architectural modern home",默认图像生成效果如下所示:
虽然生成的图像效果不错,但是如果只想要一个干净的建筑物,而不想背景中含有树木和草地等,此时我们可以通过设置negative prompt来达到这种效果。这里将negative prompt设为"trees, bushes, leaves, greenery",其生成的建筑物就干净了很多:
可以看到合理使用negative prompt能够帮助我们去除不想要的东西来提升图像生成效果。一般情况下,输入的text或者prompt我们称之为“正向提示词 ”,而negative prompt称之为“反向提示词 ”,想要生成的好的图像,不仅要选择好的正向提示词,也需要好的反向提示词,这和文本生成模型也比较类似:都需要好的prompt。这里也举一个对正向prompt优化的例子(这个例子来源于微软的工作Optimizing Prompts for Text-to-Image Generation),这里的原始prompt为"A rabbit is wearing a space suit",可以看到直接生成的效果其实是不尽人意的:
但是如果我们将prompt改为"A rabbit is wearing a space suit, digital Art, Greg rutkowski, Trending cinematographic artstation",其生成的效果就大大提升:
这里我们其实只是在原有的prompt基础加上了一些描述词,有时候我们称之为“魔咒 ”,不同的模型可能会有不同的魔咒。上述我们讨论了SD的文生图的主要参数,这里简单总结一下:
SD默认生成512x512大小的图像,但实际上可以生成其它分辨率的图像,但是可能会出现不协调,如果采用多尺度策略训练,会改善这种情况;
采用快速的noise scheduler,SD在去噪步数为30~50步时就能生成稳定的图像;
SD的guidance_scale设置为7~9是比较稳定的,过小和过大都会出现图像质量下降,实际使用中可以根据具体情况灵活调节;
可以使用negative prompt来去除不想要的东西来改善图像生成效果;
好的prompt对图像生成效果是至关重要的。
上边我们介绍了如何使用SD进行文生图以及一些主要参数,在最后我们也给出文生图这个pipeline的内部流程代码,如下所示:
import torch
from diffusers import AutoencoderKL, UNet2DConditionModel, DDIMScheduler
from transformers import CLIPTextModel, CLIPTokenizer
from tqdm.auto import tqdm


model_id = "runwayml/stable-diffusion-v1-5"
# 1. 加载autoencoder
vae = AutoencoderKL.from_pretrained(model_id, subfolder="vae")
# 2. 加载tokenizer和text encoder
tokenizer = CLIPTokenizer.from_pretrained(model_id, subfolder="tokenizer")
text_encoder = CLIPTextModel.from_pretrained(model_id, subfolder="text_encoder")
# 3. 加载扩散模型UNet
unet = UNet2DConditionModel.from_pretrained(model_id, subfolder="unet")
# 4. 定义noise scheduler
noise_scheduler = DDIMScheduler(
    num_train_timesteps=1000,
    beta_start=0.00085,
    beta_end=0.012,
    beta_schedule="scaled_linear",
    clip_sample=False, # don't clip sample, the x0 in stable diffusion not in range [-1, 1]
    set_alpha_to_one=False,
)

# 将模型复制到GPU上
device = "cuda"
vae.to(device, dtype=torch.float16)
text_encoder.to(device, dtype=torch.float16)
unet = unet.to(device, dtype=torch.float16)

# 定义参数
prompt = [
    "A dragon fruit wearing karate belt in the snow",
    "A small cactus wearing a straw hat and neon sunglasses in the Sahara desert",
    "A photo of a raccoon wearing an astronaut helmet, looking out of the window at night",
    "A cute otter in a rainbow whirlpool holding shells, watercolor"
]
height = 512
width = 512
num_inference_steps = 50
guidance_scale = 7.5
negative_prompt = ""
batch_size = len(prompt)
# 随机种子
generator = torch.Generator(device).manual_seed(2023)


with torch.no_grad():
 # 获取text_embeddings
 text_input = tokenizer(prompt, padding="max_length", max_length=tokenizer.model_max_length, truncation=True, return_tensors="pt")
    text_embeddings = text_encoder(text_input.input_ids.to(device))[0]
 # 获取unconditional text embeddings
 max_length = text_input.input_ids.shape[-1]
 uncond_input = tokenizer(
     [negative_prompt] * batch_size, padding="max_length", max_length=max_length, return_tensors="pt"
 )
      uncond_embeddings = text_encoder(uncond_input.input_ids.to(device))[0]
 # 拼接为batch,方便并行计算
 text_embeddings = torch.cat([uncond_embeddings, text_embeddings])

 # 生成latents的初始噪音
 latents = torch.randn(
     (batch_size, unet.in_channels, height // 8, width // 8),
     generator=generator, device=device
 )
 latents = latents.to(device, dtype=torch.float16)

 # 设置采样步数
 noise_scheduler.set_timesteps(num_inference_steps, device=device)

 # scale the initial noise by the standard deviation required by the scheduler
 latents = latents * noise_scheduler.init_noise_sigma # for DDIM, init_noise_sigma = 1.0

 timesteps_tensor = noise_scheduler.timesteps

 # Do denoise steps
 for t in tqdm(timesteps_tensor):
     # 这里latens扩展2份,是为了同时计算unconditional prediction
     latent_model_input = torch.cat([latents] * 2)
     latent_model_input = noise_scheduler.scale_model_input(latent_model_input, t) # for DDIM, do nothing

     # 使用UNet预测噪音
        noise_pred = unet(latent_model_input, t, encoder_hidden_states=text_embeddings).sample

     # 执行CFG
     noise_pred_uncond, noise_pred_text = noise_pred.chunk(2)
     noise_pred = noise_pred_uncond + guidance_scale * (noise_pred_text - noise_pred_uncond)

     # 计算上一步的noisy latents:x_t -> x_t-1
     latents = noise_scheduler.step(noise_pred, t, latents).prev_sample

 # 注意要对latents进行scale
 latents = 1 / 0.18215 * latents
 # 使用vae解码得到图像
    image = vae.decode(latents).sample
图生图
图生图(image2image)是对文生图功能的一个扩展 ,这个功能来源于SDEdit这个工作,其核心思路也非常简单:给定一个笔画的色块图像,可以先给它加一定的高斯噪音(执行扩散过程)得到噪音图像,然后基于扩散模型对这个噪音图像进行去噪,就可以生成新的图像,但是这个图像在结构和布局和输入图像基本一致。
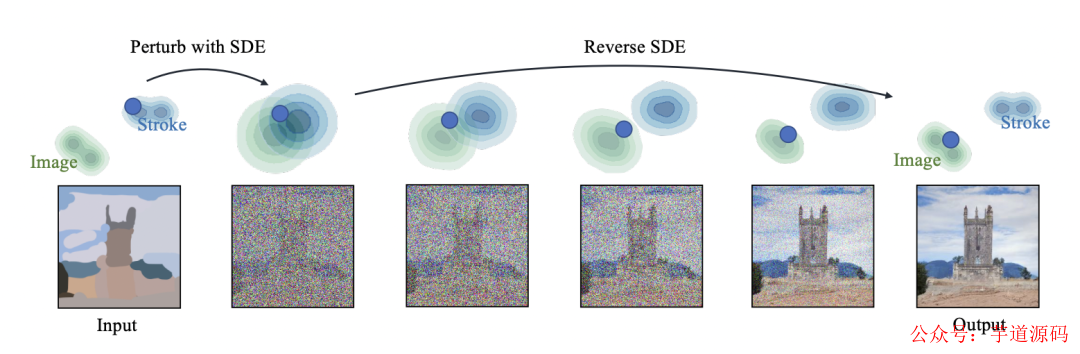
对于SD来说,图生图的流程图如下所示,相比文生图流程来说,这里的初始latent不再是一个随机噪音,而是由初始图像经过autoencoder编码之后的latent加高斯噪音得到,这里的加噪过程就是扩散过程。要注意的是,去噪过程的步数要和加噪过程的步数一致,就是说你加了多少噪音,就应该去掉多少噪音,这样才能生成想要的无噪音图像。
在diffusers中,我们可以使用StableDiffusionImg2ImgPipeline来实现文生图,具体代码如下所示:
import torch
from diffusers import StableDiffusionImg2ImgPipeline
from PIL import Image

# 加载图生图pipeline
model_id = "runwayml/stable-diffusion-v1-5"
pipe = StableDiffusionImg2ImgPipeline.from_pretrained(model_id, torch_dtype=torch.float16).to("cuda")

# 读取初始图片
init_image = Image.open("init_image.png").convert("RGB")

# 推理
prompt = "A fantasy landscape, trending on artstation"
generator = torch.Generator(device="cuda").manual_seed(2023)

image = pipe(
    prompt=prompt,
    image=init_image,
    strength=0.8,
    guidance_scale=7.5,
    generator=generator
).images[0]
image
相比文生图的pipeline,图生图的pipeline还多了一个参数strength,这个参数介于0-1之间,表示对输入图片加噪音的程度,这个值越大加的噪音越多,对原始图片的破坏也就越大,当strength=1时,其实就变成了一个随机噪音,此时就相当于纯粹的文生图pipeline了。下面展示了一个具体的实例,这里的第一张图为输入的初始图片,它是一个笔画的色块,我们可以通过图生图将它生成一幅具体的图像,其中第2张图和第3张图的strength分别是0.5和0.8,可以看到当strength=0.5时,生成的图像和原图比较一致,但是就比较简单了,当strength=0.8时,生成的图像偏离原图更多,但是图像的质感有一个明显的提升。
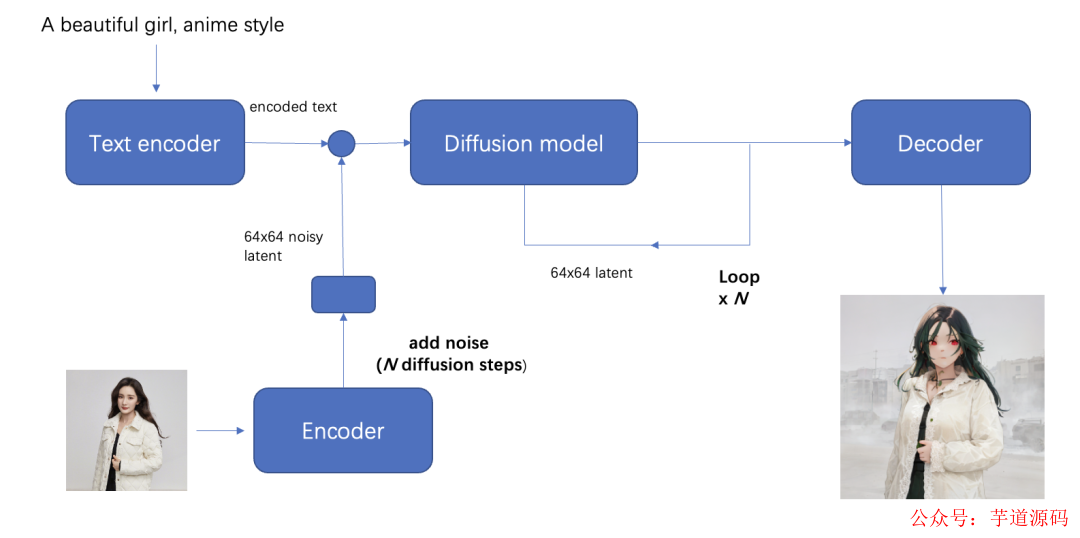
图生图这个功能一个更广泛的应用是在风格转换上,比如给定一张人像,想生成动漫风格的图像。这里我们可以使用动漫风格的开源模型anything-v4.0,它是基于SD v1.5在动漫风格数据集上finetune的,使用它可以更好地利用图生图将人物动漫化。下面的第1张为输入人物图像,采用的prompt为"masterpiece, best quality, 1girl, red hair, medium hair, green eyes",后面的图像是strength分别为0.3-0.9下生成的图像。可以看到在不同的strength下图像有不同的生成效果,其中strength=0.6时我觉得效果是最好的。
总结来看,图生图其实核心也是依赖了文生图的能力,其中strength这个参数需要灵活调节来得到满意的图像 。在最后,我们也给出图生图pipeline的内部主要代码,如下所示:
import PIL
import numpy as np
import torch
from diffusers import AutoencoderKL, UNet2DConditionModel, DDIMScheduler
from transformers import CLIPTextModel, CLIPTokenizer
from tqdm.auto import tqdm


model_id = "runwayml/stable-diffusion-v1-5"
# 1. 加载autoencoder
vae = AutoencoderKL.from_pretrained(model_id, subfolder="vae")
# 2. 加载tokenizer和text encoder
tokenizer = CLIPTokenizer.from_pretrained(model_id, subfolder="tokenizer")
text_encoder = CLIPTextModel.from_pretrained(model_id, subfolder="text_encoder")
# 3. 加载扩散模型UNet
unet = UNet2DConditionModel.from_pretrained(model_id, subfolder="unet")
# 4. 定义noise scheduler
noise_scheduler = DDIMScheduler(
    num_train_timesteps=1000,
    beta_start=0.00085,
    beta_end=0.012,
    beta_schedule="scaled_linear",
    clip_sample=False, # don't clip sample, the x0 in stable diffusion not in range [-1, 1]
    set_alpha_to_one=False,
)

# 将模型复制到GPU上
device = "cuda"
vae.to(device, dtype=torch.float16)
text_encoder.to(device, dtype=torch.float16)
unet = unet.to(device, dtype=torch.float16)

# 预处理init_image
def preprocess(image):
    w, h = image.size
    w, h = map(lambda x: x - x % 32, (w, h))  # resize to integer multiple of 32
    image = image.resize((w, h), resample=PIL.Image.LANCZOS)
    image = np.array(image).astype(np.float32) / 255.0
    image = image[None].transpose(0, 3, 1, 2)
    image = torch.from_numpy(image)
    return 2.0 * image - 1.0

# 参数设置
prompt = ["A fantasy landscape, trending on artstation"]
num_inference_steps = 50
guidance_scale = 7.5
strength = 0.8
batch_size = 1
negative_prompt = ""
generator = torch.Generator(device).manual_seed(2023)

init_image = PIL.Image.open("init_image.png").convert("RGB")

with torch.no_grad():
 # 获取prompt的text_embeddings
 text_input = tokenizer(prompt, padding="max_length", max_length=tokenizer.model_max_length, truncation=True, return_tensors="pt")
    text_embeddings = text_encoder(text_input.input_ids.to(device))[0]
 # 获取unconditional text embeddings
 max_length = text_input.input_ids.shape[-1]
 uncond_input = tokenizer(
     [negative_prompt] * batch_size, padding="max_length", max_length=max_length, return_tensors="pt"
 )
      uncond_embeddings = text_encoder(uncond_input.input_ids.to(device))[0]
 # 拼接batch
 text_embeddings = torch.cat([uncond_embeddings, text_embeddings])

 # 设置采样步数
 noise_scheduler.set_timesteps(num_inference_steps, device=device)
 # 根据strength计算timesteps
 init_timestep = min(int(num_inference_steps * strength), num_inference_steps)
 t_start = max(num_inference_steps - init_timestep, 0)
 timesteps = noise_scheduler.timesteps[t_start:]


 # 预处理init_image
 init_input = preprocess(init_image)
    init_latents = vae.encode(init_input.to(device, dtype=torch.float16)).latent_dist.sample(generator)
    init_latents = 0.18215 * init_latents

 # 给init_latents加噪音
 noise = torch.randn(init_latents.shape, generator=generator, device=device, dtype=init_latents.dtype)
 init_latents = noise_scheduler.add_noise(init_latents, noise, timesteps[:1])
 latents = init_latents # 作为初始latents


 # Do denoise steps
 for t in tqdm(timesteps):
     # 这里latens扩展2份,是为了同时计算unconditional prediction
     latent_model_input = torch.cat([latents] * 2)
     latent_model_input = noise_scheduler.scale_model_input(latent_model_input, t) # for DDIM, do nothing

     # 预测噪音
        noise_pred = unet(latent_model_input, t, encoder_hidden_states=text_embeddings).sample

     # CFG
     noise_pred_uncond, noise_pred_text = noise_pred.chunk(2)
     noise_pred = noise_pred_uncond + guidance_scale * (noise_pred_text - noise_pred_uncond)

     # 计算上一步的noisy latents:x_t -> x_t-1
     latents = noise_scheduler.step(noise_pred, t, latents).prev_sample

 # 注意要对latents进行scale
 latents = 1 / 0.18215 * latents
    # 解码
    image = vae.decode(latents).sample
图像inpainting
最后我们要介绍的一项功能是图像inpainting,它和图生图一样也是文生图功能的一个扩展。SD的图像inpainting不是用在图像修复上,而是主要用在图像编辑 上:给定一个输入图像和想要编辑的区域mask,我们想通过文生图来编辑mask区域的内容。SD的图像inpainting原理可以参考论文Blended Latent Diffusion,其主要原理图如下所示:
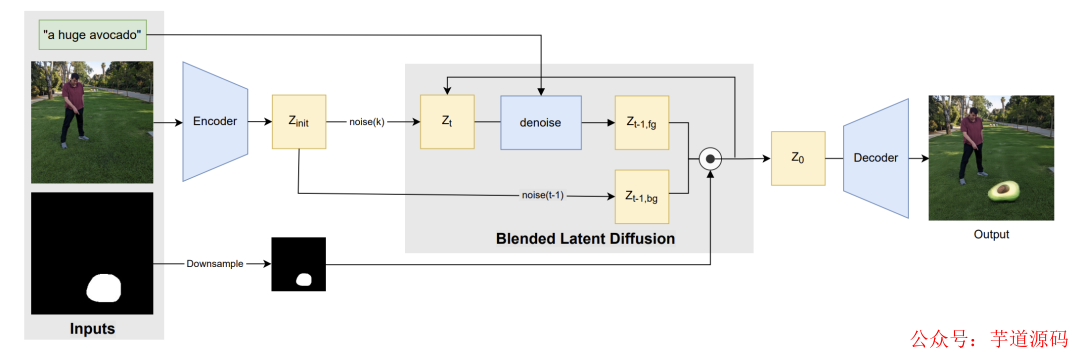
它和图生图一样:首先将输入图像通过autoencoder编码为latent,然后加入一定的高斯噪音生成noisy latent,再进行去噪生成图像,但是这里为了保证mask以外的区域不发生变化,在去噪过程的每一步,都将扩散模型预测的noisy latent用真实图像同level的nosiy latent替换。在diffusers中,使用StableDiffusionInpaintPipelineLegacy可以实现文本引导下的图像inpainting,具体代码如下所示:
import torch
from diffusers import StableDiffusionInpaintPipelineLegacy
from PIL import Image

# 加载inpainting pipeline
model_id = "runwayml/stable-diffusion-v1-5"
pipe = StableDiffusionInpaintPipelineLegacy.from_pretrained(model_id, torch_dtype=torch.float16).to("cuda")

# 读取输入图像和输入mask
input_image = Image.open("overture-creations-5sI6fQgYIuo.png").resize((512, 512))
input_mask = Image.open("overture-creations-5sI6fQgYIuo_mask.png").resize((512, 512))

# 执行推理
prompt = ["a mecha robot sitting on a bench", "a cat sitting on a bench"]
generator = torch.Generator("cuda").manual_seed(0)

with torch.autocast("cuda"):
    images = pipe(
        prompt=prompt,
        image=input_image,
        mask_image=input_mask,
        num_inference_steps=50,
        strength=0.75,
        guidance_scale=7.5,
        num_images_per_prompt=1,
        generator=generator,
    ).images
下面是一个具体的生成效果,这里我们将输入图像的dog换成了mecha robot或者cat,从而实现了图像编辑。
要注意的是这里的参数guidance_scale也和图生图一样比较重要,要生成好的图像,需要选择合适的guidance_scale。如果guidance_scale=0.5时,生成的图像由于过于受到原图干扰而产生一些不协调,如下所示:
合适的prompt也比较重要,比如如果我们去掉prompt中的"sitting on a bench",那么编辑的图像效果也会出现不协调:
无论是上面的图生图还是这里的图像inpainting,我们其实并没有去finetune SD模型,只是扩展了它的能力,但是这两样功能就需要精确调整参数才能得到满意的生成效果。这里,我们也给出StableDiffusionInpaintPipelineLegacy这个pipeline内部的核心代码:
import PIL
import numpy as np
import torch
from diffusers import AutoencoderKL, UNet2DConditionModel, DDIMScheduler
from transformers import CLIPTextModel, CLIPTokenizer
from tqdm.auto import tqdm

def preprocess_mask(mask):
    mask = mask.convert("L")
    w, h = mask.size
    w, h = map(lambda x: x - x % 32, (w, h))  # resize to integer multiple of 32
    mask = mask.resize((w // 8, h // 8), resample=PIL.Image.NEAREST)
    mask = np.array(mask).astype(np.float32) / 255.0
    mask = np.tile(mask, (4, 1, 1))
    mask = mask[None].transpose(0, 1, 2, 3)  # what does this step do?
    mask = 1 - mask  # repaint white, keep black
    mask = torch.from_numpy(mask)
    return mask

def preprocess(image):
    w, h = image.size
    w, h = map(lambda x: x - x % 32, (w, h))  # resize to integer multiple of 32
    image = image.resize((w, h), resample=PIL.Image.LANCZOS)
    image = np.array(image).astype(np.float32) / 255.0
    image = image[None].transpose(0, 3, 1, 2)
    image = torch.from_numpy(image)
    return 2.0 * image - 1.0

model_id = "runwayml/stable-diffusion-v1-5"
# 1. 加载autoencoder
vae = AutoencoderKL.from_pretrained(model_id, subfolder="vae")
# 2. 加载tokenizer和text encoder
tokenizer = CLIPTokenizer.from_pretrained(model_id, subfolder="tokenizer")
text_encoder = CLIPTextModel.from_pretrained(model_id, subfolder="text_encoder")
# 3. 加载扩散模型UNet
unet = UNet2DConditionModel.from_pretrained(model_id, subfolder="unet")
# 4. 定义noise scheduler
noise_scheduler = DDIMScheduler(
    num_train_timesteps=1000,
    beta_start=0.00085,
    beta_end=0.012,
    beta_schedule="scaled_linear",
    clip_sample=False, # don't clip sample, the x0 in stable diffusion not in range [-1, 1]
    set_alpha_to_one=False,
)

# 将模型复制到GPU上
device = "cuda"
vae.to(device, dtype=torch.float16)
text_encoder.to(device, dtype=torch.float16)
unet = unet.to(device, dtype=torch.float16)

prompt = "a mecha robot sitting on a bench"
strength = 0.75
guidance_scale = 7.5
batch_size = 1
num_inference_steps = 50
negative_prompt = ""
generator = torch.Generator(device).manual_seed(0)

with torch.no_grad():
    # 获取prompt的text_embeddings
    text_input = tokenizer(prompt, padding="max_length", max_length=tokenizer.model_max_length, truncation=True, return_tensors="pt")
    text_embeddings = text_encoder(text_input.input_ids.to(device))[0]
    # 获取unconditional text embeddings
    max_length = text_input.input_ids.shape[-1]
    uncond_input = tokenizer(
        [negative_prompt] * batch_size, padding="max_length", max_length=max_length, return_tensors="pt"
    )
    uncond_embeddings = text_encoder(uncond_input.input_ids.to(device))[0]
    # 拼接batch
    text_embeddings = torch.cat([uncond_embeddings, text_embeddings])

    # 设置采样步数
    noise_scheduler.set_timesteps(num_inference_steps, device=device)
    # 根据strength计算timesteps
    init_timestep = min(int(num_inference_steps * strength), num_inference_steps)
    t_start = max(num_inference_steps - init_timestep, 0)
    timesteps = noise_scheduler.timesteps[t_start:]


    # 预处理init_image
    init_input = preprocess(input_image)
    init_latents = vae.encode(init_input.to(device, dtype=torch.float16)).latent_dist.sample(generator)
    init_latents = 0.18215 * init_latents
    init_latents = torch.cat([init_latents] * batch_size, dim=0)
    init_latents_orig = init_latents
    # 处理mask
    mask_image = preprocess_mask(input_mask)
    mask_image = mask_image.to(device=device, dtype=init_latents.dtype)
    mask = torch.cat([mask_image] * batch_size)

    # 给init_latents加噪音
    noise = torch.randn(init_latents.shape, generator=generator, device=device, dtype=init_latents.dtype)
    init_latents = noise_scheduler.add_noise(init_latents, noise, timesteps[:1])
    latents = init_latents # 作为初始latents


    # Do denoise steps
    for t in tqdm(timesteps):
        # 这里latens扩展2份,是为了同时计算unconditional prediction
        latent_model_input = torch.cat([latents] * 2)
        latent_model_input = noise_scheduler.scale_model_input(latent_model_input, t) # for DDIM, do nothing

        # 预测噪音
        noise_pred = unet(latent_model_input, t, encoder_hidden_states=text_embeddings).sample

        # CFG
        noise_pred_uncond, noise_pred_text = noise_pred.chunk(2)
        noise_pred = noise_pred_uncond + guidance_scale * (noise_pred_text - noise_pred_uncond)

        # 计算上一步的noisy latents:x_t -> x_t-1
        latents = noise_scheduler.step(noise_pred, t, latents).prev_sample

        # 将unmask区域替换原始图像的nosiy latents
        init_latents_proper = noise_scheduler.add_noise(init_latents_orig, noise, torch.tensor([t]))
        latents = (init_latents_proper * mask) + (latents * (1 - mask))

    # 注意要对latents进行scale
    latents = 1 / 0.18215 * latents
    image = vae.decode(latents).sample
另外,runwayml在发布SD 1.5版本的同时还发布了一个inpainting模型:runwayml/stable-diffusion-inpainting,与前面所讲不同的是,这是一个在SD 1.2上finetune的模型 。原来SD的UNet的输入是64x64x4,为了实现inpainting,现在给UNet的第一个卷机层增加5个channels,分别为masked图像的latents(经过autoencoder编码,64x64x4)和mask图像(直接下采样8x,64x64x1),增加的权重填零初始化。在diffusers中,可以使用StableDiffusionInpaintPipeline来调用这个模型,具体代码如下:
import torch
from diffusers import StableDiffusionInpaintPipeline
from PIL import Image
from tqdm.auto import tqdm
import PIL

# Load pipeline
model_id = "runwayml/stable-diffusion-inpainting/"
pipe = StableDiffusionInpaintPipeline.from_pretrained(model_id, torch_dtype=torch.float16).to("cuda")

prompt = ["a mecha robot sitting on a bench", "a dog sitting on a bench", "a bench"]

generator = torch.Generator("cuda").manual_seed(2023)

input_image = Image.open("overture-creations-5sI6fQgYIuo.png").resize((512, 512))
input_mask = Image.open("overture-creations-5sI6fQgYIuo_mask.png").resize((512, 512))

images = pipe(
    prompt=prompt,
    image=input_image,
    mask_image=input_mask,
    num_inference_steps=50,
    generator=generator,
    ).images
其生成的效果图如下所示:
经过finetune的inpainting在生成细节上可能会更好,但是有可能会丧失部分文生图的能力,而且也比较难迁移其它finetune的SD模型。
SD 2.0
SD 2.0
Stability AI公司在2022年11月(stable-diffusion-v2-release)放出了SD 2.0版本,这里我们也简单介绍一下相比SD 1.x版本SD 2.0的具体改进点。SD 2.0相比SD 1.x版本的主要变动在于模型结构 和训练数据 两个部分。
首先是模型结构方面,SD 1.x版本的text encoder采用的是OpenAI的CLIP ViT-L/14模型,其模型参数量为123.65M;而SD 2.0采用了更大的text encoder:基于OpenCLIP在laion-2b数据集上训练的CLIP ViT-H/14模型,其参数量为354.03M,相比原来的text encoder模型大了约3倍。两个CLIP模型的对比如下所示:
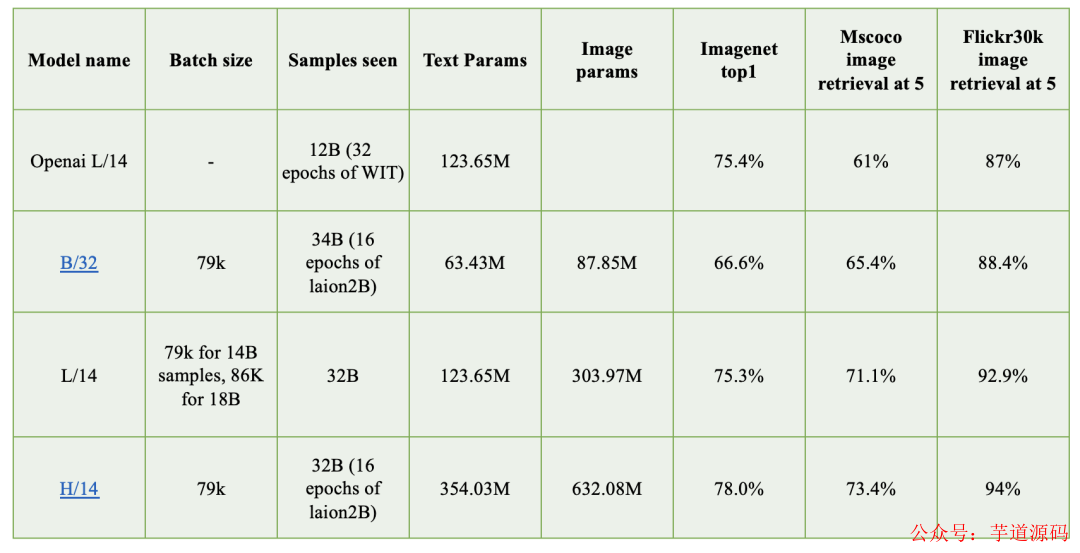
可以看到CLIP ViT-H/14模型相比原来的OpenAI的L/14模型,在imagenet1K上分类准确率和mscoco多模态检索任务上均有明显的提升,这也意味着对应的text encoder更强,能够抓住更准确的文本语义信息。另外是一个小细节是SD 2.0提取的是text encoder倒数第二层的特征,而SD 1.x提取的是倒数第一层的特征。由于倒数第一层的特征之后就是CLIP的对比学习任务,所以倒数第一层的特征可能部分丢失细粒度语义信息,Imagen论文(见论文D.1部分)和novelai(见novelai blog)均采用了倒数第二层特征。对于UNet模型,SD 2.0相比SD 1.x几乎没有改变,唯一的一个小的变动是:SD 2.0不同stage的attention模块是固定attention head dim为64,而SD 1.0则是不同stage的attention模块采用固定attention head数量,明显SD 2.0的这种设定更常用,但是这个变动不会影响模型参数。然后是训练数据,前面说过SD 1.x版本其实最后主要采用laion-2B中美学评分为5以上的子集来训练,而SD 2.0版本采用评分在4.5以上的子集,相当于扩大了训练数据集,具体的训练细节见model card。另外SD 2.0除了512x512版本的模型,还包括768x768版本的模型(https://huggingface.co/stabilityai/stable-diffusion-2),所谓的768x768模型是在512x512模型基础上用图像分辨率大于768x768的子集继续训练的,不过优化目标不再是noise_prediction,而是采用Progressive Distillation for Fast Sampling of Diffusion Models论文中所提出的 v-objective。下图为SD 2.0和SD 1.x版本在COCO2017验证集上评测的对比,可以看到2.0相比1.5,CLIP score有一个明显的提升,同时FID也有一定的提升。但是正如前面所讨论的,FID和CLIP score这两个指标均有一定的局限性,所以具体效果还是上手使用来对比。
Stability AI在发布SD 2.0的同时,还发布了另外3个模型:stable-diffusion-x4-upscaler ,stable-diffusion-2-inpainting 和stable-diffusion-2-depth 。stable-diffusion-x4-upscaler是一个基于扩散模型的4x超分模型,它也是基于latent diffusion,不过这里采用的autoencoder是基于VQ-reg的,下采样率为。在实现上,它是将低分辨率图像直接和noisy latent拼接在一起送入UNet,因为autoencoder将高分辨率图像压缩为原来的1/4,而低分辨率图像也为高分辨率图像的1/4,所以低分辨率图像的空间维度和latent是一致的。另外,这个超分模型也采用了Cascaded Diffusion Models for High Fidelity Image Generation所提出的noise conditioning augmentation,简单来说就是在训练过程中给低分辨率图像加上高斯噪音,可以通过扩散过程来实现,注意这里的扩散过程的scheduler与主扩散模型的scheduler可以不一样,同时也将对应的noise_level(对应扩散模型的time step)通过class labels的方式送入UNet,让UNet知道加入噪音的程度。stable-diffusion-x4-upscaler是使用LAION中>2048x2048大小的子集(10M)训练的,训练过程中采用512x512的crops来训练(降低显存消耗)。SD模型可以用来生成512x512图像,加上这个超分模型,就可以得到2048x2048大小的图像。
在diffusers库中,可以如下使用这个超分模型(这里的noise level是指推理时对低分辨率图像加入噪音的程度):
import requests
from PIL import Image
from io import BytesIO
from diffusers import StableDiffusionUpscalePipeline
import torch

# load model and scheduler
model_id = "stabilityai/stable-diffusion-x4-upscaler"
pipeline = StableDiffusionUpscalePipeline.from_pretrained(model_id, torch_dtype=torch.float16)
pipeline = pipeline.to("cuda")

# let's download an  image
url = "https://huggingface.co/datasets/hf-internal-testing/diffusers-images/resolve/main/sd2-upscale/low_res_cat.png"
response = requests.get(url)
low_res_img = Image.open(BytesIO(response.content)).convert("RGB")
low_res_img = low_res_img.resize((128, 128))

prompt = "a white cat"

upscaled_image = pipeline(prompt=prompt, image=low_res_img, noise_level=20).images[0]
upscaled_image.save("upsampled_cat.png")
stable-diffusion-2-inpainting是图像inpainting模型,和前面所说的runwayml/stable-diffusion-inpainting基本一样,不过它是在SD 2.0的512x512版本上finetune的。
stable-diffusion-2-depth 是也是在SD 2.0的512x512版本上finetune的模型,它是额外增加了图像的深度图作为condition,这里是直接将深度图下采样8x,然后和nosiy latent拼接在一起送入UNet模型中。深度图可以作为一种结构控制,下图展示了加入深度图后生成的图像效果:
你可以调用diffusers库中的StableDiffusionDepth2ImgPipeline来实现基于深度图控制的文生图:
import torch
import requests
from PIL import Image
from diffusers import StableDiffusionDepth2ImgPipeline

pipe = StableDiffusionDepth2ImgPipeline.from_pretrained(
   "stabilityai/stable-diffusion-2-depth",
   torch_dtype=torch.float16,
).to("cuda")

url = "http://images.cocodataset.org/val2017/000000039769.jpg"
init_image = Image.open(requests.get(url, stream=True).raw)

prompt = "two tigers"
n_propmt = "bad, deformed, ugly, bad anotomy"
image = pipe(prompt=prompt, image=init_image, negative_prompt=n_propmt, strength=0.7).images[0]
除此之外,Stability AI公司还开源了两个加强版的autoencoder:ft-EMA和ft-MSE(前者使用L1 loss后者使用MSE loss),前面已经说过,它们是在LAION数据集继续finetune decoder来增强重建效果。
SD 2.1
在SD 2.0版本发布几周后,Stability AI又发布了SD 2.1。SD 2.0在训练过程中采用NSFW检测器过滤掉了可能包含色情的图像(punsafe=0.1),但是也同时过滤了很多人像图片,这导致SD 2.0在人像生成上效果可能较差,所以SD 2.1是在SD 2.0的基础上放开了限制(punsafe=0.98)继续finetune,所以增强了人像的生成效果。
和SD 2.0一样,SD 2.1也包含两个版本:512x512版本和768x768版本。
SD unclip
Stability AI在2023年3月份,又放出了基于SD的另外一个模型:stable-diffusion-reimagine,它可以实现单个图像的变换,即image variations,目前该模型已经在在huggingface上开源:stable-diffusion-2-1-unclip。
这个模型是借鉴了OpenAI的DALLE2(又称unCLIP),unCLIP是基于CLIP的image encoder提取的image embeddings作为condition来实现图像的生成。
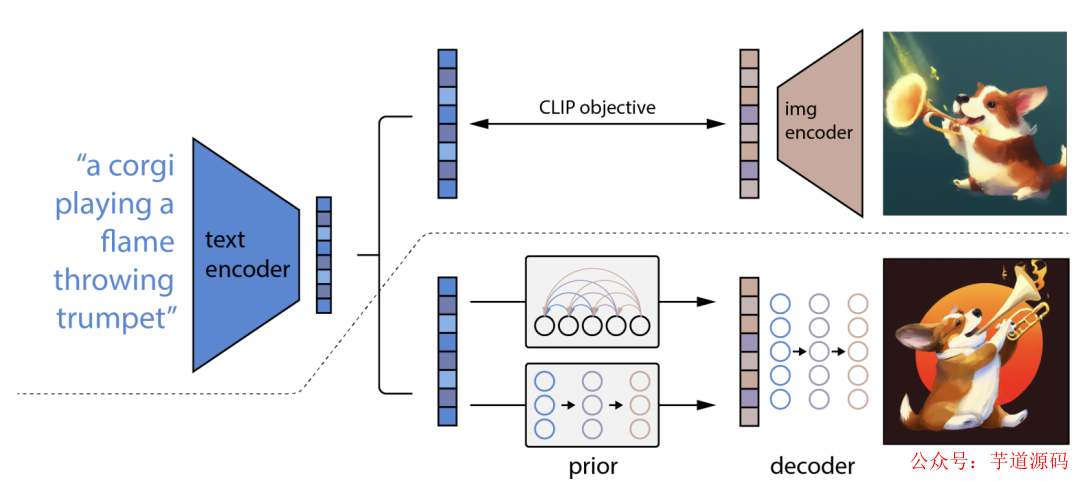
SD unCLIP是在原来的SD模型的基础上增加了CLIP的image encoder的nosiy image embeddings作为condition。具体来说,它在训练过程中是对提取的image embeddings施加一定的高斯噪音(也是通过扩散过程),然后将noise level对应的time embeddings和image embeddings拼接在一起,最后再以class labels的方式送入UNet。在diffusers中,你可以调用StableUnCLIPImg2ImgPipeline来实现图像的变换:
import requests
import torch
from PIL import Image
from io import BytesIO

from diffusers import StableUnCLIPImg2ImgPipeline

#Start the StableUnCLIP Image variations pipeline
pipe = StableUnCLIPImg2ImgPipeline.from_pretrained(
    "stabilityai/stable-diffusion-2-1-unclip", torch_dtype=torch.float16, variation="fp16"
)
pipe = pipe.to("cuda")

#Get image from URL
url = "https://huggingface.co/datasets/hf-internal-testing/diffusers-images/resolve/main/stable_unclip/tarsila_do_amaral.png"
response = requests.get(url)
init_image = Image.open(BytesIO(response.content)).convert("RGB")

#Pipe to make the variation
images = pipe(init_image).images
images[0].save("tarsila_variation.png")
其实在SD unCLIP之前,已经有Lambda Labs开源的sd-image-variations-diffusers,它是在SD 1.4的基础上finetune的模型,不过实现方式是直接将text embeddings替换为image embeddings,这样也同样可以实现图像的变换。
这里SD unCLIP有两个版本:sd21-unclip-l和sd21-unclip-h,两者分别是采用OpenAI CLIP-L和OpenCLIP-H模型的image embeddings作为condition。如果要实现文生图,还需要像DALLE2那样训练一个prior模型,它可以实现基于文本来预测对应的image embeddings,我们将prior模型和SD unCLIP接在一起就可以实现文生图了。KakaoBrain这个公司已经开源了一个DALLE2的复现版本:Karlo,它是基于OpenAI CLIP-L来实现的,你可以基于这个模型中prior模块加上sd21-unclip-l来实现文本到图像的生成,目前这个已经集成了在StableUnCLIPPipeline中,或者基于stablediffusion官方仓库来实现。
SD的其它特色应用
在SD模型开源之后,社区和研究机构也基于SD实现了形式多样的特色应用,这里我们也选择一些比较火的应用来介绍一下。
个性化生成
个性化生成是指的生成特定的角色或者风格,比如给定自己几张肖像来利用SD来生成个性化头像。在个性化生成方面,比较重要的两个工作是英伟达的Textual Inversion 和谷歌的DreamBooth 。Textual Inversion 这个工作的核心思路是基于用户提供的3~5张特定概念(物体或者风格)的图像来学习一个特定的text embeddings,实际上只用一个word embedding就足够了。Textual Inversion 不需要finetune UNet,而且由于text embeddings较小,存储成本很低。目前diffusers库已经支持textual_inversion的训练。
DreamBooth 原本是谷歌提出的应用在Imagen上的个性化生成,但是它实际上也可以扩展到SD上(更新版论文已经增加了SD)。DreamBooth首先为特定的概念寻找一个特定的描述词[V],这个特定的描述词只要是稀有的就可以,然后与Textual Inversion不同的是DreamBooth需要finetune UNet,这里为了防止过拟合,增加了一个class-specific prior preservation loss(基于SD生成同class图像加入batch里面训练)来进行正则化。
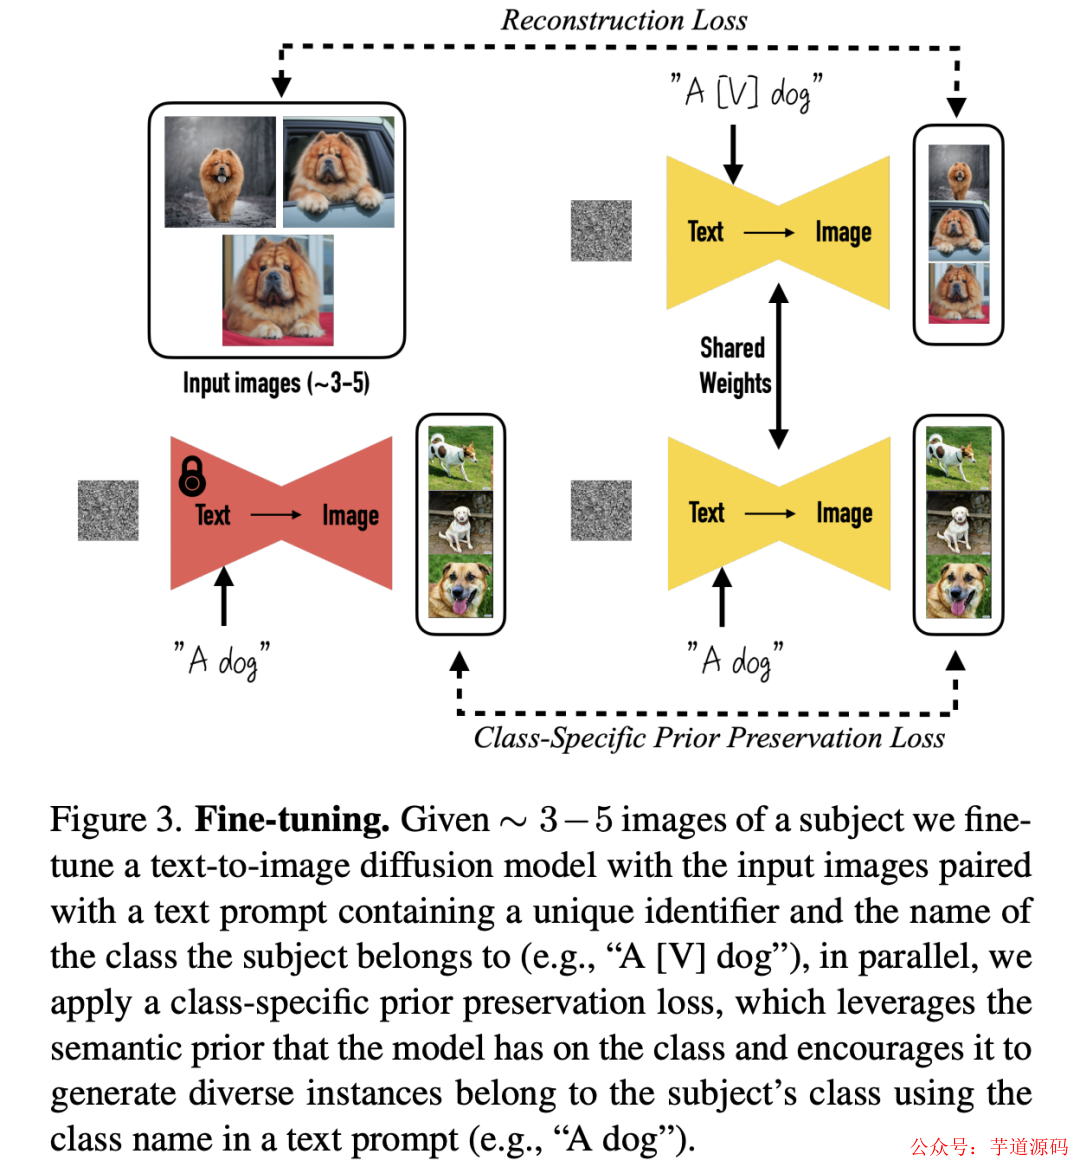
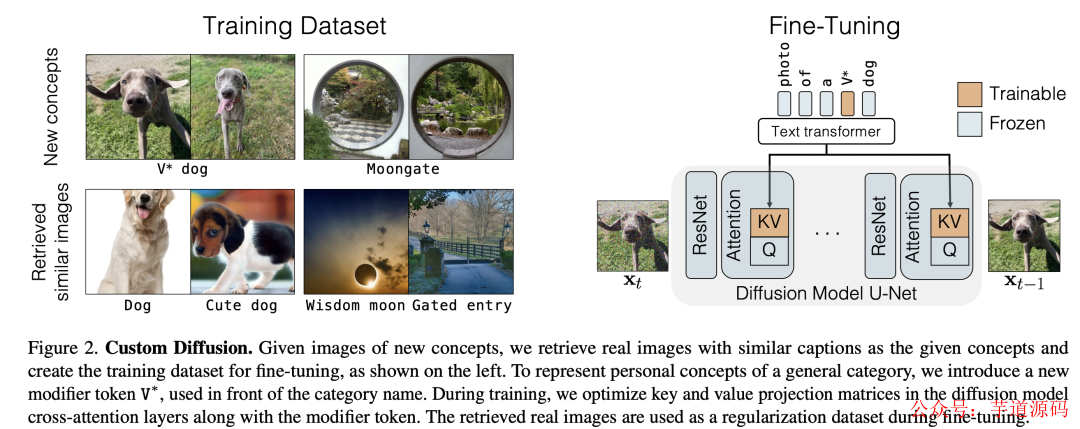
由于finetune了UNet,DreamBooth往往比Textual Inversion要表现的要好,但是DreamBooth的存储成本较高。目前diffusers库已经支持dreambooth训练,你也可以在sd-dreambooth-library中找到其他人上传的模型。DreamBooth和Textual Inversion是最常用的个性化生成方法,但其实除了这两种,还有很多其它的研究工作,比如Adobe提出的Custom Diffusion ,相比DreamBooth,它只finetune了UNet的attention模块的KV权重矩阵,同时优化一个新概念的token。
风格化finetune模型
SD的另外一大应用是采用特定风格的数据集进行finetune,这使得模型“过拟合”在特定的风格上 。之前比较火的novelai就是基于二次元数据在SD上finetune的模型,虽然它失去了生成其它风格图像的能力,但是它在二次元图像的生成效果上比原来的SD要好很多。
目前已经有很多风格化的模型在huggingface上开源,这里也列出一些:
更多的模型可以直接在huggingface text-to-image模型库上找到。此外,很多基于SD进行finetune的模型开源在civitai上,你也可以在这个网站上找到更多风格的模型。值得说明的一点是,目前finetune SD模型的方法主要有两种:一种是直接finetune了UNet,但是容易过拟合,而且存储成本;另外一种低成本的方法是基于微软的LoRA ,LoRA本来是用于finetune语言模型的,但是现在已经可以用来finetune SD模型了,具体可以见博客Using LoRA for Efficient Stable Diffusion Fine-Tuning。
图像编辑
图像编辑也是SD比较火的应用方向,这里所说的图像编辑是指的是使用SD来实现对图片的局部编辑。这里列举两个比较好的工作:谷歌的prompt-to-prompt和加州伯克利的instruct-pix2pix。谷歌的prompt-to-prompt 的核心是基于UNet的cross attention maps来实现对图像的编辑,它的好处是不需要finetune模型,但是主要用在编辑用SD生成的图像。
谷歌后面的工作Null-text Inversion有进一步实现了对真实图片的编辑:
instruct-pix2pix 这个工作基于GPT-3和prompt-to-prompt构建了pair的数据集,然后在SD上进行finetune,它可以输入text instruct对图像进行编辑:
可控生成
可控生成是SD最近比较火的应用,这主要归功于ControlNet,基于ControlNet可以实现对很多种类的可控生成,比如边缘,人体关键点,草图和深度图等等。
其实在ControlNet之前,也有一些可控生成的工作,比如stable-diffusion-2-depth 也属于可控生成,但是都没有太火。我觉得ControlNet之所以火,是因为这个工作直接实现了各种各种的可控生成,而且训练的ControlNet可以迁移到其它基于SD finetune的模型上(见Transfer Control to Other SD1.X Models):
与ControlNet同期的工作还有腾讯的T2I-Adapter以及阿里的composer-page:
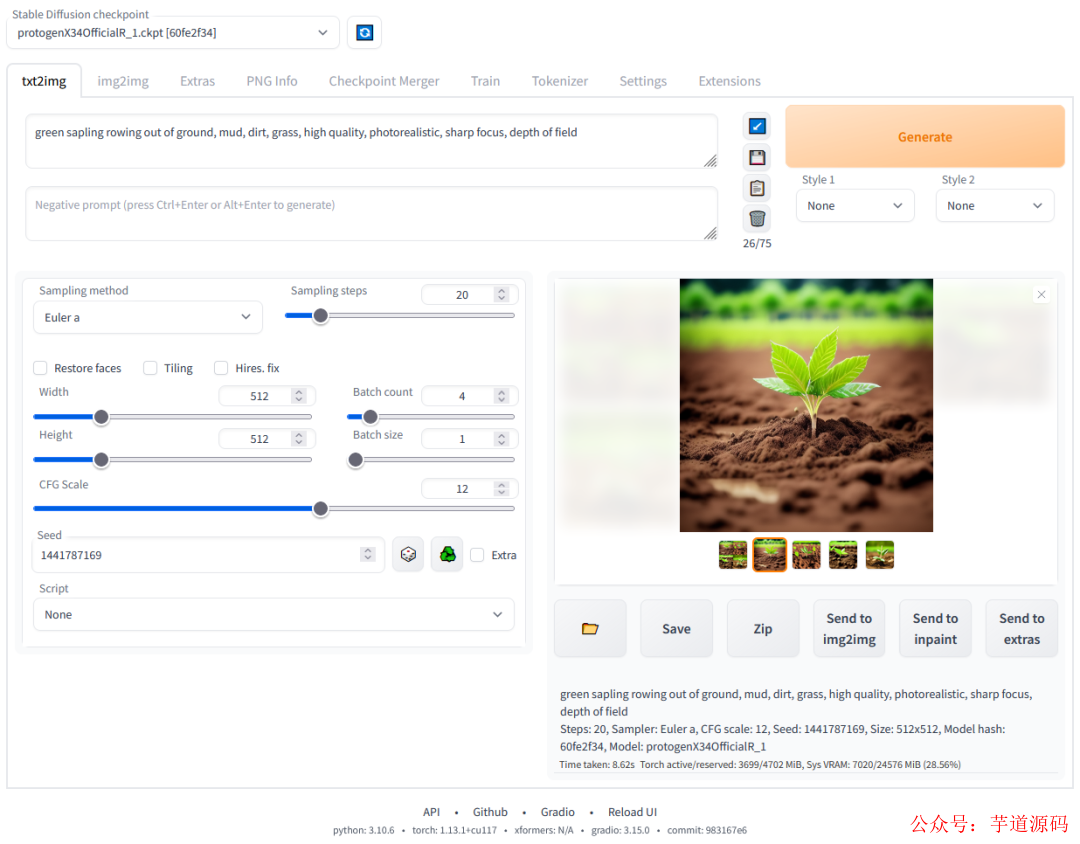
stable-diffusion-webui
最后要介绍的一个比较火的应用stable-diffusion-webui其实是用来支持SD出图的一个web工具,它算是基于gradio框架实现了SD的快速部署,不仅支持SD的最基础的文生图、图生图以及图像inpainting功能,还支持SD的其它拓展功能,很多基于SD的拓展应用可以用插件的方式安装在webui上。
后话
在OpenAI最早放出DALLE2的时候,我曾被它生成的图像所惊艳到,但是我从来没有想到图像生成的AIGC会如此火爆,技术的发展太快了,这得益于互联网独有的开源精神。我想,没有SD的开源,估计这个方向可能还会沉寂一段时间。
-
SD-WAN技术的四大特点与常见应用场景2024-05-09 2384
-
sd-wan组网技术的优势有哪些?sd-wan组网方案包括哪些技术?2024-03-27 1587
-
SD-WAN技术:是挑战还是机遇?2024-02-29 975
-
怎么通过FPGA采取SD模式实现Micro SD卡的驱动2023-09-19 4646
-
有谁知道SD驱动程序运行和管理文件结构以及对SD闪存的写入操作是否可能实现这种吞吐率?2023-06-05 782
-
基于FPGA的SD卡的数据读写实现(SD NAND FLASH)2022-12-16 13224
-
学习排序算法以及部分其它的数据结构与算法到底有没有用2021-12-21 1482
-
分立器件的实现的细节2021-10-28 1632
-
嵌入式系统设计时需要注意的技术要点和实现细节有哪些?2021-04-25 1447
-
小米手环6部分细节、上市时间曝光2021-01-24 26758
-
OPPO屏下摄像头技术部分细节公布2019-06-10 3443
-
SD-WAN技术详解2019-03-11 3697
-
如何通过 EMIB 帮助FPGA家族芯片实现带宽大涨的部分细节分析2017-12-20 7328
-
arm11以及SD卡2012-04-03 3098
全部0条评论

快来发表一下你的评论吧 !
