

鸿蒙瘦设备移植:SoC适配
描述
OpenHarmony 系统移植最核心的步骤是内核的移植,内核的稳定是一切子系统稳定的基础,上一篇我们讲述了内核启动原理,以及 vendor、board 的开发配置,本文将介绍 SoC 层级的移植适配流程。
SoC 适配
SoC 配置芯片层级编译依赖库,包括 CMSIS、HAL(硬件抽象层)等,这里包含操作总线、串口、时钟、寄存等库函数。
①创建对应的文件目录结构
目录名称按照芯片厂家、芯片型号来创建,比如 st 公司下的 stm32f4xx 系列芯片。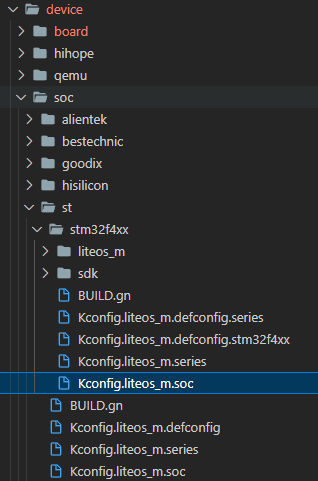
配置文件内容如下:
device/soc/st/stm32f4xx/Kconfig.liteos_m.defconfig.series
if SOC_SERIES_STM32F4xx
rsource "Kconfig.liteos_m.defconfig.stm32f4xx"
config SOC_SERIES
string
default "stm32f4xx"
endif
device/soc/st/stm32f4xx/Kconfig.liteos_m.defconfig.stm32f4xx
config SOC
string
default "stm32f4xx"
depends on SOC_STM32F4xx
device/soc/st/stm32f4xx/Kconfig.liteos_m.series
config SOC_SERIES_STM32F4xx
bool "STMicroelectronics STM32F4xx series"
select ARCH_ARM
select SOC_COMPANY_STMICROELECTRONICS
select CPU_CORTEX_M4
help
Enable support for STMicroelectronics STM32F4xx series
device/soc/st/stm32f4xx/Kconfig.liteos_m.soc
choice
prompt "STMicroelectronics STM32F4xx series SoC"
depends on SOC_SERIES_STM32F4xx
config SOC_STM32F407
bool "SoC STM32F407"
Endchoice
device/soc/st/Kconfig.liteos_m.defconfig
rsource "*/Kconfig.liteos_m.defconfig.series"
device/soc/st/Kconfig.liteos_m.defconfig
rsource "*/Kconfig.liteos_m.series"
device/soc/st/Kconfig.liteos_m.soc
config SOC_COMPANY_STMICROELECTRONICS
bool
if SOC_COMPANY_STMICROELECTRONICS
config SOC_COMPANY
default "st"
rsource "*/Kconfig.liteos_m.soc"
endif # SOC_COMPANY_STMICROELECTRONICS
device/soc/st/BUILD.gn
if (ohos_kernel_type == "liteos_m") {
import("//kernel/liteos_m/liteos.gni")
module_name = get_path_info(rebase_path("."), "name")
module_group(module_name) {
modules = [ "stm32f4xx" ]
}
}
device/soc/st/stm32f4xx/BUILD.gn
if (ohos_kernel_type == "liteos_m") {
import("//kernel/liteos_m/liteos.gni")
module_name = get_path_info(rebase_path("."), "name")
module_group(module_name) {
modules = [ "liteos_m", "sdk" ]
}
}
②移植 HAL 库函数等文件
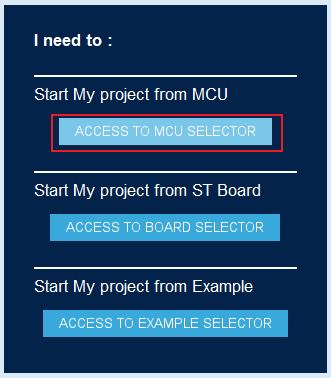
对于 STM32F407 我们可以使用官方的 STM32CubeMX 生成对应的标准的 hal 库函数文件。
选择 ACCESS TO MCU SELECTOR:
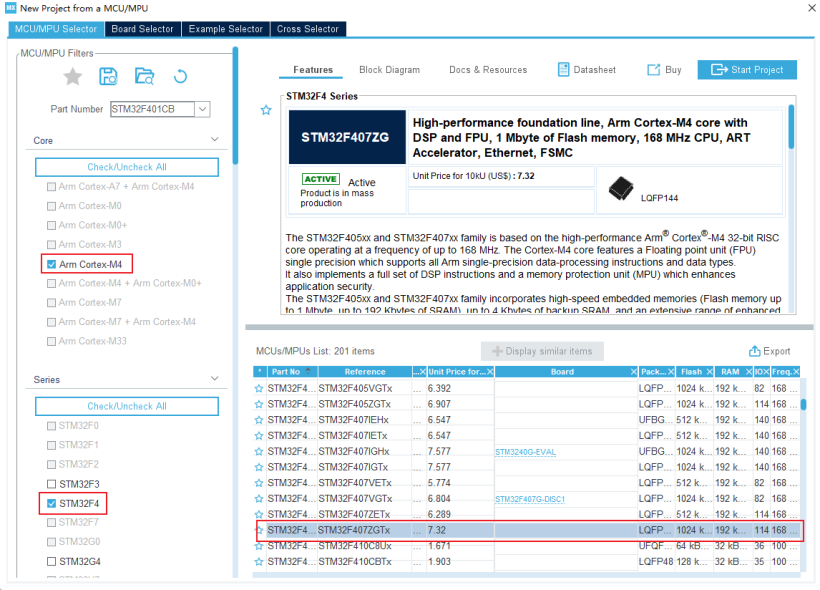
勾选 Arm Cortex-M4→STM32F4→STM32F407ZGTx:
填写工程名称,选择工程保存路径,选择 Makefile 作为编译工具,点击 GENERATE CODE 生成工程代码。
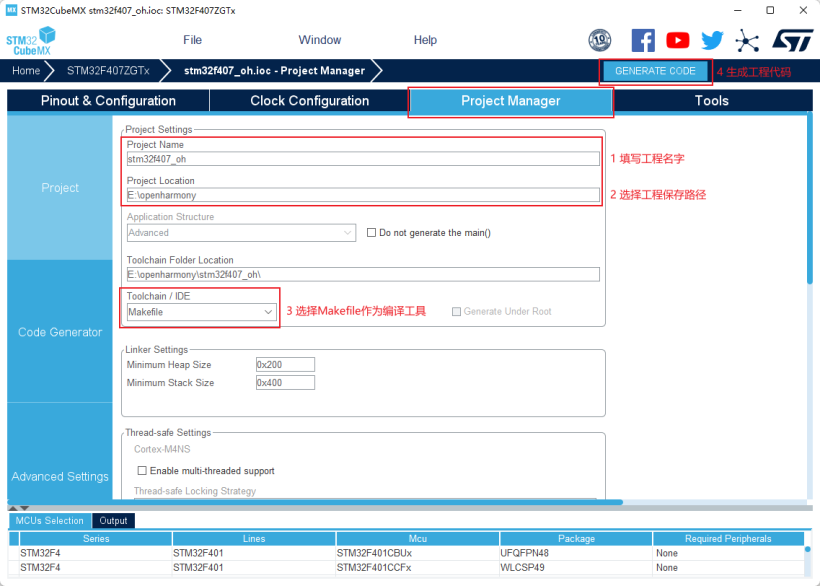
使用 vscode 打开目录,我们得到如下工程:
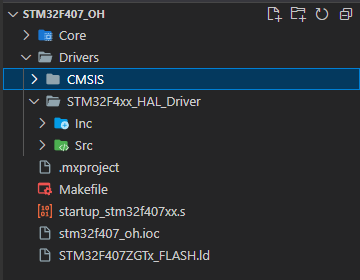
回顾一下之前讲过的系统启动的流程:
HAL 初始化
系统时钟初始化
系统初始化
系统启动
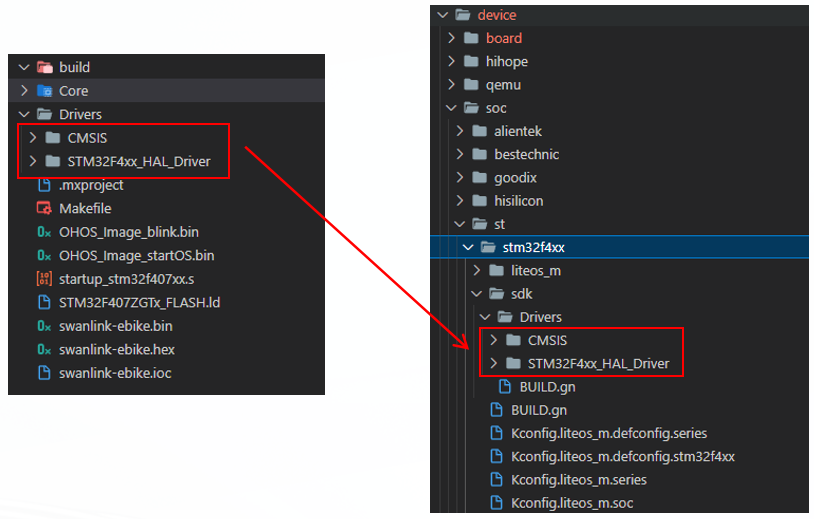
接下来我们将 HAL 库函数文件及芯片头文件迁移到 OH 代码中,文件路径如下:

将 Drivers 中的 CMSIS、STM32F4xx_HAL_Driver 复制到 /device/soc/st/stm32f4xx/sdk/Drivers 中。
③修改系统编译配置文件
使用 OH 的 gn 以及 config 文件配置系统编译流程以及包依赖关系,涉及到的配置文件如下:
device/board/alientek/explorer/liteos_m/config.gni# Kernel type, e.g. "linux", "liteos_a", "liteos_m".kernel_type = "liteos_m"# Kernel version.kernel_version = "3.0.0"# Board CPU type, e.g. "cortex-a7", "riscv32".board_cpu = "cortex-m4"# Board arch, e.g. "armv7-a", "rv32imac".board_arch = ""# Toolchain name used for system compiling.# E.g. gcc-arm-none-eabi, arm-linux-harmonyeabi-gcc, ohos-clang, riscv32-unknown-elf.# Note: The default toolchain is "ohos-clang". It's not mandatory if you use the default toolchain.board_toolchain = "arm-none-eabi-gcc"use_board_toolchain = true# The toolchain path installed, it's not mandatory if you have added toolchain path to your ~/.bashrc.board_toolchain_path = ""# Compiler prefix.board_toolchain_prefix = "arm-none-eabi-"# Compiler type, "gcc" or "clang".board_toolchain_type = "gcc"#Debug compiler optimization level optionsboard_opt_flags = ["-mcpu=cortex-m4","-mthumb","-mfpu=fpv4-sp-d16","-mfloat-abi=hard",]# Board related common compile flags.board_cflags = ["-Og","-Wall","-fdata-sections","-ffunction-sections","-DSTM32F407xx","-DHAL_UART_MODULE_ENABLED"]board_cflags += board_opt_flagsboard_asmflags = ["-Og","-Wall","-fdata-sections","-ffunction-sections",]board_asmflags += board_opt_flagsboard_cxx_flags = board_cflagsboard_ld_flags = ["-T${ohos_root_path}device/board/alientek/explorer/liteos_m/STM32F407ZGTx_FLASH.ld"]board_ld_flags += board_opt_flags# Board related headfiles search path.board_include_dirs = [ "//utils/native/lite/include" ]# Board adapter dir for OHOS components.board_adapter_dir = ""这里的核心工作就是将原有的Makefile编译文件翻译成OH的config.gni,可以看到有很多的编译参数以及宏变量定义。修改编译依赖文件BUILD.gndevice/board/alientek/explorer/liteos_m/BUILD.gnimport("//kernel/liteos_m/liteos.gni")module_name = get_path_info(rebase_path("."), "name")kernel_module(module_name) {sources = ["startup_stm32f407xx.s","Src/main.c","Src/delay.c","Src/led.c","Src/sys.c","Src/usart.c","Src/stm32f4xx_hal_msp.c","Src/stm32f4xx_it.c","Src/system_stm32f4xx.c",]include_dirs = [ "Inc",]}# "-Wl,-T" + rebase_path("STM32F407ZGTx_FLASH.ld"),config("public") {ldflags = ["-Wl,-u_printf_float"]libs = ["c","m","nosys",]}device/soc/st/stm32f4xx/sdk/BUILD.gnimport("//kernel/liteos_m/liteos.gni")module_name = "stm32f4xx_sdk"kernel_module(module_name) {asmflags = board_asmflagssources = ["Drivers/STM32F4xx_HAL_Driver/Src/stm32f4xx_hal_rcc.c","Drivers/STM32F4xx_HAL_Driver/Src/stm32f4xx_hal_rcc_ex.c","Drivers/STM32F4xx_HAL_Driver/Src/stm32f4xx_hal_gpio.c","Drivers/STM32F4xx_HAL_Driver/Src/stm32f4xx_hal_dma_ex.c","Drivers/STM32F4xx_HAL_Driver/Src/stm32f4xx_hal_dma.c","Drivers/STM32F4xx_HAL_Driver/Src/stm32f4xx_hal_cortex.c","Drivers/STM32F4xx_HAL_Driver/Src/stm32f4xx_hal.c","Drivers/STM32F4xx_HAL_Driver/Src/stm32f4xx_hal_exti.c","Drivers/STM32F4xx_HAL_Driver/Src/stm32f4xx_hal_uart.c",]include_dirs = ["//device/board/alientek/explorer/liteos_m/Inc"]}#指定全局头文件搜索路径config("public") {include_dirs = ["Drivers/STM32F4xx_HAL_Driver/Inc","Drivers/CMSIS/Device/ST/STM32F4xx/Include",]}
④改造 main 函数,拉起系统内核
我们对 device/board/alientek/explorer/liteos_m/Src/main.c 文件进行如下编辑:
int main(void)
{
HAL_Init();                         /* 初始化HAL库 */
sys_stm32_clock_init(336, 8, 2, 7); /* 初始化时钟频率168Mhz */
delay_init(168);                    /* 延时初始化 */
printf("hal、系统始终初始化完毕,开始启动系统...
");
RunTask();
}
void RunTask()
{
unsigned int ret;
ret = LOS_KernelInit();  // 初始化LiteOS系统
if (ret != LOS_OK)
{
printf("Liteos kernel init failed! ERROR: 0x%x
", ret);
}
else
{
LOS_Start(); // 启动系统
}
...
}
编译与烧录
使用 hb 工具进行编译,hb set 选择编译目标,hb build -f 执行编译。
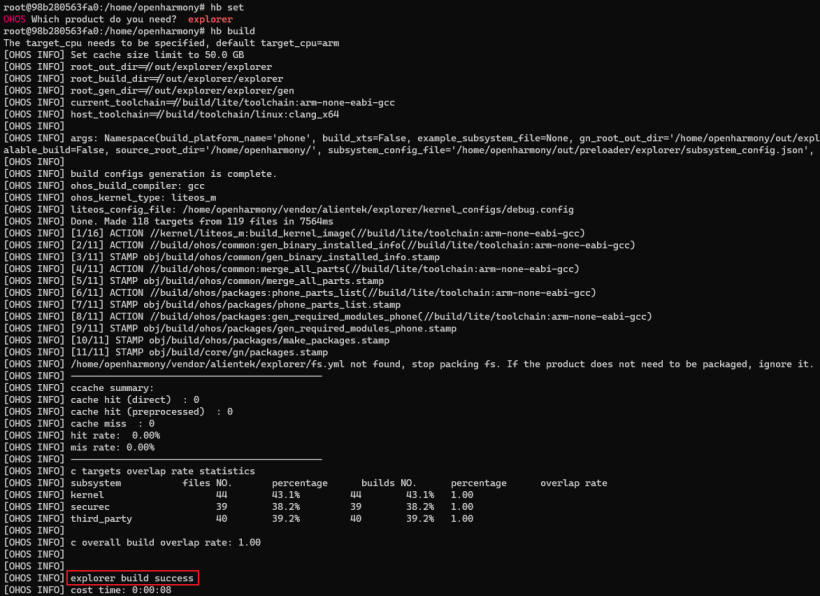
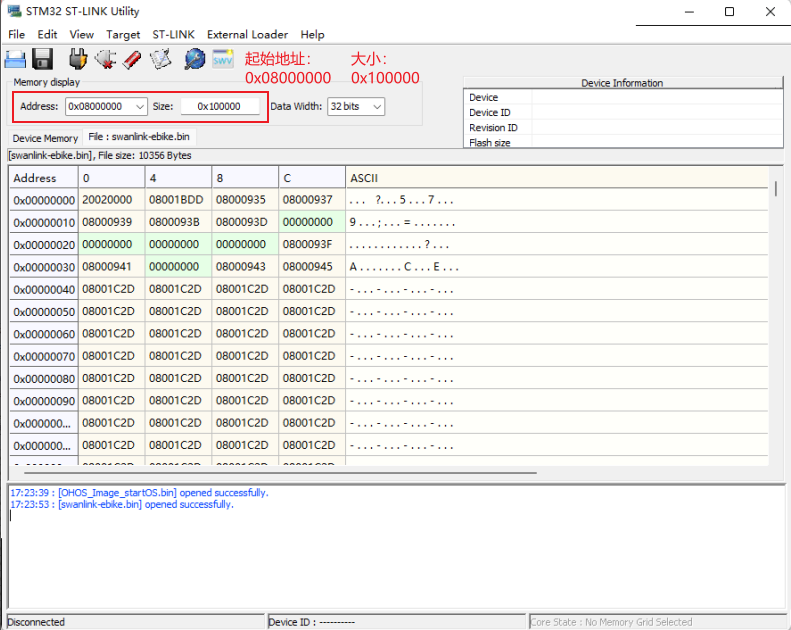
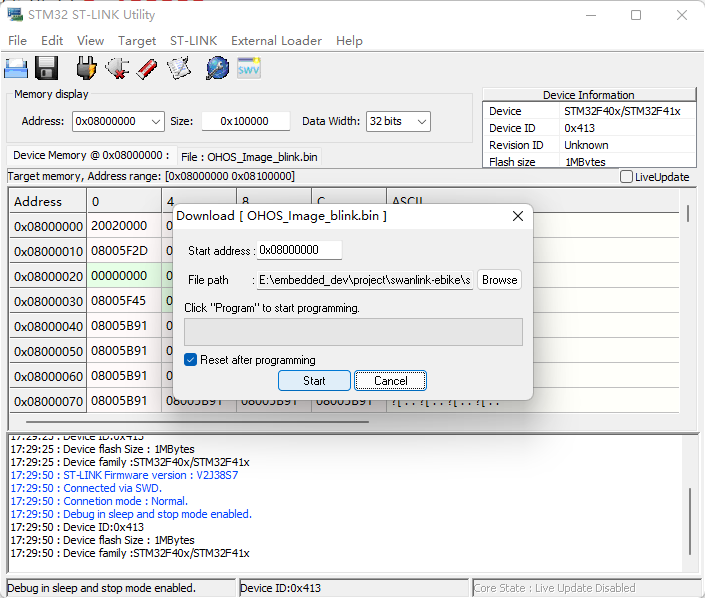
日志输出 explorer build success 表示编译成功。 编译过程中可能会遇到缺少某些结构体或者函数的定义,需要细心排查,注意宏定义是否打开。 STM32F407 开发板支持串口和 ST-LINK 烧录方式,但 OH 编译出来的是 bin 文件,bin 无法直接通过串口烧录。
需要用到 ST-LINK 工具进行烧录,烧录时需要指定 flash,开始地址:0x08000000,大小:0x100000。
开始烧录:
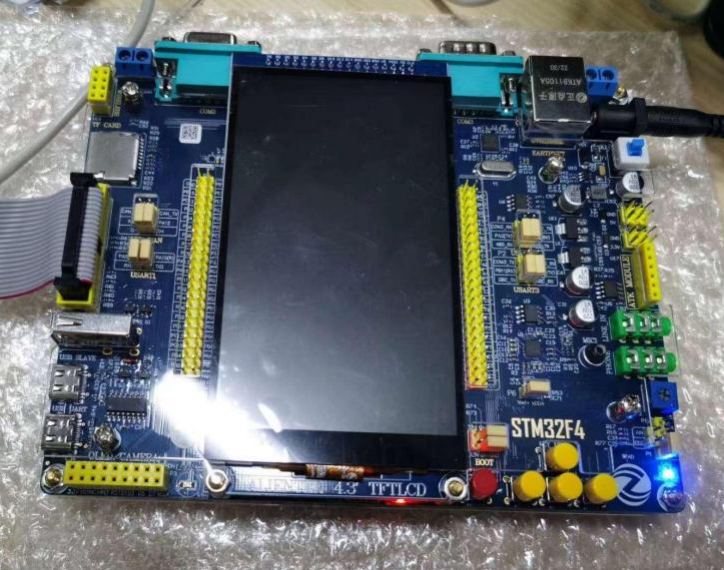
点亮开发板:
总结
本文主要讲述了 OpenHarmony 内核的 SoC 代码移植。因为 STM32F407 的架构和基础 SDK 都是官方开源的,所以移植工作也较为容易。 但在实际工作中如果遇到未开源的芯片,那么需要模组或芯片厂商提供技术支持才可完成移植工作。 到这里瘦设备 OH 适配的最核心工作已完成,希望能对热爱 OpenHarmony 的小伙伴有所帮助。
审核编辑:汤梓红
- 相关推荐
- 热点推荐
- 内核
- soc
- 移植
- 鸿蒙
- OpenHarmony
-
鸿蒙OS开发学习:【尺寸适配实现】2024-04-10 3163
-
OpenHarmony瘦设备内核移植实战(一)2023-04-24 1437
-
鸿蒙富设备移植指南:编译框架适配2023-02-08 3024
-
基于openharmony适配移植的圆形视图教程2022-04-11 626
-
基于openharmony适配移植的搜索控件2022-04-07 679
-
基于鸿蒙适配移植的开源视频缓存引擎项目案例2022-04-06 829
-
鸿蒙第三方组件适配移植的滑动验证码教程2022-04-02 1176
-
鸿蒙适配移植的开源SnackBar消息弹框教程2022-03-25 661
-
基于鸿蒙组件适配移植的流式布局2022-03-21 1025
-
鸿蒙系统开始适配游戏 适配完毕的游戏会有啥体验2021-01-11 5127
全部0条评论

快来发表一下你的评论吧 !
