

Nginx搭建流行架构LNMP的步骤
电子说
描述
1、LNMP架构概述
(1)什么是LNMP?
LNMP是一套技术的组合,L=Linux、N=Nginx、M=MySQL(MyriDB)、P=PHP(Python)
(2)LNMP架构是如何工作的?
首先Nginx服务器是不能处理动态请求,那么当用户发起动态请求时,Nginx又是如何进行处理的?
当用户发起http请求时,请求会被Nginx处理,如果是静态资源请求Nginx则直接返回,如果是动态请求Nginx则通过fastcgi协议转交给后端的PHP程序处理,具体如下图所示:

(3)Nginx与Fast-CGI详细工作流程如下图所示
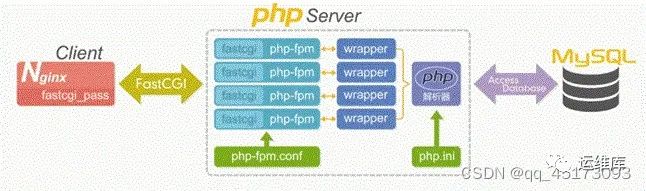
Nginx结合PHP FastCGI运行原理图
注:CGI全称通用网关接口 Commmon Gateway Interface、php-fpm(fcgi process mangemnt)管理进程、php-fpm配置文件为php-fpm.conf、php解析器的配置文件为php.ini。
(4)工作流程
①用户发送http请求报文给nginx服务器
②nginx会根据文件url和后缀来判断请求
③如果请求的是静态内容,nginx会将结果直接返回给用户
④如果请求的是动态内容,nginx会将请求交给fastcgi客户端,通过fastcgi_pass将这个请求发送给php-fpm管理进程,php-fpm管理进程接收到后会调用具体的工作进程warrap。
⑤warrap进程收到请求会生成新的线程调用php动态程序解析器。
⑥如果只是解析代码,php直接返回;如果有查询数据库操作,则由php连接数据库发起查询操作。
⑦最终数据由mysql->php->php-fpm->fastCGI->Nginx->user
2、LNMP架构环境部署
(1)使用官方仓库安装Nginx
[root@nginx ~]# cat /etc/yum.repos.d/nginx.repo
[nginx]
name=nginx repo
baseurl=http://nginx.org/packages/centos/7/$basearch/
gpgcheck=0
enabled=1

#安装Nginx,启动并加入开机自启。
[root@Server-1 ~]# yum -y install nginx
[root@Server-1 ~]# systemctl start nginx
[root@Server-1 ~]# systemctl enable nginx
(2)使用第三方扩展原安装php7.1
#yum -y https://dl.fedoraprojeck.org/pub/epel/epel-release-latest-7.noarch.rpm
#yum -y https://mirror.webtatic.com/yum/el7/webtatic-release.rpm
#安装和启用EPEL和Remi存储库 直接安装PHP会报错

[root@Server-1 ~]# yum remove php-mysql-5.4 php php-fpm php-common
[root@Server-1 ~]# cat /etc/yum.repos.d/php.repo
[php]
name = php Repository
baseurl = http://us-east.repo.webtatic.com/yum/el7/x86_64/
gpgcheck = 0

[root@Server-1 ~]# yum -y install php71w php71w-cli php71w-common php71w-devel php71w-embedded php71w-gd php71w-mcrypt php71w-mbstring php71w-pdo php71w-xml php71w-fpm php71w-mysqlnd php71w-opcache php71w-pecl-memcached php71w-pecl-redis php71w-pecl-mongodb

#启动php-fpm,并将其加入开机自启
[root@Server-1 ~]# systemctl start php-fpm
[root@Server-1 ~]# systemctl enable php-fpm
(3)安装Mariadb数据库(为什么不安装mysql------mariadb小,暂时用下数据库而已)
[root@Server-1 ~]# yum install mariadb-server mariadb -y
3、Nginx与php实现原理
在将Nginx与PHP集成的过程中,需要先了解FastCGI代理配置语法
(1)设置FastCGI服务器的地址,该地址可以指定为域名或者IP地址,以及端口
Syntax:  fastcgi_pass address;
  Default: —
  Context: location,if in location

  #语法示例
  fastcgi_pass localhost:9000;            #默认端口9000(建议使用这条)
  fastcgi_pass unix:/tmp/fastcgi.socket;  #适合在nginx和php在一台服务器上(跨网络的不行)
(2)设置fastcgi默认的首页文件,需要结合fastcgi_param一起设置
Syntax:	fastcgi_index name;
  Default:	—
  Context:	http,server,location
(3)通过fastcgi_param设置变量,并将设置的变量传递到后端的fastcgi服务器
Syntax:  fastcgi_param paramter value [if_not_empty];
   Default: —
   Context: http,server,location

   #语法示例
   fastcgi_index index.php;
   fastcgi_param SCRIPT_FILENAME /code$fastcgi_script_name;
(4)通过图形方式展示fastcgi_index与fastcgi_param作用

①nginx通过php.zxc.com找到对应的服务器
②根据fastcgi_param设置的SCRIPT_FILENAME变量中的fastcgi_spript_name(客户请求的文件)
③以上php解析的真实路径为/code/index.php发送给FastCGI
4、Nginx与php集成实现
(1)创建匹配php的配置文件
[root@Server-1 ~]# cat /etc/nginx/conf.d/phptest.conf
server {
 listen 80;
 server_name php.zxc.com;
 root /code;

 location / {
  index index.php index.html;
 }

 location ~ \\.php$ {
  fastcgi_pass 127.0.0.1:9000;
  fastcgi_param SCRIPT_FILENAME $document_root$fastcgi_script_name;
  include fastcgi_params;
 }
}
(2)启动php-fpm,并将其加入开机自启
[root@Server-1 ~]# systemctl start php-fpm
[root@Server-1 ~]# systemctl enable php-fpm

#验证php-fpm是否启动,127.0.0.1:9000起来了就成功了
[root@Client-1 ~]# netstat -lntp
Active Internet connections (only servers)
Proto Recv-Q Send-Q Local Address           Foreign Address         State       PID/Program name
tcp        0      0 0.0.0.0:22              0.0.0.0:*               LISTEN      1039/sshd
tcp        0      0 127.0.0.1:25            0.0.0.0:*               LISTEN      1213/master
tcp        0      0 127.0.0.1:9000          0.0.0.0:*               LISTEN      16441/php-fpm: mast
tcp        0      0 0.0.0.0:3306            0.0.0.0:*               LISTEN      14128/mysqld
tcp        0      0 0.0.0.0:111             0.0.0.0:*               LISTEN      746/rpcbind
tcp        0      0 0.0.0.0:80              0.0.0.0:*               LISTEN      16507/nginx: master
tcp6       0      0 :::22                   :::*                    LISTEN      1039/sshd
tcp6       0      0 ::1:25                  :::*                    LISTEN      1213/master
tcp6       0      0 :::111                  :::*                    LISTEN      746/rpcbind
(3)测试nginx与php是否集成成功
#创建一个php文件
[root@server-1 ~]# cat /code/page.php
?phpspan
 phpinfo();
?>

#访问http://php.zxc.com/page.php,能访问就可以了
5、php与mariadb数据库(mysql也行)集成实现
(1)启动Mariadb数据库,并将其加入开机自启
[root@Server-1 ~]# systemctl start mariadb
[root@Server-1 ~]# systemctl enable mariadb
(2)给Mariadb配置登入密码,并使用新密码登入数据库
[root@Server-1 ~]# mysqladmin password ‘P@ssw0rd’
[root@Server-1 ~]# mysql -uroot -pP@ssw0rd
(3)准备一个php文件,测试能否正常连接数据库
[root@Server-1 ~]# cat /code/mariadb.php
?php$servername = "localhost";
    $username = "root";
    $password = "P@ssw0rd";

    // 创建连接
    $conn = mysqli_connect($servername, $username, $password);

    // 检测连接
    if (!$conn) {
        die("Connection failed: " . mysqli_connect_error());
    }
    echo "php连接MySQL数据库成功";
    ?>
    #只要访问该页面,出现 "php连接MySQL数据库成功"就说明成功了
-
Nginx架构拆分集群详解2025-06-28 1825
-
openstack搭建详细步骤2025-05-07 2479
-
nginx重启命令linux步骤是什么?2024-07-10 490
-
搭建Keepalived+Lvs+Nginx高可用集群负载均衡2023-06-25 4539
-
Nginx_LNMP架构拆分2023-05-22 1294
-
Nginx如何和现有监控系统集成2022-08-22 1733
-
Nginx服务器的搭建步骤2020-04-07 2871
-
Nginx的安装和启动服务2019-08-05 1741
-
基于Ubuntu的Django+uwsgi+nginx项目部署步骤2019-07-09 1993
-
基于MYSQL,PHP和nginx的部署论坛2019-03-19 1331
-
ECS配置lnmp的详细步骤资料说明2019-03-04 1194
-
【NanoPi NEO试用体验】之安装配置Nginx环境WEB网站详解2016-10-18 7685
全部0条评论

快来发表一下你的评论吧 !
