
CW32实时时钟(RTC)介绍(下)
电子说
描述
4.RTC模块初始化,ErrorStatus 返回值为SUCCESS或ERROR
ErrorStatus RTC_Init(RTC_InitTypeDef* RTC_InitStruct)
{
CW_SYSCTRL->APBEN1_f.RTC = 1;            //  启动RTC外设时钟,使能RTC模块

if ((RCC_GetAllRstFlag() & SYSCTRL_RESETFLAG_POR_Msk) != RCC_FLAG_PORRST)  //不是上电复位,直接退出

{

    RCC_ClearRstFlag(RCC_FLAG_ALLRST);

    return SUCCESS;

}

RTC_Cmd(DISABLE);                        //  停止RTC,保证正确访问RTC寄存器

RTC_SetClockSource(RTC_InitStruct->RTC_ClockSource);        // 设置RTC时钟源, 用户需首先启动RTC时钟源!!!

RTC_SetDate(&RTC_InitStruct->DateStruct);// 设置日期,DAY、MONTH、YEAR必须为BCD方,星期为0~6,代表星期日,星期一至星期六

RTC_SetTime(&RTC_InitStruct->TimeStruct); //时间,HOUR、MINIUTE、SECOND必须为BCD方式,用户须保证HOUR、AMPM、H24之间的关联正确性

RTC_Cmd(ENABLE);

RCC_ClearRstFlag(RCC_FLAG_ALLRST);

return SUCCESS;
}
5.RTC周期中断时间设置
int RTC_SetInterval(uint8_t Period)
{
uint16_t timeout = 0xffff;


RTC_UNLOCK();

if (IS_RTC_START())         // 如果RTC正在运行,则使用WINDOWS、ACCESS访问

{

    CW_RTC->CR1_f.ACCESS = 1;

    while ((!CW_RTC->CR1_f.WINDOW) && timeout--);

    if (timeout == 0) return 1;


}

CW_RTC->CR0_f.INTERVAL = Period;

CW_RTC->CR1_f.ACCESS = 0;

RTC_LOCK();

return 0;
}
6.设置时钟中断使能
int RTC_ITConfig(uint32_t RTC_IT, FunctionalState NewState)
{
uint16_t timeout = 0xffff;
RTC_UNLOCK();

CW_RTC->CR1_f.ACCESS = 1;

while ((!CW_RTC->CR1_f.WINDOW) && timeout--);

if (timeout == 0) return 1;

if (!NewState)

{

    CW_RTC->IER &= ~RTC_IT;

}

else

{

    CW_RTC->IER |= RTC_IT;

}

CW_RTC->CR1_f.ACCESS = 0;

RTC_LOCK();

return 0;
}
void RTC_IRQHandlerCallBack(void)
{
if (RTC_GetITState(RTC_IT_ALARMA))

{

    RTC_ClearITPendingBit(RTC_IT_ALARMA);

    printf("*********Alarm!!!!\\r\\n");

}

if (RTC_GetITState(RTC_IT_INTERVAL))

{

    RTC_ClearITPendingBit(RTC_IT_INTERVAL);

    ShowTime();
}
void NVIC_Configuration(void)
{
__disable_irq();

NVIC_EnableIRQ(RTC_IRQn);

__enable_irq();
}
7.RTC时钟测试,初始化日历,使用间隔中断0.5秒通过Log输出日期时间
int32_t main(void)
{
RTC_InitTypeDef RTC_InitStruct = {0};

RTC_AlarmTypeDef RTC_AlarmStruct = {0};

/*系统时钟配置*/

RCC_Configuration();

/* GPIO 口配置*/

GPIO_Configuration();
LogInit();//配置输出时间所需GPIO口以及串口UART配置
printf("RTC Init...\\r\\n");
printf(" (RTC CR0:%04x,CR1:%04x,CR2:%04x,RESET FLAG:0x%08x)\\r\\n",CW_RTC->CR0,CW_RTC->CR1,CW_RTC->CR2,CW_SYSCTRL->RESETFLAG);
RCC_LSE_Enable(RCC_LSE_MODE_OSC, RCC_LSE_AMP_NORMAL, RCC_LSE_DRIVER_NORMAL); // 选择LSE为RTC时钟
RTC_InitStruct.DateStruct.Day = 0x21; //日
RTC_InitStruct.DateStruct.Month = RTC_Month_June;//月
RTC_InitStruct.DateStruct.Week = RTC_Weekday_Monday;//星期
RTC_InitStruct.DateStruct.Year = 0x21; //年
//设置日期,DAY、MONTH、YEAR必须为BCD方式,星期为0~6,代表星期日,星期一至星期六
printf("-------Set Date as 20%x/%x/%x\\r\\n", RTC_InitStruct.DateStruct.Year,RTC_InitStruct.DateStruct.Month,RTC_InitStruct.DateStruct.Day);
//打印日期
RTC_InitStruct.TimeStruct.Hour = 0x11; //时
RTC_InitStruct.TimeStruct.Minute = 0x58;//分
RTC_InitStruct.TimeStruct.Second = 0x59;//秒
RTC_InitStruct.TimeStruct.AMPM = 0;
RTC_InitStruct.TimeStruct.H24 = 0; //采用12小时设置
//设置时间,HOUR、MINIUTE、SECOND必须为BCD方式,用户须保证HOUR、AMPM、H24之间的关联正确性
printf("-------Set Time as %02x:%02x:%02x\\r\\n", RTC_InitStruct.TimeStruct.Hour,RTC_InitStruct.TimeStruct.Minute,RTC_InitStruct.TimeStruct.Second);//打印时间
RTC_InitStruct.RTC_ClockSource = RTC_RTCCLK_FROM_LSE;
RTC_Init(&RTC_InitStruct); // RTC模块初始化, 用户需选定需要使用的时钟源
printf("=====Set interval period as 0.5s...\\r\\n");
RTC_SetInterval(RTC_INTERVAL_EVERY_0_5S);
//闹钟为工作日上午的6:45
RTC_AlarmStruct.RTC_AlarmMask = RTC_AlarmMask_WeekMON | RTC_AlarmMask_WeekTUE |
RTC_AlarmMask_WeekWED | RTC_AlarmMask_WeekTHU |RTC_AlarmMask_WeekFRI;
//设定时间为周一到周五
RTC_AlarmStruct.RTC_AlarmTime.Hour = 6;
RTC_AlarmStruct.RTC_AlarmTime.Minute = 0x45;
RTC_AlarmStruct.RTC_AlarmTime.Second = 0;
RTC_SetAlarm(RTC_Alarm_A, &RTC_AlarmStruct); // 设置闹钟,BCD格式
RTC_AlarmCmd(RTC_Alarm_A, ENABLE);//使能闹钟
printf("=====Enable ALRAMA and INTERVAL IT...\\r\\n");
RTC_ITConfig(RTC_IT_ALARMA | RTC_IT_INTERVAL, ENABLE);
//设置中断使能
While(1){}
}
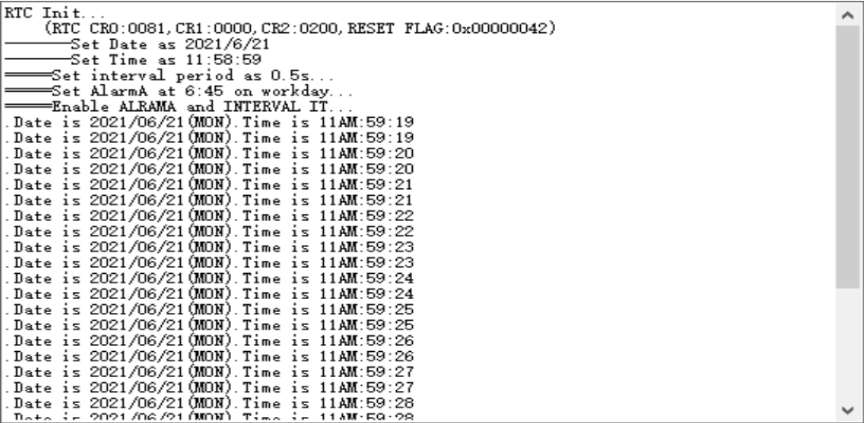
8.通过UART串口验证RTC工作正常

-
CW32系列微控制器的时钟源和定时器选项介绍2025-12-16 33
-
CW32实时时钟(RTC)介绍2023-10-24 2005
-
STM32 RTC实时时钟(一)2023-07-22 6214
-
CW32实时时钟(RTC)介绍(上)2023-05-26 2309
-
DA1468x SoC 的实时时钟(RTC) 概念2023-03-15 507
-
RTC实时时钟实验的相关资料分享2022-03-02 4207
-
RTC实时时钟怎么使用?2022-01-18 1689
-
STM32CubeMX系列|RTC实时时钟2021-12-24 889
-
STM32CubeMX | 40 - 实时时钟RTC的使用(日历和闹钟)2021-11-23 1001
-
实时时钟(RTC)简要介绍2021-10-09 2930
-
什么是实时时钟(RTC)?如何更改RTC的时间?2021-07-19 2479
-
浅谈RTC实时时钟特征与原理2021-06-30 11979
-
一文看懂rtc实时时钟和单片机时钟的区别2018-05-14 62447
-
HT49 MCU RTC(实时时钟)的使用介绍2010-03-26 1310
全部0条评论

快来发表一下你的评论吧 !

