

PyTorch教程-14.1. 图像增强
电子说
描述
在8.1 节中,我们提到大型数据集是深度神经网络在各种应用中取得成功的先决条件。图像增强在对训练图像进行一系列随机变化后生成相似但不同的训练示例,从而扩大了训练集的大小。或者,图像增强的动机可能是训练示例的随机调整允许模型减少对某些属性的依赖,从而提高它们的泛化能力。例如,我们可以通过不同的方式裁剪图像,使感兴趣的对象出现在不同的位置,从而减少模型对对象位置的依赖。我们还可以调整亮度和颜色等因素,以降低模型对颜色的敏感度。图像增强对于当时 AlexNet 的成功来说可能是不可或缺的。在本节中,我们将讨论这种在计算机视觉中广泛使用的技术。
%matplotlib inline
import torch
import torchvision
from torch import nn
from d2l import torch as d2l
%matplotlib inline
from mxnet import autograd, gluon, image, init, np, npx
from mxnet.gluon import nn
from d2l import mxnet as d2l

npx.set_np()
14.1.1。常见的图像增强方法
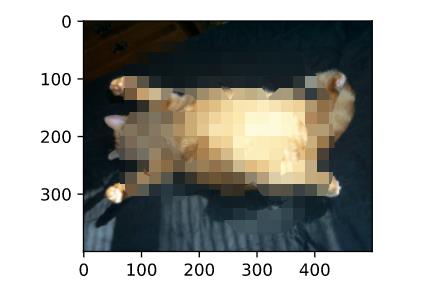
在我们对常见图像增强方法的研究中,我们将使用以下方法400×500形象一个例子。
d2l.set_figsize()
img = d2l.Image.open('../img/cat1.jpg')
d2l.plt.imshow(img);
d2l.set_figsize()
img = image.imread('../img/cat1.jpg')
d2l.plt.imshow(img.asnumpy());

大多数图像增强方法都具有一定的随机性。为了方便我们观察图像增强的效果,接下来我们定义一个辅助函数apply。aug此函数在输入图像上多次运行图像增强方法img 并显示所有结果。
def apply(img, aug, num_rows=2, num_cols=4, scale=1.5):
  Y = [aug(img) for _ in range(num_rows * num_cols)]
  d2l.show_images(Y, num_rows, num_cols, scale=scale)
def apply(img, aug, num_rows=2, num_cols=4, scale=1.5):
  Y = [aug(img) for _ in range(num_rows * num_cols)]
  d2l.show_images(Y, num_rows, num_cols, scale=scale)
14.1.1.1。翻转和裁剪
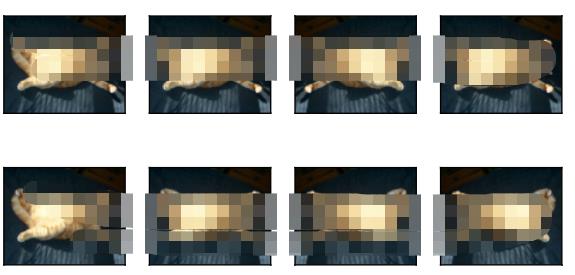
左右翻转图像通常不会改变对象的类别。这是最早和最广泛使用的图像增强方法之一。接下来,我们使用该transforms模块创建实例RandomHorizontalFlip,它以 50% 的几率左右翻转图像。
apply(img, torchvision.transforms.RandomHorizontalFlip())

上下翻转不像左右翻转那样常见。但至少对于这个示例图像,上下翻转并不妨碍识别。接下来,我们创建一个RandomVerticalFlip实例,以 50% 的几率上下翻转图像。
apply(img, torchvision.transforms.RandomVerticalFlip())

Flipping the image left and right usually does not change the category of the object. This is one of the earliest and most widely used methods of image augmentation. Next, we use the transforms module to create the RandomFlipLeftRight instance, which flips an image left and right with a 50% chance.
apply(img, gluon.data.vision.transforms.RandomFlipLeftRight())

Flipping up and down is not as common as flipping left and right. But at least for this example image, flipping up and down does not hinder recognition. Next, we create a RandomFlipTopBottom instance to flip an image up and down with a 50% chance.
apply(img, gluon.data.vision.transforms.RandomFlipTopBottom())

在我们使用的示例图像中,猫位于图像的中间,但一般情况下可能并非如此。在7.5 节中,我们解释了池化层可以降低卷积层对目标位置的敏感性。此外,我们还可以随机裁剪图像,让物体以不同的尺度出现在图像中的不同位置,这样也可以降低模型对目标位置的敏感度。
在下面的代码中,我们随机裁剪一个面积为 10%∼100%每次都是原始区域的大小,这个区域的宽高比是随机选择的 0.5∼2. 然后,该区域的宽度和高度都缩放为 200 像素。除非另有说明,之间的随机数a和b本节中指的是从区间中随机均匀采样得到的连续值 [a,b].
shape_aug = torchvision.transforms.RandomResizedCrop(
  (200, 200), scale=(0.1, 1), ratio=(0.5, 2))
apply(img, shape_aug)

shape_aug = gluon.data.vision.transforms.RandomResizedCrop(
  (200, 200), scale=(0.1, 1), ratio=(0.5, 2))
apply(img, shape_aug)

14.1.1.2。改变颜色
另一种增强方法是改变颜色。我们可以改变图像颜色的四个方面:亮度、对比度、饱和度和色调。在下面的示例中,我们将图像的亮度随机更改为 50% (1−0.5) 和 150% (1+0.5) 的原始图像。
apply(img, torchvision.transforms.ColorJitter(
  brightness=0.5, contrast=0, saturation=0, hue=0))
apply(img, gluon.data.vision.transforms.RandomBrightness(0.5))

同样,我们可以随机改变图像的色调。
apply(img, torchvision.transforms.ColorJitter(
  brightness=0, contrast=0, saturation=0, hue=0.5))

apply(img, gluon.data.vision.transforms.RandomHue(0.5))

我们也可以创建一个RandomColorJitter实例,同时设置如何随机改变图片的brightness, contrast, saturation, 。hue
color_aug = torchvision.transforms.ColorJitter(
  brightness=0.5, contrast=0.5, saturation=0.5, hue=0.5)
apply(img, color_aug)

color_aug = gluon.data.vision.transforms.RandomColorJitter(
  brightness=0.5, contrast=0.5, saturation=0.5, hue=0.5)
apply(img, color_aug)

14.1.1.3。结合多种图像增强方法
在实践中,我们将结合多种图像增强方法。例如,我们可以组合上面定义的不同图像增强方法,并通过实例将它们应用于每个图像Compose。
augs = torchvision.transforms.Compose([
  torchvision.transforms.RandomHorizontalFlip(), color_aug, shape_aug])
apply(img, augs)

augs = gluon.data.vision.transforms.Compose([
  gluon.data.vision.transforms.RandomFlipLeftRight(), color_aug, shape_aug])
apply(img, augs)

14.1.2。图像增强训练
让我们训练一个具有图像增强功能的模型。这里我们使用 CIFAR-10 数据集而不是我们之前使用的 Fashion-MNIST 数据集。这是因为 Fashion-MNIST 数据集中物体的位置和大小已经归一化,而 CIFAR-10 数据集中物体的颜色和大小有更显着的差异。CIFAR-10 数据集中的前 32 个训练图像如下所示。
all_images = torchvision.datasets.CIFAR10(train=True, root="../data",
                     download=True)
d2l.show_images([all_images[i][0] for i in range(32)], 4, 8, scale=0.8);
Downloading https://www.cs.toronto.edu/~kriz/cifar-10-python.tar.gz to ../data/cifar-10-python.tar.gz
0%| | 0/170498071 [00:00
Extracting ../data/cifar-10-python.tar.gz to ../data

d2l.show_images(gluon.data.vision.CIFAR10(
  train=True)[:32][0], 4, 8, scale=0.8);
为了在预测过程中获得确定的结果,我们通常只对训练样例进行图像增强,而不会在预测过程中使用带有随机操作的图像增强。这里我们只使用最简单的随机左右翻转的方法。此外,我们使用 ToTensor实例将一小批图像转换为深度学习框架所需的格式,即 0 到 1 之间的 32 位浮点数,形状为(批量大小,通道数,高度,宽度).
train_augs = torchvision.transforms.Compose([
   torchvision.transforms.RandomHorizontalFlip(),
   torchvision.transforms.ToTensor()])

test_augs = torchvision.transforms.Compose([
   torchvision.transforms.ToTensor()])
接下来,我们定义一个辅助函数以方便读取图像和应用图像增强。PyTorch 数据集提供的参数transform应用增强来转换图像。详细介绍DataLoader请参考 4.2节。
def load_cifar10(is_train, augs, batch_size):
  dataset = torchvision.datasets.CIFAR10(root="../data", train=is_train,
                      transform=augs, download=True)
  dataloader = torch.utils.data.DataLoader(dataset, batch_size=batch_size,
          shuffle=is_train, num_workers=d2l.get_dataloader_workers())
  return dataloader
train_augs = gluon.data.vision.transforms.Compose([
  gluon.data.vision.transforms.RandomFlipLeftRight(),
  gluon.data.vision.transforms.ToTensor()])

test_augs = gluon.data.vision.transforms.Compose([
  gluon.data.vision.transforms.ToTensor()])
Next, we define an auxiliary function to facilitate reading the image and applying image augmentation. The transform_first function provided by Gluon’s datasets applies image augmentation to the first element of each training example (image and label), i.e., the image. For a detailed introduction to DataLoader, please refer to Section 4.2.
def load_cifar10(is_train, augs, batch_size):
  return gluon.data.DataLoader(
    gluon.data.vision.CIFAR10(train=is_train).transform_first(augs),
    batch_size=batch_size, shuffle=is_train,
    num_workers=d2l.get_dataloader_workers())
14.1.2.1。多 GPU 训练
我们在 CIFAR-10 数据集上训练第 8.6 节中的 ResNet-18 模型。回想一下13.6 节中对多 GPU 训练的介绍 。在下文中,我们定义了一个函数来使用多个 GPU 训练和评估模型。
#@save
def train_batch_ch13(net, X, y, loss, trainer, devices):
  """Train for a minibatch with multiple GPUs (defined in Chapter 13)."""
  if isinstance(X, list):
    # Required for BERT fine-tuning (to be covered later)
    X = [x.to(devices[0]) for x in X]
  else:
    X = X.to(devices[0])
  y = y.to(devices[0])
  net.train()
  trainer.zero_grad()
  pred = net(X)
  l = loss(pred, y)
  l.sum().backward()
  trainer.step()
  train_loss_sum = l.sum()
  train_acc_sum = d2l.accuracy(pred, y)
  return train_loss_sum, train_acc_sum

#@save
def train_ch13(net, train_iter, test_iter, loss, trainer, num_epochs,
        devices=d2l.try_all_gpus()):
  """Train a model with multiple GPUs (defined in Chapter 13)."""
  timer, num_batches = d2l.Timer(), len(train_iter)
  animator = d2l.Animator(xlabel='epoch', xlim=[1, num_epochs], ylim=[0, 1],
              legend=['train loss', 'train acc', 'test acc'])
  net = nn.DataParallel(net, device_ids=devices).to(devices[0])
  for epoch in range(num_epochs):
    # Sum of training loss, sum of training accuracy, no. of examples,
    # no. of predictions
    metric = d2l.Accumulator(4)
    for i, (features, labels) in enumerate(train_iter):
      timer.start()
      l, acc = train_batch_ch13(
        net, features, labels, loss, trainer, devices)
      metric.add(l, acc, labels.shape[0], labels.numel())
      timer.stop()
      if (i + 1) % (num_batches // 5) == 0 or i == num_batches - 1:
        animator.add(epoch + (i + 1) / num_batches,
               (metric[0] / metric[2], metric[1] / metric[3],
               None))
    test_acc = d2l.evaluate_accuracy_gpu(net, test_iter)
    animator.add(epoch + 1, (None, None, test_acc))
  print(f'loss {metric[0] / metric[2]:.3f}, train acc '
     f'{metric[1] / metric[3]:.3f}, test acc {test_acc:.3f}')
  print(f'{metric[2] * num_epochs / timer.sum():.1f} examples/sec on '
     f'{str(devices)}')
#@save
def train_batch_ch13(net, features, labels, loss, trainer, devices,
           split_f=d2l.split_batch):
  """Train for a minibatch with multiple GPUs (defined in Chapter 13)."""
  X_shards, y_shards = split_f(features, labels, devices)
  with autograd.record():
    pred_shards = [net(X_shard) for X_shard in X_shards]
    ls = [loss(pred_shard, y_shard) for pred_shard, y_shard
       in zip(pred_shards, y_shards)]
  for l in ls:
    l.backward()
  # The `True` flag allows parameters with stale gradients, which is useful
  # later (e.g., in fine-tuning BERT)
  trainer.step(labels.shape[0], ignore_stale_grad=True)
  train_loss_sum = sum([float(l.sum()) for l in ls])
  train_acc_sum = sum(d2l.accuracy(pred_shard, y_shard)
            for pred_shard, y_shard in zip(pred_shards, y_shards))
  return train_loss_sum, train_acc_sum

#@save
def train_ch13(net, train_iter, test_iter, loss, trainer, num_epochs,
        devices=d2l.try_all_gpus(), split_f=d2l.split_batch):
  """Train a model with multiple GPUs (defined in Chapter 13)."""
  timer, num_batches = d2l.Timer(), len(train_iter)
  animator = d2l.Animator(xlabel='epoch', xlim=[1, num_epochs], ylim=[0, 1],
              legend=['train loss', 'train acc', 'test acc'])
  for epoch in range(num_epochs):
    # Sum of training loss, sum of training accuracy, no. of examples,
    # no. of predictions
    metric = d2l.Accumulator(4)
    for i, (features, labels) in enumerate(train_iter):
      timer.start()
      l, acc = train_batch_ch13(
        net, features, labels, loss, trainer, devices, split_f)
      metric.add(l, acc, labels.shape[0], labels.size)
      timer.stop()
      if (i + 1) % (num_batches // 5) == 0 or i == num_batches - 1:
        animator.add(epoch + (i + 1) / num_batches,
               (metric[0] / metric[2], metric[1] / metric[3],
               None))
    test_acc = d2l.evaluate_accuracy_gpus(net, test_iter, split_f)
    animator.add(epoch + 1, (None, None, test_acc))
  print(f'loss {metric[0] / metric[2]:.3f}, train acc '
     f'{metric[1] / metric[3]:.3f}, test acc {test_acc:.3f}')
  print(f'{metric[2] * num_epochs / timer.sum():.1f} examples/sec on '
     f'{str(devices)}')
现在我们可以定义train_with_data_aug函数来训练带有图像增强的模型。该函数获取所有可用的 GPU,使用 Adam 作为优化算法,对训练数据集应用图像增强,最后调用train_ch13刚刚定义的函数来训练和评估模型。
batch_size, devices, net = 256, d2l.try_all_gpus(), d2l.resnet18(10, 3)
net.apply(d2l.init_cnn)

def train_with_data_aug(train_augs, test_augs, net, lr=0.001):
  train_iter = load_cifar10(True, train_augs, batch_size)
  test_iter = load_cifar10(False, test_augs, batch_size)
  loss = nn.CrossEntropyLoss(reduction="none")
  trainer = torch.optim.Adam(net.parameters(), lr=lr)
  net(next(iter(train_iter))[0])
  train_ch13(net, train_iter, test_iter, loss, trainer, 10, devices)
batch_size, devices, net = 256, d2l.try_all_gpus(), d2l.resnet18(10)
net.initialize(init=init.Xavier(), ctx=devices)

def train_with_data_aug(train_augs, test_augs, net, lr=0.001):
  train_iter = load_cifar10(True, train_augs, batch_size)
  test_iter = load_cifar10(False, test_augs, batch_size)
  loss = gluon.loss.SoftmaxCrossEntropyLoss()
  trainer = gluon.Trainer(net.collect_params(), 'adam',
              {'learning_rate': lr})
  train_ch13(net, train_iter, test_iter, loss, trainer, 10, devices)
让我们使用基于随机左右翻转的图像增强来训练模型。
train_with_data_aug(train_augs, test_augs, net)
loss 0.224, train acc 0.922, test acc 0.820
3237.5 examples/sec on [device(type='cuda', index=0), device(type='cuda', index=1)]

train_with_data_aug(train_augs, test_augs, net)
loss 0.168, train acc 0.942, test acc 0.837
1933.3 examples/sec on [gpu(0), gpu(1)]

14.1.3。概括
图像增强是在现有训练数据的基础上生成随机图像,以提高模型的泛化能力。
为了在预测过程中获得确定的结果,我们通常只对训练样例进行图像增强,而不会在预测过程中使用带有随机操作的图像增强。
深度学习框架提供了许多不同的图像增强方法,可以同时应用。
14.1.4。练习
在不使用图像增强的情况下训练模型: 。比较使用和不使用图像增强时的训练和测试准确性。这个对比实验能否支持图像增强可以减轻过拟合的论点?为什么?train_with_data_aug(test_augs, test_augs)
在 CIFAR-10 数据集的模型训练中结合多种不同的图像增强方法。它会提高测试准确性吗?
参考深度学习框架的在线文档。它还提供了哪些其他图像增强方法?
-
使用PyTorch加速图像分割2023-08-31 1695
-
PyTorch教程7.2之图像卷积2023-06-05 673
-
基于PyTorch的图像数据增强技术2022-11-22 1388
-
13种图像增强技术的pytorch实现方法2022-11-04 1166
-
详解各种图像数据增强技术2022-10-26 2621
-
基于GFO算子的图像增强算法如何去实现?2021-06-04 1300
-
使用PyTorch提取CNNs图像特征2020-05-05 8461
-
如何设计基于FPGA的彩色图像增强系统?2019-10-21 2626
-
Pytorch模型训练实用PDF教程【中文】2018-12-21 5207
-
基于Retinex图像增强2017-11-25 1281
-
图像的对数增强问题2017-09-26 3343
-
基于labview的红外图像增强2014-04-27 2825
-
图像增强-频率滤波2010-08-25 689
全部0条评论

快来发表一下你的评论吧 !
