

Spring Boot 3.1 中如何整合Spring Security和Keycloak
电子说
描述

在今年2月14日的时候,Keycloak 团队宣布他们正在弃用大多数 Keycloak 适配器。其中包括Spring Security和Spring Boot的适配器,这意味着今后Keycloak团队将不再提供针对Spring Security和Spring Boot的集成方案。

但是,如此强大的Keycloak,还要用怎么办呢?本文就来聊聊,在最新的Spring Boot 3.1版本之下,如何将Keycloak和Spring Security一起跑起来。
准备工作
这里所采用的框架与工具版本信息如下:
- Spring Boot 3.1.0
- Keycloak 21.1.1
如果您采用的是其他版本,本文内容不一定有效,但可以作为参考。
基于 Spring Boot + MyBatis Plus + Vue & Element 实现的后台管理系统 + 用户小程序,支持 RBAC 动态权限、多租户、数据权限、工作流、三方登录、支付、短信、商城等功能
- 项目地址:https://github.com/YunaiV/ruoyi-vue-pro
- 视频教程:https://doc.iocoder.cn/video/
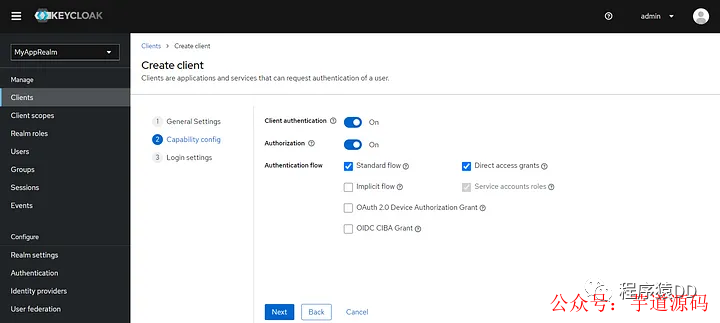
配置Keycloak
第一步:为Spring Boot应用创建Realm,并在下面创建一个Client
第二步:创建一个SYS_ADMIN角色,并创建一个用户赋予SYS_ADMIN角色
第三步:调用Keycloak接口生成Access Token,可以用下面的curl命令或者其他任何发请求的工具,比如:Postman等。
curl --location 'http://localhost:9090/realms/MyAppRealm/protocol/openid-connect/token'
--header 'Content-Type: application/x-www-form-urlencoded'
--data-urlencode 'username='
--data-urlencode 'password='
--data-urlencode 'grant_type=password'
--data-urlencode 'client_id=My-Awesome-App'
--data-urlencode 'client_secret='
--data-urlencode 'scope=openid'
记住获得到Access Token,后续验证时候要用。
基于 Spring Cloud Alibaba + Gateway + Nacos + RocketMQ + Vue & Element 实现的后台管理系统 + 用户小程序,支持 RBAC 动态权限、多租户、数据权限、工作流、三方登录、支付、短信、商城等功能
- 项目地址:https://github.com/YunaiV/yudao-cloud
- 视频教程:https://doc.iocoder.cn/video/
配置Spring Boot应用
第一步:创建一个Spring Boot应用,这个很简单,这里不赘述了。
第二步:在pom.xml中添加依赖:
<dependency>
   <groupId>org.springframework.securitygroupId>
   <artifactId>spring-security-oauth2-joseartifactId>
dependency>
第三步:修改配置文件
spring:
  security:
    oauth2:
      resourceserver:
        jwt:
          issuer-uri: http://localhost:9090/realms/MyAppRealm
          jwk-set-uri: http://localhost:9090/realms/MyAppRealm/protocol/openid-connect/certs
第四步:创建一个需要鉴权的测试接口
@RequestMapping("/test")
@RestController
public class MySuperSecuredController {

    @GetMapping("/hello")
    public String hello(){
        return "hello";
    }

}
第五步:创建SecurityFilterChain,用来告知Spring Security在JWT令牌中查找角色信息的位置。
@Configuration
@EnableWebSecurity
public class WebSecurityConfig {


    @Bean
    public SecurityFilterChain securityFilterChain(HttpSecurity httpSecurity) throws Exception {
        httpSecurity
                .authorizeHttpRequests(registry -> registry
                        .requestMatchers("/test/**").hasRole("SYS_ADMIN")
                        .anyRequest().authenticated()
                )
                .oauth2ResourceServer(oauth2Configurer -> oauth2Configurer.jwt(jwtConfigurer -> jwtConfigurer.jwtAuthenticationConverter(jwt -> {
                    Map> realmAccess = jwt.getClaim("realm_access");
                    Collection roles = realmAccess.get("roles");
                    var grantedAuthorities = roles.stream()
                            .map(role -> new SimpleGrantedAuthority("ROLE_" + role))
                            .toList();
                    return new JwtAuthenticationToken(jwt, grantedAuthorities);
                })))
        ;

        return httpSecurity.build();
    }
}
验证一下
在完成了上面配置所有之后之后,启动Spring Boot应用,同时保证Keycloak也在运行中。
尝试请求/test/hello接口:
-
当不包含
Authorization头信息的时候,将返回401错误 -
当包含
Authorization头信息(前文用调接口获取的Access Token)的时候,才能正确访问到。
小结
虽然Keycloak 团队宣布了不再对Spring Security提供适配,但Spring Security长期以来一直为OAuth和OIDC提供强大的内置支持。所以,只要我们理解Spring Security是如何处理OAuth和OIDC的,那么与Keyloak的集成依然不复杂。
-
如何在Spring Boot应用程序中整合ZXing库2023-12-03 2063
-
Spring Boot的启动原理2023-10-13 1781
-
Spring Boot启动 Eureka流程2023-10-10 1953
-
Spring Boot Actuator快速入门2023-10-09 1631
-
在Spring Boot中如何使用定时任务2023-04-12 1862
-
Spring Boot中整合两种定时任务的方法2023-04-07 2490
-
Spring Boot Web相关的基础知识2023-03-17 1580
-
强大的Spring Boot 3.0要来了2022-10-31 3141
-
Spring Boot特有的实践2022-09-29 1834
-
「Spring认证」什么是Spring GraphQL?2021-08-10 1577
-
启动Spring Boot项目应用的三种方法2021-01-14 2326
-
Spring Boot从零入门1 详述2020-12-10 1410
-
Mybatis整合spring的思路和步骤2020-11-04 1547
-
Spring boot中Redis的使用2020-03-27 1769
全部0条评论

快来发表一下你的评论吧 !
